
DIY Board and Batten: Transforming a Teen Boy’s Study with Style & Functionality
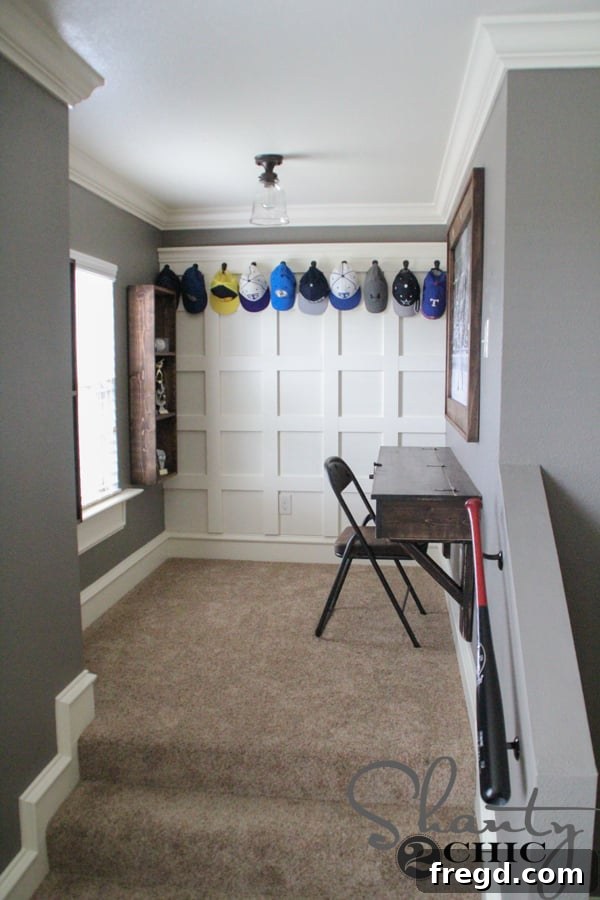
Last week, a wave of creative energy inspired me to tackle some overdue projects in my boys’ rooms. I’m absolutely thrilled with the incredible progress we’ve made in my 11-year-old’s room, especially with a feature that brings both architectural interest and much-needed organization: a DIY board and batten wall treatment. This project has not only dramatically elevated the room’s aesthetic but also ingeniously incorporated a functional hat rack, a storage solution I’ve been eager to implement for a long time!
The Genesis of a Unique Study Space
Our home, a labor of love completed just over a year ago by my stepdad, Tim (affectionately known as Bapa), presented a few interesting design challenges. My 11-year-old son’s initial room plans were somewhat compact and lacked a truly functional layout. However, Bapa, with his ingenious vision, discovered an opportunity to expand the space by reclaiming what would have been “wasted space” over our front porch. This brilliant alteration transformed a simple bedroom into a really cool, dedicated study area for my son. While building codes necessitated a few steps leading into this elevated space, the added square footage and the unique character it brings to the room have made it undeniably worth every effort.
Here’s a glimpse of the space before its transformation. It patiently awaited a creative touch, and I’m so glad I finally decided to dive in! This entire study makeover has been a personal DIY endeavor, and I’m excited to share detailed plans for all the elements you see in future posts. But for today, we’re focusing on the star of the show: a stunning and highly functional board and batten wall treatment that cost a mere $110 to create!
Why Board and Batten? An Affordable & Stylish DIY Accent Wall
Board and batten is a classic wall treatment that adds depth, texture, and architectural interest to any room. It’s incredibly versatile, working beautifully in traditional, farmhouse, and even modern settings. For a teen boy’s room, it offers a sophisticated yet durable finish that can withstand daily wear and tear. One of its greatest advantages is its affordability, especially when approached as a DIY project. By using plywood and MDF, you can achieve a high-end look without the high-end price tag. Beyond aesthetics, this specific design offered the perfect opportunity to integrate a long-desired hat rack, providing a neat and organized display for my son’s collection of caps.
Gathering Your Materials: What You’ll Need
This tutorial is tailored to a wall space approximately 5 feet wide. Adjust quantities as necessary for your specific dimensions. Quality materials make a difference in the final look and longevity of your project.
- Plywood: One sheet of 4×8 1/4″ Purebond Plywood (Purebond is a great choice for its eco-friendly, formaldehyde-free composition and smooth finish.)
- MDF Boards:
- 5 – 1×4 primed MDF boards @ 8ft. (Primed MDF saves painting time and ensures a smooth finish.)
- 1 – 1×6 primed MDF board @ 8ft. (For the top header)
- 1 – 1×3 primed MDF board @ 8ft. (For the top ledge)
- Casing: 1 – 6ft. piece of primed casing (This adds a decorative edge and covers screw heads.)
- Screws: 2 1/2″ and 1 1/4″ wood screws (I highly recommend Spax screws with a T-star head for their superior grip and ease of driving.)
- Fasteners: Finish nails or staples (1 1/4″ staples or brad nails are ideal for paneling and battens.)
- Adhesive: Liquid Nails for paneling (Provides strong, long-lasting adhesion between plywood and wall.)
- Finishing Supplies:
- Multi-purpose caulk (Paintable, for sealing gaps and joints.)
- Wood filler (Paintable, for nail holes and minor imperfections.)
- Tools (Recommended):
- Tape measure, pencil, level
- Jigsaw (for cutting out electrical outlets)
- Drill and impact driver (or just a drill with plenty of torque)
- Stapler or finish nailer
- Caulk gun (an 18-volt Ryobi Caulk Gun makes this task much easier)
- Stud finder
- Safety glasses, ear protection
Step-by-Step Guide: Building Your Board and Batten Wall
1. Strategic Planning and Layout
Before any cuts are made, meticulously plan your wall layout. I opted for a 5-foot wide by 5-foot tall section. For a square pattern, I aimed for at least five squares across, which translates to four vertical boards. Since my 1×4 boards are actually 3.5 inches wide, I subtracted the total width of these four boards from the wall’s total width, then divided that number by five to determine the spacing between each vertical batten. It’s crucial to draw this layout directly onto your wall. This allows you to visualize the pattern and, more importantly, ensure that no vertical boards align directly over an electrical outlet. Adjust your board spacing slightly if needed to avoid this, as cutting around outlets is more complex but entirely manageable.
2. Preparing for Electrical Outlets
Safety first! Before touching any electrical components, always turn off the power to the room at your circuit breaker. You don’t need to remove the electrical socket entirely; simply loosen it enough to allow the plywood panel to slide behind it.
Carefully measure the dimensions of the electrical box and its exact location on the wall.
Transfer these measurements precisely onto your plywood sheet.
Draw the outline of the electrical box on the plywood, ensuring it matches your measurements.
For clean cuts, drill a pilot hole inside the marked area. This allows you to easily insert your jigsaw blade.
Carefully cut out the box using a jigsaw, following your drawn lines for a precise opening.
3. Installing the Plywood Panels
Generously apply Liquid Nails to the entire back surface of your plywood panel. This adhesive is crucial for a strong bond and to prevent any future warping of the plywood.
Before adhering the plywood, use a stud finder to mark the locations of your wall studs. This ensures maximum stability. Carefully position the plywood panel on the wall, aligning it with your drawn layout.
Secure the plywood to the studs using 1 1/4″ staples with a stapler. While a finish nailer can also work, a stapler often provides a flatter, more secure hold for paneling, minimizing potential buckling. Repeat this process for all plywood sections. A key advantage of the square pattern is efficient material usage; plan your cuts to maximize coverage from one sheet. Make sure to clearly mark where your 1×4 boards will go, as they will skillfully conceal the seams between plywood panels. This is the perfect moment to double-check those batten locations!
4. Attaching the Top Header and Casing
Once all the plywood panels are firmly in place, install the 1×6 primed MDF board along the very top edge of your paneling. Secure this board into the wall studs using 2 1/2″ wood screws. Position these screws high enough that they will be completely covered by the decorative casing you’ll add next, eliminating the need for wood filler on these holes. An impact driver makes this task effortless, but a standard drill will also get the job done efficiently.
Now, it’s time to add the primed casing. This piece provides a refined, finished look.
Attach the casing directly on top of the 1×6 board, ensuring the very top edges of both pieces are flush. Use finish nails or staples to secure the casing for a clean, professional finish.
5. Creating the Decorative Ledge
To give the board and batten a more substantial, finished appearance and a practical ledge, add the 1×3 primed MDF board to the very top, resting on both the casing and the 1×6. This step proved a bit tricky due to lower ceiling clearances in this specific area, requiring the use of a right-angle drill. Fortunately, it worked out! I secured the 1×3 with 1 1/4″ wood screws and a bead of Liquid Nails. (If planning allowed, attaching the 1×3 to the 1×6 with pocket hole screws *before* mounting to the wall, and then adding the casing, would have been a more straightforward approach.)
6. Installing the Battens: Vertical and Horizontal Boards
For each of the 1×4 batten boards, apply a continuous line of Liquid Nails along the back. This adhesive bond is essential for a lasting installation. Then, carefully position each board according to your pre-marked layout.
Secure the 1×4 boards using 1 1/4″ brad nails. I switched from a stapler to a brad nailer for the battens to create smaller holes that are easier to fill, ensuring a smoother final paint finish.
For my wall, an 11-inch spacing between the vertical boards worked perfectly to create a balanced look. Now, onto the horizontal pieces to complete the grid pattern.
With numerous short horizontal pieces, it’s incredibly helpful to measure all of them in advance and create a detailed cutting list. Cut them all at once in your workshop. To avoid confusion, remember to label each piece with its corresponding location on the wall. While most of my cuts were precise, a few required minor adjustments – a small trip back to the shop doubles as extra steps, right? Attach these smaller horizontal boards using the same combination of Liquid Nails and brad nails.
I maintained an 11-inch spacing for the horizontal boards as well, completing the perfect square pattern. Starting from the bottom, you’ll notice the top squares are slightly shorter, but the decorative trim at the top beautifully balances the overall design.
7. The Essential Finishing Touches: Filling & Caulking
The “fun” part might be over, but the most crucial steps for a professional finish are next: filling and caulking. Use paintable wood filler to meticulously fill all nail holes in the 1×4 boards and the joints where boards meet. Don’t forget to check the plywood panels for any staple holes as well! Apply a small amount to each hole and smooth it out with your finger for an undetectable finish once painted.
Next, apply all-purpose caulk to all seams and gaps where boards meet the wall or each other. An 18-volt Ryobi Caulk Gun, while not an everyday tool, proves incredibly valuable for projects of this scale, making the caulking process smooth and efficient.
8. Painting for a Seamless Look
Once the caulk and wood filler have fully dried (follow manufacturer instructions for drying times), apply two coats of high-quality paint. I chose Valspar’s Ivory Lace, which perfectly matches my existing trim, creating a cohesive and elegant look. The fresh coat of paint pulls everything together, transforming the individual components into one unified, stunning accent wall.
9. The Integrated Hat Rack: Function Meets Style
This is arguably the most exciting part for me: the addition of 10 hooks along the board and batten, instantly creating a stylish and incredibly functional hat rack! This ingenious integration means no more scattered hats, and it adds a personal touch to my son’s newly revamped study. It’s a fantastic example of how DIY projects can combine aesthetic appeal with practical solutions, perfectly tailored to your family’s needs.
The Grand Reveal: A Transformed Teen Study!
I am absolutely thrilled to finally have this beautiful, functional, and organized space for my son. He loves his new study and especially his unique hat rack! It’s rewarding to see how a thoughtful DIY project can completely transform a room, making it both more appealing and practical. This board and batten wall treatment truly grounds the study, giving it character and a sense of permanence. I’ll be sharing more projects from this amazing space very soon!
Complementary Projects: The DIY Platform Bed
This board and batten wall is just one piece of the puzzle in creating an inspiring teen room. I also built a sturdy and stylish platform bed for his room. If you’re looking to complete the look or simply need an easy DIY bed solution, you can find the detailed plans for both the platform bed and the headboard HERE.
Thank you so much for joining me on this DIY journey! I hope this detailed guide inspires you to tackle your own home transformation projects. Happy building!
~Ashley
Project Details:
- Wall Paint Color: Seine by Valspar (on adjacent walls)
- Trim/Board and Batten Paint Color: Matched Ivory Lace by Valspar (oil-based paint for durability)
- Folding Chair: World Market (purchased on sale for $44 – a budget-friendly find!)