
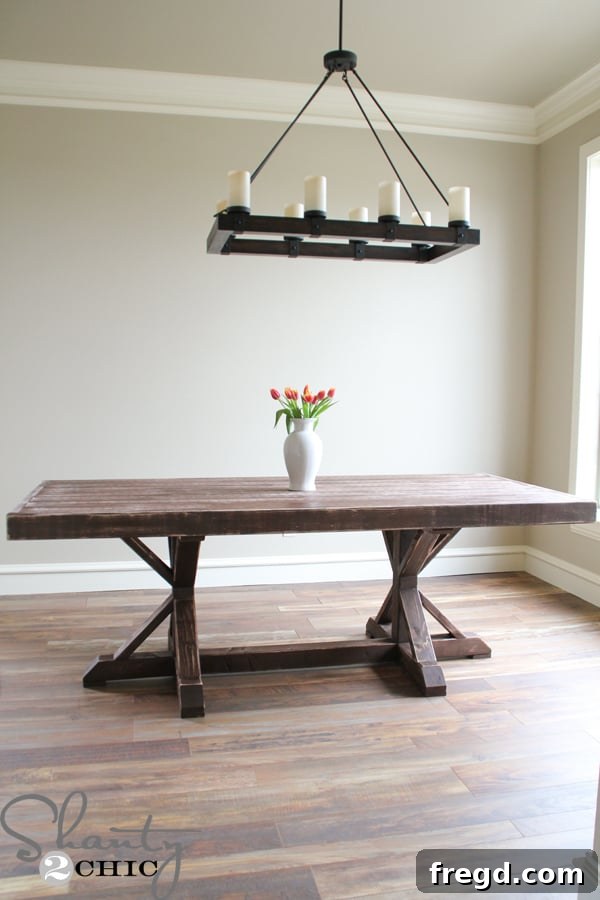
Unlock the secret to crafting a stunning, high-end farmhouse dining table without breaking the bank. This comprehensive guide provides free plans and a detailed tutorial, empowering you to build a beautiful solid wood dining table for an incredible fraction of the cost—just $110! Inspired by the coveted designs of Restoration Hardware, you can achieve that sought-after rustic elegance in your home with this approachable DIY project.
There’s a unique satisfaction that comes from furnishing your home with pieces you’ve crafted yourself. As I embarked on filling the empty rooms of my new house, one vision stood out: a grand, rustic dining table. I had been dreaming of building this Restoration Hardware-inspired masterpiece since the first stages of building my new home. The appeal of a distressed, solid wood dining table, evoking the charm of timber reclaimed from a century-old building, is truly undeniable. Imagine solid pine timbers, artfully joined, creating a focal point that exudes warmth and character.
For a continuous flow of our latest DIY furniture projects and home decor inspirations, make sure to follow us on Instagram and Pinterest. We love sharing our passion for building and decorating with our community!
The allure of this table isn’t just its aesthetic; it’s the astounding value. The Restoration Hardware table that served as my inspiration retails for approximately $2,205, before taxes. My DIY version? A mere $110! This staggering difference highlights the incredible savings and personal satisfaction that comes with taking on a woodworking project of this scale. It’s truly a testament to what you can achieve with a little effort and the right guidance.
Table of Contents
How to Build a Restoration Hardware Inspired Farmhouse Dining Table
Building a farmhouse dining table, especially one with the grandeur of a Restoration Hardware piece, might seem daunting at first glance. However, with the right plans and a step-by-step tutorial, it’s a remarkably achievable project for DIY enthusiasts of all skill levels. This guide will walk you through each stage, from gathering materials to applying the final finish, ensuring you create a durable and beautiful piece that will be cherished for years to come. The beauty of DIY lies in the ability to customize every detail to your taste, and this project is no exception.
Essential Supplies for Your DIY Dining Table
The foundation of any successful woodworking project begins with selecting the right materials. For this sturdy farmhouse dining table, we opt for pine or whitewood boards, which offer excellent workability and a beautiful grain for staining, all while keeping costs down significantly. Ensure all your lumber is straight and free of major defects before purchasing.
- Table Top Planks: 7 – 1x6x8 Pine or Whitewood Boards (These form the main surface of your table, creating that classic planked look.)
- Table Frame & Supports: 8 – 2x4x8 Pine or Whitewood Boards (Essential for constructing the apron and supporting structures of the table base.)
- Table Legs: 2 – 4x4x8 Pine or Whitewood Posts (These robust posts will serve as the primary legs. As an alternative, you can laminate two 2x4s together for each post, creating a cost-effective 4×4 substitute.)
- Standard Pocket Hole Screws: 1 1/4″ Pocket Hole Screws (Used for joining the 1×6 tabletop planks and other smaller connections with precision.)
- Larger Pocket Hole Screws: 2 1/2″ Pocket Hole Screws (For stronger joints, particularly in the 2×4 frame components.)
- Heavy Duty Pocket Hole Screws: Kreg HD Screws (Specifically designed for joining thicker materials like the 4×4 posts, ensuring maximum strength and stability.)
- Brad Nails: 1 1/4″ Brad Nails (Ideal for attaching trim pieces or other areas where minimal visibility of fasteners is desired.)
- Wood Screws: 2 1/2″ Wood Screws (Versatile screws for general assembly where pocket holes are not used or for adding extra reinforcement.)
- Adhesive: Wood Glue (Crucial for adding strength and longevity to all joints, ensuring a solid, unyielding structure.)
- Finishing Products: Stain and/or Paint (The choice of finish will define the table’s character. Select colors and types that complement your home decor.)
Tools You’ll Need for Your Farmhouse Table Project
Having the right tools makes all the difference in a woodworking project, ensuring accuracy, efficiency, and safety. Here’s what you’ll need:
- Miter Saw: Essential for making precise crosscuts and miter cuts, especially for the table’s legs and frame components.
- Drill: Your workhorse for drilling pilot holes, driving screws, and using in conjunction with your Kreg Jig.
- Kreg Jig (Pocket Hole Jig): An indispensable tool for creating strong, concealed joints. You’ll need both a standard Kreg Jig and a Kreg Jig HD for the thicker 4×4 lumber.
- Brad Nailer: Speeds up the process of attaching trim and offers a clean finish compared to traditional nailing.
- Sander (Orbital or Corner Cat): For smoothing rough lumber, preparing surfaces for stain, and achieving a distressed look if desired.
- Clamps: Various sizes of clamps, especially face clamps, are vital for holding pieces securely while drilling and joining, ensuring tight seams.
- Measuring Tape and Pencil: Accuracy is key in woodworking; always measure carefully.
- Safety Glasses and Hearing Protection: Always prioritize personal safety when operating power tools.
We are thrilled to offer FREE printable plans for this beautiful farmhouse table! Building your own furniture can be incredibly rewarding, and we want to make it as accessible as possible. Simply click the image below or HERE to access your complimentary Farmhouse Table Plans. These detailed plans, combined with our step-by-step visual tutorial, will guide you through every cut and assembly.

As always, I’ve meticulously documented each stage with clear tutorial pictures to ensure your building process is as smooth as possible. Crafting farmhouse tables delivers immense satisfaction both in terms of the finished product and the cost savings. They might appear complex, but this particular design is surprisingly straightforward, even for novice builders. Let’s dive into building this stunning DIY Restoration Hardware style dining table!
Step 1: Building the Robust Table Top
The tabletop is the heart of your dining table, and building a sturdy, flat surface is crucial. This design utilizes 1×6 boards joined together to create that classic planked farmhouse aesthetic. Start by laying out your 1×6 boards on a flat surface, arranging them to achieve the best grain pattern and minimize any visible imperfections.
Once you’re satisfied with the layout of your 1×6 boards, it’s time to prepare them for joining. The secret to a strong and seamless planked top lies in pocket hole joinery. Using your Kreg Jig, set the drilling depth to 3/4″ – this is the standard setting for 1x material (which is actually 3/4″ thick). Drill pocket holes along the long edges of all but the outermost planks. Space your pocket holes approximately every 6-8 inches to ensure a very secure connection across the entire tabletop.
- For those new to pocket hole joinery, the Kreg Jig is an invaluable tool for creating strong, concealed joints in woodworking. You can learn more about it and find the Kreg Jig HERE on Amazon.
- If you’d like a visual guide, watch our comprehensive “How to Use a Kreg Jig” video HERE.
With the pocket holes drilled, it’s time to assemble the planks. Apply a bead of wood glue along the edges of the boards before joining them. Then, use 1 1/4″ pocket hole screws to firmly attach the boards together. A critical step here to prevent bowing and ensure a perfectly flat surface is to clamp each pocket joint as you go. Kreg Face Clamps are particularly effective for this task, providing the necessary pressure to pull the joint tight while the screw is driven. Work systematically across the tabletop, ensuring each joint is tight and flush.
- Kreg Jig Face Clamps are incredibly useful for this step, providing targeted pressure. You can find the Kreg Jig Face Clamps HERE on Amazon.
With the main planks securely joined, the tabletop now needs its protective and aesthetic trim. This trim provides a finished edge and enhances the visual weight of the table. It is always best practice to measure and cut these trim pieces as you go, ensuring a perfect fit for your specific tabletop dimensions, rather than relying solely on pre-cut measurements from the plans.
Begin by cutting the long side trim pieces to size. Apply wood glue along the edges of the tabletop where the trim will sit, then attach the trim pieces with 1 1/4″ pocket hole screws, ensuring they are flush with the tabletop surface. Follow this by carefully measuring the width for the end trim pieces. Cut them to size, apply wood glue, and attach them using 1 1/4″ pocket hole screws driven from the end of each plank into the trim pieces. This method creates a robust apron around the tabletop, securing all the planks and giving the table a substantial, finished appearance.
Step 2: Constructing the Sturdy Table Base
The table base is where the true character of the farmhouse style often shines, providing robust support and visual appeal. The legs, in particular, will define the table’s overall presence. For this design, we are utilizing substantial 4×4 posts for the legs and feet, providing a heavy-duty, classic farmhouse look.
Begin by using your miter saw to precisely cut the 4×4 pieces for the table base, following the dimensions provided in the free plans. Accuracy in these cuts is paramount for a stable and symmetrical base. The feet of the table require a 45-degree miter cut, which creates a clean, angled base that adds to the aesthetic appeal of the farmhouse style.
- If you’re looking for guidance on using this essential woodworking tool, watch our “How to use a Miter Saw” video HERE!
Here’s a clear image showcasing the 45-degree miter cut required for the table feet, ensuring you get the angle just right for that elegant taper.
Before proceeding with assembly, it’s a good idea to thoroughly sand all the individual pieces, especially the 4x4s, which can often be quite rough. I used a 50-grit sanding pad with my Corner Cat sander to effectively smooth out the rough spots and prepare the wood for finishing. Always sand with the grain of the wood to avoid unsightly scratches. While I don’t always pre-sand, the condition of these particular 4x4s made it a necessary step for a refined final product.
To join the substantial 4×4 leg pieces together, a standard Kreg Jig might not suffice. This is where the Kreg HD (Heavy Duty) comes into play. It’s designed for thicker stock and creates incredibly strong pocket hole joints. Using your Kreg HD, drill pocket holes into the long base runner pieces. The process is straightforward: clamp the wood securely, and drill. Once the holes are drilled, attach the runner to the feet using Kreg HD screws, which are specifically formulated for these heavier applications.
- The Kreg Jig HD is a game-changer for working with thicker lumber. You can find the Kreg Jig HD HERE on Amazon.
This image shows the runners and feet temporarily assembled. It’s important to note that this initial assembly is temporary and primarily serves to establish the pocket hole joints for the long stretcher. Do not use wood glue at this stage, as the stretcher will be removed before the final base assembly. This temporary attachment ensures everything aligns perfectly before the permanent connections are made.
Next, proceed to attach the short feet to the base structure. Ensure all connections are tight and square, contributing to the overall stability of the table.
With the table feet upside down, securely attach a foot pad to the bottom of each foot. These pads are essential for protecting your floors and allowing the table to slide more easily when moved. They also add a subtle finished touch to the base.
Once the foot pads are in place, flip the feet right-side up and proceed to attach the main table legs. Ensure these are plumb and square for a stable final product.
Now, begin stacking the pre-cut 2×4 pieces on top of the legs, forming the upper part of the table base structure. For these connections, I recommend using 2 1/2″ Spax screws. While they might be a bit pricier than standard wood screws, their self-drilling tip often eliminates the need for pre-drilling, saving you significant time and effort, especially when working with multiple fasteners. Ensure each layer is flush and securely fastened to create a solid foundation for the tabletop.
Here you can see the legs completely assembled, forming robust, visually appealing supports for your dining table. Believe it or not, at this stage, it’s time to move on to staining! It’s crucial to stain the base and tabletop components separately before their final attachment. This allows for complete coverage, especially in tight corners and joints, ensuring a professional and uniform finish across the entire table. Staining individual components now will save you a lot of frustration later.
Step 3: Finishing and Staining Your DIY Dining Table
The finish you choose for your DIY dining table will profoundly impact its final appearance, bringing out the wood’s natural beauty and protecting it for years of use. Before applying any stain, we employ a technique called “water popping.” This involves wiping down the entire table surface with a damp cloth and allowing it to dry completely. Water popping helps to raise the wood grain evenly, allowing the stain to penetrate more uniformly and resulting in a richer, more consistent color.
For this table, I selected Carrington by Rust-Oleum, a beautiful stain that perfectly complements the rustic farmhouse aesthetic. To apply, simply wipe on a single, even coat with a clean, dry cloth. Allow the stain to penetrate the wood for approximately 5 minutes, then use another clean cloth to gently wipe off any excess, blending the finish for a smooth, consistent look. Remember, the beauty of DIY is personalization – feel free to choose any stain or paint color that aligns with your personal style and home decor. Rust-Oleum offers a wide variety of stains, giving you ample options to find your perfect shade.
- Discover the full range and find Rust-Oleum Stain HERE on Amazon.
To achieve that desirable worn, antique farmhouse look, I decided to distress the table after staining. Using my Ryobi Corner Cat sander with an 80-grit sanding pad, I carefully went over all the edges and high-traffic areas. This technique subtly removes some of the stain and exposes the raw wood underneath, mimicking years of natural wear and tear. A word of caution: I initially performed this distressing step after the table was fully assembled and moved inside, which created a considerable mess. If you plan to distress your table, I highly recommend doing it outdoors or in a well-ventilated workshop *before* bringing the finished pieces indoors to avoid a cleanup headache.
Finally, to protect the stained and distressed wood, I applied three coats of Varathane polyurethane in a matte finish using a bristle brush. The matte finish is ideal for a farmhouse table, as it provides durable protection without adding an artificial sheen, preserving the natural look and feel of the wood. This protective layer guards against minor spills, scratches, and daily wear, making the table much more “kid-friendly” and easier to maintain. While the polyurethane offers excellent protection, I still recommend using coasters and placemats during use to maximize its longevity. The matte finish ensures effortless cleanup, allowing you to enjoy your beautiful table worry-free.
- For long-lasting protection, you can find the Varathane Polyurethane HERE on Amazon.
Step 4: Securing the Table Top to the Base
The final assembly step brings together your beautifully crafted tabletop and the sturdy base, creating a complete and functional dining table. The plans suggest using screws for attaching the angle pieces that connect the top to the base, and this is a highly effective method. If you have a brad nailer, it can also be used for a quick and clean attachment, especially for less load-bearing connections, but screws generally provide a stronger hold.
If you opt for wood screws, remember to pre-drill pilot holes to prevent splitting the wood, especially in the 4×4 leg posts. For the lower angle pieces, pre-drill from the top of the angle piece into the leg post at a slight downward angle. For the upper angle pieces, pre-drill at an upward angle. Follow through with 2″ wood screws, ensuring a firm connection. After the screws are in place, you can fill the screw holes with wood filler for a seamless finish that can then be sanded and stained to match the table.
The transformation is complete! Seeing your handcrafted dining table come to life, from raw lumber to a stunning centerpiece, is an incredibly rewarding experience. It’s a testament to your hard work and a beautiful addition to your home.
Conclusion: Enjoy Your Handcrafted Farmhouse Table
I absolutely adore my new dining room table! It has truly transformed my dining room, adding the perfect touch of authentic farmhouse style that I envisioned. This is, without a doubt, my favorite farmhouse table I’ve built to date. Now, with the table complete, my next projects involve crafting matching benches and continuing to furnish the rest of the room to complement this magnificent centerpiece. The satisfaction of building such a significant piece of furniture is immense, and I hope this tutorial inspires you to embark on your own DIY journey.
Explore More DIY Projects
If you’re eager to complete your dining space, you’ll be delighted to know that we also offer
free plans for the matching benches HERE. These benches are designed to perfectly complement your new farmhouse dining table, creating a cohesive and inviting dining area.
Thank you so much for stopping by and joining me on this building adventure! We appreciate your support and enthusiasm for DIY. – Ashley
Curious about other elements and design choices you’ve spotted in this dining room? We’ve got you covered! Just click the links below for more detailed information and inspiration to complete your own space:
- Discover the exact paint colors used in this room HERE.
- Learn all about the durable and stylish laminate flooring installed in this space HERE.
- Find the elegant chandelier that illuminates the dining table HERE.
If you’re looking for more fun projects, check out our DIY Bar Cart tutorial for another stylish and functional addition to your home.
And for a touch of rustic wall decor, don’t miss our Pottery Barn Inspired Pallet Art project.
Over the years, we’ve had the pleasure of building a wide variety of gorgeous farmhouse tables, each with its unique charm and design. If this particular style doesn’t perfectly match your vision, or if you’re simply eager to explore more options, we have an extensive collection of other free dining table plans available. Click on the images below to discover more designs and find the perfect table for your home:
Still searching for the perfect dining table design? We invite you to explore our comprehensive list of over 25 DIY dining table plans, tailored for beginners and experienced builders alike. With such a vast selection, you’re sure to find the ideal design that perfectly suits your aesthetic preferences and functional needs.