
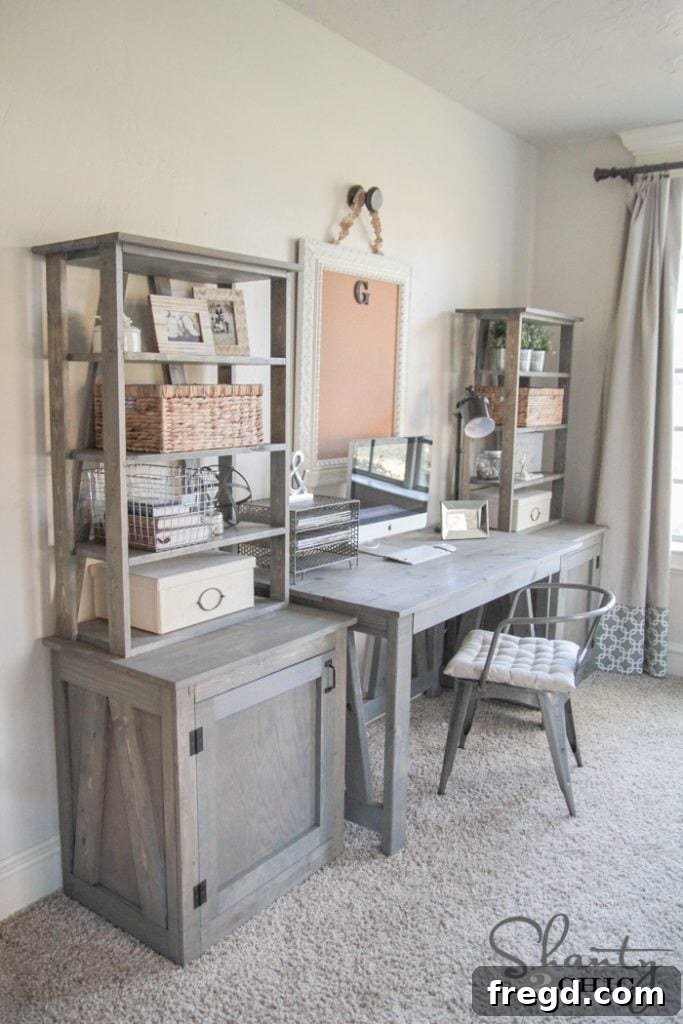
I am thrilled to finally unveil the third and culminating part of my beloved DIY Desk System. This journey has been incredibly rewarding, transforming a simple idea into a fully functional and beautifully cohesive home office setup. Previously, I walked you through the creation of the main desk unit, a cornerstone piece designed for both style and productivity. Following that, we tackled the versatile side tables, which ingeniously double as nightstands, adding valuable storage and surface area. Today marks the grand finale: introducing the custom-built DIY Bookcases that perfectly integrate with the system, bringing functionality, organization, and a touch of rustic charm to your workspace.
Creating your own furniture is an immensely satisfying endeavor, and this DIY desk system is a testament to what can be achieved with a little effort and the right guidance. Each component has been designed with simplicity and versatility in mind, ensuring that even those relatively new to woodworking can achieve professional-looking results. The bookcases are no exception; they are designed to be straightforward to build, yet offer incredible flexibility in how they can be used and configured. Whether you’re looking to store books, display cherished items, or simply keep your office supplies neatly organized, these bookcases are the ideal solution.
Elevate Your Workspace with Custom DIY Bookcases
My love for this completed desk system is immeasurable. It’s more than just furniture; it’s a personalized space that inspires creativity and productivity. The bookcases, in particular, are perhaps the most straightforward component of the entire system, making them an excellent project for beginners or anyone looking for a quick and impactful build. Their inherent simplicity doesn’t compromise on functionality or style. In fact, it enhances their versatility.
One of the standout features of these DIY bookcases is their adaptable design. You can seamlessly integrate them on top of other pieces of furniture, such as the matching side tables from this very desk system, to create a cohesive and robust storage unit. This modular approach allows you to customize your setup based on your available space and evolving needs. Alternatively, if you’re working with a shorter space or simply prefer a standalone piece, these bookcases can function perfectly on their own, providing essential vertical storage without overwhelming the room. Imagine them gracing a cozy reading nook or providing extra organization in a craft room. Their potential configurations are truly limitless, making them a smart addition to any home.
Access Your Free Woodworking Plans
As always, I’m committed to making DIY woodworking accessible to everyone. That’s why I’m providing comprehensive, step-by-step instructions right here, ensuring you have all the guidance you need to construct these beautiful bookcases. To further streamline your building process, you can also download and print the FREE woodworking plans by clicking here or by using the button below. These detailed plans include cut lists, diagrams, and precise measurements, eliminating guesswork and helping you achieve accurate results.
A massive thank you goes out to Jay of Jay’s Custom Creations, who consistently translates our original design concepts into these incredibly user-friendly printable plans for our readers. His expertise in drafting and his dedication to the DIY community are truly invaluable. We highly recommend checking out his work for more inspiration and woodworking wisdom!
Selecting Your Materials: The Foundation of Your Bookcase
For the primary shelving and structural elements of these bookcases, I opted for 1×12 lumber. This dimension provides ample depth for books and decorative items while maintaining a sleek profile. When it comes to wood species, I personally chose whitewood for this project. Whitewood is a fantastic choice for budget-conscious builders, offering a cost-effective solution without sacrificing the ability to achieve a beautiful finish. However, it’s worth noting that finding perfectly straight pieces of whitewood at the hardware store can sometimes be a “booger” – requiring a bit of patience and careful sifting through the stacks. Don’t be deterred; the effort is well worth it!
Beyond its affordability, I particularly adore how whitewood takes on a rustic stain. The natural knots and grain patterns absorb the stain unevenly, creating a charming, aged, and distressed look that perfectly complements a farmhouse or industrial aesthetic. If you prefer a smoother, less knotty appearance, select pine is another excellent alternative. It’s often easier to find straight pieces and offers a consistent grain, though it typically comes at a slightly higher price point. Ultimately, the choice of wood is yours and can be tailored to your budget, desired aesthetic, and the availability of materials in your area.
Essential Tools for Your DIY Bookcase Project
Having the right tools is crucial for any successful woodworking project, and these bookcases are no exception. One of the most essential pieces of equipment for making precise and efficient cuts is a miter saw. For this project, I relied on my trusty Ridgid Miter Saw, a 12-inch sliding compound model. My building partner, Ash, and I both prefer this size and style for a multitude of reasons.
We frequently receive questions about whether to invest in a 10-inch or 12-inch miter saw. While a detailed post on the nuances of different saws is definitely on our to-do list, here’s the basic rundown: The larger the blade, the greater the cutting capacity. A 12-inch blade can handle wider stock in a single pass compared to a 10-inch blade. More importantly, the *sliding mechanism* on a compound miter saw is incredibly handy and, in our opinion, a game-changer for anyone serious about building furniture. This feature allows the blade to move forward and backward across the workpiece, significantly increasing the cross-cutting capacity. My 12-inch sliding saw, for example, can cut nearly 30 inches wide if you flip the board after the initial sliding cut – an indispensable capability when working with wider boards like these 1x12s, or even larger materials for other projects. It grants unparalleled versatility for various angles and wider stock.
If you’re just starting out or working with a tighter budget, a 10-inch sliding miter saw can still tackle the vast majority of DIY projects. Ryobi recently introduced an excellent 10-inch sliding miter saw, which you can check out HERE. This saw is powerful enough for almost every plan on our site, and its attractive price point makes it an ideal choice for a starter tool or even a perfect Christmas gift for the aspiring woodworker in your life!
Beyond the miter saw, you’ll also need a reliable tape measure, a pencil for marking, quality wood glue, and a finish nailer to secure your joints. These basic tools, combined with careful execution, will empower you to bring your woodworking projects to life.
Step-by-Step Bookcase Assembly Guide
Once all your wood pieces are precisely cut according to the free plans, it’s time to bring your bookcase to life. Precision in the early stages will pay dividends in the final product’s stability and appearance.
Step 1: Mark Shelf Placement
Begin by laying out one of your side pieces. Using a pencil and tape measure, carefully mark the exact locations where each of the horizontal shelf pieces will be attached. Accuracy here is paramount to ensure all shelves are level and evenly spaced. Double-check your measurements against the plans.
Step 2: Apply Wood Glue for Strength
Before attaching any pieces, run a generous bead of Gorilla Wood Glue along the edges of the side 1×3 pieces where the shelves will connect. Wood glue is your secret weapon for creating incredibly strong, long-lasting joints. It provides a bonding surface that, once dried, is often stronger than the wood itself. Don’t skip this critical step!
Step 3: Secure with Finish Nails
With the glue applied, position your first shelf piece onto the marked line. Then, using my Ryobi AirStrike 16G Finish Nailer loaded with 1.25-inch nails, I secured the side piece into the shelf piece. The nailer provides a quick and robust temporary hold while the wood glue dries, ensuring a tight and stable joint. Ensure your nails go straight through the side piece and into the end grain of the shelf for maximum hold.
Step 4: Continue Assembling the Frame
Here is the first piece connected, forming the initial structure of your bookcase. Continue this process, attaching the remaining shelf pieces to the first side panel. Once one side is complete, repeat the marking, gluing, and nailing steps to attach the remaining three side pieces to the other ends of the shelves. Ensure that each connection is square and flush. This methodical approach ensures a sturdy and symmetrical bookcase frame.
Step 5: Attach the Back Panel
Once the main frame with all shelves and sides is assembled, cut the back pieces to size (referencing your plans). These pieces not only provide structural rigidity but also prevent items from falling out the back. Apply wood glue along the edges where the back panel will meet the frame, then secure it using the same 1.25-inch finish nails. Make sure to drive your nails into the back edges of the shelf pieces for a strong, stable connection. This step also helps square up your entire bookcase, ensuring it stands true and sturdy.
Step 6: Plank the Top for a Finished Look
The final construction step is to add the planked top. This not only gives your bookcase a beautiful, finished aesthetic but also adds another layer of stability. Cut your top planks to size, apply wood glue to the top edges of the bookcase frame, and then secure the planks with 1.25-inch nails. Ensure the planks are evenly spaced and flush with the edges for a professional appearance. This detail truly elevates the overall look of the bookcase, making it appear more substantial and custom-made.
And just like that, the construction is DONE! See, I told you it was easier than you might think. With careful measurements and a systematic approach, you’ll have a sturdy, functional bookcase frame ready for finishing.
Finishing Touches: Achieving that Weathered Grey Look
With the construction complete, it’s time to add the finishing touches that truly make these bookcases shine and integrate them seamlessly with the rest of the DIY Desk System. I chose to stain my bookcases before moving them into their final position in my bedroom, which makes the staining process much easier and more accessible. To maintain a consistent aesthetic, I used the same awesome stain combo that I applied to the desk and side tables.
My new favorite stain combination starts with Varathane wood stain in Weathered Grey. This product is a dream to work with! You can easily find it at Home Depot, and its benefits are incredible: it only requires one coat for full coverage and, best of all, it dries in just one hour. This rapid drying time means you can move on to the next step of your project much faster, saving you valuable time and allowing for quicker project completion. The Weathered Grey provides a beautiful, muted base that is both contemporary and timeless, laying the groundwork for the distressed look I love.
To achieve a more pronounced distressed and aged appearance, I applied Rust-Oleum decorative glaze on top of the dried Weathered Grey stain. This glaze adds depth and highlights the wood’s natural texture, giving it that sought-after vintage feel. The application is straightforward: simply brush the glaze onto the surface, ensuring even coverage, and then immediately wipe off the excess with a clean cloth. It’s crucial to work on one section or side at a time, as this glaze tends to dry relatively quickly. This technique allows you to control the level of distressing, making it darker in crevices and lighter on raised surfaces. Like the stain, this decorative glaze is also readily available at Home Depot, making it convenient to source all your finishing materials from one place.
Final Assembly and the Dream Workspace Unveiled
That’s truly it for the build and finish! With the stain and glaze applied and fully cured, it was time for the final exciting step: setting everything up and integrating the bookcases into my complete desk system. I carefully positioned the bookcases on top of the side tables, and then made a conscious decision to attach them for added stability and a more cohesive, built-in look. Instead of permanent gluing, which could hinder future reconfigurations or moving, I opted to use 2-inch wood screws. These screws were driven from inside the top of the side cabinet into the base of the bookcase. This method provides a secure attachment while still allowing for the system to be disassembled if I ever need to move or rearrange my workspace. This modularity is a key benefit of designing your own furniture.
And here she is, all set up and proudly displayed – my custom-built DIY desk system, truly fit for a queen! The combination of the sturdy desk, the versatile side tables, and these elegant, rustic bookcases creates a harmonious and highly functional workspace. It’s a testament to the power of DIY, proving that with a vision and some basic tools, you can craft furniture that not only meets your specific needs but also reflects your personal style. This home office has been transformed into a space that is both inspiring and incredibly efficient, making every moment spent here a joy.
Join the DIY Movement!
I genuinely hope you love this complete DIY Desk System as much as I do! It’s been an incredible journey sharing each stage of this project, and the final result is truly a dream workspace. This entire system exemplifies how custom, handmade furniture can not only save you money but also create a space perfectly tailored to your needs and aesthetic preferences. Imagine the satisfaction of looking at your organized, stylish home office and knowing you built it with your own hands.
Thank you so much for following along with me on this woodworking adventure. Your support and enthusiasm are what make these projects so rewarding. I would absolutely LOVE for you to share this comprehensive guide and PIN it to your Pinterest boards with your friends and fellow DIY enthusiasts. Let’s inspire more people to pick up tools and create something beautiful!
Remember, embarking on a DIY project, especially one as fulfilling as building your own desk and bookcases, is an empowering experience. If you have any questions at all about the materials, tools, steps, or finishing techniques, please don’t hesitate to leave a comment below. I’m always happy to help guide you through your building process. What are you waiting for? Start planning your custom home office today!
~Whitney