
Hey there, fellow DIY enthusiasts and home decor lovers!
Craft Your Own Rustic Charm: An Easy DIY Planter Box Centerpiece for Any Dining Table
After transforming my dining room with those gorgeous decorative wall mirrors, I realized something was missing right at the heart of the room: a captivating centerpiece for my dining table. It looked, dare I say, a little bare, a little unfinished. A beautiful dining space deserves a focal point that ties everything together, reflecting your personal style and adding warmth. That’s when inspiration struck!
Today, I’m thrilled to share a super simple, incredibly rewarding DIY project that will dress up any table and bring a touch of rustic elegance to your home: a custom-made wooden planter box centerpiece. This project is not only easy to tackle, even for beginner woodworkers, but the results are absolutely stunning. Get ready to elevate your dining room decor without breaking the bank!
Why Choose a DIY Wooden Planter Box?
There’s something uniquely satisfying about crafting your own home decor. A DIY wooden planter box offers numerous advantages over store-bought alternatives. Firstly, it allows for complete customization. You dictate the dimensions, the finish, and the level of distressing, ensuring it perfectly complements your existing decor. Want a long, slender box for a grand farmhouse table? Or a more compact design for a cozy breakfast nook? You got it!
Secondly, it’s incredibly cost-effective. High-quality wooden centerpieces can fetch a hefty price in boutiques, but with a few simple materials from your local hardware store, you can create a piece that looks just as good, if not better, for a fraction of the cost. This project, for instance, kept wood costs under $10 – a true budget-friendly marvel!
Finally, a handmade item adds character and a personal story to your home. Each ding, each brushstroke of stain, tells a tale of creativity and effort. It’s more than just a decorative item; it’s a conversation starter, a testament to your hands-on spirit, and a unique touch that makes your house feel more like a home.
Gathering Your Supplies: Materials & Tools for Your Rustic Centerpiece
One of the best parts about this project is the minimal list of materials and tools required. You likely have many of these items in your garage already!
Materials Needed:
- 2 – 1x6x4 Whitewood Boards: These will form the long sides of your planter box. Whitewood is an excellent choice for DIY projects due to its affordability and ease of working with.
- 1 – 2×4 Stud: This piece will serve as the base and end supports for your planter. The length of a standard stud (typically 8 feet) will give you plenty to work with.
- Gorilla Wood Glue: Essential for a strong, lasting bond between your wood pieces. Any reputable wood glue will do, but Gorilla Wood Glue is known for its reliability.
- Nails: Brad nails or finishing nails are ideal for securing the boards while the glue dries, adding extra structural integrity. A nail gun makes this process super fast, but a hammer and nails work just fine.
- Furniture Upholstery Nails (Optional, but highly recommended for rustic charm): These decorative tacks, often found near screws and nails at hardware stores like Lowe’s, add fantastic detail and a vintage feel to the finished piece.
- Wood Stain: I highly recommend Rust-Oleum Ultimate Wood Stain for its quick-drying and low-odor properties, but choose any stain color that matches your aesthetic.
- Glass Bottles: To fill your planter! You can find these at specialty bottle sites like this one (I used 12-ounce sauce bottles, SAU12), or repurpose old glass coke bottles, Starbucks bottles, or any interesting glass jars you have on hand.
- Small Flowers or Greenery: Artificial or fresh, to complete the look! Hobby Lobby is a great source for faux florals.
Tools You’ll Need:
- Measuring Tape: For accurate cuts and assembly.
- Miter Saw or Hand Saw: To cut your wood to the desired lengths. A miter saw will provide cleaner, faster cuts.
- Pencil: For marking your cuts.
- Safety Glasses: Always protect your eyes when cutting or nailing.
- Hammer or Nail Gun: For fastening the pieces together.
- Wood Block or Sandpaper (Optional): For distressing the wood.
- Stain Applicator: A rag, foam brush, or natural bristle brush for applying the wood stain.
- Gloves: To protect your hands during staining.
The total cost for the raw wood alone for this particular project was under $10! That’s an incredible value for a bespoke piece of home decor.
Step-by-Step Tutorial: Building Your Rustic Planter Box
Let’s dive into the fun part – bringing this beautiful centerpiece to life!
Step 1: Gathering Your Wood & Making Initial Cuts
Begin by laying out your wood. For this project, I used two 1x6x4 whitewood boards and one 2×4 stud. The 4-foot length of the 1x6s perfectly suited my dining table. If your table is shorter or longer, adjust the length of your main boards accordingly. Remember, customization is key!
Measure and cut your 2×4 stud to the same length as your two 1×6 boards. In my case, this was 4 feet. This 2×4 piece will form the sturdy base of your planter box, providing a solid foundation for the side panels.
Step 2: Assembling the Base
With your base piece cut, it’s time to start assembling. Apply a generous bead of Gorilla Wood Glue along one of the long edges of your 2×4 stud. Carefully align one of the 1×6 boards along this glued edge, ensuring it’s flush at both ends. Press firmly to create a good bond. Then, use nails to secure the 1×6 to the 2×4. The glue provides long-term strength, while the nails hold the pieces securely in place as the glue dries. Repeat this process for the second 1×6 board on the opposite side of the 2×4. You’ll essentially be creating an inverted “U” shape.
Ensure your connections are tight and square. This initial assembly forms the main trough of your planter box. Allow the glue to set for a bit before moving on, or at least handle the piece with care.
Step 3: Adding the End Pieces
Next, you’ll finish off the ends of the planter box. From your remaining 2×4 stud, cut two smaller pieces. The exact length will depend on the width of your 1×6 boards and the 2×4 base. For my project, these end pieces were 3.75 inches each. This measurement ensures they fit snugly between the two 1×6 side panels, creating a finished look while embracing that charming, slightly “shanty” aesthetic I was aiming for.
Apply wood glue to the ends of the 1×6 boards and to the sides of your cut 2×4 end pieces. Position the end pieces firmly against the sides, ensuring they are flush with the top and bottom edges of the 1x6s. Secure them with nails through the 1x6s into the end pieces. This step completes the structural box, making it robust and ready for its decorative touches.
Step 4: Embracing the Rustic Charm – Distressing and Embellishing
Now for the fun part that truly defines the “shanty-chic” or farmhouse aesthetic! To give the planter box a wonderfully aged and rustic appearance, I purposefully created some dings and imperfections all around the entire box. You can use a hammer, a chain, or even some rough sandpaper to add dents, scratches, and worn edges. Don’t be afraid to get creative – these imperfections are what give the piece character and authenticity.
After distressing, I added furniture upholstery nails around the perimeter. These small, decorative tacks instantly elevate the piece, giving it a vintage, artisanal feel. You can find these at most hardware stores, typically in the same aisle as screws and nails. Simply space them out evenly along the edges of your planter box and tap them in with a hammer. The subtle metallic accents beautifully complement the distressed wood.
The Finishing Touch: Staining Your Masterpiece
The right stain can truly transform your wooden creation, bringing out the natural beauty of the wood grain and deepening its character. This step is crucial for achieving that warm, inviting rustic look.
Discovering the Perfect Stain
For this project, I decided to try a new product: Rust-Oleum Ultimate Wood Stain, which I found at Lowe’s. I honestly wasn’t expecting a huge difference from my usual go-to stains, but I was pleasantly surprised – even shocked – by how superior this product was.
The standout feature of Rust-Oleum Ultimate Wood Stain is its incredibly fast drying time. I applied the stain, and within an hour, the planter box was dry to the touch and ready to be handled! This is a game-changer for DIY projects, as it significantly cuts down on project time and allows you to move forward much quicker. Beyond its quick-dry formula, it also boasts a much less potent odor compared to other stains I’ve used, making for a more pleasant working experience. And, crucially, it’s far less sticky, which makes cleanup and handling much easier. If you’re looking for a top-performing stain, I wholeheartedly recommend giving this one a try – you’ll love it!
Applying the Stain
Before applying any stain, make sure your planter box is clean and free of any sawdust. Use a clean rag, foam brush, or natural bristle brush to apply the stain. Follow the grain of the wood for the smoothest finish. Apply the stain evenly, working in sections. Allow it to penetrate for a few minutes (refer to product instructions), then wipe off any excess with a clean cloth. For a deeper, richer color, you can apply a second coat after the first has fully dried. Always work in a well-ventilated area, even with low-odor stains, and wear gloves to protect your hands.
Styling Your New Centerpiece
Once your stain has fully dried, your beautiful DIY planter box is complete and ready for its starring role on your dining table! Now comes the truly creative part: styling it to reflect your personal taste and the season.
Curating Your Display
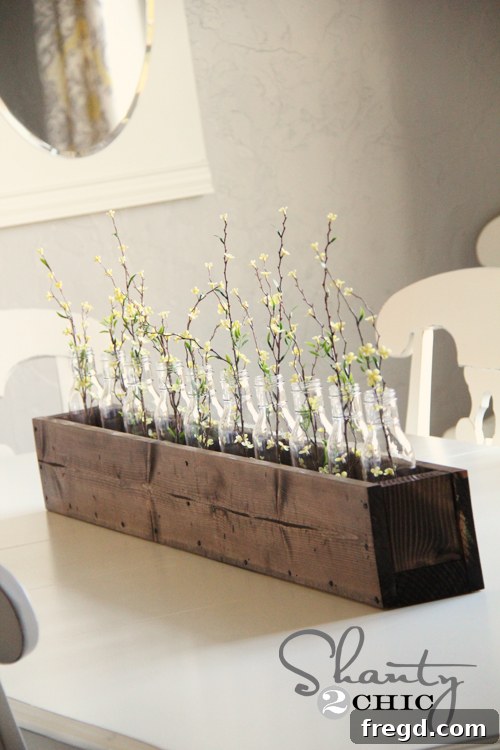
I chose to fill my planter box with a collection of glass bottles, which I sourced from a specialty bottle site (find similar here; I used their 12-ounce sauce bottles, SAU12). These elegant, uniform bottles create a clean and sophisticated look within the rustic box. Inside each bottle, I placed small artificial flowers from Hobby Lobby, adding a delicate touch of color and life. The combination of rustic wood, clear glass, and vibrant blooms is simply enchanting.
But the possibilities are endless! Here are a few ideas to inspire your styling:
- Repurposed Bottles: Don’t limit yourself to new bottles. Old glass coke bottles, Starbucks glass bottles, vintage milk bottles, or any interesting glass sauce bottles you’ve collected can be fantastic options. Their varied shapes and slight imperfections will enhance the rustic charm.
- Seasonal Decor: Easily change the look with the seasons! In autumn, fill the bottles with small sprigs of fall leaves or wheat. During the holidays, add miniature ornaments or pine cones. For spring, pastel flowers and faux bird’s nests would be delightful.
- Fresh Flowers: For a truly organic touch, use fresh-cut flowers. A mix of wildflowers or garden roses in your glass bottles will bring beautiful fragrance and natural beauty to your table.
- Herbs: If you love to cook, consider planting small pots of culinary herbs (like basil, rosemary, or thyme) directly into the planter (ensure proper drainage if using live plants, or keep them in their nursery pots). This adds a functional and fragrant element.
- Candles: For a cozy ambiance, place votive candles or pillar candles in varying heights directly into the box, or into clear glass hurricane sleeves for safety.
Here’s a glimpse at how my finished planter box centerpiece looks, styled and ready to impress:
Why This DIY Planter Box is a Must-Have for Your Home
This easy DIY planter box isn’t just a project; it’s an invitation to bring personalized style and warmth into your dining area. It’s a testament to the fact that beautiful, custom home decor doesn’t have to come with a hefty price tag or require advanced woodworking skills. With simple materials, basic tools, and a little creative flair, you can transform ordinary wood into an extraordinary statement piece.
Whether you’re aiming for a cozy farmhouse vibe, an industrial-chic aesthetic, or simply want to add a unique, handmade touch to your table, this planter box delivers. It’s versatile, adaptable, and a fantastic way to express your creativity. Plus, imagine the compliments you’ll receive when guests ask where you bought such a charming piece, and you can proudly say, “I made it myself!”
Share Your Creations!
I would absolutely love to see how your planter boxes turn out! If you decide to tackle this project, please share your photos and ideas. Pin it to your Pinterest boards for future inspiration, Stumble it for others to discover, and share it with your friends and family below. Let’s inspire each other to create beautiful homes, one DIY project at a time!
Thanks so much for stopping by and joining me on this creative journey! If you’re looking for more inspiration to spruce up your dining room, be sure to check out these related posts:
More DIY Inspiration for Your Dining Space
Painting Dining Chairs: A Budget-Friendly Transformation
Dining Table Revamp: Breathing New Life into an Old Favorite
DIY Window Panels: Adding Architectural Interest with Wood
Have a wonderful and creative day!
~Whitney