
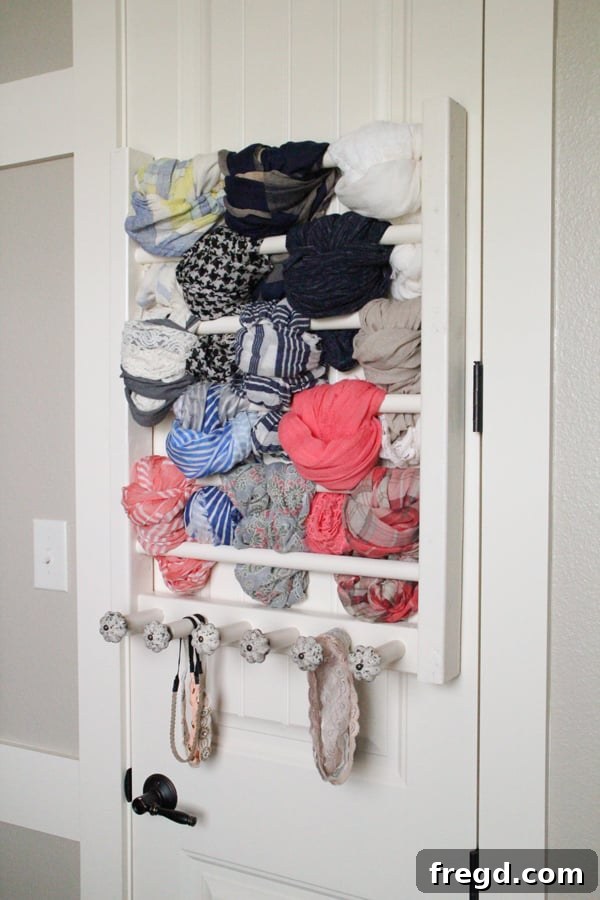
The Ultimate DIY Over-the-Door Scarf Storage Rack: Reclaim Your Closet Space
Do you find yourself battling a chaotic collection of scarves, tangled and hidden deep within your closet? If you’re anything like me, a slight obsession with scarves can quickly lead to an overwhelming clutter situation. While I’m currently in the midst of building a comprehensive closet storage system, finding the perfect solution for my ever-growing scarf collection became an urgent priority. Hanging them on traditional hangers was simply not cutting it; they were constantly getting tangled, making it impossible to see what I owned, and ultimately, leading to wasted time searching. That’s why I paused all other projects to create a solution that would bring order and elegance to my beloved scarves.
With just a few simple dowel rods and some lumber, I successfully constructed this fantastic over-the-door scarf rack, and I couldn’t be happier with the results! The entire project was incredibly budget-friendly, with lumber costs coming in at approximately $15 and the decorative knobs priced around $2 each (thanks to a sale at Hobby Lobby!). For such a minimal investment, the impact on my closet organization has been immense, providing a huge bang for my buck.
One of the best aspects of this DIY scarf organizer is its quick build time and minimal tool requirement. I completed the entire rack in about 30-45 minutes. Even if you don’t own an electric saw, this project is easily achievable with a basic hand saw, making it accessible for almost any DIY enthusiast.
Why DIY Scarf Storage? The Battle Against Closet Chaos
Every fashion enthusiast knows the struggle: a drawer overflowing with scarves, a closet rod burdened by countless hangers, or simply a pile on a shelf that quickly devolves into a tangled mess. Scarves, while beautiful accessories, can be notoriously difficult to store neatly. They tend to slip, wrinkle, and hide their true patterns and colors when not properly organized.
The Problem with Traditional Scarf Storage
- Tangling & Wrinkling: Scarves, especially delicate ones, easily tangle when piled or hung incorrectly, leading to frustrating knots and unsightly wrinkles.
- Lack of Visibility: When scarves are crammed together, it’s impossible to see your entire collection, making it difficult to choose the perfect accessory for your outfit. You often forget what you even own!
- Wasted Space: Traditional methods often don’t optimize vertical space, leaving valuable closet real estate underutilized.
- Damage & Wear: Constantly rummaging through a messy pile can pull threads or damage delicate fabrics.
Benefits of a Custom DIY Scarf Rack
Creating your own scarf rack, like this over-the-door solution, offers a multitude of advantages that transcend simple organization:
- Enhanced Visibility & Accessibility: Each scarf hangs freely and individually, allowing you to instantly see and access your entire collection. No more digging!
- Space Optimization: Utilizing the often-overlooked space behind a door or on a narrow wall, this rack frees up prime real estate in your main closet.
- Protection for Your Scarves: By preventing tangles and creases, your scarves will remain in pristine condition, ready to wear.
- Customization & Personal Touch: A DIY project allows you to choose the exact dimensions, finish, and decorative elements that perfectly match your home decor and personal style.
- Budget-Friendly: Avoid expensive store-bought organizers that may not even fit your specific needs. This project is incredibly cost-effective.
- Sense of Accomplishment: There’s nothing quite like the satisfaction of building something functional and beautiful with your own hands.
Project Overview: Your Affordable & Quick Scarf Organization Solution
This project is designed for efficiency and ease. It’s a straightforward build that yields incredibly rewarding results, transforming your scarf storage from a headache into a highlight of your organized home. Let’s gather our materials and dive into the simple steps to create this essential piece of closet organization.
Materials You’ll Need
Before you begin, ensure you have all the necessary supplies. A quick trip to your local hardware store or home improvement center should cover most of these items:
- Lumber Supplies:
- 1 – 2×3 @ 8ft. (This will be cut down for the main frame pieces and the bottom support.)
- 3 – 1″ dowels @ 48″ (These will be cut into longer pieces for the main scarf rods and shorter pieces for the accessory hooks.)
- Tools:
- Saw (Miter saw, circular saw, or even a simple hand saw with a miter box will work for accurate cuts.)
- Drill (A cordless drill is highly recommended for versatility.)
- 1″ Forstner Bit (Essential for drilling clean, flat-bottomed holes for the dowels.)
- Pocket Hole Jig (For attaching the bottom support piece securely.)
- Hammer
- Measuring Tape
- Pencil
- Safety Glasses (Always important when working with tools!)
- Other Supplies:
- Wood Glue (A strong wood adhesive is crucial for the dowel connections.)
- 1 1/2″ Pocket Hole Screws
- Sandpaper (Optional, for smoothing rough edges before painting.)
- Spray Paint (Your color of choice; Rust-Oleum Heirloom White was used in this example for a classic look.)
- Decorative Knobs (6 pieces, chosen to complement your style.)
- Gorilla Glue Super Glue Gel (Or similar strong adhesive, for securing knobs if needed.)
- 3M Command Strips (Large size, 4 for each side, for damage-free hanging on doors.)
- Hollow Door Anchors (Optional, if you prefer a permanent, screw-in wall mount.)
Step-by-Step Guide: Building Your Dream Scarf Organizer
Follow these detailed instructions to construct your very own over-the-door scarf rack. Precision in measuring and drilling will ensure a sturdy and aesthetically pleasing finished product.
Step 1: Preparing Your Lumber
Begin by making your cuts. From your 8-foot 2×3, cut two pieces at 30 inches each. These will form the vertical side supports of your scarf rack. Next, take your 1-inch dowels. You’ll need six main dowel rods for hanging scarves. Cut these six dowels to a length of 20 inches each. Remember to save the remaining scraps from your dowels; they’ll be used later for the smaller accessory hooks.
Step 2: Drilling Holes for the Main Dowels
Now it’s time to prepare the side supports for the dowels. Attach a 1-inch Forstner bit to your drill. A Forstner bit is ideal here because it creates clean, flat-bottomed holes, which will make for a stronger and neater connection. On each of your 30-inch 2×3 pieces, you will drill six holes. The depth of these holes only needs to be about 1/2 inch – just deep enough to accommodate the tip of the bit and provide a secure socket for the dowel. Precision is key here: start your first hole 2 inches from the top of the 2×3, and then space subsequent holes every 4 1/2 inches down the board. While I initially drilled my holes right down the middle of the board, a valuable lesson learned is that drilling them slightly closer to one side of the 2×3 would leave more space behind the scarves, making it easier to tuck them in and preventing them from brushing against the door or wall. Consider this slight offset if you want maximum scarf clearance.
Repeat this drilling process for the second 30-inch 2×3 piece. It is absolutely crucial that the holes on both side pieces line up exactly. Take your time to measure and mark carefully before drilling to ensure perfect alignment for your dowels.
Step 3: Assembling the Main Rack Frame
With your holes drilled, it’s time for assembly. Apply a small drop of wood glue into each hole on one of the 2×3 side pieces. Be careful not to use too much glue, as excess will create a messy overflow. A little goes a long way to create a strong bond.
Carefully insert each of your 20-inch dowel rods into the glued holes. You may need to gently hammer them into place to ensure a snug fit. Use a rubber mallet or place a scrap piece of wood over the dowel end before hammering to prevent damaging the dowel itself.
Once all dowels are inserted into the first side piece, apply glue to the remaining exposed dowel ends. Then, carefully align the second 2×3 side piece with the dowels and hammer it onto them. To prevent denting or damaging the surface of your finished 2×3, place a scrap piece of wood between your hammer and the 2×3 as you tap it into place. Allow the glue to dry completely according to the manufacturer’s instructions before proceeding.
Step 4: Adding the Bottom Support Piece
With your main dowel frame assembled, measure the exact space between the two 2×3 side pieces. Cut another piece of 2×3 lumber to this precise measurement. This piece will serve as the bottom support for your rack.
Using a pocket hole jig, drill two 1 1/2-inch pocket holes into each end of this newly cut bottom 2×3 piece. Pocket holes are an excellent way to create strong, concealed joints, perfect for this application.
Now, attach this bottom support piece to the very bottom of your scarf rack frame using 1 1/2-inch pocket hole screws. Ensure that the pocket holes face the back of the rack for a cleaner appearance. I initially attached mine flush with the back of the rack, but if I were to do it again, I would recommend attaching it flush with the front. This minor adjustment would create a small ledge at the back, which is surprisingly useful for tucking in the ends of scarves or other accessories more neatly. It’s a small detail that enhances functionality, proving that even experienced DIYers are always learning! Despite this, the rack still works great.
Step 5: Creating the Accessory Hooks
Now, let’s add the versatile accessory hooks. On the bottom 2×3 piece you just attached, drill six 1-inch holes, mirroring the method you used for the side pieces. While I simply “eyeballed” my spacing for these, feel free to measure them precisely for perfect symmetry. These holes don’t need to be as deep as the main dowel holes, just enough to securely hold the short dowel pieces.
From your saved dowel scraps, cut six small pieces, each 3 1/2 inches long. Apply a dab of wood glue into each of the newly drilled holes on the bottom 2×3. Then, hammer these short dowel pieces into the holes. These will form the sturdy base for your decorative accessory knobs.
Step 6: Finishing Touches: Painting Your Rack
Before installing the knobs, it’s time to add a beautiful finish to your scarf rack. I chose to spray about two coats of Rust-Oleum Heirloom White spray paint all over the entire wooden structure. This particular shade perfectly matched the existing trim and door colors in my home, creating a cohesive and polished look. When spray painting, remember to work in a well-ventilated area, use even strokes, and apply multiple thin coats rather than one thick coat to prevent drips and achieve a smooth, professional finish. Allow adequate drying time between coats and before proceeding to the next step.
Step 7: Installing Decorative Knobs
The final step in building the rack is to attach your chosen decorative knobs. First, drill a pilot hole into the very center of each of the short dowel pieces on the bottom 2×3. The diameter of this pilot hole should be just slightly smaller than the width of the knob screw to ensure a tight, secure fit. This prevents the wood from splitting when you insert the screw.
Then, carefully hammer a knob into each pilot hole. This should be a snug fit. If you find that the fit isn’t as tight as you’d like, or if you want extra security, add a drop of Gorilla Glue Super Glue Gel (or a similar strong adhesive) into the pilot hole before inserting the knob. This will ensure your knobs remain firmly in place, ready to hold your precious accessories.
That’s it! Your beautiful and functional DIY scarf rack is now complete and ready for action.
Mounting Your DIY Scarf Rack
For a damage-free installation, especially on a door, I highly recommend using large 3M Command Strips. I used four on each of the vertical side pieces, and this baby isn’t budging! They offer a surprisingly strong hold and can be removed cleanly without leaving residue or damaging paint. If you prefer a more permanent mounting solution directly to a wall or door, make sure to use hollow door anchors or appropriate wall anchors, depending on your wall material, to ensure stability and safety.
Beyond Scarves: Versatile Organization for All Your Accessories
While designed primarily for scarves, the genius of this rack extends beyond its initial purpose. The addition of the bottom dowels and decorative knobs creates a perfect spot for a variety of other accessories. I specifically added them for organizing my hair accessories, belts, and necklaces. This multi-functional design makes the rack an even more valuable addition to any closet or bedroom. It’s a true all-in-one accessory hub!
Conclusion: Organized Living, One DIY Project at a Time
The saying “a place for everything, and everything in its place” has never rung truer than with this DIY scarf storage rack. It has brought an incredible sense of order to my collection of scarves, making them accessible, visible, and beautifully displayed. It’s funny, but this project even impressed my husband more than many of my other DIY endeavors – so much so that he asked for a modified version for his ties and belts! Talk about a score! This simple, affordable, and quick build truly delivers on its promise of efficient and stylish organization.
I hope this detailed guide empowers you to tackle your own scarf storage challenges. It’s a rewarding project that not only declutters your space but also adds a personalized touch to your home. Happy organizing!
Thanks so much for stopping by!
~Ashley