
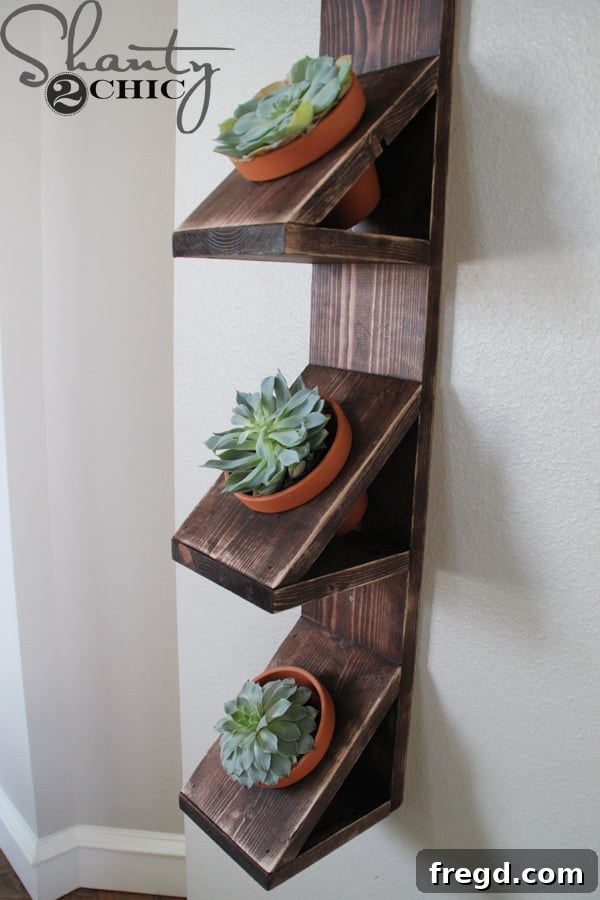
Transform Your Space with a Stunning DIY Succulent Wall Planter
Are you searching for a unique way to infuse life and style into your home? Do you have a blank wall, perhaps in a narrow dining room or hallway, that’s just begging for a touch of greenery? Look no further! This comprehensive guide will walk you through creating your very own eye-catching succulent wall planter. Succulents are not just beautiful; they are incredibly low-maintenance, making them perfect for both seasoned plant enthusiasts and beginner gardeners alike. Get ready to transform that empty space into a vibrant, living art installation that’s both inexpensive and profoundly rewarding to build.
This charming succulent wall planter is not only a fantastic decorative piece but also an incredibly budget-friendly project, costing around just $10 for the primary material (a single 1x6x10 board)! One of the best aspects of this DIY project is its incredible versatility. You can easily customize its length and the number of plant pockets to perfectly fit your specific wall dimensions and aesthetic preferences. Whether you envision a compact display with just a few plants or a dramatic vertical garden stretching across a larger area, this design is fully adaptable. Let’s dive into the simple steps to create this beautiful and functional piece for your home.
Why Choose a DIY Succulent Wall Planter?
Vertical gardening has surged in popularity, offering innovative solutions for urban dwellers and anyone looking to maximize their green space. A DIY succulent wall planter stands out as an exceptional choice for several compelling reasons:
- Aesthetic Appeal: Succulents bring a modern, minimalist, yet organic touch to any room. Their diverse shapes, textures, and subtle colors create a captivating visual display that can serve as a stunning focal point.
- Space-Saving Solution: Ideal for small apartments, narrow hallways, or any area where floor space is at a premium. By utilizing vertical space, you can enjoy a garden without sacrificing valuable square footage.
- Budget-Friendly Decor: Compared to purchasing pre-made vertical planters or elaborate wall art, this DIY project offers significant savings. The main material cost is minimal, allowing you to invest more in a variety of beautiful succulents.
- Customization at Your Fingertips: From the choice of wood and stain to the size and arrangement of your plant pockets, every aspect can be tailored to match your interior design.
- Low Maintenance: Succulents are renowned for their drought tolerance and minimal care requirements. They thrive on neglect, making this an ideal project for busy individuals or those new to gardening.
- Therapeutic Value: Engaging in a woodworking project, followed by the act of nurturing plants, offers a satisfying and therapeutic experience. There’s immense pride in creating something beautiful and functional with your own hands.
Gathering Your Tools and Materials
Before you begin, ensure you have all the necessary tools and materials ready. Having everything organized will make the building process smoother and more enjoyable. Safety should always be your priority, so remember to wear appropriate protective gear like safety glasses and gloves when working with power tools.
Materials:
- Wood: One 1x6x10 foot board (pine or common board is generally affordable and easy to work with).
- Wood Glue: High-quality wood glue (e.g., Gorilla Wood Glue or Titebond) for strong, lasting joints.
- Pocket Hole Screws: 1 1/4 inch pocket hole screws.
- Brad Nails: 3/4 inch brad nails.
- Wood Stain: Rust-Oleum Dark Walnut stain (or your preferred stain/paint).
- Clean Cloths: For applying and blending stain.
- Succulents: A variety of medium-sized succulents (often found at local hardware stores or nurseries).
- Clay Pots: Medium-sized clay pots (ensure they fit the 4-inch holes you will cut).
- Hanging Hardware: Wall anchors and 2-inch screws for secure wall mounting.
Tools:
- Miter Saw: Essential for precise angled cuts.
- Jigsaw: For cutting out the circular holes for your pots.
- Power Drill: For drilling pilot holes and pocket holes.
- Pocket Hole Jig: Such as a Kreg Jig, for drilling strong, concealed pocket holes.
- Orbital Sander or Corner Cat Sander: With 80-grit sanding pads for smoothing edges.
- Tape Measure and Pencil: For accurate measurements and markings.
- Round Object (4-inch diameter): For tracing circles (e.g., a small can, glass, or compass).
- Wood Clamps: To secure pieces to your workbench while cutting or drilling.
- Brad Nailer: An 18-gauge brad nailer (e.g., Ryobi) will make assembly quick and easy.
- Safety Glasses and Gloves: Always prioritize safety!
Step-by-Step Construction Guide
Let’s get started on building your beautiful succulent wall planter!
Step 1: Preparing Your Wood Cuts with Precision
The foundation of your planter lies in accurate wood cuts. Begin by preparing the main backboard and the pieces that will hold your succulent pots.
- Main Backboard: Take your 1x6x10 board and cut one piece to 48 inches long. This will be the main vertical support of your planter.
- Pot Holder Pieces: Next, cut five pieces that will serve as the top supports for your pots. Each of these pieces should be 8 inches long, measured from long point to long point. To achieve this, set your miter saw to a 45-degree angle. Make a cut, then flip the board and make another 45-degree cut, ensuring the ends are mitered in opposite directions (not parallel). This distinctive angle will create an appealing slope for your succulents to sit in.
Once cut, these mitered pieces will have a unique, angled shape, ready for the next step.
Step 2: Crafting the Succulent Pockets
Now, let’s create the openings where your succulents will beautifully reside. Accuracy here ensures your pots sit perfectly.
- Trace Your Circles: Take one of the mitered 8-inch pieces. Find a round object with a 4-inch diameter (or the precise diameter of the top of your chosen succulent pots, just under the rim) and trace a circle onto the wood. It’s crucial that this circle is large enough to accommodate the pot itself, allowing the pot’s rim to rest on the wood surface, preventing it from falling through.
- Drill a Pilot Hole: Securely clamp the wood piece to your workbench. Using your power drill, carefully drill a pilot hole just inside the traced circle. This hole will serve as the entry point for your jigsaw blade, making the circular cut much easier and safer.
- Cut the Circle: Insert your jigsaw blade into the pilot hole and carefully cut along the traced line to remove the circle. Take your time to achieve a smooth cut.
- Smooth the Edges: The cut edges will likely be rough. Use your orbital or corner cat sander with an 80-grit sanding pad to smooth them out, creating a clean finish that won’t damage your pots or scratch your hands.
- Repeat for All Pieces: Follow these steps to cut and sand holes in the remaining four mitered pieces.
You should now have five beautifully prepared pot holder pieces, each with a perfectly cut and sanded opening.
Step 3: Assembling the Structure – Building the Base
This stage involves creating the supportive shelves that will sit underneath your pot holder pieces.
- Cut Bottom Support Pieces: Cut five pieces of the 1×6 board, each measuring 5.5 inches long. These will act as the horizontal supports for the succulent pockets.
- Drill Pocket Holes: Using your pocket hole jig, drill two pocket holes on one end of each of the five 5.5-inch pieces. Pocket holes provide a strong, concealed way to join wood, resulting in a cleaner look for your finished planter.
- Attach Bottom Supports to Backboard: Apply a small amount of wood glue to the end of a 5.5-inch piece (the end without pocket holes). Position it against the 48-inch backboard, ensuring it is flush and level. Then, use 1 1/4 inch pocket hole screws to secure it firmly to the backboard from the back.
- Space Evenly: Start by attaching the first 5.5-inch piece at one end of the 48-inch backboard. Then, space the subsequent pieces 10 inches apart (measured from the edge of one piece to the edge of the next). This consistent spacing will create a visually balanced planter and provide ample room for your succulents.
Step 4: Securing the Pot Holders
With the bottom supports in place, it’s time to add the mitered pieces with the circular cutouts, which will cradle your succulents.
- Apply Wood Glue: For maximum strength and durability, apply Gorilla Wood Glue to both mitered ends of one of your pot holder pieces. The glue creates an incredibly strong bond, complementing the brad nails.
- Attach with Brad Nailer: Carefully position the glued pot holder piece onto the bottom of one of the 5.5-inch support pieces. Use your Ryobi 18-gauge brad nailer with 3/4 inch brad nails to firmly attach the mitered piece to the underside of the support. Drive several nails to ensure a secure connection.
- Secure to Backboard: Once the bottom is secured, align the top mitered end of the pot holder piece with the 48-inch backboard. Apply more glue if needed, and use your brad nailer to attach it securely to the backboard using 3/4 inch brad nails. Repeat this process for all five pot holder pieces, ensuring they are all perfectly aligned and flush.
Congratulations! Your wooden planter structure is now fully assembled and ready for its finishing touches.
Step 5: Finishing Touches – Staining for Style
The right finish can dramatically enhance the beauty of your planter, bringing out the natural grain of the wood and complementing your home decor.
- Apply Stain: Using a clean cloth, apply one generous coat of Rust-Oleum Dark Walnut stain (or your chosen color) to the entire assembled piece. Ensure even coverage on all surfaces.
- Let it Penetrate: Allow the stain to sit and penetrate the wood for approximately 5 minutes. This allows the pigment to soak in, providing a rich, deep color.
- Blend and Wipe: With a separate clean cloth, gently blend and wipe off any excess stain. Work with the grain of the wood to achieve a smooth, even finish. If you desire a darker hue, you can apply a second coat after the first has dried completely. Always follow the manufacturer’s instructions for drying times.
- Optional Sealing: For added protection, especially if the planter will be in a humid environment or exposed to occasional water (from watering plants), consider applying a clear sealant or polyurethane topcoat once the stain is fully dry.
Hanging Your Masterpiece and Populating with Life
With your planter beautifully stained and dry, the final steps involve hanging it securely and adding your beloved succulents.
- Secure Hanging: The assembled planter, especially once filled with soil, plants, and water, can be quite heavy. It’s crucial to hang it securely. Locate wall studs for the strongest attachment points. If studs aren’t available where you want to hang it, use appropriate wall anchors that can support the weight. Drive two 2-inch screws through the backboard of the planter and into the wall (either into studs or reliable anchors).
- Select Your Succulents: Head to your local hardware store or nursery and choose a variety of medium-sized succulents. Look for plants with different colors, textures, and growth habits to create an interesting display. Many succulents are incredibly affordable, often costing around $5 each.
- Choose Compatible Pots: Pair your succulents with medium-sized clay pots. Clay pots are excellent for succulents because they are porous, allowing excess moisture to evaporate, which helps prevent root rot. Ensure your chosen pots fit perfectly into the 4-inch holes you cut, with the rim resting on the wood. These can often be found for as little as $1 each.
- Arrange and Enjoy: Place your succulents, still in their pots, into the prepared holes. Step back and admire your new, vibrant vertical garden!
This DIY succulent wall planter is more than just a place to display plants; it’s a statement piece that brings natural beauty and a touch of handmade charm to your home. It’s incredibly easy to make, remarkably inexpensive, and adds so much character to any room. The joy of creating something beautiful and functional with your own hands is truly unmatched. We hope you love the unique touch this vertical garden brings to your space as much as we do!
Thank you so much for following along with this creative DIY journey!