
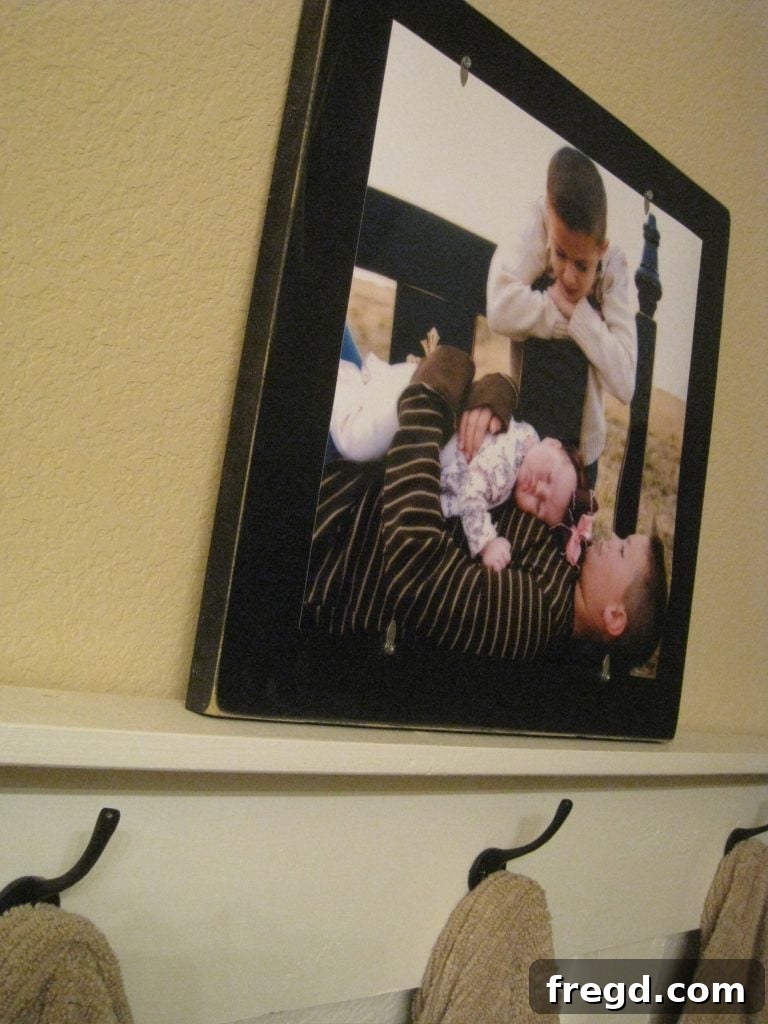
Unlock Your Memories: Create a Stunning DIY Custom Photo Display (No Frame Needed!)
Do you have a collection of cherished photographs hidden away in boxes, digital folders, or simply sitting neglected because you can’t find the ‘perfect’ frame? You’re not alone! Many of us struggle with displaying our favorite memories, especially those beautiful, oddly-sized prints that standard frames just don’t accommodate. The good news? You don’t need a pricey custom frame or a trip to a specialty store to bring those photos to life. Today, we’re diving into a brilliantly simple, budget-friendly, and completely customizable DIY photo display project that lets your treasured images shine without any permanent damage.
For too long, I found myself in this very predicament. After moving, my house felt bare, lacking the personal touch that only displayed photographs can bring. The mission was clear: tackle this photo display dilemma once and for all. What I discovered was a creative solution using readily available materials – a method that’s not only incredibly easy but also allows you to swap out photos as often as you like, keeping your home decor fresh and your memories front and center.
The Challenge: Finding the Perfect Frame for Unique Photos
Every photo tells a story, and some stories come in unique shapes and sizes. Take, for instance, a beautiful candid shot from a special event – perhaps a Christmas gathering, as was the case for the initial inspiration for this project. These photos often capture raw emotion and artistic angles that make them truly special. However, their non-standard dimensions can make traditional framing a nightmare. You might love the shape and size of the picture itself, but searching for a corresponding frame often leads to frustration, compromise, or costly custom options.
This project was born out of that very frustration. I had a wonderful photo, taken by a dear friend (thank you, Cindy!), that I absolutely adored. Its unique proportions made it impossible to fit into any standard frame I could find. Instead of letting it languish, I decided it was time to get creative and “shanty it up,” as they say – transforming a simple idea into a charming, functional piece of home decor. This approach not only solves the framing problem but also adds a rustic, personalized touch that off-the-shelf frames often lack.
Why Choose a DIY Photo Display? Beyond Just Saving Money
While saving money is certainly a compelling reason to embark on a DIY project, the benefits of creating your own photo display extend far beyond your wallet. Here’s why this project is a game-changer for anyone looking to showcase their memories:
- Unmatched Customization: No more compromising on size, color, or style. You dictate every aspect, ensuring your display perfectly complements your photo and your existing home decor. Want a vibrant pop of color? Done. A minimalist monochrome look? Easy.
- Budget-Friendly: This project thrives on repurposing. Utilize scrap wood, leftover paint, and craft supplies you might already have tucked away. It’s an ideal way to turn forgotten materials into something beautiful and functional.
- No Permanent Damage to Photos: This is a huge advantage! Traditional framing often involves adhesives or precise trimming that can irrevocably alter your precious prints. Our brad-secured method allows you to easily insert and remove photos without a single tear, crease, or sticky residue. Preserve your originals for years to come.
- Versatility and Adaptability: Bored with a photo? Want to update your seasonal decor? Swapping out pictures is incredibly simple, making this display dynamic and adaptable to your changing tastes or new memories.
- Personal Touch and Unique Charm: A handmade item brings character and warmth to any room. It’s a conversation starter and a testament to your creativity, adding a truly personal touch that mass-produced frames can never replicate.
- Eco-Conscious Crafting: By utilizing scrap materials, you’re not only saving money but also reducing waste, giving new life to items that might otherwise end up in a landfill.
Gathering Your Materials: What You’ll Need for Your Custom Photo Holder
One of the best aspects of this DIY project is its simplicity and reliance on basic craft supplies and materials you might already have on hand. Here’s a comprehensive list of what you’ll need to create your personalized photo display:
Essential Materials:
- Scrap Wood (MDF, Plywood, or Solid Wood): A piece slightly larger than your chosen photograph. MDF (Medium-Density Fiberboard) is excellent for a smooth finish, as used in this project. Plywood or even reclaimed solid wood planks can also work, offering different textures and finishes.
- Your Chosen Photograph: The star of the show! Ensure it’s printed on sturdy paper.
- Spray Paint (or Acrylic Paint/Stain): For finishing your wood board. Rust-oleum black semi-gloss spray paint was used here for a sleek look, but choose any color or finish that suits your style.
- Decorative Brads or Fasteners: These are typically used in scrapbooking but are perfect for holding your photo securely. Look for ones with small, decorative heads. Small screws (itty bitty screws, as originally described) can also be used if the brads don’t come with a screw attachment or if you prefer a more industrial look.
Tools You’ll Need:
- Pencil and Ruler: For tracing and marking.
- Saw: A hand saw, jigsaw, or circular saw for cutting your wood to size. Always prioritize safety when using power tools.
- Sandpaper or Sanding Block: Fine-grit sandpaper (around 120-220 grit) for smoothing edges. A sanding block offers better grip.
- Drill (with small bit) and Screwdriver: If your brads require pilot holes or if you’re using small screws.
- Protective Gear: Safety glasses, gloves, and a mask (especially when spray painting).
Your Step-by-Step Guide to Crafting a Unique Photo Display
Ready to transform that forgotten photo into a focal point? Follow these simple steps to create your very own custom display board.
Step 1: Select Your Photo and Prepare Your Wood
First, pick the photograph you wish to display. Consider its size, orientation, and overall aesthetic. Once you have your photo, grab your piece of scrap wood. The goal is to create a backing board that provides a subtle border around your photo, making it stand out without overpowering it.
Lay your photo centered on the scrap wood. Using a pencil, carefully trace around the perimeter of the photo, leaving a small, even margin on all sides. This traced outline will guide your cuts, ensuring a perfect fit for your display.
Step 2: Cut and Smooth Your Display Board
With your outline traced, it’s time to cut the wood. Using your preferred saw (a jigsaw offers great maneuverability for precise cuts, but a hand saw works too), carefully cut along your traced lines. Take your time to ensure straight and clean edges.
Once cut, the edges of your board might be a bit rough. This is where your sandpaper or sanding block comes in. Give all the edges and corners a good, light sanding. This not only smooths out any splinters or rough patches but also prepares the surface for painting, ensuring a professional-looking finish. While it might be tempting to sand after painting, doing it beforehand often yields a cleaner result and is easier to correct any imperfections. However, as demonstrated in the original project, even if you forget and sand after, it can still turn out beautifully!
Step 3: Prime and Paint Your Board
Now for the fun part – adding color! In a well-ventilated area, or outdoors, lay your smoothed wood board on a drop cloth or old newspaper. If your wood is porous or you’re using a light paint color, a coat of primer can help achieve a more even and vibrant finish, though it’s often optional with spray paint on MDF.
Apply your chosen spray paint (like the Rust-oleum black semi-gloss). Apply thin, even coats, moving the can steadily across the surface. Avoid holding the can in one spot for too long to prevent drips. Apply two coats, allowing ample drying time between each coat as per the product instructions. This layering technique ensures a durable and richly colored finish.
Step 4: Select and Place Your Decorative Brads
While your paint is drying, gather your decorative brads. These small, often metallic fasteners are typically found in the scrapbooking section of craft stores like Jo-Ann’s, or you might even have some hiding in your own craft drawers from past hobbies! They come in a wide variety of styles, colors, and sizes, allowing for further personalization.
Once your board is completely dry, position your photo centrally on the painted board. Mark the four corners of the photo lightly with a pencil. These marks will indicate where you’ll place your brads. You want the brads to sit just over the corners of the photo, holding it in place securely but allowing it to slide underneath.
Using a drill with a tiny bit (if necessary for pilot holes, especially in denser wood) or simply a small screwdriver, carefully screw in your brads at the marked locations. Ensure they are secure but not overtightened, as you’ll need a slight gap for the photo to slide under.
Step 5: Final Sanding (If You Forgot!) and Inserting Your Photo
If you opted to sand after painting (it happens to the best of us!), now’s the time to do a light, final pass with your sanding block around the edges and corners to give it a slightly distressed or smoother finish. This step is entirely optional and depends on the look you’re going for.
With the board complete, it’s time for the moment of truth! Gently slide your chosen photograph under the decorative brads, ensuring it’s snug and centered. And just like that, your unique, custom photo display is ready!
Displaying Your Masterpiece and Exploring Creative Variations
Once your custom photo display is complete, the possibilities for showcasing it are endless. For this project, it found a perfect home propped up on the board and batten treatment in the kids’ bathroom, adding a personal and cheerful touch to an often-overlooked space. This simple display method is ideal for shelves, mantels, desks, or even as part of a larger gallery wall.
Creative Variations to Inspire Your Next Project:
- Gallery Wall: Create several display boards in varying sizes and colors to form a dynamic and personalized gallery wall. Mix and match photos for a truly eclectic look.
- Seasonal Themes: Easily swap out photos to match holidays or seasons. Imagine a display with autumn leaves in fall, festive holiday photos in winter, and bright beach scenes in summer.
- Textured Finishes: Instead of just paint, consider adding texture with fabric, wallpaper scraps, or even a thin layer of cork for a bulletin board effect.
- Stenciling and Decoupage: Personalize your board further by stenciling patterns, quotes, or names onto the wood, or decoupage with decorative paper before adding your brads.
- Wall Mounting: If you prefer to hang your display, simply attach a sawtooth hanger or D-rings to the back of the board. Ensure it’s level and secure on your wall.
- Different Fasteners: Experiment with different types of brads, small clips, or even decorative thumbtacks for a varied aesthetic.
The beauty of this project lies in its ability to present your cherished photos without fear of permanent damage. We all have those irreplaceable prints that we’re hesitant to alter, and this method provides a wonderful solution. You can enjoy your memories front and center, knowing they are safely displayed and can be easily removed or swapped at any time. I truly can’t wait to create more of these in various sizes to fill our home with even more cherished moments!
Bonus Moment: Celebrating Summer and New Beginnings
Speaking of cherished moments, life is full of them! Just a quick snapshot from our recent adventures – Tenley took her very first dip in the pool yesterday! The boys absolutely loved it, and it was a joyful start to what promises to be a fantastic summer. May your days be filled with similar happy memories, ready to be captured and displayed beautifully!
Conclusion: Embrace Your Inner Crafter and Display Your World
From forgotten photos to cherished focal points, this DIY custom photo display project offers a simple yet impactful way to personalize your living space. It’s a testament to the idea that creativity doesn’t have to be complicated or expensive. With just a few basic materials and a bit of time, you can craft beautiful, reusable displays that celebrate your memories and add unique character to your home. So gather those beloved pictures, find some scrap wood, and start creating – your walls (and your heart) will thank you!
~Ashley