
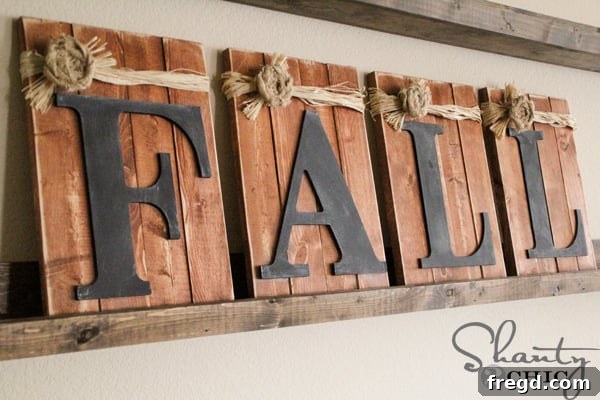
DIY Rustic Fall Chalkboard Pallet Sign: An Easy & Affordable Project to Welcome Autumn
Welcome, fellow DIY enthusiasts and home decor lovers! We’re thrilled you’ve stopped by to discover your next creative project. If you’re passionate about crafting unique pieces that add warmth and character to your home, we invite you to connect with us on our Instagram and Pinterest accounts. There, you’ll find a continuous stream of our latest projects, behind-the-scenes glimpses, and plenty of inspiration, just like this charming new chalkboard sign we’re about to dive into!
As the days begin to shorten and a crispness enters the air, there’s nothing quite like transforming your living space to reflect the cozy spirit of fall. This year, even with lingering warm temperatures trying to delay the autumn mood, the urge to embrace fall decorating finally hit! We’re incredibly excited to share our very first DIY fall decor project of the season today: a rustic and adorable chalkboard sign made from repurposed pallet wood and stylish MDI letters. This project is not only budget-friendly, costing under $15 for all materials, but it’s also wonderfully quick and straightforward. It’s truly our kind of DIY – maximum impact with minimal fuss!
Why Embrace DIY for Your Fall Decor?
There’s a special satisfaction that comes with creating your own home decor, especially when it comes to seasonal themes. DIY fall projects offer numerous benefits beyond just aesthetics. Firstly, they allow for complete personalization; you can tailor colors, textures, and messages to perfectly match your home’s unique style and your personal preferences. Secondly, crafting your own decorations is often significantly more affordable than purchasing mass-produced items, making beautiful decor accessible to everyone regardless of budget. This particular chalkboard pallet sign is a prime example, delivering a high-end farmhouse look without the hefty price tag. Lastly, engaging in DIY crafts can be incredibly therapeutic and rewarding. It’s an opportunity to express your creativity, learn new skills, and bring a personal touch to your surroundings that store-bought items simply can’t replicate. Imagine the pride you’ll feel when guests admire your handcrafted sign, knowing you brought it to life with your own hands.
Project Overview: Crafting Your Rustic Fall Chalkboard Sign
Our featured project combines the rustic appeal of distressed wood pallets with the functional charm of chalkboard letters. The result is a versatile and inviting piece perfect for any fall display, whether it’s on your entryway table, mantelpiece, or even as a unique wall hanging. The design utilizes simple 1×3 wooden boards, transformed into miniature pallet segments, and pre-cut MDI letters that are easily converted into functional chalkboards. The beauty of this sign lies in its simplicity and the ability to customize its message season after season. It’s a fantastic way to introduce a touch of farmhouse style and autumnal warmth into your home without committing to a time-consuming or expensive endeavor. We’ve outlined every step to ensure your crafting experience is smooth and enjoyable.
Materials and Tools You’ll Need for This Project
Before you begin, gather all your supplies to ensure a seamless crafting process. One of the best aspects of this project is that most items are readily available at your local hardware store or craft supply shop, and many can be sourced affordably or even repurposed. Remember, opting for furring strips instead of standard 1x3s can further reduce costs without sacrificing quality for this decorative piece.
Materials:
- 2 – 1x3x10 ft common boards (or furring strips for a more budget-friendly option)
- Gorilla Glue Wood Glue (or similar strong wood adhesive)
- Light Walnut Wood Stain (or your preferred rustic shade)
- 9-inch MDI letters (from Hobby Lobby or other craft stores; “FALL” or “HOME” are popular choices)
- Chalkboard spray paint (Rust-Oleum or similar brand)
- Scrap burlap fabric (can be purchased at craft or fabric stores)
- Natural raffia strands (available at craft stores)
- One piece of white chalk
- Clean cloths or paper towels for wiping stain
Tools:
- Measuring tape and pencil
- Miter saw or hand saw with a miter box (a hand saw is sufficient for this project)
- Brad nailer (with 5/8-inch brad nails) OR Hammer (with 5/8-inch finishing nails)
- Foam brush for stain application
- Corner Cat or sandpaper (medium grit) for distressing
- Hot glue gun and glue sticks
- Scissors
Step-by-Step Guide: Crafting Your Fall Chalkboard Sign
Step 1: Preparing Your Wood Pallets – Cutting the Boards
The foundation of our charming sign lies in the perfectly cut wooden boards. Begin by taking your two 1x3x10 ft boards. Using your measuring tape and pencil, mark out 16 pieces, each precisely 14 inches long. This will give you four sets of four boards, forming the basis for your individual pallet signs. For cutting, a miter saw offers quick and accurate results, but if you’re working with limited tools, a basic hand saw coupled with a miter box will work perfectly. The miter box helps guide your saw for straight cuts, which are essential for a clean finish. This is an excellent opportunity to get comfortable with basic woodworking if you’re a beginner. Always prioritize safety when using any cutting tool; wear appropriate eye protection and ensure your workpiece is securely clamped before making a cut.
Step 2: Assembling the Pallet Boards
Now that your boards are cut, it’s time to assemble them into the mini pallet sections. For each sign, you will need four 14-inch boards. Lay these four boards parallel to each other on a flat surface, ensuring they are evenly spaced. To secure them, you’ll use smaller pieces of wood (often referred to as shims or support pieces, though you can cut additional 1×3 scraps for this). Apply a generous amount of Gorilla Glue Wood Glue along the back of the four boards where your support pieces will be placed. Then, position two support pieces horizontally across the back of the four vertical boards, one near the top and one near the bottom. If you have a brad nailer, this step is incredibly fast; use 5/8-inch brad nails to firmly attach the support pieces to each of the four vertical boards. No brad nailer? No problem! A hammer and 5/8-inch finishing nails will work just as effectively. While it might take a little more time and manual effort to tap each nail in, the end result will be just as sturdy and beautiful. We tested this method on one of our pallets, and it held up wonderfully. Allow the glue to dry completely according to the manufacturer’s instructions before moving on.
Step 3: Staining for that Perfect Rustic Finish
With your pallet signs assembled, it’s time to enhance their natural beauty with a stain. For this project, we opted for a lighter stain than usual – Light Walnut. This particular shade offers a beautiful, warm, and inviting tone that perfectly complements the fall aesthetic without being too dark, allowing the wood grain to still shine through. We absolutely love the look it creates! In fact, we’ve used it on other beloved projects like our Pallet Wall Art and DIY Dresser, which speaks to its versatility and appeal. To apply the stain, simply wipe one coat onto the wood using a foam brush. Ensure an even application across all surfaces. Let the stain sit for about 5 minutes, allowing it to penetrate the wood fibers. After this brief period, gently wipe the excess with a clean cloth. The goal isn’t to remove the stain entirely, but rather to ensure it’s evenly spread, removing any puddles and achieving a consistent color. This technique allows the wood’s natural character to remain visible while imparting a rich, warm finish. Set your stained pallets aside in a well-ventilated area to dry thoroughly while you work on the next step.
Step 4: Crafting Your Chalkboard Letters
While your stained pallets are drying, shift your focus to the letters. We chose 9-inch MDI letters, which are widely available at craft stores like Hobby Lobby. Keep an eye out for sales, as you can often snag them for around $1 each, making this a highly economical choice for your signage! The “MDI” refers to medium-density fiberboard, a smooth surface perfect for painting. To transform these ordinary letters into functional chalkboards, you’ll need chalkboard spray paint. Find a well-ventilated area, preferably outdoors, and lay your letters on a protected surface. Apply two light, even coats of chalkboard spray paint to each letter. The key here is thin coats to prevent drips and ensure a smooth, durable finish. Make sure to allow sufficient drying time between coats as recommended by the spray paint manufacturer. Rushing this step can lead to a sticky finish or uneven texture. Once both coats are applied and thoroughly dry, these letters will be ready to display your festive fall messages.
Step 5: Distressing Your Pallets for Authentic Charm
Once your chalkboard letters are drying, turn your attention back to the stained pallet signs to add that coveted rustic, aged look. Distressing is a wonderful technique that gives your brand-new wood a charming, weathered appearance, making it seem as though it has a story to tell. We used a tool called a “Corner Cat” to achieve this, which is essentially a specialized sanding tool designed for edges. However, you can achieve similar effects with medium-grit sandpaper or even by gently tapping the edges and surfaces with a hammer, chain, or other blunt objects to create nicks and dents. Focus on distressing all over – the front surfaces, the sides, and especially the edges of each board. The goal is to soften sharp corners, create subtle wear marks, and reveal hints of the natural wood beneath the stain, mimicking years of natural aging. This step adds significant character and depth to your fall signs, enhancing their farmhouse appeal.
Step 6: Attaching Your Chalkboard Letters
Now for the exciting part – bringing your signs to life by attaching the chalkboard letters! With your letters fully dry and seasoned, carefully position one letter on the center of each pallet. We found that leaving approximately one inch of space between the bottom of each letter and the bottom edge of the pallet creates a balanced and aesthetically pleasing look. Once you’re happy with the placement, use a hot glue gun to securely attach each letter to its respective pallet. Hot glue provides an instant bond, making this step quick and easy. Apply a generous amount of hot glue to the back of the letter, then firmly press it onto the pallet board. Hold it in place for a few seconds to ensure a strong adhesion. If you prefer a more permanent attachment, you could also use a stronger wood adhesive or even small, thin finishing nails, but hot glue is perfectly adequate for decorative purposes.
Step 7: Adding Burlap and Raffia Embellishments
To truly enhance the rustic fall aesthetic, we’ll add some charming embellishments using burlap and raffia. These natural materials instantly evoke a cozy, harvest-time feel. For the burlap, we used scrap pieces we had on hand, but you can easily purchase burlap by the yard at Hobby Lobby or any local fabric store. Raffia is also readily available at craft stores. To create the top accent, grab a generous bunch of raffia strands – about 10-15 strands per sign will create a nice fullness. Wrap these strands around the top portion of each pallet sign, draping them over the front. Then, tie a simple but secure knot between the first and second boards from the top. This not only keeps the raffia in place but also adds a lovely textural detail that complements the distressed wood. Arrange the raffia so it drapes naturally, adding to the sign’s organic charm.
Step 8: Creating and Attaching the Burlap Rosette
To add a final touch of farmhouse elegance, we’ll incorporate a burlap rosette. These little fabric flowers are incredibly simple to make and add beautiful dimension to your project. If you’re new to making them, don’t worry – you can click HERE for an easy, no-sew tutorial on how to create these flat-rolled rosettes. Once your burlap rosette is ready, use your hot glue gun to attach it directly on top of the raffia knot you just made. This covers the knot neatly and provides a focal point for the raffia embellishment. After the rosette is securely in place, take your scissors and snip the excess raffia strands, leaving them about an inch or so from the knot. This creates a tidy and natural-looking finish, making the rosette and raffia appear perfectly integrated into the sign’s design.
Step 9: Activating the Chalkboard Effect
The final step in perfecting your chalkboard letters is to “season” them, giving them that authentic, well-used chalkboard look. This process helps prepare the surface for writing and ensures that your chalk marks will erase cleanly in the future. To do this, take a piece of white chalk and rub it gently all over the entire surface of each chalkboard letter. Don’t press too hard; you just want to create a light, even layer of chalk dust. Once each letter is fully covered in a hazy white layer, take a clean paper towel or a soft, dry cloth and gently wipe down the letters. This will remove most of the chalk dust, leaving behind a subtle, ghosted effect that mimics the appearance of a well-loved, vintage chalkboard. This step is crucial for achieving that characteristic chalkboard aesthetic and making your letters truly pop with rustic charm.
Displaying Your Beautiful Fall Sign
And there you have it – your absolutely stunning DIY Rustic Fall Chalkboard Pallet Sign is complete! We truly love the final look. We also thought it would be a delightful idea to make this sign interactive for our family by having everyone list things they are thankful for on each letter – and we did just that! How incredibly cool and personal does this chalkboard sign look now? It’s not just decor; it’s a canvas for gratitude and connection. This versatile sign can be displayed in countless ways: prop it up on your mantelpiece alongside gourds and candles, arrange it on an entryway table to welcome guests, or hang it on a wall to create a focal point. Its rustic charm complements any fall decor theme, from farmhouse chic to cozy traditional. Feel free to change the chalk messages throughout the season, from festive greetings to inspirational quotes, adding an ever-evolving personal touch to your home.
Maintenance and Care for Your DIY Decor
To keep your beautiful fall sign looking its best for many seasons to come, a little care goes a long way. When cleaning the chalkboard letters, use a slightly damp cloth or a dedicated chalkboard eraser for best results. Avoid abrasive cleaners or scrubbing too hard, as this could damage the chalkboard paint. For the wooden pallets, simply dust them with a soft, dry cloth. If the stain ever appears dull, you can always apply another light coat of stain or a clear protective finish to refresh its look. Store your sign in a dry, temperate environment during the off-season to protect the wood and embellishments from extreme temperature changes or humidity.
Embrace the Spirit of Autumn with Your Handmade Creation
We are absolutely thrilled with our first DIY fall decor project of the season, and it truly feels like just what we needed to shake off the lingering summer heat and fully embrace the wonderful spirit of autumn. This rustic chalkboard sign is more than just a decoration; it’s a statement piece that adds warmth, personality, and a touch of handmade charm to your home. We hope you love creating and displaying this chalkboard sign as much as we do! If this project has inspired you, we would be incredibly grateful if you would share your thoughts, pin it to your Pinterest boards, and share it with your friends and family. Your support helps us continue to bring you exciting new DIY ideas.
Happy Fall, everyone!
~Ashley