
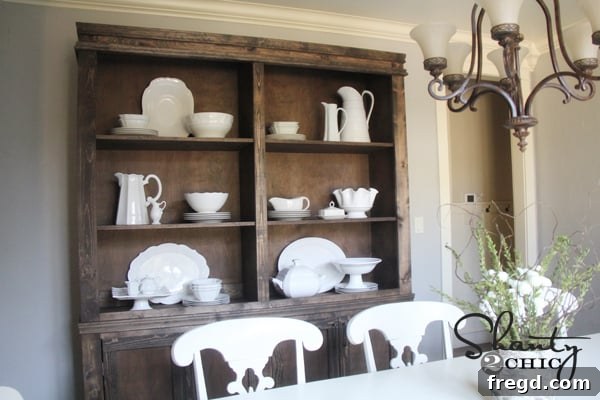
Hello fellow DIY enthusiasts and home decor lovers! We’re thrilled to kick off this Friday by sharing the detailed journey of crafting our stunning **Restoration Hardware-inspired dining hutch**. If you’ve been following along, you might remember our excitement when we first unveiled the matching sideboard plans a couple of weeks ago. Your incredible comments and shares truly made our day, and we always cherish hearing from our amazing community!
Today, we’re diving deep into the construction of its companion piece – a magnificent hutch that promises to elevate any dining space. While we’ll provide plenty of insights, tips, and build pictures right here, remember that you can find the complete, step-by-step plans over at Ana-White.com. Our goal is to empower you to create high-end furniture without the high-end price tag, and this hutch is a perfect example of that philosophy in action.
Unveiling the Restoration Hardware-Inspired Dining Hutch
Witnessing a project come to life from concept to completion is always rewarding, and this hutch is no exception. Take a peek at how beautifully this piece turned out – a testament to thoughtful design and accessible woodworking techniques.
Don’t let the grand scale of this piece intimidate you. While it certainly makes a statement, the construction is surprisingly straightforward. We designed it with very basic cuts and simple lines, making it an approachable project for DIYers of varying skill levels. The beauty of this design lies in its simplicity, allowing the quality materials and your craftsmanship to truly shine, just like a piece from Restoration Hardware.
Choosing the Right Materials: Why PureBond Plywood?
Just as with our popular sideboard, our material of choice for this substantial build was PureBond Plywood. We’ve become true advocates for this incredible material, and for good reason. PureBond offers the luxurious aesthetic of real hardwood but at a mere fraction of the cost, making high-quality furniture projects genuinely affordable. Its consistent quality and smooth finish save countless hours in sanding and preparation, allowing you to focus more on the enjoyable aspects of building.
Beyond its aesthetic and economic advantages, PureBond plywood stands out for its commitment to health and the environment. It’s proudly formaldehyde-free, ensuring a healthier indoor air quality for your home – a critical consideration for any furniture piece that will be a central part of your living space. Furthermore, it’s manufactured right here in the USA, supporting local economies and reducing carbon footprint. For us, it has unequivocally become our ‘go-to’ material for nearly all our furniture-building endeavors, providing both peace of mind and professional results. We believe in transparency and sharing what works best, and PureBond consistently delivers on its promises.
Discover the Benefits of PureBond Plywood
Want to learn more about why PureBond is our preferred choice? We’ve even created a short video where the Shanty Sisters discuss the numerous benefits of using PureBond in your projects. Take a moment to watch and see why this material is a game-changer for DIY furniture builders.
For more detailed information, feel free to click the link below to visit the official PureBond Plywood website. You can also connect with them and explore user projects by visiting their Facebook page. They often have special promotions and information on how you might even try PureBond Plywood for FREE! It’s an opportunity not to be missed if you’re serious about elevating your woodworking projects.
The Foundation: Precise Cuts and Effortless Preparation
One of the easiest ways to simplify a large furniture build is to get your materials pre-cut. We enlisted the help of the friendly associates at our local Home Depot to cut our PureBond plywood sheets into manageable 15 3/4″ wide boards. This service is a lifesaver, especially for those without a large workshop or high-precision cutting tools. It drastically reduces the initial setup time and ensures your main pieces are perfectly square and sized, laying a solid foundation for the rest of your project. Plus, it frees you up to tackle the more intricate, enjoyable aspects of the build!
Here’s a snapshot of the diligent team at Home Depot handling the heavy lifting and precise cuts, while we, admittedly, stood back patiently and perhaps scrolled through a few feeds on our phones. It truly makes the starting phase of any project incredibly simple and stress-free.
With our boards perfectly cut and ready, the actual assembly process became remarkably smooth. This simple step can save you hours and greatly increase the accuracy of your build, setting you up for success right from the start.
The Essential Tool: Mastering the Kreg® Jig
For this entire hutch build, our most cherished and indispensable tool was undoubtedly our Kreg® Jig. If you’re serious about DIY furniture building, investing in a Kreg Jig is one of the best decisions you can make. It allows you to create strong, secure joints quickly and efficiently, giving your projects a professional, finished look without complicated joinery techniques. The Kreg Jig revolutionized our approach to woodworking, making it accessible and enjoyable to create beautiful, durable pieces.
We primarily utilized 3/4″ pocket holes paired with 1 1/4″ pocket hole screws throughout the construction. This combination provides exceptional strength and stability, ensuring the hutch is robust enough to last for years to come. The beauty of pocket hole joinery is how it hides fasteners, leaving you with clean, smooth surfaces ideal for staining or painting. It’s a clean, efficient, and incredibly strong method for assembling large furniture pieces.
Adding Versatility: The Kreg® Shelf Pin Jig
Beyond the standard Kreg Jig, this project also gave us the perfect opportunity to finally put our Kreg® Shelf Pin Jig to excellent use! One of the standout features of this dining hutch, offering immense practicality and customization, is its adjustable shelves. This functionality allows you to adapt the hutch to display various items, from tall vases to stacks of dinner plates, making it incredibly versatile.
Creating these movable shelves was astonishingly simple, taking only minutes to add precisely spaced holes to the entire piece using the Kreg Shelf Pin Jig. If you’ve ever struggled with uneven shelf holes or the tedious measurement required for adjustable shelving, this tool is a revelation. Let us walk you through just how effortlessly it transformed our hutch into a highly adaptable storage and display unit.
We began the process by clamping a small block of wood firmly to the base of the hutch’s side panels. This block serves as a crucial starting point and a consistent reference for all our subsequent drilling, ensuring that the shelf pin holes are perfectly aligned and evenly spaced across every side. This initial setup step is key to achieving a professional and symmetrical look for your adjustable shelves.
The Kreg Shelf Pin Jig comes equipped with a specialized drill bit, precisely sized for shelf pins. After attaching this bit to our drill, we proceeded to drill the first set of six holes into one side panel. The jig guides the drill bit perfectly straight, preventing any wobble or uneven holes that can often occur with freehand drilling.
What truly makes this jig a marvel is its ingenious locating pin. Once you’ve drilled your first set of holes, you simply move the jig along the panel and insert the locating pin into one of the previously drilled holes. This clever mechanism ensures that every subsequent set of holes is perfectly spaced and aligned with the previous ones, creating a seamless and consistent pattern down the entire length of your piece. It’s an incredibly smart design feature that eliminates guesswork and guarantees professional-grade results every time. We were so impressed with the precision and ease of use!
Honestly, we absolutely adore this tool! After effortlessly creating a multitude of perfectly aligned shelf pin holes, we couldn’t help but show off our handiwork to our hubby. The sheer pride of achieving such precision with so little effort was palpable. This tool makes what could be a tedious and error-prone task incredibly simple and enjoyable, leading to highly functional and aesthetically pleasing adjustable shelving.
Assembling the Structure: Glue and Trim Details
While pocket screws provide immense structural integrity, we always reinforce all our joints with a strong wood adhesive. For this project, we relied on **Gorilla Wood Glue** for all our seams. This extra step dramatically increases the durability and longevity of your furniture, creating bonds that are often stronger than the wood itself. Apply a thin, even bead along all mating surfaces before driving in your pocket screws, and wipe away any squeeze-out immediately with a damp cloth to ensure a clean finish for staining.
Once the main framework was securely assembled, the next crucial step was adding the trim. This is where the hutch truly starts to take on its refined, Restoration Hardware-inspired character. Trim work is essential for hiding raw plywood edges, adding architectural detail, and giving the piece a built-in, custom look. Careful measuring and cutting are vital here to ensure tight, seamless joints that elevate the overall aesthetic. We meticulously applied each piece, ensuring every line was crisp and every corner met perfectly, transforming simple plywood into a sophisticated furniture piece.
Here are a few more progress shots, illustrating how the trim pieces were integrated, and how the entire structure seamlessly came together, building confidence with each step.
The Finishing Touch: Staining for a Timeless Look
With the construction complete and all the trim meticulously in place, it was time for the magical transformation – the staining process. We decided to use the very same high-quality materials and techniques that we successfully applied to the matching sideboard, ensuring a cohesive and elegant look for our dining set. Consistency in finish is key to achieving that perfectly coordinated, designer aesthetic.
Our choice for stain was **Rust-Oleum Ultimate Wood Stain**, readily available at Lowe’s. We absolutely rave about this product for several compelling reasons. Its “Ultimate” designation is well-deserved: it provides rich, vibrant color in a single coat, saving significant time and effort compared to other stains that require multiple applications. Furthermore, its quick-drying formula means projects can be completed faster, allowing you to admire and use your new furniture sooner. This stain penetrates deeply to bring out the natural beauty of the wood grain, creating a durable and exquisite finish that perfectly complements the Restoration Hardware aesthetic. Applying it evenly and working with the grain is crucial for a professional result, and always remember to test on a scrap piece first!
The Grand Reveal: Your DIY Masterpiece
And now, for the moment we’ve all been waiting for – the stunning culmination of our efforts. Here are a few more captivating images of the completed dining hutch, standing proudly as a testament to what thoughtful design, quality materials, and a bit of elbow grease can achieve. The rich, deep tones of the stain beautifully highlight the clean lines and solid construction, making it an undeniable focal point in any dining area. It’s truly rewarding to see the vision come to life in such a grand and functional way.
And, of course, a look at the dining hutch alongside its perfect partner, the sideboard. Together, they create a cohesive and luxurious dining set that rivals high-end store-bought pieces, all while reflecting your personal touch and the satisfaction of building it yourself.
If you missed the initial project, you can revisit our detailed post on building the matching sideboard HERE. We encourage you to explore both projects to create a complete and stunning dining room transformation.
Ready to embark on this rewarding DIY journey yourself? You can access the complete, printable plans for building this magnificent dining hutch directly on Ana White’s website. Her plans are renowned for their clarity and ease of follow, making complex builds approachable for everyone.
Don’t forget to connect with us and become part of our growing DIY community! Make sure to follow us on Facebook for daily inspiration, project updates, and exciting news. We have some truly amazing giveaways from our favorite brands lined up for the next couple of weeks, and we can’t wait to share these opportunities with all of you!