
Unlock Holiday Charm: Craft Your Own DIY Christmas Card Display for Under $10!
Welcome to Day 6 of our festive “12 Days of Christmas” celebration! We’re thrilled to share another fantastic, budget-friendly project that will add a touch of handmade warmth to your holiday season. Today, we’re diving into crafting a super quick, incredibly easy, and undeniably cute Christmas card display. Get ready to transform your living space into a festive gallery for all those cherished holiday greetings. The best part? Anyone can make this display, and with a little creativity, it can be easily restyled for any time of year!
There’s something truly special about receiving Christmas cards. Each one is a little note of love, a cherished update from friends and family near and far. But once they arrive, the question often becomes: how do we display them beautifully without cluttering our countertops or having them spill off every surface? Store-bought cardholders can be expensive and lack the personal touch that homemade decor offers. That’s where this delightful DIY project comes in, offering a perfect solution that’s both economical and endlessly customizable.
A Glimpse at the Finished Masterpiece
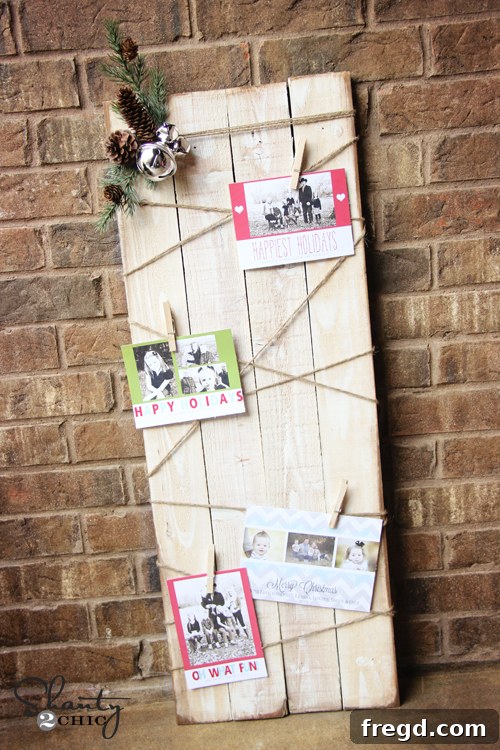
Before we dive into the nitty-gritty, let’s take a moment to admire the charming simplicity and festive appeal of the finished Christmas card display. Imagine this lovely piece gracing your mantelpiece, an entryway table, or even a cozy corner, proudly showcasing your holiday mail. It’s a statement piece that speaks volumes about festive cheer and clever crafting.
What makes this project even sweeter? It cost us under $10 to make, and we had it done in under an hour! That’s right – an hour! In a season often filled with busy schedules and stretched budgets, a quick and affordable craft like this is a true holiday miracle. It proves that stunning, personalized holiday decor doesn’t have to break the bank or consume your entire weekend. Let’s get crafting!
Gather Your Simple Supplies: The Foundation of Your Festive Display
One of the beauties of this Christmas card display is its reliance on readily available and inexpensive materials. You won’t need any specialized tools or exotic crafting supplies. Most of these items can be found at your local hardware store or craft shop, making this project accessible to everyone. Here’s what you’ll need to bring this festive vision to life:
- **Furring Strips:** These economical pieces of wood form the sturdy base of your display. They are incredibly versatile and perfect for a rustic, farmhouse-inspired look.
- **Stir Sticks:** These small, flat wooden sticks are ideal for creating the individual card slots. You can often find them in bulk at craft stores or even at coffee shops.
- **Gorilla Wood Glue:** For strong, reliable adhesion that will keep your display together for years to come.
- **Paint:** Your favorite color to match your holiday decor. We’ll be using a specific favorite for a distressed look.
- **Christmas Stems or Embellishments:** To add a touch of festive flair and personalize your display.
- **Hot Glue Gun & Glue Sticks:** For attaching embellishments quickly and securely.
- **Basic Hand Tools:** Measuring tape, saw (or ask for cuts at the hardware store), sandpaper (optional), paint brush.
We opted for furring strips for their raw, unfinished aesthetic and incredibly low cost. They are the perfect canvas for achieving that rustic, shabby-chic look that so many adore during the holidays. Don’t be afraid to embrace their natural imperfections, as they only add to the character of your finished piece.
For those seeking robust adhesion, Gorilla Wood Glue is an absolute go-to. It creates a powerful bond, ensuring that your stir sticks remain firmly in place, supporting all those precious cards. Quality glue makes all the difference in the longevity of your DIY projects. (Consider searching for “Gorilla Wood Glue” for a similar product).
Step-by-Step: Crafting Your Easy Christmas Card Display
Now that you have all your materials assembled, let’s walk through the simple steps to construct your beautiful Christmas card display. You’ll be amazed at how quickly this project comes together!
Step 1: Prepare Your Furring Strips
First, decide on the desired height and width of your display. For a standard size, a single furring strip cut to about 3-4 feet in length works wonderfully. If you want a wider display, you can either use a wider piece of wood or join two furring strips side-by-side for a more substantial look. Lightly sand any rough edges to ensure a smooth finish, although for a truly rustic look, minimal sanding is fine. This base will be the canvas for your holiday creativity.
Step 2: Attach the Stir Sticks
This is where your display truly takes shape! Lay your furring strip flat on a stable surface. Arrange your stir sticks horizontally across the furring strip, spacing them evenly. The distance between each stir stick will depend on the size of the cards you typically receive and how many you wish to display. A good starting point is 4-6 inches between each stick to accommodate various card sizes. Once you’re happy with the spacing, apply a generous bead of Gorilla Wood Glue along the back of each stir stick and firmly press it onto the furring strip. It’s crucial to ensure strong contact for a secure hold. Wipe away any excess glue that might seep out.
Remember to apply Gorilla Wood Glue under each stir stick for maximum durability. Let the glue dry completely according to the manufacturer’s instructions. This step is critical to ensure your display can hold a full collection of cards without any worries.
Step 3: Prepare for Painting
Once the glue has fully cured and all your stir sticks are securely in place, your display is ready for paint! This is where you infuse your personality into the project. Choose a color that complements your existing holiday decor or one that truly speaks to your festive spirit. For a timeless Christmas look, traditional reds, greens, whites, or metallics are excellent choices. However, don’t shy away from unexpected hues like icy blues, deep purples, or even a chic black for a modern touch.
Step 4: Apply Your Favorite Paint
We opted for a single light coat of our absolute favorite paint, which helps achieve a beautiful distressed look. Applying a thin coat allows some of the natural wood grain to show through, adding depth and character. If you prefer a solid, opaque finish, you may need two or more coats, allowing each to dry thoroughly between applications. A light sanding after the first coat can also help achieve a smoother surface if desired. (Our preferred paint, often used for its fantastic coverage and ability to distress, is a versatile option for many DIY projects).
The distressing technique involves lightly sanding certain areas once the paint is dry, particularly along edges and raised surfaces, to reveal the wood underneath. This creates a charming, aged appearance that enhances the rustic appeal of the display. It’s a simple step that adds a lot of visual interest.
Once your paint is dry and you’ve achieved your desired finish, your display is almost complete. It’s amazing how a simple coat of paint can transform raw materials into something beautiful and cohesive.
Step 5: Add Festive Embellishments
This final step is where you truly personalize your display and bring in the holiday spirit. We chose classic Christmas stems to adorn the top corner of our board, adding a pop of color and texture. Gather your chosen embellishments – whether it’s faux berries, pine cones, small ornaments, ribbons, or artificial greenery.
Use a hot glue gun to securely attach your chosen stems or embellishments. A small dab of hot glue is usually sufficient to hold them firmly in place. Experiment with placement – a cluster in one corner, a garland along the top, or small accents on each side can all look wonderful. This step allows you to tailor the display to your unique style, whether you prefer traditional, modern, minimalist, or whimsical holiday decor.
The Big Reveal: Your Gorgeous DIY Christmas Card Holder!
And that’s it! In just a few simple steps, you’ve created a beautiful and functional Christmas card display that will be the envy of all your holiday guests. Now, are you ready to see it all finished and styled with actual cards?
Versatility Beyond Christmas: Adapting Your Display Year-Round
While this project shines as a Christmas card display, its simple design makes it incredibly versatile for year-round use. Imagine repurposing it to hold family photos, children’s artwork, inspirational quotes, or even small notes and reminders in a home office or kitchen. A quick change of paint color or embellishments can instantly transform its theme. For spring, think pastel paints and faux floral stems; for a birthday, use bright colors and celebratory ribbons. This truly is a craft that keeps on giving, making it a sustainable and practical addition to your home decor collection.
What do you think? We are so pleased with it! And, of course, the incredibly low price makes us love it even more. There’s immense satisfaction in creating something beautiful and functional with your own hands, especially when it costs so little. This display is not just a place to put cards; it’s a canvas for memories and a testament to clever crafting.
Join the Celebration: Our 12 Days of Christmas Collaboration!
We’ve teamed up with some fabulous bloggers to bring you this exciting “12 Days of Christmas” series! Each day brings a new dose of inspiration, DIY projects, and festive ideas to make your holidays brighter. Make sure to check out their incredible work, and keep an eye out for today’s special giveaway!
About the Shanty Sisters: Your Guides to Budget-Friendly Home Transformations
We are two sisters dedicated to sharing our passion for transforming homes beautifully, all while sticking to a budget! With eight wonderful kiddos between us, we’ve learned to put every naptime to good use, turning small windows of time into opportunities for big changes. We believe that a stylish and comfortable home shouldn’t come with a hefty price tag, and we love empowering others to create their dream spaces through DIY.
From ambitious building projects like our stunning Pedestal Dining Table for just $125:
And this incredible $65 farmhouse table that became a centerpiece:
To transforming everyday items, like turning a simple Walmart mirror into a sophisticated $15 DIY mirror:
And even offering valuable resources like our latest free printable alphabet banner, perfect for any celebration or decor:
You can also stay connected with us and get daily doses of inspiration by following us on Facebook!
And keep up with all of our latest posts, project ideas, and inspirations by following us on Pinterest!
Thank You for Stopping By!
Thanks so much for stopping by today and joining us for this fun, easy, and affordable DIY project! We hope you feel inspired to create your own beautiful Christmas card display this holiday season.
We would LOVE for you to share this Christmas card display idea with your friends and family, and don’t forget to PIN it below to save it for later or inspire others!
Happy Crafting!
~Whitney