
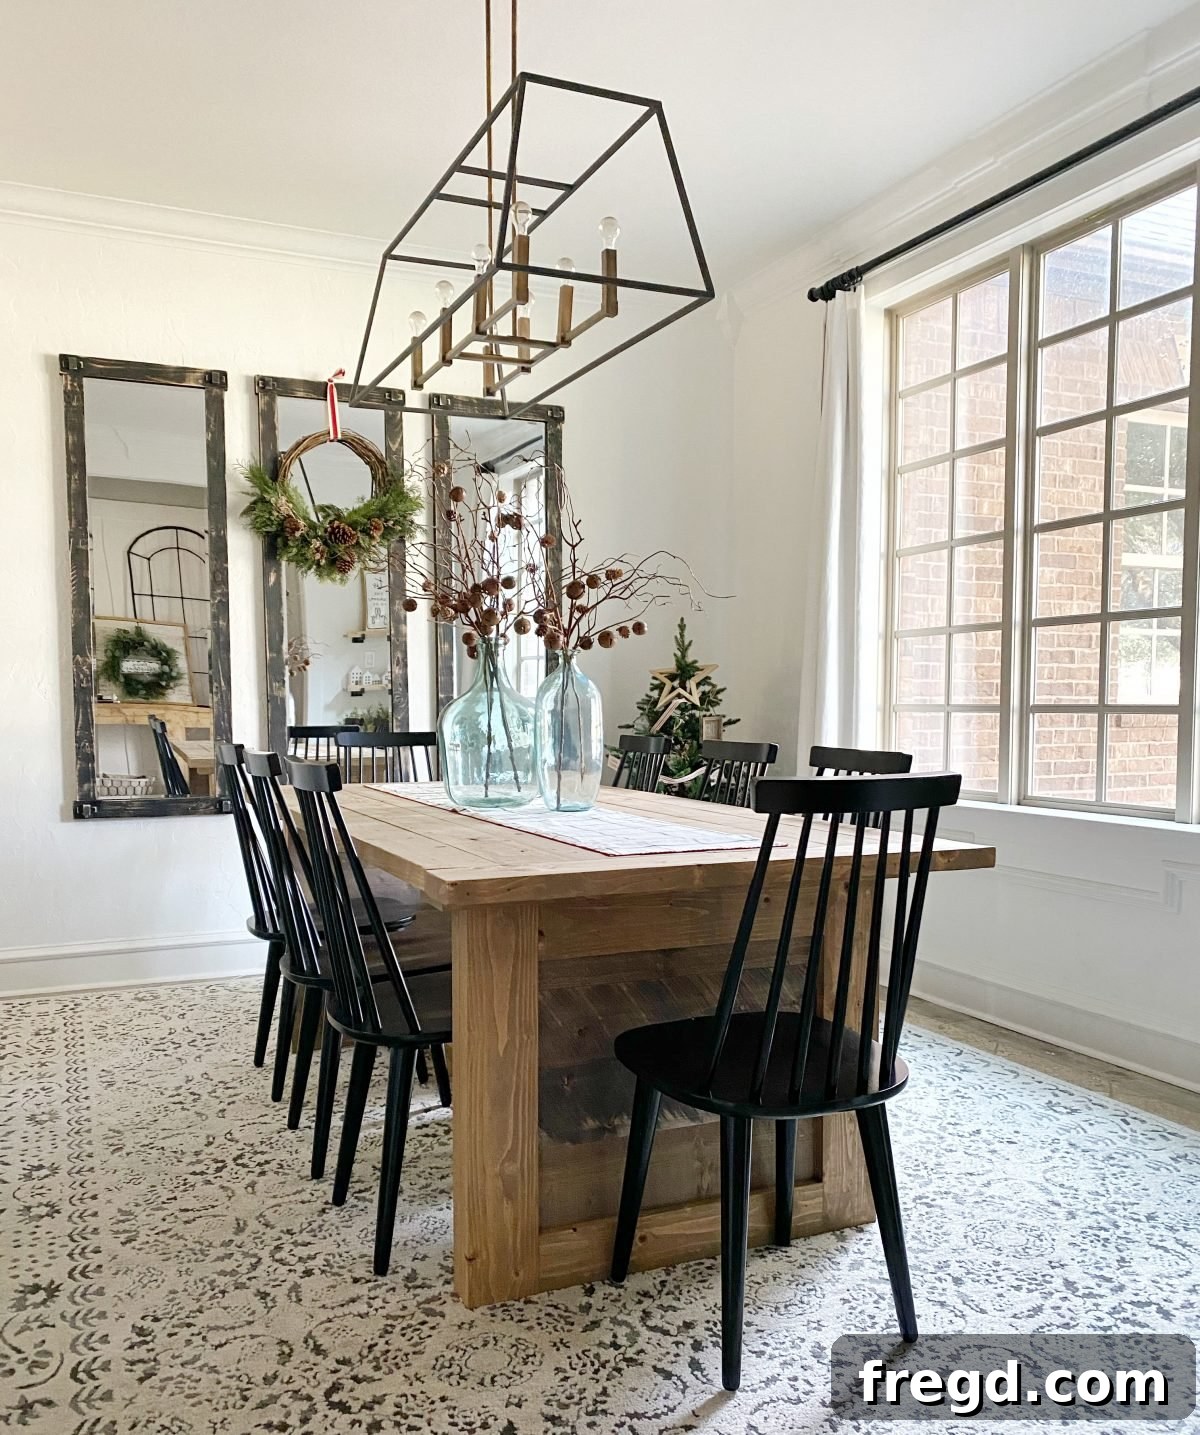
Happy building, fellow DIY enthusiasts! Today, I am absolutely thrilled to share a project that’s not just about building furniture, but about reclaiming a cherished space in my home. Like many families worldwide, my dining room underwent a significant transformation back in March, evolving into a bustling home office for my six children, five of whom were navigating virtual schooling. The old dining table, a piece I had lovingly built myself, eventually gave way to an array of desks and study stations, a testament to adapting to unprecedented times.
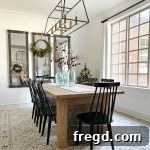
Now, as life shifts once more and my children’s schooling situations have changed, the time has come to take back my dining room. And what better way to mark this transition than with a brand new centerpiece? I envisioned and designed this stunning DIY Farmhouse Panel Dining Table, crafted almost entirely from versatile 2×6 boards, a small sheet of scrap plywood, and some truly gorgeous barn wood. The result is a table that not only serves its purpose beautifully but also brings warmth, character, and a touch of rustic elegance back into our home. Take a look at how wonderfully it turned out – it’s a project I’m incredibly proud to share!
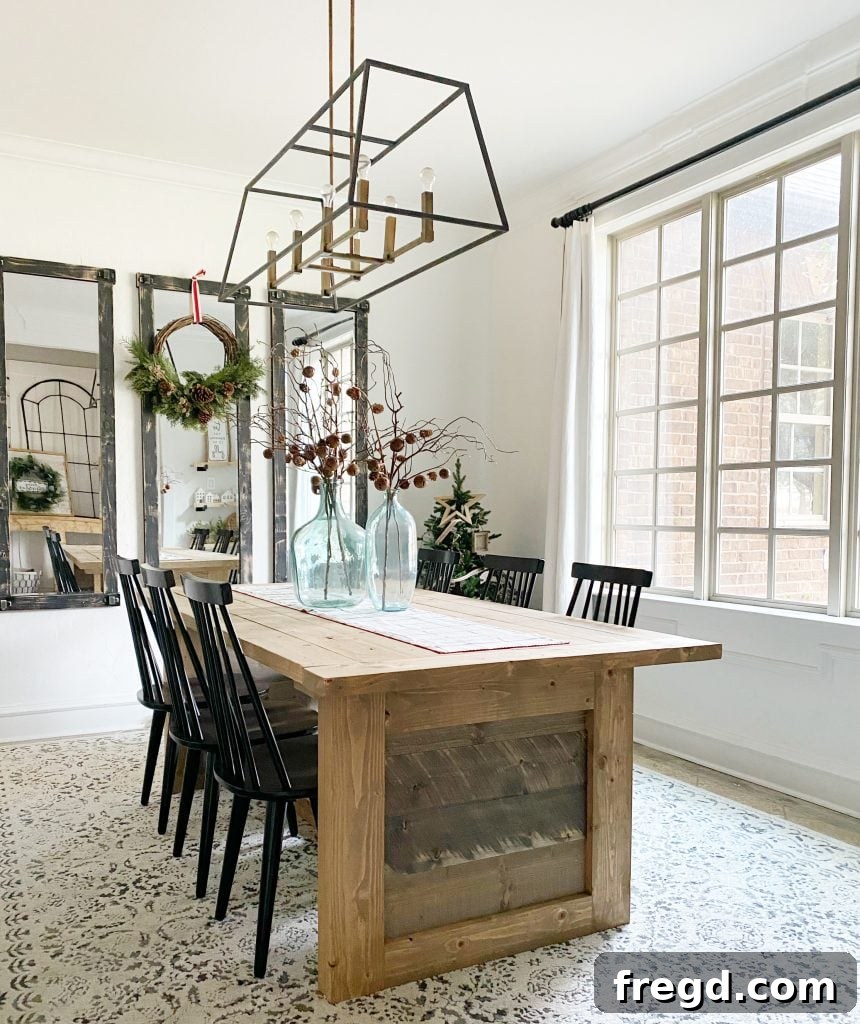
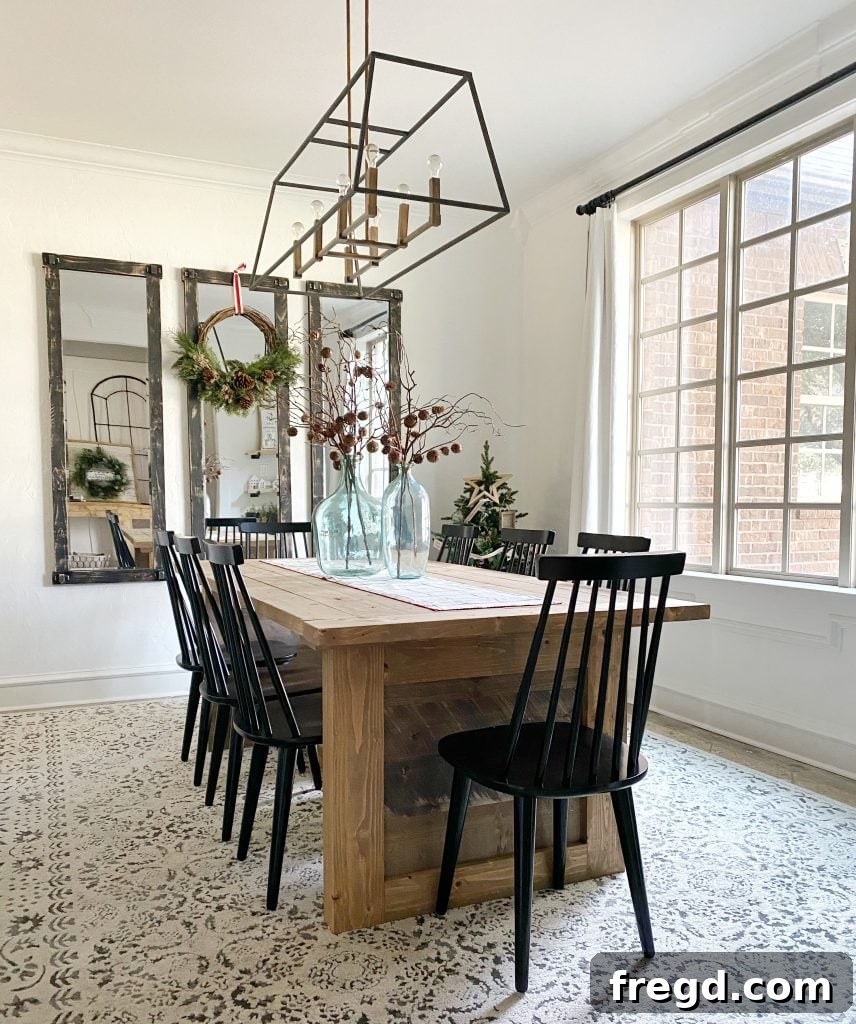
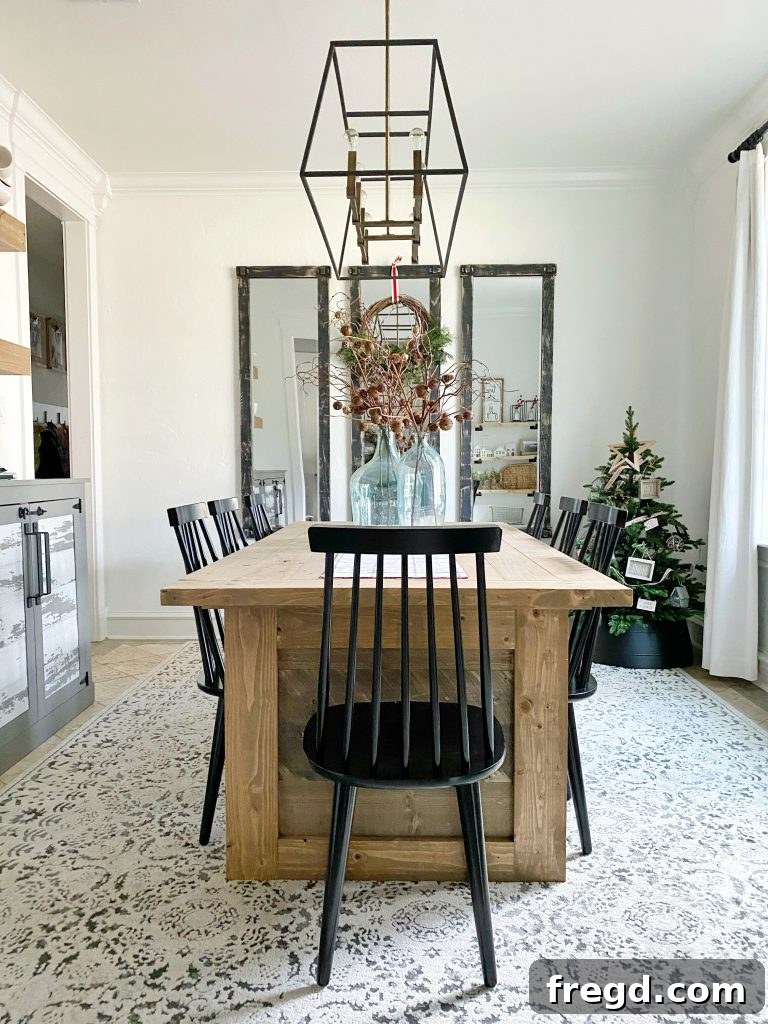
Why Build Your Own Farmhouse Dining Table?
Building your own furniture offers immense satisfaction, and a farmhouse dining table is the perfect project to experience it. Not only can you tailor the dimensions and aesthetics to perfectly fit your space and style, but you also save a significant amount compared to purchasing a custom-made or even mass-produced piece of similar quality. This DIY Farmhouse Dining Table project is designed to be approachable for intermediate builders, utilizing readily available materials like 2×6 lumber, making it a truly budget-friendly option. Imagine gathering your family around a table you built with your own hands – it’s more than just furniture; it’s a legacy.
Before we dive into the detailed instructions, I highly recommend watching the comprehensive DIY video linked below. It provides invaluable visual guidance, demonstrating each step of the building process. You can also easily download the free printable plans, complete with cut lists and measurements, at the bottom of this post to assist you every step of the way. These plans are meticulously designed to ensure your build is as smooth and successful as possible.
Essential Materials and Tools for Your Farmhouse Table Project
A successful DIY project starts with the right materials and tools. For this DIY Farmhouse Panel Dining Table, we’ve focused on cost-effective yet sturdy options that deliver a beautiful, lasting result. The primary material is standard 2×6 lumber, which is incredibly versatile and affordable. The addition of a small sheet of scrap plywood for the leg panels and some genuine barn wood for the top adds character and unique appeal.
Materials List:
- 2×6 Lumber: The backbone of your table. We’ll be ripping these down to specific widths for the legs, aprons, and tabletop planks. Always choose straight, knot-free boards if possible.
- Small Sheet of Scrap Plywood: Used for the decorative side panels of the table bases.
- Barn Wood: I sourced my barn wood from Lowe’s. It was surprisingly inexpensive, and one box was more than enough to complete the entire table with some to spare. It’s an excellent way to add authentic rustic charm. If barn wood isn’t available, reclaimed wood or even new wood treated with a distressed finish can achieve a similar look.
- Wood Glue: Essential for strong, durable joints. Don’t skimp on quality here.
- 2.5″ Pocket Hole Screws: For robust hidden joinery throughout the base and tabletop.
- 1.5″ Pocket Hole Screws: Specifically for attaching the plywood panels.
- 2″ Finish Nails: For securing some of the horizontal base components.
- 2.5″ Wood Screws: For attaching the top support board and the tabletop itself.
Recommended Tools:
- Miter Saw or Circular Saw: For making precise crosscuts. A miter saw offers greater accuracy.
- Table Saw (Highly Recommended): Crucial for ripping the 2×6 boards down to 5″ and 4″ widths. If you don’t own one, many lumber yards offer ripping services, or you can use a circular saw with a straight edge guide, though it requires more care.
- Kreg Jig: An absolute game-changer for this project. I used my AMAZING Kreg Foreman for speed and efficiency, but any Kreg jig model will work perfectly for creating strong pocket holes.
- Drill/Driver: For driving screws.
- Wood Clamps: You’ll need several, especially face clamps (like these HERE) for securing boards during gluing and screwing.
- Measuring Tape and Pencil: For accurate measurements and markings.
- Safety Glasses and Hearing Protection: Always prioritize safety when working with power tools.
- Chairs: While not part of the build, quality chairs complete the look. I found mine to be a fantastic steal HERE on Amazon!
Step-by-Step Guide to Building Your DIY Farmhouse Dining Table
Let’s get started on bringing this beautiful DIY Farmhouse Panel Dining Table to life! Remember to always double-check your measurements and cuts. Precision is key in woodworking, ensuring all your components fit together seamlessly for a professional finish. Refer to the free printable plans for exact dimensions and detailed diagrams.
1. Crafting the Sturdy Table Legs
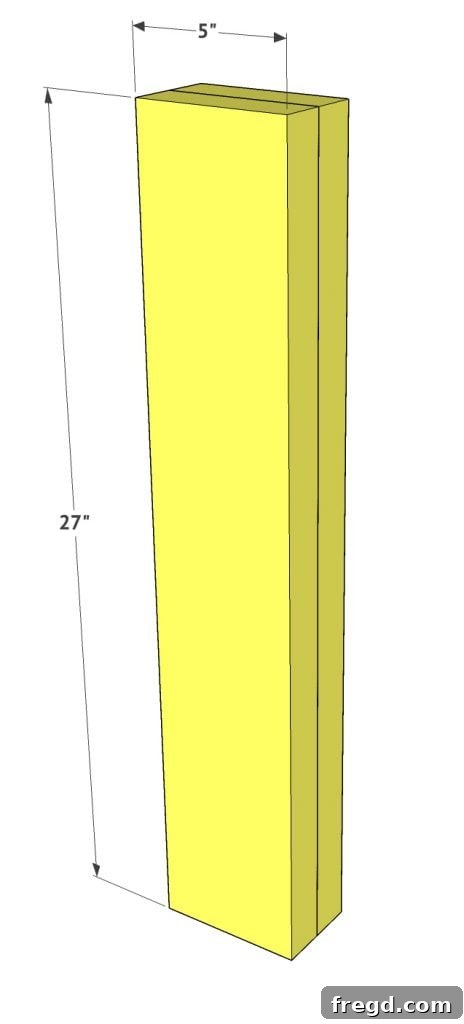
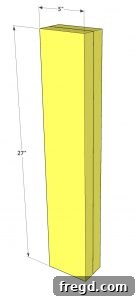
The foundation of your table’s strength and aesthetic lies in its legs. This entire table is constructed from 2×6 boards. First, make all the necessary cuts for the leg pieces according to your printable plans. Once cut to length, rip each 2×6 board down to a precise 5” width using a table saw. This step is crucial for achieving the refined, substantial look of the farmhouse legs. You will then take two of these 5” wide boards, apply a generous amount of wood glue along their mating surfaces, and firmly clamp them together to form one solid leg. Repeat this process to construct a total of four identical legs for your table. Allow ample time for the wood glue to cure completely before proceeding to the next step, ensuring maximum strength and stability.
2. Assembling the Table Bases
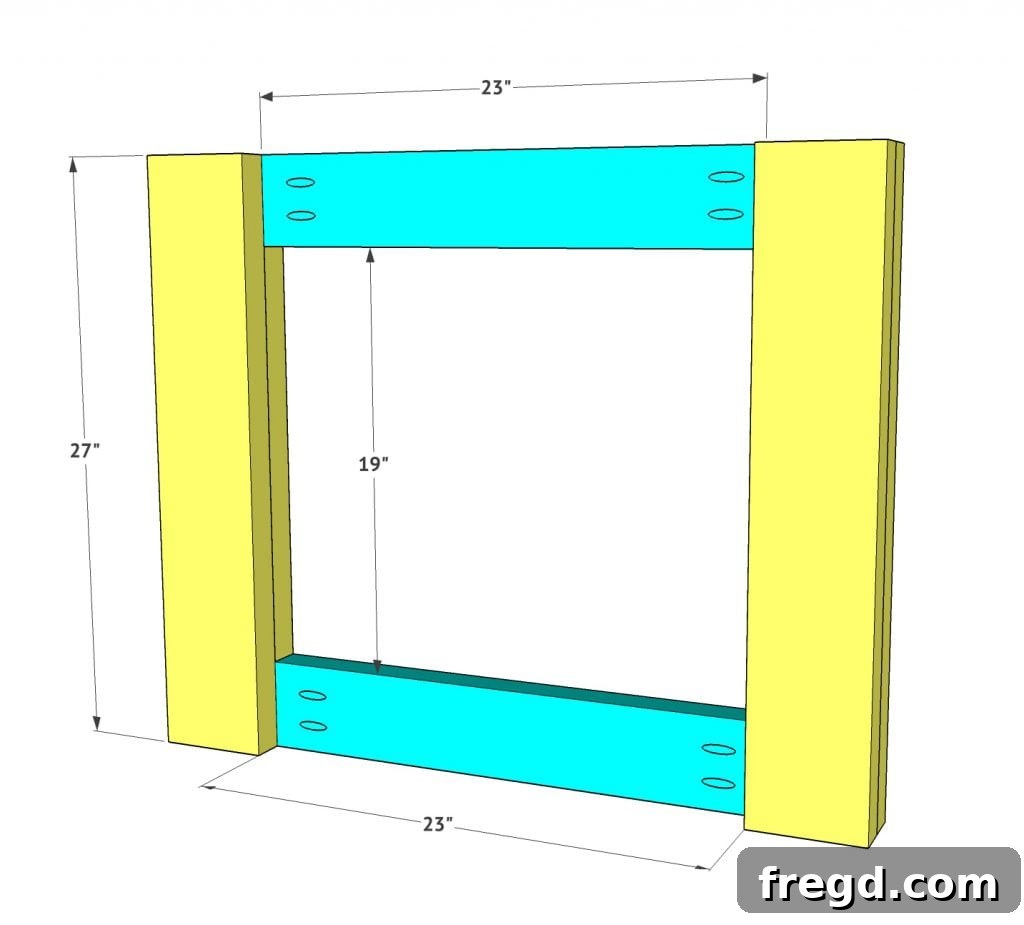
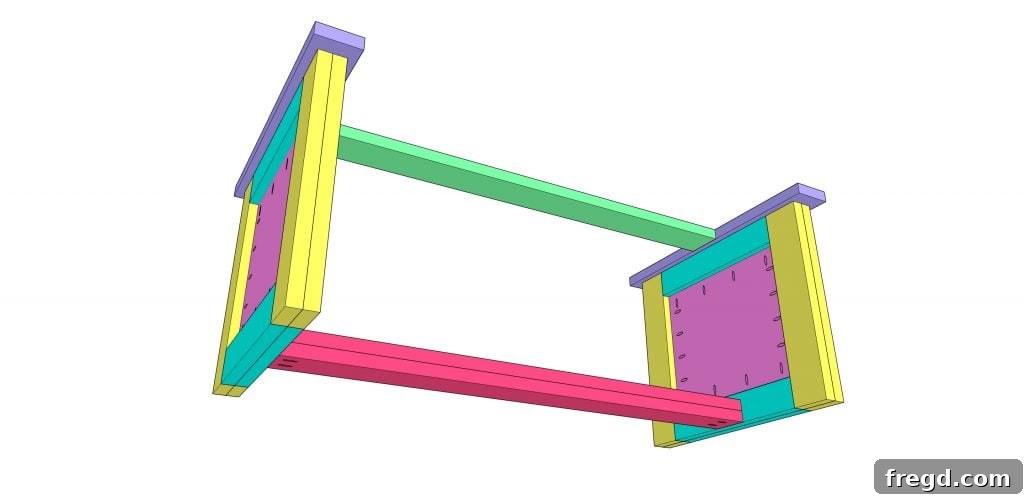
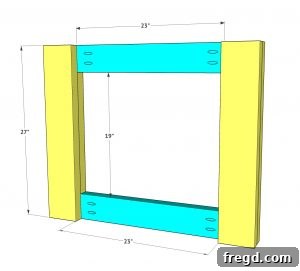
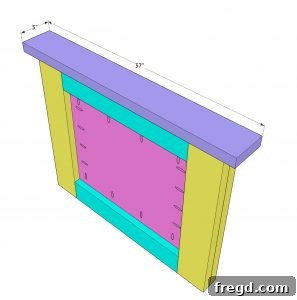
Once your four legs are fully dried and stable, it’s time to begin assembling the two foundational bases of your table. These bases provide the primary support for the tabletop and incorporate the unique panel design. For the horizontal support boards of the base, rip them down to 4” wide. Using wood glue and 2.5” pocket hole screws, attach these horizontal boards to the legs. Ensure that the pocket holes are drilled to accommodate 1.5” material thickness. Position these horizontal boards so they are perfectly flush with both the ends of the leg boards and flush with one side of the legs. This alignment is critical for the aesthetic and structural integrity of the base. Carefully repeat this precise step to construct your second identical base.
3. Securing the Top Horizontal Supports
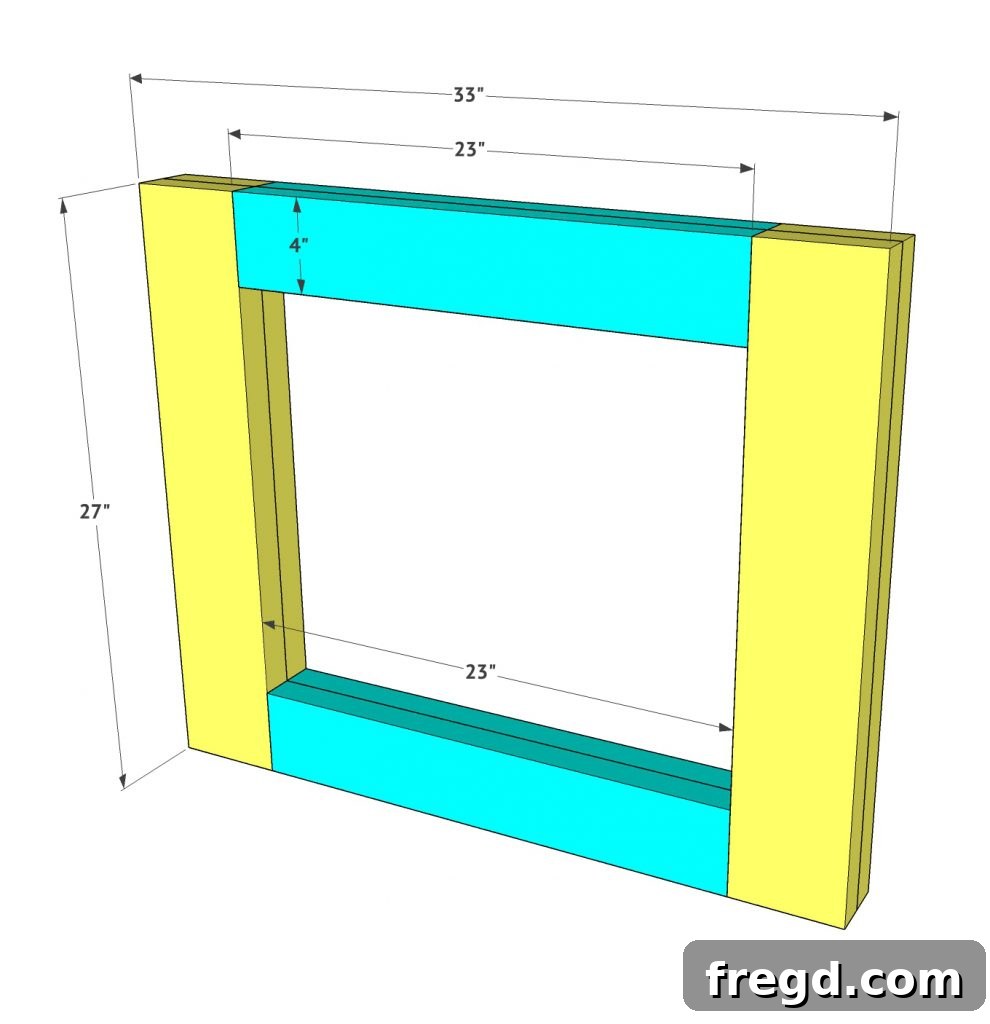
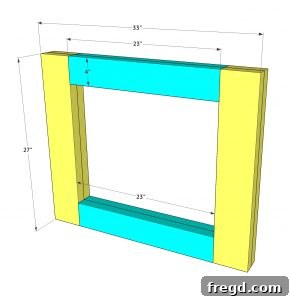
With the initial horizontal boards in place, you will now add the corresponding matching boards directly on top. These boards will cover the visible pocket holes from the previous step, creating a clean, finished appearance. Apply a generous bead of wood glue to the top surface of the horizontal boards you just attached. Then, carefully place the matching boards on top, aligning them precisely. Secure these boards using 2” finish nails, driven strategically to ensure a strong bond without splitting the wood. Repeat this process meticulously for both table bases.
4. Integrating the Plywood Panels
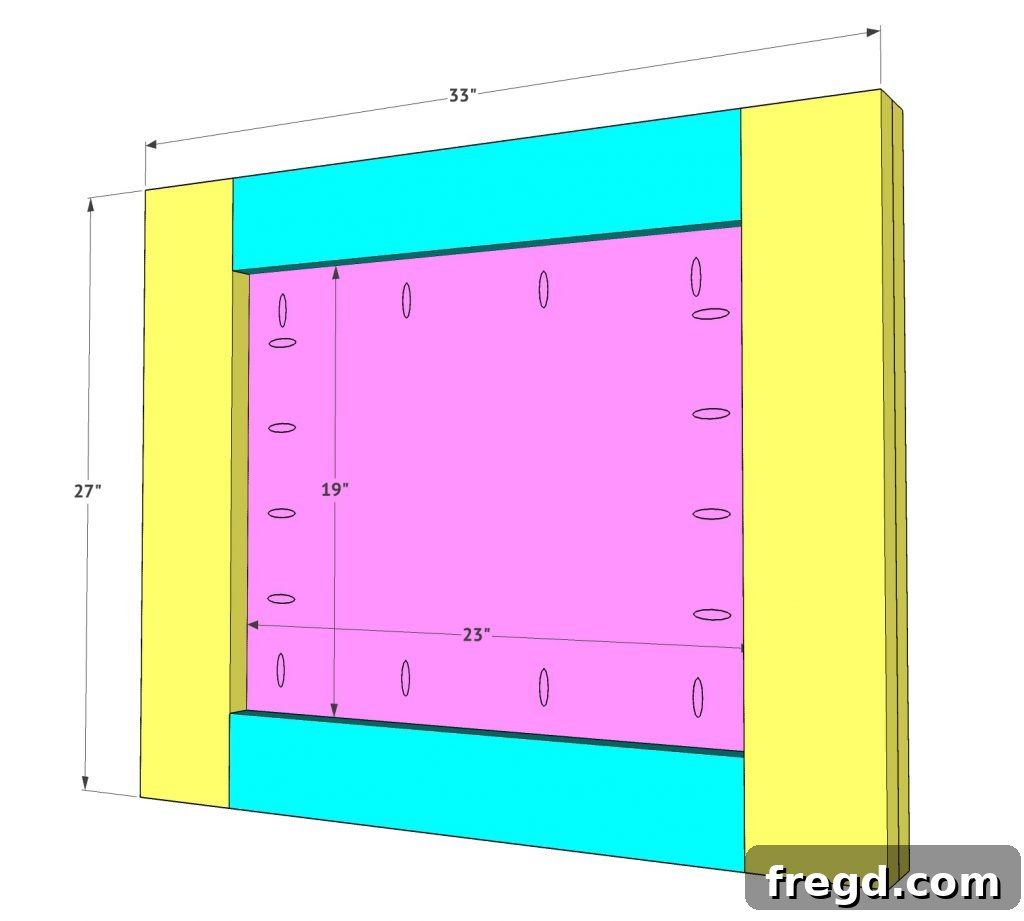
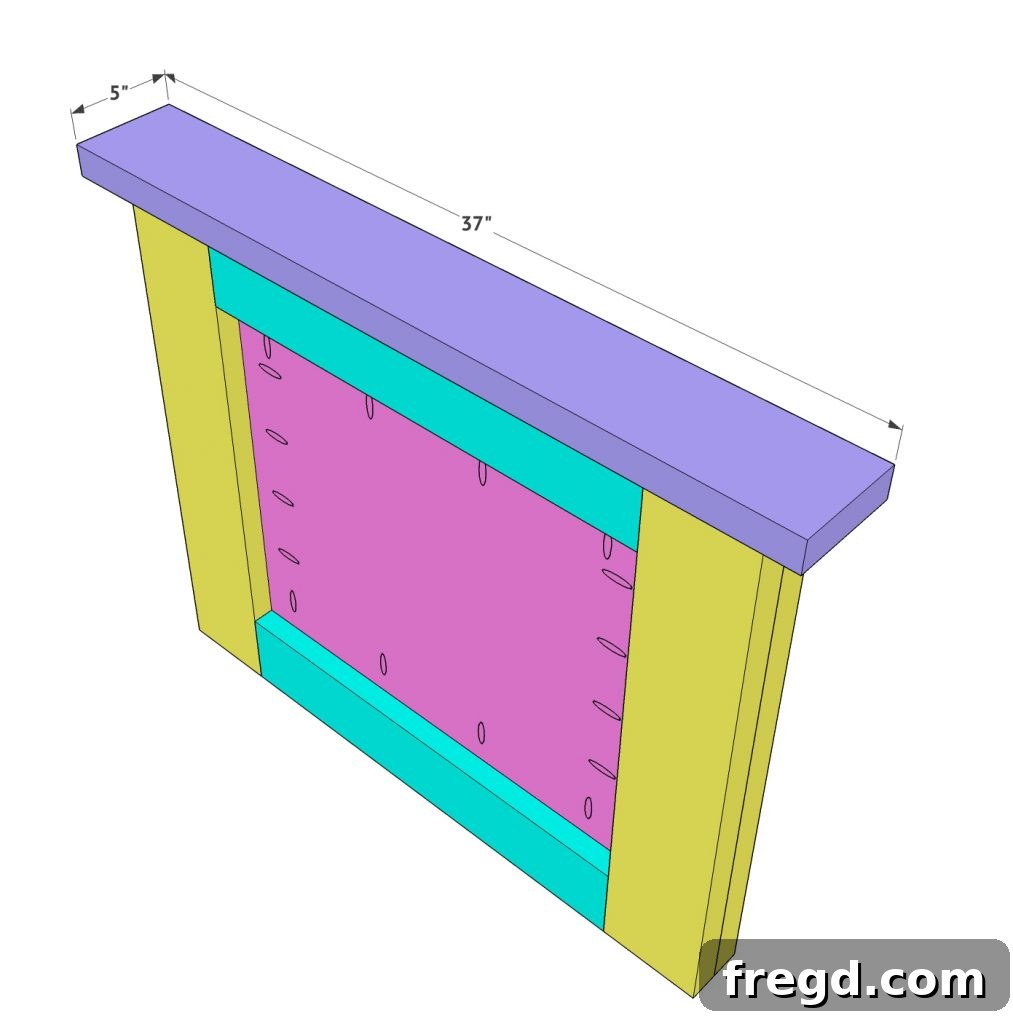
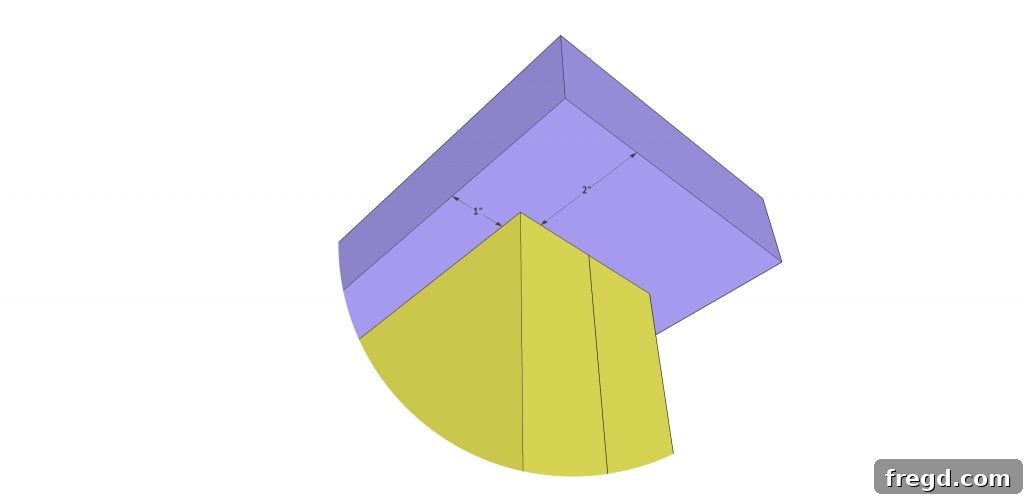
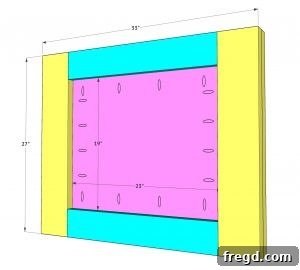
The distinctive panel design of this farmhouse dining table is achieved by incorporating plywood centers into each base. Prepare your plywood panels by drilling 3/4” pocket holes around all their edges. These will be used to attach the plywood securely to the inside of your bases. Apply wood glue to the contact surfaces of the base where the plywood will sit, then position the plywood panels. Attach them using 1.5” pocket hole screws. A crucial detail for the overall aesthetic is to ensure these panels are set back exactly 1 1/8” from the outside edges of the legs. This recess creates a pleasing visual depth and allows for future decorative paneling if desired. Pay close attention to this spacing for both bases.

5. Adding the Top 2x Board to Each Base
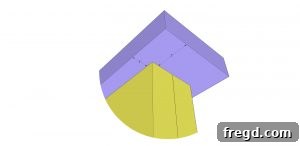
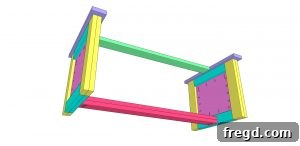
Now, enhance the structural integrity and visual continuity of each base by adding a top 2x board. These boards, like the leg components, should be ripped to 5” wide. Carefully position each 5” wide board on the very top and center of its respective base. Apply wood glue generously to the contact surfaces. Then, secure these boards using 2.5” wood screws, driving them down through the top of the board and into the underlying components of each base. This step provides a solid anchoring point for the tabletop later on and reinforces the entire base structure.
6. Connecting the Bases with the Top Runner
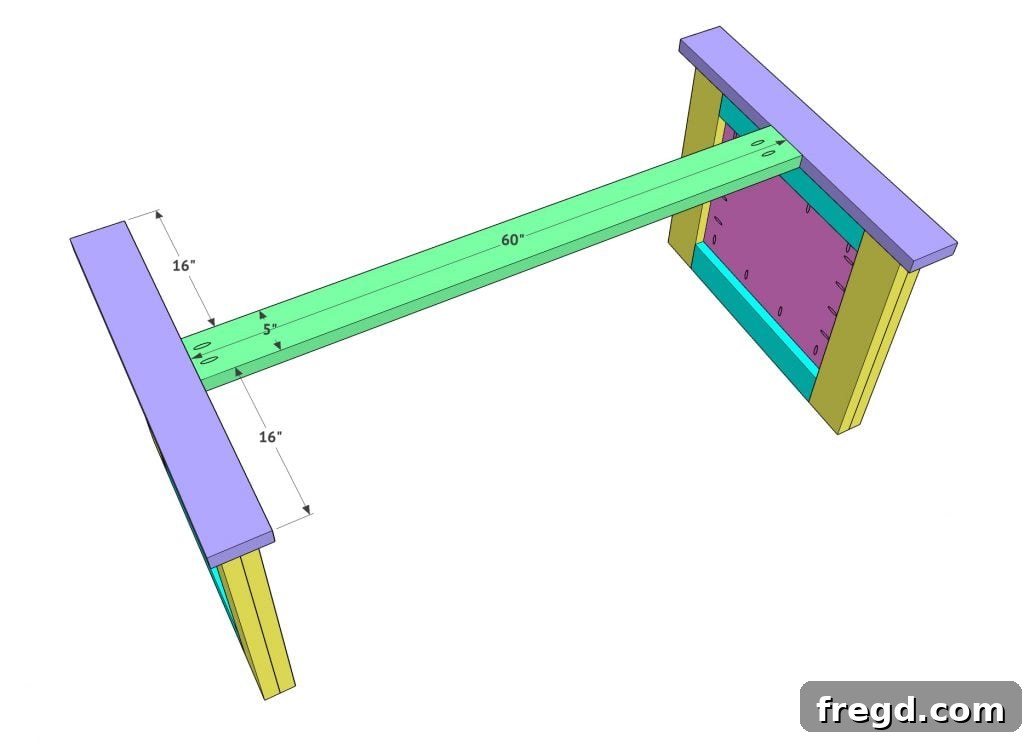
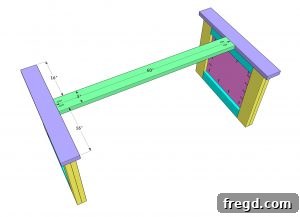
With both bases constructed, it’s time to connect them and begin forming the main structure of the table. Take the board designated as the top runner, which should also be ripped to 5” wide. This long board will span between the two bases, providing crucial stability and support for the tabletop. Apply wood glue to the ends of the runner where it will meet the top 2x boards of each base. Attach it securely to the center of each base using 2.5” pocket hole screws, driven through 1.5” pocket holes. This connection is vital for the overall rigidity of your DIY wood dining table.
7. Installing the First Bottom Runner
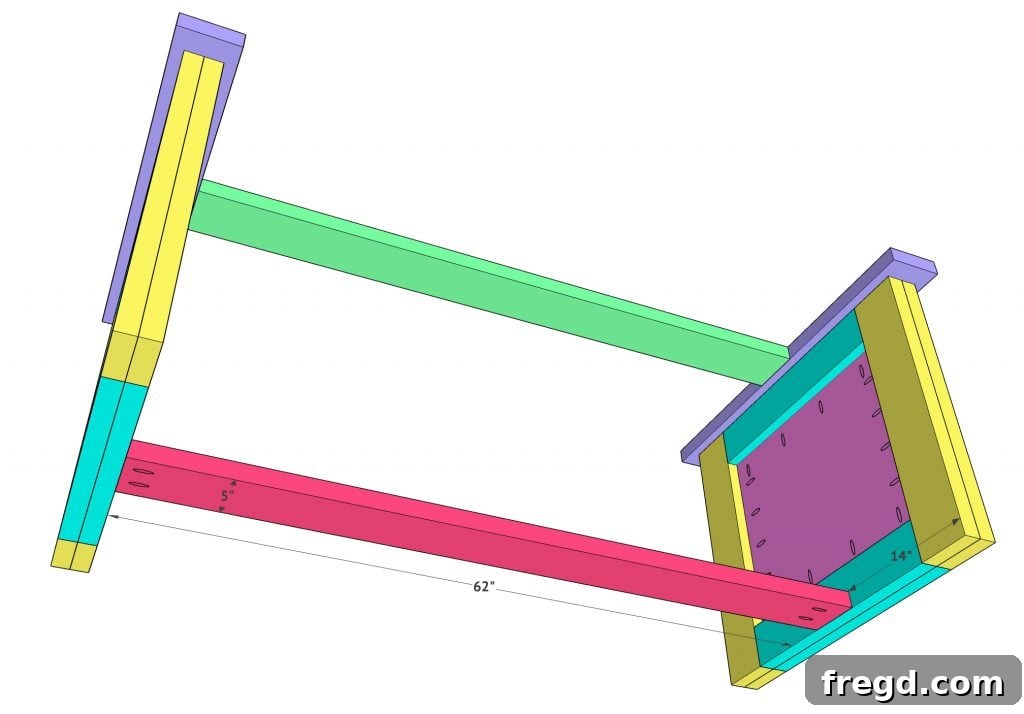
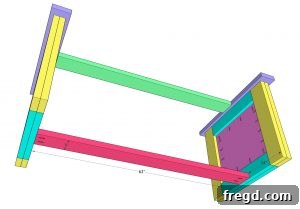
Mirroring the top runner, the first bottom runner also serves to connect and strengthen the two table bases at their lower section. This board will be attached in the exact same manner as the top runner. Carefully center it and align it perfectly flush with the bottom edges of the bases. Once positioned correctly, apply wood glue to the contact points and attach the runner to the bases using 2.5” pocket hole screws, again driven through 1.5” pocket holes. This dual-runner system creates a robust and aesthetically balanced base for your custom dining table.
8. Adding the Second Bottom Runner for Enhanced Stability
To further enhance the stability and visual weight of the table’s base, we will add a second bottom runner directly on top of the first. This second runner is identical in dimensions to the first, also ripped to 5” wide. Apply a generous amount of wood glue to the entire top surface of the already attached runner. Carefully set the second runner directly on top, ensuring it is perfectly aligned and flush on all sides. Use clamps to hold the two runners tightly together while you secure them. Drive 2.5” wood screws from the underside of the bottom runner up into the top one. This creates a thick, substantial beam that adds both strength and a beautiful, chunky aesthetic to the base of your 2×6 dining table.
9. Constructing the Impressive Tabletop
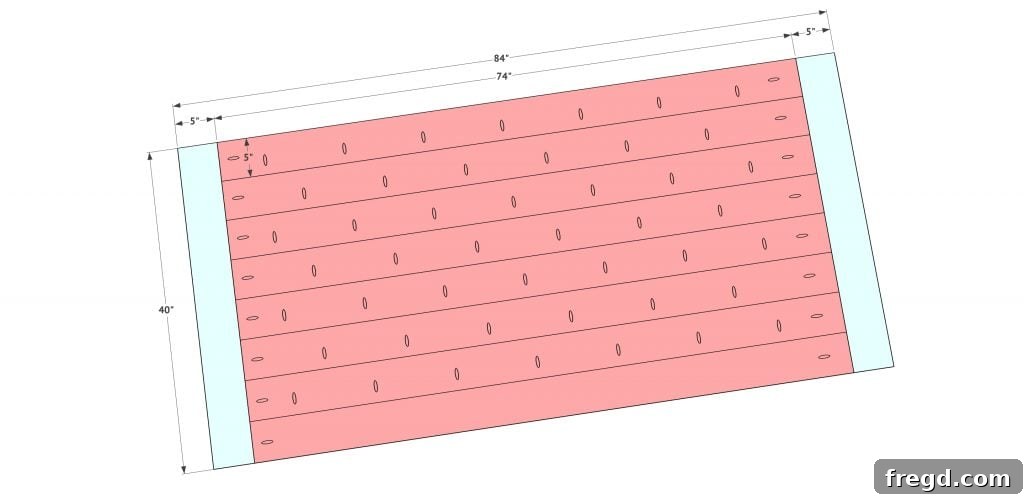
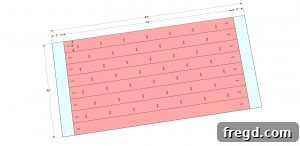
Now for the centerpiece – the tabletop! All the boards for your tabletop, whether they are new 2x6s or the beautiful barn wood planks, should be ripped to a consistent 5” wide. This uniformity creates a cohesive and professional look. Lay out your planks, arranging them to achieve your desired aesthetic, especially if using barn wood with varying character. Apply wood glue along the long edges where planks meet. Then, attach these planks to each other using 2.5” pocket hole screws, driven through 1.5” pocket holes, ensuring a strong, flat, and seamless surface. Once the main planks are joined, attach the breadboards to each end of the tabletop. Breadboards add a classic farmhouse touch and help prevent warping. Use 2.5” pocket hole screws through 1.5” pocket holes drilled at the end of each plank, connecting them to the breadboards. This method allows for wood movement while maintaining a secure attachment.
10. Final Assembly: Attaching the Tabletop to the Base
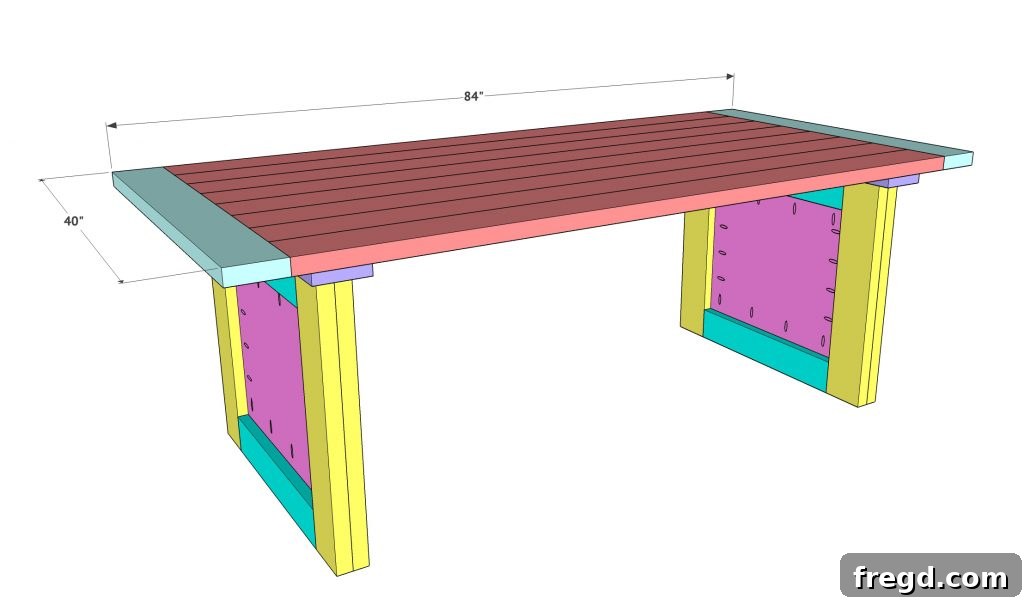
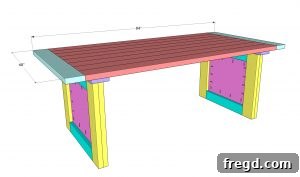
The final crucial step in building your DIY Farmhouse Panel Dining Table is securely attaching the tabletop to the completed base. A practical tip I always follow is to wait until the table has been moved into its permanent spot in the dining room before securing the top. This makes maneuvering the heavy base and large top much easier separately. Furthermore, I deliberately avoid using wood glue for this final attachment. This allows for easier disassembly if you ever need to move the table again in the future, or if you wish to refinish or replace the top. To attach the top, carefully center it on the base. Then, drive 2.5” wood screws up through the top runner and the top support boards on each base, directly into the underside of the tabletop. Ensure these screws are long enough to penetrate well into the tabletop for a secure hold without going all the way through. Distribute the screws evenly for maximum stability.

Customizing Your Farmhouse Panel Dining Table
This design offers fantastic opportunities for personalization! While I chose to use beautiful barn wood for my tabletop panels, you can truly make this table your own. Consider adding any kind of planks you desire to the plywood centers on the bases. Options include:
- Reclaimed Pallet Wood: For an even more rustic and budget-friendly look.
- Thin Veneer Panels: For a sleeker, modern farmhouse aesthetic.
- Decorative Moldings: To add architectural detail to the plywood.
- Paint or Stain: You can paint the bases a contrasting color (like classic white or black) and stain the tabletop a rich, warm tone. Or go for a monochromatic look for a more contemporary feel. Experiment with distressing techniques for an authentic aged appearance.
Be sure to watch the DIY video for ideas on how I attached my barn wood panels and other finishing touches. This is truly the perfect table to customize and make it uniquely yours. Don’t forget to share your amazing builds with us using the hashtag #shanty2chic on social media! We love seeing your creativity and how you adapt our farmhouse table plans.
Finishing Touches and Maintenance
Once your DIY Farmhouse Panel Dining Table is fully assembled, the final steps involve sanding, staining, and sealing to protect your masterpiece and enhance its beauty. Start by thoroughly sanding all surfaces, gradually moving from coarse-grit sandpaper (e.g., 80-grit) to fine-grit (e.g., 180 or 220-grit) to achieve a smooth finish. This preparation is essential for an even stain application.
For staining, choose a color that complements your home decor. Apply the stain according to the manufacturer’s instructions, wiping off excess for a consistent look. After the stain has dried completely, apply several coats of a durable topcoat, such as polyurethane or a hard wax oil. This will protect the wood from spills, scratches, and daily wear and tear, ensuring your table remains beautiful for years to come. Lightly sand between coats with a very fine-grit sandpaper (e.g., 320-grit) for an ultra-smooth finish. Always allow adequate drying time between coats and before heavy use.
For ongoing maintenance, simply wipe your table with a damp cloth and mild soap for regular cleaning. Avoid harsh chemicals that can strip the finish. With proper care, your DIY wood furniture will be a cherished family heirloom.
DIY Farmhouse Panel Dining Table – Detailed Instructions & Plans
Instructions Overview (Refer to main guide for full details):
-
Rip 2×6 boards to 5” and 4” widths. Construct 4 legs by gluing two 5″ boards together.

-
Form 2 bases by attaching 4″ wide horizontal boards to the legs using wood glue and 2.5” pocket hole screws (1.5” pocket holes). Ensure flush alignment.
-
Place matching boards on top of pocket holes, securing with wood glue and 2” finish nails for a clean look.
-
Attach plywood centers to both bases using 3/4” pocket holes and 1.5” pocket hole screws. Panels should be set back 1 1/8” from leg edges.
-
Review spacing for plywood panels.
-
Add the top 5” wide 2x board to each base using wood glue and 2.5” wood screws through the top and into the base.
-
Review spacing for top 2x board.
-
Attach the 5” wide top runner to the center of both bases using wood glue and 2.5” pocket hole screws (1.5” pocket holes).
-
Attach the first bottom runner, centered and flush with the bottom of the bases, using wood glue and 2.5” pocket hole screws (1.5” pocket holes).
-
Add the second 5” wide bottom runner on top of the first with wood glue, clamp, and secure with 2.5” wood screws from the bottom.
-
Build the tabletop using 5” wide planks. Attach planks with 2.5” pocket hole screws (1.5” pocket holes), then attach breadboards similarly.
-
Attach the tabletop to the base using 2.5” wood screws through the runner and top support boards into the underside of the table. Avoid wood glue for future mobility.
-
Review spacing for tabletop attachment.


Happy Building! We hope you thoroughly enjoy the process of creating this beautiful and functional piece of DIY wood furniture for your home. Remember, the effort you put in will be rewarded with a unique and personal dining table that will be the focal point of countless family meals and memories.
Don’t forget to explore our extensive collection of other DIY builds! We offer over 25 DIY dining table plans, designed to fit a wide range of budgets, styles, and skill levels. Whether you’re a seasoned woodworker or just starting your DIY journey, you’ll find inspiration for your next project.