
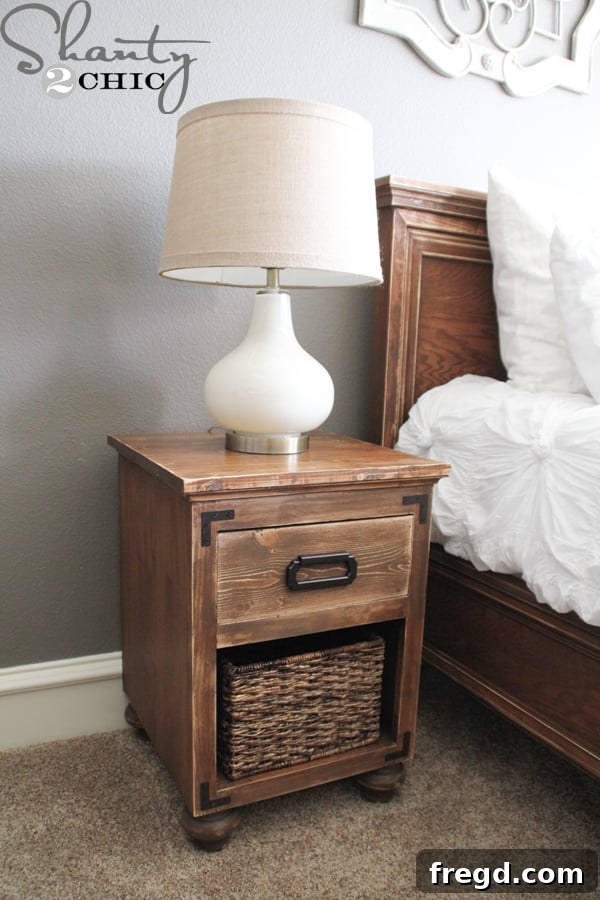
After what felt like an eternity, our bedroom finally feels truly complete! For nearly 18 months, my bedside essentials have been without a proper home, making the arrival of these custom-built nightstands an absolute game-changer. It’s more than just furniture; it’s a transformation that brings both essential functionality and personalized style back into our most intimate space. The immediate impact on the room’s aesthetic and practical use is nothing short of life-changing, and I’m beyond excited to share this journey with you.
Crafting the Perfect Bedside Companion: Our Custom Nightstand Design
My vision for these nightstands was clear and deliberate: they had to perfectly complement the queen bed that I meticulously crafted for our bedroom, ensuring a cohesive and harmonious aesthetic throughout the sleeping area. Beyond mere style, practicality was paramount. I specifically designed them to feature at least one spacious, easy-glide drawer, ideal for neatly stashing away books, reading glasses, hand lotions, or other bedside necessities, thereby keeping the surface clutter-free and serene. Armed with these specific design goals, I eagerly immersed myself in the workshop, and the result is this beautifully simple, yet highly functional, nightstand. Its inherent simplicity also makes it incredibly easy to modify, allowing for personalized adaptations to suit various preferences and needs.
Your DIY Journey Starts Here: Free Nightstand Plans and Step-by-Step Tutorial
To empower fellow DIY enthusiasts and help you replicate this charming piece, we are thrilled to offer comprehensive, FREE printable plans for this stylish nightstand project. These detailed plans are accompanied by a step-by-step tutorial, meticulously guiding you through every phase of the build, from initial cuts to the final decorative touches. Whether you’re a seasoned woodworker eager for a new project or a passionate beginner looking to dive into furniture making, these resources are designed to make your journey enjoyable and successful. You can easily access and print your set of plans by clicking on the image below or by clicking HERE. Please note that each set of plans is formatted for building one nightstand, allowing you the flexibility to create a matching pair or a single piece as needed for your space.
A heartfelt thank you goes out to our incredibly talented friend, Jay from Jay’s Custom Creations, for his invaluable contribution in meticulously creating the professional, printable version of these plans. We highly recommend exploring his website, where you’ll discover an extensive collection of equally impressive and innovative furniture plans, perfect for your next woodworking adventure!
Essential Tools and Materials for Your DIY Nightstand Project
Before we dive into the construction, let’s ensure you have all the necessary tools and materials on hand for a smooth and efficient build. This project is designed to be accessible, but having the right equipment will make a significant difference in both the ease of assembly and the quality of your finished nightstand.
Key Tools You’ll Need:
- Kreg K5 Pocket-Hole Jig: Essential for creating strong, hidden joints without visible fasteners. This jig simplifies assembly and results in a clean, professional look.
- Miter Saw: For precise and accurate crosscuts and angle cuts, especially crucial for molding.
- Brad Nailer: Ideal for attaching trim, molding, and other delicate pieces quickly and securely with minimal visible fasteners.
- Stapler (or Finish Nailer): Perfect for attaching drawer bottoms and back panels, offering a strong hold.
- Drill/Driver: For pre-drilling holes and driving screws.
- Level: Absolutely critical for ensuring drawer slides are perfectly straight and the overall structure is plumb.
- Measuring Tape and Pencil: For accurate measurements and markings.
- Safety Glasses: Always wear appropriate personal protective equipment when working with power tools.
Main Materials Required:
- Purebond Plywood: We used Purebond plywood for its quality and sustainable properties. You’ll need it ripped to size for the main nightstand components.
- 1x Boards: For internal supports, drawer runners, and the nightstand top.
- Drawer Slides: Ensure smooth and quiet operation of your drawer. Choose a suitable length and weight capacity.
- Bun Feet: Four decorative bun feet will elevate the nightstand and add a touch of classic elegance.
- Wood Glue: For reinforcing all joints, ensuring maximum strength and durability.
- 1 1/4″ Pocket Hole Screws: Specifically designed for pocket hole joinery.
- Brad Nails: Various lengths for general assembly and molding attachment.
- Wood Filler: To conceal nail holes and minor imperfections before finishing.
- Varathane Early American Stain: For a beautiful, rich wood finish.
- Varathane Triple Thick Polyurethane: To protect the wood and provide a durable, long-lasting topcoat.
- Decorative Hardware: A drawer pull or knob of your choice to complete the look.
Now that our workspace is prepared and our materials are gathered, let’s roll up our sleeves and begin building this gorgeous nightstand!
Step-by-Step DIY Nightstand Construction Guide
Step 1: Making Initial Cuts and Drilling Pocket Holes
The foundation of any solid woodworking project lies in accurate cuts and strong joinery. I began by making all my necessary cuts from the Purebond plywood. To make the process smoother, I had the larger sheets of plywood expertly ripped down to manageable widths at Home Depot, then brought them home to make the precise crosscuts for each component. For this project, the primary pieces visible in the image are the two side panels and the bottom board of the nightstand. Utilizing my Kreg K5 pocket-hole jig, I meticulously drilled pocket holes into the bottom board. These strategically placed holes are crucial for creating strong, hidden joints that will later connect the side panels securely, ensuring a clean and professional finish.
Step 2: Assembling the Main Nightstand Frame
With all the initial cuts and pocket holes ready, the nightstand frame begins to take shape. I carefully attached the side panels to the bottom piece. Using 1 1/4-inch pocket hole screws, I secured these components, ensuring a tight and sturdy connection. The significant advantage of using pocket holes in this location is that they will be discreetly hidden underneath the nightstand, maintaining a clean and seamless aesthetic from the exterior. Apply a small amount of wood glue to the joints before fastening for added strength.
Step 3: Installing Top Supports
Next, I moved on to installing the top supports. These pieces are vital as they provide the structural integrity needed to support the drawer mechanism and will eventually anchor the nightstand’s top panel. Secure them firmly with wood glue and screws or brad nails, ensuring they are perfectly flush with the top edge of the side panels.
Step 4: Attaching Drawer Slides with Precision
A perfectly functioning drawer is paramount for any nightstand. This step involves carefully attaching the drawer slides to the inner sides of the nightstand frame. I cannot overstate the importance of precision here: I used a reliable level to meticulously check and adjust the slides, ensuring they were perfectly straight and level. This crucial step prevents any future sticking, misalignment, or uneven operation of the drawer, guaranteeing smooth, effortless functionality for years to come.
Step 5: Adding Back Supports and Drawer Spacers
After the drawer slides were securely in place and leveled, I proceeded to attach the back supports. These pieces add rigidity to the overall structure and provide a solid surface for attaching the optional back panel later. Following this, I attached the drawer spacers. These small but important blocks help define the exact opening for the drawer, ensuring a snug fit and smooth operation. I secured these spacers using both wood glue for a strong bond and my trusty brad nailer for quick and firm placement.
At this stage, the main nightstand carcass is essentially complete and ready for the drawers. While you could attach the back panel now, I personally prefer to wait until the very end of the project. This approach provides easier access for any minor adjustments or fixes that might be needed during the final stages of the build, making any potential troubleshooting much simpler.
Step 6: Building and Fitting the Drawer
Building the drawer requires careful and precise measurement to ensure a perfect fit within the nightstand frame. While the plans provide general dimensions, it’s always best to take real-world measurements for the drawer components. There can often be slight variations in the main frame, and accounting for these guarantees a smooth-sliding drawer. My preferred method is to temporarily place the side pieces of the drawer frame inside the assembled nightstand. This allows me to take an exact measurement for the front and back pieces, guaranteeing a perfect, snug fit without any guesswork.
Once the precise measurements are confirmed, I build the drawer frame using 3/4-inch pocket holes and 1 1/4-inch pocket hole screws. This joinery method creates a very strong and durable drawer box, capable of holding its contents securely for years. Always apply wood glue to all mating surfaces before driving the screws for maximum strength.
Before proceeding, I always perform a test fit of the drawer frame within the nightstand to ensure it slides in and out smoothly and without any binding. This critical check allows for any last-minute adjustments if needed. Once satisfied with the fit, I attach the bottom of the drawer. For this, I utilized my Ryobi Stapler, as staples provide an incredibly secure attachment and are less likely to pull away from the piece over time compared to other fasteners. If you don’t have a stapler, finish nails can also be used effectively, just ensure you apply wood glue first for a solid bond.
Step 7: Attaching Decorative Bun Feet
To add the elegant bun feet and elevate the nightstand, I first flipped the entire assembly upside down. I then attached small foot support pads to each corner of the bottom panel using a combination of wood glue and brad nails. These pads provide a solid, level surface for the bun feet to attach to. Next, I pre-drilled pilot holes for the bun feet screws. It’s essential to use a drill bit that matches the diameter of the bun feet screws to ensure a secure, tight fit without splitting the wood.
Finally, I applied a generous amount of wood glue to the foot pads and then carefully screwed in the bun feet, tightening them securely until they were flush and stable. These specific bun feet were purchased from Home Depot, and you can find similar ones here.
Step 8: Constructing and Attaching the Nightstand Top
The nightstand top is an important visual element that also offers functional surface area. I first assembled the top panel itself, ensuring it was perfectly flat and square. Once assembled, I carefully positioned it onto the nightstand frame. Precision in placement is key here; I ensured a consistent 3/4-inch overhang on the front and both sides of the nightstand. To achieve this uniform overhang, a simple trick is to use a scrap 1x piece of wood as a guide, lining it up against the edge of the nightstand frame and then flush with the top panel. This guarantees perfect alignment. Once properly positioned, I secured the top with 1 1/4-inch brad nails, adding wood glue underneath for a permanent and strong bond.
Step 9: Adding Decorative Cove Molding
Now for a detail that truly elevates the nightstand’s appearance: adding cove molding! While it might seem intricate, I find a simple and effective method to achieve perfectly mitered corners. I begin by setting my miter saw to a 45-degree angle (this is the top adjustment on most saws) and cutting one end of the molding piece. This creates the first part of the corner joint. Next, I line the mitered edge of this piece exactly where it should meet the nightstand corner. With the molding temporarily held in place, I then mark the opposite end for its cut. This technique ensures a precise, custom fit for each section of molding around the top of the nightstand. For the side pieces, you’ll repeat the same process, marking for the straight cut at the end to meet the corner of the front piece.
I attach each piece of molding securely using both wood glue for a strong, permanent bond and brad nails to hold it firmly in place while the glue dries. This combination creates a seamless, elegant transition around the top edge.
Step 10: Attaching the Drawer Face and Final Preparations
Finally, I added the drawer face. This step can be done at any point after the drawer box is built, but I personally prefer to wait until the entire nightstand is assembled and all structural elements are exactly as I like them. This allows for any last-minute adjustments to ensure the drawer face sits perfectly flush and square. Before moving on to staining, I meticulously filled all visible nail holes and any minor imperfections with wood filler. Once the filler was dry, I sanded the entire piece thoroughly, ensuring a silky-smooth surface that is perfectly prepared for the finishing treatments. This crucial preparation is key to achieving an even stain application and a professional-looking finish.
The Finishing Touches: Staining and Sealing for Lasting Beauty
With the construction complete and the surface perfectly prepped, it was time to bring out the natural beauty of the wood. I applied one even coat of Varathane Early American Stain, a shade that beautifully complements our bedroom decor and highlights the wood grain. To protect the nightstand and give it a lasting, durable finish, I then sealed it with Varathane Triple Thick Polyurethane. This product is a personal favorite for its exceptional protection against wear and tear, as well as its beautiful sheen, which truly brings out the depth of the stain. After allowing the polyurethane to cure properly, the nightstands were ready for their final adornments!
That was it for the woodworking! I carefully brought the newly finished nightstands into the bedroom and added the perfect finishing touch: cute campaign-style hardware from Home Depot. You can explore the specific hardware I chose HERE.
The Ultimate Bedroom Transformation: Cost-Effective Custom Furniture
I’m incredibly happy with the way our bedroom is finally coming together! It’s such a wonderful feeling to finally have a cohesive and functional set, with our custom-built bed perfectly complemented by these elegant nightstands. The transformation of the space is truly remarkable. Reflecting on the entire project, the sense of accomplishment is immense, especially when considering the significant savings achieved. Each custom-built nightstand cost approximately $140, a remarkable saving when compared to similar retail pieces that often exceed $700 in stores. The decorative bun feet, while adding a charming touch, accounted for about $10 each, offering an area where budget-conscious builders could explore more economical alternatives if desired.
What truly stands out is the overall value: our entire custom bedroom suite, encompassing a queen headboard, footboard, side rails, and these two stunning, handcrafted nightstands, amounted to a total investment of just $680. This is an astounding figure when you consider the quality and bespoke nature of the furniture. This DIY endeavor is not just about saving money; it’s about crafting a personalized, high-quality bedroom sanctuary tailored precisely to our tastes and needs. It’s a definite WIN in every sense of the word, proving that with a little effort and the right plans, you can create beautiful, functional furniture without breaking the bank.
Curious About Other Items in Our Newly Transformed Room?
For those interested in the complete look of our bedroom, here are details on some of the other elements:
- DIY Queen Bed: Find the full tutorial and plans for the matching bed HERE.
- Bedding: The comfortable and stylish Laurel Comforter Set in White, sourced from Birch Lane – available HERE.
- Couch: A cozy and inviting piece from World Market.
- Curtains: Elegant and timeless curtains from Pottery Barn.
- Wall Hangings: Decorative accents that add personality, found at Hobby Lobby.
Thank you so much for stopping by and joining us on this exciting DIY journey. We hope this detailed tutorial inspires you to tackle your next woodworking project and create something truly special for your home!
~Ashley