
***
Build Your Own HGTV Open Concept Dining Table: Free Plans & DIY Guide!
***
What an incredible journey it’s been! We had an absolute blast at our family watch party for the premiere of our pilot, Open Concept, on HGTV. The outpouring of support from all of you has been truly heartwarming and deeply encouraging. We are so grateful for your continuous enthusiasm and for making this experience so much fun!
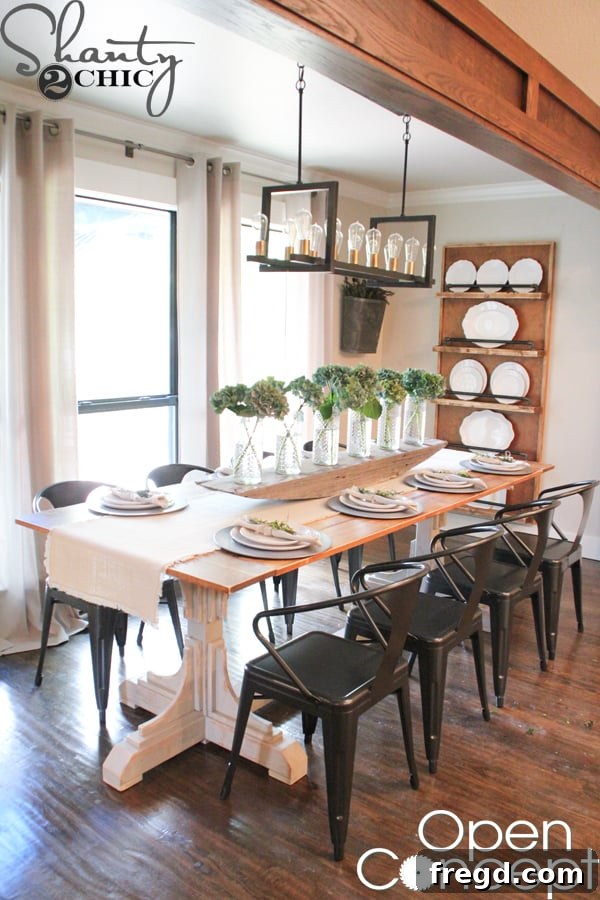
As promised, we are thrilled to share the FREE plans for that show-stopping HGTV Open Concept Dining Table! This table isn’t just a piece of furniture; it’s a statement, a centerpiece that brings warmth and character to any dining space. We absolutely fell in love with it during the build, and we’re sure you will too.
Get Your Free Dining Table Plans Here!
This remarkable piece features a deceptively simple design, elevated by intricate leg detailing that gives it a truly unique and appealing aesthetic. We’re here to guide you through every step of the building process. To get started, you can download and print the comprehensive free plans right HERE or by clicking the button below. These plans include detailed measurements and diagrams to ensure your build is as smooth as possible.
Building this table was an incredibly rewarding experience. Its design, while straightforward in essence, includes custom leg details that add a sophisticated touch. Before diving into the build, we recommend carefully reviewing the entire plan and gathering all your materials and tools.
Materials and Lumber Selection for Your DIY Dining Table
The first step in any successful woodworking project is acquiring the right materials. For this HGTV dining table, we primarily used pine or whitewood. We often get asked about our preferred wood type for most of our projects. Our go-to choices are typically pine, common board, and whitewood. These woods are not only cost-effective and readily available at most home improvement stores like Home Depot but also finish beautifully, offering a timeless aesthetic that works wonderfully for farmhouse or rustic designs.
When selecting your lumber, take the time to inspect each piece. Look for boards that are straight, free from significant knots, warps, or cracks. Good quality lumber will make your building process much smoother and result in a more durable and attractive finished product. Don’t hesitate to sift through the stacks to find the best pieces; it’s a small investment of time that pays off significantly.
Step-by-Step Guide: Building Your HGTV Dining Table
1. Constructing the Table Legs
Each leg of this dining table is crafted from 4×4 lumber. We sourced ours from Home Depot, ensuring we purchased untreated 4x4s, which are generally priced around $13 each in our area. Before making any precise cuts, always trim a very small piece off the end of each board. This practice ensures you’re starting with a perfectly square edge, which is crucial for accurate measurements and cuts throughout the project.
Begin by cutting the long 4×4 pieces and the leg components according to your plans. The distinctive tapered look of the legs is achieved by trimming the edge of each leg piece at a 45-degree angle using a miter saw. This detail adds elegance and visual interest to the table’s base.
The diagram below illustrates precisely where to make these angled cuts on your leg pieces to achieve the desired taper.
2. Assembling Legs with Kreg HD Jigs
To securely attach all the 4×4 pieces, we relied on our Kreg HD Jigs to create strong pocket holes. When working with robust 4×4 material, it’s essential to use the Heavy-Duty (HD) Kreg Jig, as it’s designed for thicker stock, unlike the regular Kreg Jig. If you’re new to the world of Kreg Jigs, don’t worry! It’s an indispensable tool for creating incredibly strong, concealed joints, making woodworking projects significantly easier and more professional. We highly recommend investing in one; you’ll wonder how you ever built without it! You can watch a quick video explanation HERE.
3. Crafting the Lower Stretcher (Customizing for Transport)
Our original plans called for a single long stretcher piece at the bottom. However, we quickly realized that a single, lengthy piece would pose a significant challenge when it came to moving the finished table into its new home. To mitigate this, we opted for a practical modification: breaking the stretcher into three distinct pieces. We attached two shorter pieces to the outside of the legs, creating a sturdy frame, and then added a shorter runner in the middle to bridge the gap. Both methods are perfectly valid, so choose the approach that best suits your space and ease of transport. This flexibility allows you to tailor the build to your specific needs.
The image below clearly demonstrates how we attached the leg components using Kreg HD screws through the precisely drilled pocket holes, ensuring a secure and durable assembly.
4. Adding Protective Foot Pads
Next, we integrated small foot pads to the bottom of the table legs. These are modest square pieces of wood, carefully cut to slightly lift the table off the floor. This seemingly minor addition serves two crucial purposes: it protects your flooring from scratches and scuffs and also safeguards the table legs from potential moisture or damage on the floor. To attach these, simply use wood glue for a strong bond and reinforce with 1.25-inch brad nails. Our cordless Ryobi brad nailer made this step quick and effortless, saving time and ensuring a clean finish.
5. Constructing the Upper Leg Support Frame
The upper section of the legs, which will eventually support the tabletop, is constructed using a similar technique. For these connections, we created 1.5-inch pocket holes and utilized 2.5-inch pocket hole screws for maximum strength. For this part of the build, we typically use our K5 Kreg Jigs, which are incredibly versatile for a wide range of stock thicknesses. The K5’s clamping mechanism and storage features make it a favorite in our workshop.
Again, remember our decision to modify the long runner on the plans. We applied the same principle here, breaking it into segments to make the table easier to maneuver. We securely attached the vertical support boards to the feet using HD pocket holes and screws. Following this, the top pieces were affixed using wood glue for added stability, supplemented with 2.5-inch wood screws driven through the top of the supports and into each vertical leg. This combination ensures a robust and stable base for your dining table.
6. The Art of Decorative Leg Trim
Now for the truly enjoyable part – adding the trim that gives this table its distinctive character! You will cut 1×3 boards to create a wrap-around effect on each leg. These trim pieces are attached using a combination of wood glue for a permanent bond and 1.25-inch brad nails to hold them securely in place while the glue dries. This layering effect adds depth and visual interest to the otherwise simple 4×4 legs.
Once the lower trim pieces are in place, proceed to attach the upper ones in the same manner, following the design from your free plans.
After the basic trim is applied, you’ll move on to cutting and attaching the more intricate, decorative trim pieces. These charming accents are cut from 1×12 boards using a jigsaw. Precision is key here! We found it helpful to cut one piece as a template and then use it to trace the remaining pieces. This method ensures consistency across all decorative elements, guaranteeing a cohesive and polished look for your table.
The diagrams in your plans will guide you on how to measure and draw out each decorative piece accurately. Remember, using a template after your first successful cut ensures all subsequent pieces match perfectly.
Working with softer woods like pine sometimes means encountering a few minor breaks, especially on intricate cuts. Don’t fret if this happens! A little wood glue can often repair these small imperfections seamlessly. It’s all part of the creative process and making memories in your workshop!
7. Assembling the Planked Tabletop
The beautiful tabletop for this HGTV dining table is constructed from planked pine. For this section, we created 3/4-inch pocket holes and used 1.25-inch pocket hole screws to join all the planks together. Importantly, we did NOT use wood glue on the tabletop itself. This allows for the natural expansion and contraction of the wood over time, preventing potential warping or cracking, which is a common issue with large, solid wood surfaces. The pocket hole screws provide sufficient strength while allowing for this essential movement.
Here’s a great example of how pocket holes are used to attach elements like breadboards to the main tabletop planks. While this image might show a smaller piece, the principle remains identical for your full dining table top.
8. Attaching the Tabletop to the Base
Once your tabletop is fully assembled, it’s time to connect it to the sturdy leg bases. We secured the tabletop using 2-inch wood screws driven through the bottom of the 2×4 supports on the legs and up into the tabletop. It’s crucial not to use wood glue in this step if you anticipate ever needing to disassemble the table for moving. The screws provide a strong, yet reversible, connection, making future transport or rearrangement much more convenient.
Finishing Touches: Staining and Painting Your Masterpiece
Choosing Your Stain
For the tabletop, we applied one of our all-time favorite stains: Varathane Wood Stain in Dark Walnut from Home Depot. This product is truly remarkable! It goes on smoothly in a single coat and, incredibly, dries in under an hour. This rapid drying time is a huge advantage, allowing you to move on to the next steps of your project much faster. The rich, deep tone of Dark Walnut perfectly complements the rustic yet refined aesthetic of this dining table.
Painting the Base
The base of the table received a fresh, elegant look with Rust-Oleum’s new Chalked Paint in Linen White. We seriously adore this paint! It’s also readily available at Home Depot and offers a beautiful, soft, ultra-matte finish that is characteristic of chalk paint. Its ease of application and excellent coverage make it a fantastic choice for furniture projects, providing a lovely contrast to the stained tabletop.
The Grand Reveal: Your DIY HGTV Dining Table!
With the construction and finishing complete, it was time for the grand reveal! Our amazing hubbies helped us move and set up the table at Brooke and Dack’s place. What do you think of the final result? We think it’s absolutely AMAZING and truly transformed their dining area. This table is not just a functional piece but a focal point that radiates craftsmanship and style.
Styling Your Dining Space: Where We Found These Treasures
Beyond the table itself, the surrounding decor plays a huge role in creating an inviting dining atmosphere. Here’s a breakdown of where we sourced some of the complementary items you see in the photos:
- The charming plate rack on the wall? You can find the full tutorial to build your own HERE!
- The elegant table runner and comfortable chairs were discovered at World Market.
- The beautiful window panels that frame the space are from Hobby Lobby.
- Those stylish metal chargers adding a touch of sophistication are from Pottery Barn – yes, we loved them so much we bought some for ourselves too!
- The exquisite glass hobnail jars, perfect for a centerpiece, were sourced from Saveoncrafts.com.
- The rustic metal wall baskets adorned with greenery also came from World Market, enhancing the natural feel.
- And finally, the lovely platters and plates gracing the table are all fantastic finds from HomeGoods.
We believe these details complete the look, creating a harmonious and welcoming dining experience.
Thank You & What’s Next!
And once more, a massive THANK YOU, friends, for your unwavering support! You’ve made this entire journey incredibly enjoyable for us, and we truly wish we could personally thank each and every one of you for your encouragement. We are so thankful for the opportunity to have filmed this pilot for HGTV and to have helped this wonderful family. We are filled with hope that this pilot will blossom into a full series, allowing us to share more DIY inspiration and transformations with you. We promise to keep you updated on all developments, so stay tuned!
As always, please don’t hesitate to reach out if you have any questions at all about this build or any other DIY projects. Your success is our joy!
Happy Building!
Whitney and Ashley
Looking for more inspiration? You can find our full list of over 25 DIY Dining Table tutorials here!