
Craft Stunning DIY Chalkboards on a Budget: The Ultimate Guide to Handmade Gifts
Happy crafting, everyone! I’m absolutely thrilled to share my latest project with you today – a venture that combines creativity, affordability, and a dash of rustic charm. If you’re anything like me, you’re constantly on the lookout for thoughtful gift ideas that won’t break the bank. Well, get ready, because these magnificent DIY chalkboards are the answer!
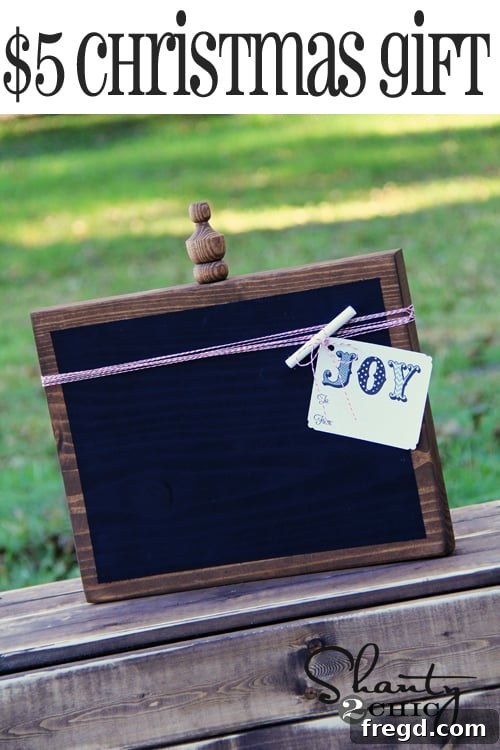
Imagine creating six beautiful, personalized gifts in just one afternoon, all for less than $5 each. Yes, you read that right! I managed to whip up a batch of these during nap time today, and the results are truly captivating. They’re not just a gift; they’re a statement, a piece of functional art that anyone would be delighted to receive. Take a look at how they turned out:
Why DIY Chalkboards Are the Perfect Gift
I genuinely adore these chalkboards, and I’m confident you will too. Their appeal lies in their incredible versatility. They make a perfect gift for virtually anyone on your list – family, friends, neighbors, or even colleagues. Imagine them in a kitchen, perfect for grocery lists or daily menus; in an entryway for heartwarming messages; or in a child’s room for endless creativity. They’re also an absolutely fantastic option for teacher appreciation gifts, offering a handmade touch that shows genuine care and effort.
Beyond being a gift, these chalkboards serve as stylish and functional pieces of home decor. Their rustic aesthetic, born from the natural wood and rich stain, can complement various interior styles, from farmhouse chic to modern minimalist. They’re practical, reusable, and offer a unique way to communicate or decorate. The best part? They are incredibly easy to make! Let me walk you through the simple process.
Your DIY Chalkboard Project: A Detailed Supply List
Before we dive into the creative fun, let’s gather all the necessary supplies. Planning ahead ensures a smooth and enjoyable crafting experience. Remember, one of the biggest advantages of this project is its cost-effectiveness, especially when making multiple items.
Core Materials for Six Beautiful Chalkboards
- 8-Foot 2×12″ Pine Board: This is the backbone of our project. You can find these sturdy boards at any major home improvement store like Lowe’s or Home Depot. An 8-foot board typically costs around $12, and it will yield six individual chalkboards. This is where the significant savings come in, bringing the cost per chalkboard down to just $2 for the raw material. If you don’t own a saw or prefer not to cut wood yourself, most hardware stores offer free cutting services. Just ask a friendly associate in the lumber section to cut your 8-foot board into six 14-inch pieces.
- Wood Finials: To add a charming, decorative touch to the top of each chalkboard, we’ll use wood finials. I usually find a great selection at Lowe’s, often in the trim or decorative wood section. If you can’t spot them there, craft stores are another excellent resource. While their style might vary slightly, any small wooden finial or decorative knob will work beautifully to elevate the look of your chalkboards.
- Wood Stain: For this project, I highly recommend a quick-drying wood stain. My personal favorite is Rustoleum stain, known for its rich finish and incredibly fast drying time – often less than an hour! Choose a color that complements your desired aesthetic; a dark walnut or espresso stain will lend a classic, rustic feel, while a lighter oak might offer a more contemporary look.
- Chalkboard Spray Paint: This is the magic ingredient that transforms ordinary wood into a functional writing surface. There are many brands available, but all offer a durable, easy-to-apply finish. Make sure to buy a can that specifically states “chalkboard paint” for the best results.
- Painter’s Tape (Frog Tape recommended): Achieving crisp, clean lines between your stained frame and the chalkboard surface is crucial, and good painter’s tape is your best friend here. Frog Tape is particularly effective due to its PaintBlock Technology, which prevents paint bleed, ensuring professional-looking edges.
Essential Tools for a Smooth Crafting Experience
- Drill with appropriate drill bit: Ladies, if you don’t already own a drill, put it on your wish list right now! A cordless drill is an indispensable tool for any DIY enthusiast. You’ll need it to create small pilot holes for attaching the finials. Ensure your drill bit is slightly smaller than the base of your finial to create a snug fit.
- Sandpaper or sanding block (optional but recommended): A light sanding after cutting and before staining can help smooth any rough edges and ensure better stain absorption.
- Clean rags or brushes: For applying the wood stain. Rags work well for wiping on and off, while brushes can give a more even coat.
- Safety Gear: Always work in a well-ventilated area when staining and spray painting. Consider wearing gloves and a mask to protect yourself from fumes and potential skin contact.
From Raw Wood to Rustic Charm: Your Step-by-Step Chalkboard DIY
Now that we have all our materials and tools ready, let’s get our hands dirty and start creating! You’ll be amazed at how quickly these come together.
Step 1: Prepare Your Wood Base with Precision
If you opted to cut your own wood, carefully measure and cut your 8-foot 2×12″ board into six 14-inch pieces. Always prioritize safety when using power tools; wear appropriate eye protection and ensure your workpiece is securely clamped. If you had the store cut the wood for you, you’re one step ahead! Once cut, give all the edges and surfaces a light sanding with fine-grit sandpaper. This will remove any splinters, smooth out imperfections, and create a better surface for stain absorption, resulting in a more professional finish.
Step 2: Add Elegant Finials for a Decorative Touch
With your wood pieces ready, it’s time to add the finials. Choose one end of each 14-inch board to be the top. Using your drill, create a small pilot hole centered on the top edge of each board. This hole should be just deep enough to accommodate the base of your finial, ensuring it sits securely without protruding through the front or back of the board. If your finials have a screw-in mechanism, drill a slightly smaller hole than the screw. If they are designed to be glued, a shallow hole will suffice to help guide placement.
Step 3: Deepen the Character with Rich Wood Stain
Now for the truly enjoyable part – adding the stain! Ensure you are working in a well-ventilated area, preferably outdoors or in an open garage. Apply your chosen wood stain generously with a clean rag or brush, following the wood grain. Allow the stain to sit for a few minutes, then wipe off any excess with a clean, dry rag. This technique ensures the stain penetrates the wood fibers, highlighting its natural beauty without leaving a tacky residue. For a deeper, richer color, you can apply a second coat after the first has dried completely. With a fast-drying stain like Rustoleum, this usually means you’ll be ready for the next step in about an hour!
Step 4: Define Your Chalkboard Area with Painter’s Tape
Once the stain is completely dry (check the product instructions for specific drying times, though an hour is often sufficient for fast-drying types), you’re ready to create the area for your chalkboard paint. Carefully apply painter’s tape around the perimeter of each board, creating a clean, rectangular or square frame. Press the tape down firmly along all edges to prevent any paint bleed. Using high-quality tape like Frog Tape will make a significant difference in achieving sharp, professional-looking lines for your chalkboard surface.
Step 5: Transform with Chalkboard Spray Paint
Now for the truly magical part! In a well-ventilated area, shake your chalkboard spray paint can thoroughly for at least one minute. Hold the can approximately 8-12 inches from the surface and apply several thin, even coats, allowing each coat to dry to the touch before applying the next. Avoid spraying too heavily in one spot, as this can lead to drips or an uneven finish. This spray paint is incredible – it can turn almost any surface into a writeable chalkboard! Continue applying coats until you achieve complete, opaque coverage. Once the final coat feels dry to the touch (usually 15-30 minutes), you can carefully peel off the painter’s tape. Remove the tape while the paint is still slightly tacky but not wet, to prevent it from pulling up dry paint, but also not fully dry, which might cause it to crack along the edges.
Step 6: The Finishing Touches and Curing Process
After removing the tape, take a moment to admire your clean lines! Now, you can securely attach your finials into the pre-drilled holes. A dab of strong wood glue on the finial’s base before inserting will ensure it stays firmly in place. The final, crucial step is to “cure” and “prime” your new chalkboard surface. Most chalkboard paints require a curing time (often 24-72 hours) before they are ready for use. This allows the paint to harden fully. After curing, prime the surface by gently rubbing the side of a piece of chalk all over the entire chalkboard area. Then, wipe it clean with a dry cloth. This process prepares the surface, preventing “ghosting” or permanent marks from the first time you write on it. How easy peasy was that?
Smart Savings: The True Cost of Your Handmade Chalkboards
Curious about the exact numbers? Let’s do the math together to truly appreciate the incredible value of this DIY project!
- 8-foot 2×12″ Pine Board: Approximately $12. Since this yields 6 chalkboards, the cost per board piece is just $2.00.
- Wood Finials: These can vary, but generally, you can find a set of 6 for around $6-12, bringing the cost per finial to $1.00-$2.00. Let’s estimate $1.50 per finial.
- Wood Stain (one can): A can of stain costs about $8-$15. This can be used for many projects, so for 6 chalkboards, the proportional cost is minimal, perhaps $1.00-$2.00 per chalkboard. Let’s say $1.50.
- Chalkboard Spray Paint (one can): A can costs around $4-$7 and will cover many chalkboards. Proportional cost for 6 chalkboards could be $0.50-$1.00 each. Let’s say $0.75.
- Painter’s Tape: A roll costs $5-$10 and is good for countless projects. Proportional cost for 6 chalkboards is negligible, perhaps $0.25.
Adding it all up: $2.00 (wood) + $1.50 (finial) + $1.50 (stain) + $0.75 (paint) + $0.25 (tape) = Approximately $6.00 per chalkboard. My initial estimate was even lower, proving just how budget-friendly these are! Even with a slight variation, creating a truly unique and personalized gift for this price is an absolute steal.
Elevate Your Craft: Pro Tips and Customization Ideas
Achieving Flawless Results: Troubleshooting and Best Practices
- Ventilation is Key: Always work in a well-ventilated area when staining and spray painting. Fresh air helps with drying and disperses fumes.
- Thin Coats for Paint: When using spray paint, multiple thin coats are always better than one thick coat. This prevents drips, ensures even coverage, and creates a smoother finish.
- Tape Removal Timing: Experiment with removing painter’s tape when the paint is still slightly tacky. Removing it when wet can cause smudges, and when completely dry, it might tear off bits of paint.
- Curing and Priming: Don’t skip the curing time and priming steps for your chalkboard paint. These are vital for its longevity and performance.
- Cleanliness: Keep your work area clean to prevent dust or debris from sticking to your wet stain or paint.
Personalize Your Creation: Beyond the Basic Chalkboard
- Different Finials: Explore various styles of finials or even use small decorative knobs for a different aesthetic.
- Painted Frames: Instead of staining, consider painting the wood frame in a color that matches the recipient’s decor.
- Add Hooks: Attach small hooks to the bottom edge of the chalkboard for keys, small notes, or even mugs.
- Stenciling: Use stencils to add a permanent design or quote to the stained frame before applying chalkboard paint.
- Magnetic Chalkboard: For an added layer of functionality, you could apply magnetic primer before the chalkboard paint, turning it into a magnetic chalkboard!
Want to see a few more shots of these beauties?
The Ultimate Gifting Touch: Grab Your Free Printable Tags!
Did you notice those adorable tags on the chalkboards? They add such a sweet, personal touch, don’t they? Guess what – I designed them myself, and I’ll be offering them as a FREE printable right here tomorrow! Make sure to come back and download them to complete your handmade gifts with that extra special flair. LOVE!
Gift with Love, Craft with Joy: Your Handmade Chalkboards Await
I truly hope you’ve enjoyed this tutorial and are inspired to create your own rustic chalkboards. Mine will be heading to my kiddos’ teachers for Christmas, and I’m already planning to make more for family and friends. This project hits all the sweet spots: so easy to construct, incredibly quick to complete, but oh-so-cute and thoughtful in its final presentation. It’s the perfect combination for impactful, budget-friendly gifting!
Your support means the world, so if you loved this project, I would be absolutely delighted if you could share it on your social media channels and Pin it to your favorite DIY boards using the image below. Let’s spread the joy of handmade gifts!
Thanks so much for stopping by and spending some time in my creative corner!
Also, make sure to keep up with all of Shanty’s latest posts and projects by following us on Facebook!
Follow Shanty2Chic on Facebook
And don’t forget to get endless inspiration by following Shanty on Pinterest!