
Welcome back, fellow home improvement enthusiasts! Today, I’m thrilled to pull back the curtain and share the complete, step-by-step guide on how we successfully installed our beautiful new laminate flooring. If you’ve been following our journey, you might recall my previous posts detailing the selection process and our decision to go with a stunning reclaimed-wood-look laminate. For those who missed it or want a refresher on how we chose this particular style, you can catch up on our flooring selection here and here. Last week, I gave you a little sneak peek, and now it’s time to dive into the nitty-gritty of making it a reality.
Embarking on a flooring installation project might seem daunting at first glance, but I promise you, with the right approach and a clear understanding of each step, installing laminate flooring is a completely achievable and incredibly rewarding DIY endeavor. Our chosen laminate, with its durable construction and easy-to-use click-lock system, truly makes the process straightforward for any homeowner looking to refresh their space without breaking the bank. We’ve even put together a concise video to visually walk you through the core techniques, demonstrating just how simple it is to lay down these planks and transform your home.
Yes, it’s laminate, and yes, it’s designed for easy, do-it-yourself installation. The video below provides a fantastic visual summary, showcasing the simplicity of the entire process. Watch it, and you’ll quickly see why we’re so enthusiastic about tackling this project yourselves!
Pretty easy, right? For those who appreciate a deeper dive into the specifics, along with some helpful tips and tricks we learned along the way, let’s explore each step in more detail with a series of step-by-step photographs and explanations.
Essential First Steps: Preparation and Underlayment
Before you even think about laying your first laminate plank, proper preparation of your subfloor is paramount. A clean, level, and dry subfloor is the foundation for a successful and long-lasting laminate installation. Take the time to sweep, vacuum, and address any uneven spots or moisture issues. Once your subfloor is ready, the next critical component is the underlayment.
The first tangible step in installing your laminate flooring is rolling out the underlayment. This crucial layer serves multiple purposes: it acts as a moisture barrier, provides sound dampening, and offers a slight cushioning effect underfoot. Cutting it to size is surprisingly simple. I found that a standard box cutter sliced through it with ease. There’s no need for intricate measuring here; I simply rolled the underlayment up against the wall, folded it where the floor meets the wall, and made my cut along that crease. Continue this process, ensuring that each strip of underlayment abuts the previous one neatly, without overlapping, to create a smooth, consistent base across your entire room.
Laying the Foundation: Starting Your First Row
The first row of laminate planks sets the stage for the entire floor, so getting it perfectly straight and properly spaced is critical. Precision here will ensure a professional-looking finish throughout your project.
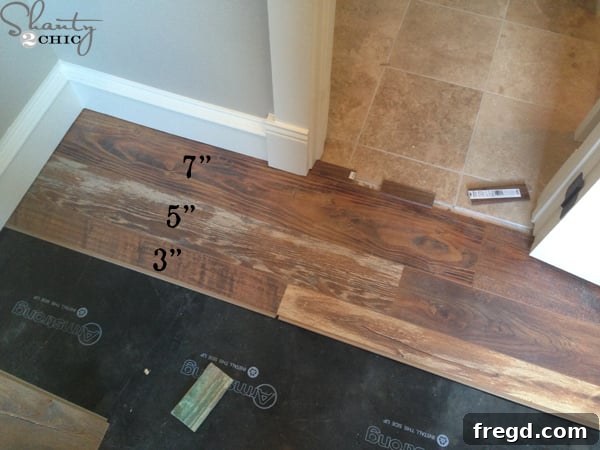
To begin, I used a few scrap pieces of T-molding as temporary spacers between my existing tile floor and the new laminate. The T-molding itself isn’t installed until the flooring is complete, but these spacers ensure there’s enough room for it to fit snugly later. Crucially, these spacers also helped me maintain a perfectly straight line for the first row of planks, which is absolutely vital for a flawless installation. Additionally, remember to use spacers along the walls to create the necessary expansion gap. Laminate, being a wood-based product, will expand and contract with changes in temperature and humidity. An expansion gap of about 1/4 to 3/8 inch around the perimeter of the room allows for this movement without buckling the floor. These small details in the initial setup will save you headaches down the line.
The Click-Lock System: Effortless Connections
One of the greatest advantages of modern laminate flooring is its ingenious click-lock system. This innovative design eliminates the need for messy glues, making the installation process cleaner and quicker. Our laminate is a “floating” floor, meaning it’s not mechanically fastened to the subfloor, allowing it to expand and contract naturally.
Each laminate plank is designed with intricate grooves along its edges. These grooves are the key to the “fold and lock” mechanism, allowing the planks to securely interlock with each other, forming a seamless and sturdy surface. Understanding how these grooves align is fundamental to a smooth installation.
As you work from left to right, ensure that the grooves of the first row planks are visible along the bottom and right side. To connect the next plank, simply lift the edge closest to you slightly, align the tongue of the new plank with the groove of the previously laid plank, and slide it over the groove. It’s often easiest to engage the long side first, angling the new plank slightly upwards.
Once aligned, gently lower the plank, applying firm, even pressure. You’ll hear and feel it click securely into place, forming a tight, gap-free seam. With practice, this motion becomes intuitive, allowing you to quickly cover large areas. Always inspect your seams to ensure they are fully engaged and there are no visible gaps between planks, as this ensures the floor’s integrity and aesthetic appeal.
Ensuring a Tight Fit: Tapping Planks
While the click-lock system is remarkably efficient, there will be instances where a little extra encouragement is needed to ensure the planks are fully seated and tightly interlocked. This is where a tapping block and a soft-faced mallet become invaluable tools.
We discovered that a soft scrap piece of wood worked perfectly as a tapping block. The key is to place this block against the edge of the laminate plank you wish to tighten, and then gently tap the block with a hammer. This technique allows you to distribute the force evenly, pushing the plank further into its locked position without directly striking the delicate edges of the laminate. It’s crucial to be careful not to break off any of the grooves when tapping; the protective block is essential for preventing damage to the interlocking mechanism, which could compromise the stability and appearance of your entire floor.
Mastering the Cut: Precision for a Perfect Finish
As you near the end of each row or encounter obstacles, you’ll inevitably need to cut planks to size. This might sound intimidating, but it’s one of the most satisfying parts of the installation process, especially when you achieve a perfect fit.
When you reach a wall, a full plank simply won’t fit, so precise cutting is required. This is where the “fun part” begins, as you get to measure and tailor each piece to its specific spot. Various tools can be used for cutting laminate, including a miter saw for straight cuts, a jigsaw for more intricate shapes, or even a specialized laminate cutter for dust-free operation. Choose the tool that best suits the type of cut you need to make and your comfort level.
For a guaranteed accurate cut, here’s a foolproof method: take the next full plank, lay it directly on top of the previous one (the one you just installed), and slide it up against the wall. Then, take a third plank and lay it on top of the second plank, flush against the wall. Mark the second plank where it meets the edge of the third plank. This marks your cutting line. When you do this, make sure to flip the board backward and upside down so that you are cutting off the correct end, preserving the interlocking groove for the next connection. In the picture, you can clearly see the grooves on the plank I’m marking are facing up instead of down, indicating the correct orientation for cutting. A crucial tip here: always save the scrap piece from this cut! If it’s long enough, it can often be used as the starting piece for your next row, which significantly helps in staggering your joints and minimizing waste.
Achieving a Professional Look: Patterning and Staggered Joints
Beyond simply laying planks, paying attention to the pattern of your laminate flooring is key to achieving a professional, natural-looking finish and enhancing the floor’s stability. Randomness, within certain guidelines, is your friend here.
As mentioned in the video, manufacturers like Armstrong often provide specific patterning suggestions to optimize both aesthetics and structural integrity. For instance, a common recommendation is to ensure that joints are staggered by at least 5 inches from one row to the next. This means avoiding “H-patterns” or “stair-step” effects, where end joints line up across multiple rows, which can weaken the floor and look less natural. In the picture above, you can clearly observe this staggered joint pattern. You’ll also notice the specific advice to include a 5-inch plank every other row; this creates a visually appealing rhythm and prevents too many short pieces from clustering together, which can detract from the overall look. Staggering joints isn’t just about aesthetics; it also significantly contributes to the overall strength and durability of your floating floor by distributing pressure more evenly across the entire surface.
Here’s another perspective showcasing more of the pattern as the installation progresses. Take a moment to appreciate how the staggered seams break up the visual monotony and enhance the floor’s resemblance to real hardwood. Planning your layout before you start laying can help achieve this desired effect, even dry-laying a few rows to visualize the pattern.
The Final Touches: Transitions and Tricky Areas
Once your main flooring is laid, the next step involves addressing transitions between different flooring types and navigating any unique architectural features in your space.
When you’re finished laying the main body of the laminate, it’s time to close up any gaps between your new laminate and adjacent flooring (like tile or carpet) with a T-molding. T-molding provides a neat, finished edge and accommodates the expansion gap needed at transition points. We simply used liquid nails to secure our T-molding firmly in place, ensuring a smooth and durable transition. It’s a simple step that significantly enhances the professional appearance of your newly installed floor.
Every home has its quirks, and ours was no exception. We encountered a few “weird cuts” around our stairwell posts, which required careful measurement and execution. To handle these intricate shapes, we meticulously measured around the post, transferred those measurements precisely onto the laminate plank, and then used a jigsaw to cut out the custom shape. The jigsaw’s fine blade allows for curved and irregular cuts, making it an indispensable tool for these challenging spots. Since this was a new construction project, we had the foresight to install our baseboards high enough to allow the laminate and its underlayment to slide neatly underneath, creating a clean, seamless look without the need for additional trim. However, we did have to use a jamb saw to undercut the door jambs, allowing the laminate to slide beneath them for a professional finish. If we hadn’t been able to raise the baseboards, a simple and effective alternative would have been to install a quarter-round molding, painted to match the baseboards, around the perimeter. This provides a clean finish and covers the expansion gap just as effectively.
An Alternative to T-Molding: A Special Tip
Here’s a practical tip that might interest those who, like me, aren’t huge fans of visible T-molding. While Armstrong typically recommends T-molding for transitions, in our living room, where the new laminate met the kitchen tile, we found a beautiful alternative. We were able to skip the T-molding entirely by using a sanded caulk that perfectly matched our tile grout. To achieve this, we carefully used tile spacers between the tile and the laminate during installation to maintain a consistent expansion gap. We were particularly lucky that the laminate happened to be the exact same thickness as our tile in this particular area, allowing for a flush transition. This wasn’t the case in other areas of the house, where we did resort to T-molding, but it’s a fantastic option to consider if your flooring thicknesses align and you prefer a seamless look. It’s a small detail that can make a big difference in the overall aesthetic.
Concluding Thoughts: A Rewarding DIY Journey
I genuinely hope this comprehensive guide has demystified the process of installing laminate flooring and instilled confidence in you to tackle this fantastic DIY project. It was a truly fun, engaging, and immensely rewarding experience for us. The transformation it brought to our home is incredible, and I wouldn’t hesitate to do it all over again. The satisfaction of stepping onto a floor you’ve installed yourself is unparalleled.
Transforming a house into a home involves many such projects, and our flooring installation is just one piece of the puzzle. If you’re looking for more inspiration and insights into our home renovation journey, be sure to check out these other exciting house updates:
- Our stunning cabinet reveal: HERE
- The big countertop reveal: HERE
- A detailed look at our overall flooring choices: HERE
- Discovering our kitchen tile selections: HERE
Thank you so much for stopping by and joining us on this home improvement adventure. We love sharing our experiences and empowering you to create the home of your dreams, one DIY project at a time!
~Ashley