
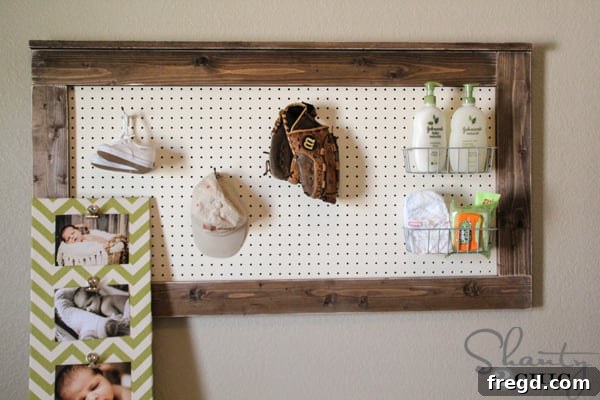
Hey there, DIY enthusiasts! I’m thrilled to share a detailed tutorial for the absolutely charming and highly functional pegboard I recently crafted. This project was specifically designed for a friend’s nursery, but its versatile appeal means it would be a fantastic addition to almost any room in your home – from a creative office space to a lively kids’ playroom, or even a functional garage workshop.
If you happened to miss the stunning West Elm-inspired dresser that complements this pegboard beautifully, you can find the complete tutorial right HERE. This custom pegboard project is not only incredibly easy to build, but it’s also incredibly budget-friendly, costing under $20 in materials. Plus, you can comfortably complete it in a single afternoon. The beauty of a DIY pegboard lies in its infinite customization possibilities and its ability to transform clutter into organized beauty. Let’s dive into how you can create your very own!
Why Choose a DIY Pegboard?
Before we get started, let’s talk about why a DIY pegboard is such a fantastic project. Unlike off-the-shelf options, building your own allows for complete control over size, color, finish, and overall aesthetic. You can tailor it to perfectly match your existing decor, whether you’re going for a farmhouse, rustic, modern, or industrial look. It’s a fantastic way to add personalized storage and display space, enhancing both the functionality and charm of any room. For a nursery, it offers a dynamic changing station solution, easily adapting as your child grows. In an office, it can keep supplies neatly organized and accessible. The possibilities are truly endless!
Gather Your Materials & Tools for This Custom Pegboard Project
Preparation is key for any successful DIY project. Here’s everything you’ll need to create your custom pegboard. I’ve included some details on why these specific items are recommended to help you understand their role in the build.
Materials:
- 2×4 Pegboard Sheet: I sourced mine from Lowe’s, a standard hardboard pegboard. This size offers ample space for organization without being overwhelming. You can adjust the size to fit your specific needs, but remember to adjust your frame dimensions accordingly.
- Rust-Oleum Heirloom White Spray Paint (Satin Finish): While the pegboard may already be white, a coat of Heirloom White provides a lovely creamy, soft hue that perfectly complements a vintage or farmhouse aesthetic. The satin finish offers a subtle sheen that is easy to clean.
- 2 – 1×4 @ 8ft. Pine Boards: Pine is an excellent choice for framing due to its affordability, light weight, and ease of cutting and staining. These will form the sturdy outer frame of your pegboard.
- Wood Stain (Dark Walnut): A rich dark walnut stain will give your frame a warm, rustic, and sophisticated look that contrasts beautifully with the cream pegboard.
- Kreg Jig Pocket Hole Screws: These specialized screws create incredibly strong, concealed joints, ensuring your frame is durable and aesthetically pleasing.
- 1-inch Wood Screws: Used for securely attaching the pegboard to the frame.
- 1×2 @ 6ft. Pine Board: This piece will serve as the decorative and functional top trim, adding a finished look and a small ledge.
Tools:
- Miter Saw: Essential for precise, clean cuts on your pine boards. A miter saw makes quick work of angled and straight cuts, ensuring your frame pieces fit together perfectly. If you’re new to using one, we have a detailed video tutorial on how to operate a miter saw HERE!
- Kreg Jig: This ingenious tool allows you to drill pocket holes for strong, hidden joinery, making frame assembly incredibly simple and secure. Learn how to use a Kreg Jig with our video tutorial HERE!
- Cordless Drill/Driver: An indispensable tool for drilling pocket holes and driving screws.
- Orbital Sander or Corner Cat Sander: Used for distressing the wood edges, giving it a charming, aged appearance.
- Brad Nailer: Perfect for attaching the trim piece neatly and securely with minimal visible fasteners.
- Measuring Tape and Pencil: For accurate measurements and markings.
- Safety Glasses and Hearing Protection: Always prioritize safety when working with power tools!
Step-by-Step Guide to Building Your Pegboard
Now that you have all your materials and tools ready, let’s begin the fun part – building your pegboard! Follow these steps carefully for a beautiful and sturdy result.
Step 1: Preparing Your Pegboard
Start by taking your 2×4 pegboard sheet. Although it might already be white, we’re going to apply two generous coats of Rust-Oleum Heirloom White spray paint in a satin finish. Why spray paint it again? The goal is to achieve a specific creamy, antique white tone that perfectly complements the dresser and provides a softer, warmer look than plain stark white. Lay your pegboard flat in a well-ventilated area, and apply thin, even coats, allowing sufficient drying time between each application. This will prevent drips and ensure a smooth, professional finish. The satin sheen will also add a subtle elegance.
Step 2: Cutting Your Frame Boards
Next, take your two 1x4x8ft pine boards. Using your miter saw, carefully cut them into the following lengths: two boards at 21 inches and two boards at 45 inches. These dimensions are crucial for creating a frame that perfectly fits your 2×4 (24×48 inches) pegboard. Always double-check your measurements before making a cut, and remember to account for the blade’s kerf (the width of the cut). Precision here ensures a flush and attractive frame. If you’re using a hand saw and miter box as an alternative, take your time to ensure straight and accurate cuts.
Step 3: Drilling Pocket Holes with Your Kreg Jig
Once your frame boards are cut, it’s time to prepare them for assembly using your Kreg Jig. For each of the four cut boards, you will drill two pocket holes into one end. It doesn’t matter which end you choose at this stage, as long as each piece has pocket holes on one end. The Kreg Jig makes this process straightforward, creating strong, angled holes that will allow you to join the boards together seamlessly from the backside, keeping the front of your frame clean and free of visible screws. Ensure your Kreg Jig is set correctly for the thickness of your 1×4 boards before drilling.
Step 4: Staining and Distressing the Frame
Now, let’s give your frame some character. Apply your chosen wood stain, Dark Walnut, to all sides and edges of your four frame pieces. Use a rag or brush, following the grain of the wood. Wipe off any excess stain after a few minutes to achieve your desired depth of color. Once the stain has dried, use your orbital sander or a specialized Corner Cat sander to lightly distress all the edges of the boards. This step is key to achieving that charming, aged, and rustic look. Focus on corners and edges where natural wear would occur, creating subtle imperfections that add to the piece’s unique appeal. The contrast of the dark stained, distressed wood with the creamy pegboard will be stunning.
Step 5: Assembling the Frame
It’s time to bring your frame together! Using the Kreg Jig pocket hole screws, assemble the frame. I opted for a slightly unconventional, overlapping pattern for assembly, which lends an industrial and rustic feel to the finished product. Instead of a typical mitered or butt joint where edges align perfectly, each board overlaps the other at the corners. This creates a more robust, chunky look that stands out. Carefully align your boards and drive the pocket hole screws to create strong, secure joints. Ensure your frame forms a perfect rectangle before moving on. This unique joinery adds a custom touch that differentiates it from standard frames.
Step 6: Attaching the Pegboard to the Frame
With your frame assembled, flip it over so the back is facing up. Carefully center your painted pegboard on the back of the frame. Ensure there’s an even border around all sides. Using 1-inch wood screws, securely attach the pegboard to the frame. Drive screws every 6-8 inches along the perimeter of the frame to ensure the pegboard is firmly held in place. This creates a strong, unified unit that is ready for heavy-duty organization. The 1-inch screws are just long enough to grip the frame without protruding through the front.
Step 7: Adding the Top Trim Piece
To give your pegboard a polished, finished look and add a subtle functional ledge, we’ll add a top trim piece. Take your 1x2x6ft pine board and cut it to the exact length of the top of your assembled frame. Position this trim piece along the top edge of the pegboard frame, ensuring the back of the trim is flush with the back of the frame. This will create a slight overhang on the front, providing a small decorative shelf. Secure the trim piece using your brad nailer, driving nails discreetly along its length. The brad nailer makes for quick, strong attachment with minimal visible holes, maintaining the clean aesthetic.
Step 8: Final Distressing for a Cohesive Look
To ensure a consistent, aged appearance, gently distress the newly added trim piece. Use your sander or Corner Cat to scuff and soften the edges, mimicking natural wear and tear. This final touch integrates the trim seamlessly with the rest of the stained and distressed frame, creating a truly custom and handcrafted feel. Wipe down the entire pegboard with a clean cloth to remove any sawdust before moving on to styling.
Styling and Versatile Applications
Now for the most exciting part – dressing up your custom pegboard! I found a wonderful selection of pegboard baskets and hooks in the garage storage aisle at Lowe’s, but you can explore various options online or at local hardware stores. These accessories allow you to configure your storage exactly as needed.
For my friend’s nursery, this pegboard has become the perfect changing station. We’ve used hooks to hang frequently used items like burp cloths and small towels, while baskets hold diapers, wipes, and lotions, keeping everything within easy reach. It adds such a unique and charming touch to the room, blending practical storage with decorative display.
The beauty of this DIY pegboard lies in its incredible versatility; it can truly grow with your child. As the baby gets older, it can transform into a display for artwork, a storage unit for small toys, or even a homework station. Beyond the nursery, imagine the possibilities!
- In a Craft Room: Organize thread, tools, ribbons, and scissors.
- In a Home Office: Keep pens, notebooks, calendars, and inspiration boards tidy.
- In a Kids’ Playroom: Store art supplies, small figurines, or display favorite drawings.
- In a Kitchen: Hang cooking utensils, small pots, or display herbs.
- In a Mudroom or Entryway: Hold keys, hats, small bags, or dog leashes.
The rustic charm of the distressed frame combined with the soft cream pegboard creates a piece that feels both custom-made and timeless. It’s a statement of organized creativity.
I’m already brimming with ideas for all the other places I could incorporate these custom pegboards throughout my own home! If you’re inspired to create your own, I would absolutely love for you to share your projects and, of course, your pins!
Thank you so much for stopping by and embarking on this DIY journey with me!
~Ashley