
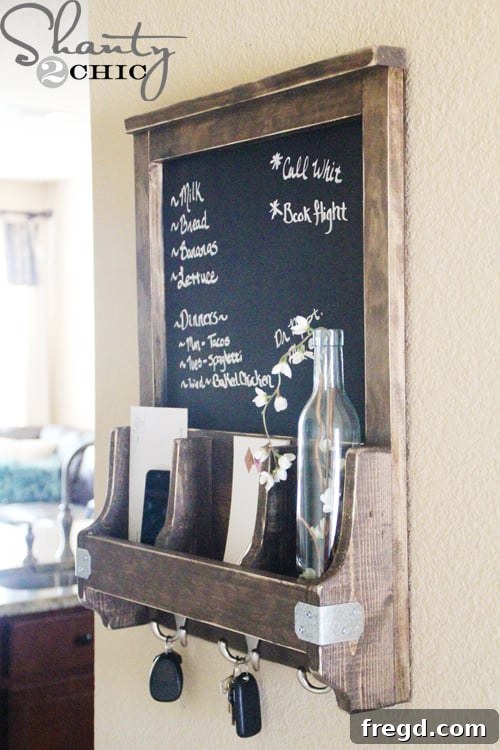
Craft Your Custom Chalkboard and Key Hook Organizer: A Beginner’s Guide to Functional Style
Are you eager to add a touch of rustic charm and unparalleled organization to your home? Look no further! This comprehensive guide will walk you through building a stunning DIY chalkboard with integrated key hooks and a practical shelf. Combining the timeless appeal of chalkboards, the utility of key storage, and the elegant blend of galvanized hardware with beautifully stained wood, this project promises to become a beloved centerpiece in your entryway, kitchen, or home office.
Don’t be intimidated by what might seem like intricate details or fancy cuts. This project is meticulously designed for beginners, proving that beautiful and functional woodworking doesn’t require years of experience or a massive budget. In fact, many DIY enthusiasts have successfully completed this organizer for under $20, showcasing its incredible cost-effectiveness. Get ready to transform your space and enjoy the immense satisfaction of creating something truly useful and stylish with your own hands!
Why Build Your Own Chalkboard Organizer?
In today’s fast-paced world, staying organized is more crucial than ever. A dedicated command center can drastically improve household efficiency, reduce clutter, and ensure important items like keys and messages are never misplaced. This DIY chalkboard organizer serves multiple purposes:
- Key Management: Say goodbye to frantic searches for keys before heading out the door. Dedicated hooks keep everything in its place.
- Message Hub: The spacious chalkboard surface is perfect for grocery lists, daily reminders, inspirational quotes, or notes to family members.
- Versatile Storage: The integrated shelf provides a handy spot for mail, sunglasses, wallets, or decorative accents.
- Customizable Aesthetic: Choose your favorite stain and hardware to perfectly match your existing decor, whether it’s farmhouse chic, industrial, or classic rustic.
- Budget-Friendly: Building it yourself is often significantly cheaper than purchasing a similar item from a retail store.
- Beginner-Friendly: This project uses common tools and techniques, making it an excellent entry point into the world of woodworking.
Embrace the joy of DIY and create an item that is not only practical but also reflects your personal style.
Gathering Your Materials: Lumber and Hardboard
The foundation of any great woodworking project lies in selecting the right materials. For this chalkboard and key hook organizer, you’ll need a modest selection of common lumber sizes and a piece of tempered hardboard. Remember, this is a fantastic opportunity to utilize any scrap wood you might have lying around, further reducing your project costs. Always check the scrap bins at your local hardware store for discounted pieces that perfectly fit the bill!
Required Lumber:
- 1 – 1×2 @ 8ft. (This board will be cut down for the chalkboard frame and top trim.)
- 1 – 1×3 @ 4ft. (Used for the shelf components.)
- 1 – 1×8 @ 4ft. (Forms the main backing for the shelf area.)
- 1 – 1×4 @ 4ft. (For the decorative “fancy” cuts that add character.)
Chalkboard Panel:
- 1 – 2’x4′ Panel of Tempered Hardboard (Tempered hardboard is ideal due to its smooth surface, which takes chalkboard paint exceptionally well. You’ll only need a portion of this, leaving plenty for future projects!)
If you’re unsure about cutting the hardboard yourself, many hardware stores offer cutting services, often for a minimal fee, which can save you time and effort.
Essential Tools for a Smooth Build
While this project is designed for beginners, having the right tools can make the process significantly smoother and more enjoyable. You don’t need a full professional workshop; many of these tools are affordable and versatile for various future DIY endeavors. A key advantage of modern cordless tools, like many from the Ryobi line mentioned in the original project, is their shared battery systems, which can save you money and simplify your charging setup.
Key Tools:
- Circular Saw with Rip Cut Guide: An invaluable tool for quickly and accurately cutting down large panels, like your tempered hardboard, into precise dimensions. The Kreg Jig Rip Cut, for instance, makes this task incredibly straightforward.
- Miter Saw (or Handsaw with Miter Box): Essential for making clean, straight crosscuts on your lumber. A 10-inch compound miter saw offers precision and ease, but a good quality handsaw paired with a miter box can achieve excellent results for those not ready for a power tool investment.
- Jigsaw: This tool shines when it comes to making curved or irregular cuts, especially for the decorative “fancy cuts” in this project. A cordless jigsaw provides excellent maneuverability.
- Cordless Sander (e.g., Corner Cat Sander): Perfect for smoothing rough edges, preparing wood for staining, and achieving that desirable distressed look. Cordless models offer convenience without the hassle of cords.
- Brad Nailer (Cordless Recommended): Makes attaching wood pieces together with nails incredibly fast and secure. A cordless brad nailer is a fantastic investment for its efficiency and portability.
- Measuring Tape, Pencil, Safety Glasses, and Hearing Protection: Absolutely crucial for accuracy and safety during all stages of the build.
Investing in quality tools, even entry-level ones, will not only ensure a successful project but also empower you for many more DIY adventures to come.
Step-by-Step Construction Guide
Now that you have all your materials and tools ready, let’s dive into building your custom chalkboard and key hook organizer. Precision in your measurements and cuts will contribute significantly to the final look and structural integrity of your piece.
1. Prepare Your Chalkboard Panel
Begin by cutting your tempered hardboard panel to the dimensions of 19 inches by 24 inches. As mentioned, a circular saw with a rip cut guide makes this process simple and accurate. If you had your hardware store cut the panel, you can skip this step.
Once your hardboard is cut, it’s time to transform it into a functional chalkboard. In a well-ventilated area, apply two even coats of chalkboard spray paint. Allow ample drying time between coats as per the manufacturer’s instructions. This ensures a durable, smooth, and fully functional writing surface.
2. Make All Your Wood Cuts
While your chalkboard panel is drying, you can efficiently move on to preparing all the lumber pieces. Accuracy here is paramount for a professional-looking finish. Use your miter saw or handsaw for these cuts, always prioritizing safety by wearing appropriate protective gear.
Here is your detailed cut list:
- 2 – 1×2 @ 24″ (These will form the vertical sides of your chalkboard frame.)
- 1 – 1×2 @ 19″ (For the top trim piece of the organizer.)
- 1 – 1×2 @ 16″ (This forms the top horizontal piece of your chalkboard frame.)
- 2 – 1×3 @ 17 3/4″ (These create the main “shelf” structure.)
- 1 – 1×3 @ 16″ (This piece forms the bottom horizontal support below the chalkboard.)
- 1 – 1×8 @ 16″ (The wider board that sits above the bottom 1×3, creating the deeper back for the shelf area.)
- 2 – 1×4 @ 10″ (These will be for your “fancy cuts” – the decorative side pieces of the shelf.)
- 2 – 1×4 @ 6 3/4″ (Also for “fancy cuts” – the decorative dividers within the shelf.)
3. Create the Decorative “Fancy Cuts”
This is where the project truly gains its unique character, and it’s far less daunting than it appears! To make these decorative cuts on your 1×4 boards (“A” and “B” pieces as referred to in the images), simply print out the provided templates, cut them out, and trace them onto your wood. This eliminates any guesswork and ensures symmetrical designs.
Once traced, securely clamp each 1×4 board to a sturdy workbench or surface. Use your jigsaw to carefully cut along the traced lines. Don’t worry about achieving absolute perfection in your cuts; any minor imperfections can be easily smoothed out in the next step.
4. Sanding for a Flawless Finish
Sanding is a critical step that prepares your wood for staining and gives your project a professional feel. Use a cordless sander, like a Corner Cat sander, to smooth all cut edges, especially those fancy curves. This inexpensive tool is fantastic for getting into tight spots and ensures a beautifully smooth surface. It also shares batteries with other cordless tools, making it a convenient choice.
5. Assemble the Shelf and Dividers
Now we’ll begin assembling the structural components of your organizer, starting with the shelf and its dividers. For every joint, use a combination of Gorilla Glue Wood Glue and brad nails for maximum strength and durability.
First, attach the two 1×3 pieces measuring 17 3/4 inches together to form the main “shelf” part. Apply wood glue, then secure with your brad nailer. This creates the primary horizontal surface where items will rest.
Next, glue and nail the assembled “shelf” to the “A” pieces (your fancy-cut 1x4s @ 10″). These “A” pieces will form the decorative sides of your shelf unit. The cordless brad nailer makes quick work of this, ensuring a strong bond without visible screw heads.
Now, attach the “B” pieces (your fancy-cut 1x4s @ 6 3/4″) to create the internal dividers of the shelf. These pieces will be glued and nailed from the backside of the shelf, ensuring a clean appearance from the front. The fronts of these “B” pieces will be subtly covered by the 1×3 shelf front.
Take a moment to admire the front view of your assembled shelf with its decorative dividers. Set this component aside; it’s time to prepare the chalkboard frame.
6. Frame the Chalkboard
This step brings your chalkboard to life by giving it a sturdy and attractive frame. For maximum adhesion and to prevent warping, use a strong adhesive like Liquid Nails in conjunction with brad nails for securing the frame pieces to the hardboard.
Apply a continuous bead of Liquid Nails to the back of the 1×2 pieces that will form the frame:
- Two 1x2s @ 24″ (for the vertical sides)
- One 1×2 @ 16″ (for the top horizontal piece)
Carefully position these 1×2 frame pieces around the chalkboard panel, ensuring they are flush with the outer edges of the hardboard. Secure them further with brad nails. The top 1×2 will be 16 inches long, and the two side 1x2s will be 24 inches long.
Next, attach the 16-inch 1×3 board to the very bottom of the chalkboard assembly, making sure its edges are flush. This piece provides a strong base. Immediately above it, attach the 16-inch 1×8 board using Liquid Nails. This wider board creates the robust backing for your key hooks and the upper part of the shelf.
For the top trim, wood glue and nail the 19-inch 1×2 to the very top of the structure. The back edge of this trim piece should be flush with the back of the chalkboard, allowing the front to overhang by approximately 3/4 inch. This creates a subtle, finished edge.
7. Attach the Shelf to the Chalkboard Frame
Now, it’s time to bring the two main components together. Apply a thin but consistent layer of wood glue to the mating surfaces of the shelf and the chalkboard backing. Carefully align the shelf so that the bottom of its “A” pieces (decorative sides) are flush with the bottom of the 24-inch 1×2 frame pieces of the chalkboard. Secure the shelf by nailing from the back of the chalkboard assembly into the shelf and its dividers. This hidden fastening method ensures a clean, professional look from the front.
Finishing Touches: Staining, Distressing, and Hardware
The assembly is complete! Now comes the fun part of giving your organizer its unique character through staining, distressing, and adding the final hardware elements. These steps truly transform raw wood into a finished piece of furniture.
1. Prepare for Staining
Before you begin staining, it’s crucial to protect your freshly painted chalkboard surface. Apply painter’s tape along the entire perimeter, right under the frame of the chalkboard. This will create a clean line and prevent any stain from bleeding onto the chalkboard. It’s generally easier to stain the entire piece after assembly, as wood glue can sometimes prevent stain adhesion if applied beforehand.
2. Apply Your Chosen Stain
For a classic, rich, and timeless look, Dark Walnut Stain is an excellent choice, as highlighted in the original project. Using a foam brush, apply a single, even coat of stain to all the exposed wood surfaces. Allow the stain to penetrate for about 5 to 10 minutes, then gently wipe away any excess with a clean, lint-free cloth. The goal isn’t to remove all the stain, but rather to ensure an even coat and prevent blotchiness. This technique allows the wood grain to shine through beautifully. Let the stain dry completely according to the product’s instructions, often 24 hours.
3. Achieve a Distressed Look (Optional)
If you desire a charming, aged, or “farmhouse chic” aesthetic, consider distressing the stained wood. Once the stain is completely dry, use your cordless corner cat sander (or a piece of fine-grit sandpaper) to lightly sand the edges and prominent areas of your organizer. This will subtly remove some of the stain, revealing the lighter wood underneath and creating a beautifully worn-in appearance. Experiment with the amount of sanding to achieve your desired level of distress.
4. Install Hardware and Prepare for Hanging
The right hardware can truly elevate the look of your organizer. Galvanized brackets and hooks add a fantastic industrial-rustic flair. Position your chosen hooks along the bottom 1×8 board. Use small wood screws to securely attach them. Depending on the number of keys you need to hang, you can choose to install two, three, or even more hooks.
To hang your finished organizer, a large sawtooth hanger is a simple and effective solution. Attach it securely to the back of the top frame piece. When mounting on your wall, always use a wall anchor for added stability, especially if your organizer will hold heavier items or if you cannot locate a wall stud.
Your Completed Chalkboard & Key Hook Organizer
Congratulations! You’ve successfully built a beautiful and highly functional piece for your home. This multi-purpose organizer is more than just a place to hang keys; it’s a testament to your DIY skills and a clever solution to everyday clutter.
This project is proof that sophisticated home organization can be achieved with beginner-friendly techniques and budget-conscious tools. The satisfaction of using something you’ve created yourself is truly unmatched. You can personalize your chalkboard messages with a chalk pen, which writes smoothly and wipes clean easily with a damp cloth.
We hope you enjoyed this detailed tutorial. If you found this DIY Chalkboard and Key Hook project inspiring, please consider sharing it with your friends and fellow DIY enthusiasts! Your pins and shares help spread the joy of crafting and home improvement. Happy DIYing!