
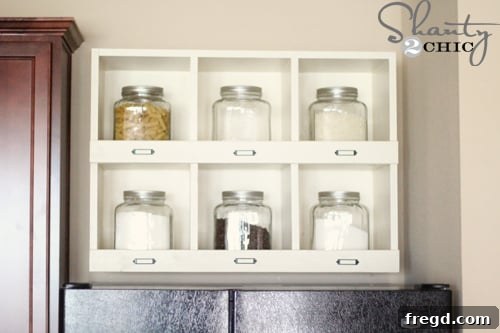
The kitchen is often called the heart of the home, but sometimes, even the most cherished spaces present design challenges. One of the most common and perplexing dilemmas homeowners face is the giant, often neglected void above the refrigerator. This expansive, seemingly unusable space can feel like a design oversight, leaving a gaping hole in an otherwise organized kitchen. It’s a struggle many can relate to: a desire for seamless cabinetry and maximum storage, met with an inexplicable empty gap. Instead of letting it become a dust collector or an eyesore, why not transform it into a stunning and highly functional storage solution? That’s precisely the journey we embarked upon, turning an enduring design frustration into a beautiful, custom DIY storage cubby.
For years, that barren expanse above the fridge loomed, a constant reminder of untapped potential. Every imagined solution seemed to clash with the existing cabinetry or simply looked out of place, creating more visual clutter than cohesion. The quest for the perfect fit felt endless until a chance encounter with a brilliant design on Ana White’s inspiring site changed everything. Her general store cubbies sparked an idea, offering both the charm and utility needed to conquer this challenging space. The original plans, while wonderful, required significant adaptation to precisely fit the unique dimensions above our refrigerator, proving that sometimes, the best solutions are born from a blend of inspiration and personalized customization.
Customizing Your DIY Refrigerator Storage Cubby: The Journey from Concept to Creation
The beauty of DIY lies in its flexibility. While Ana White’s design provided the initial blueprint, the existing dimensions of our kitchen space necessitated thoughtful modifications. This isn’t just about building a shelf; it’s about crafting a bespoke storage unit that seamlessly integrates with your home’s unique layout. The original plans were simply too grand for the compact area above the fridge, so a precise re-evaluation of all measurements was paramount. This stage involved meticulous planning, ensuring every cut and every joint would contribute to a snug and tailored fit, maximizing the often-overlooked space.
Choosing the right material is also a critical step in any DIY project. For this particular cubby, 3/4-inch MDF (Medium-Density Fiberboard) was selected. This choice wasn’t arbitrary; it was largely influenced by having a readily available half-sheet leftover from a previous project, showcasing the cost-effectiveness of utilizing existing resources. MDF offers several advantages for furniture building: it’s budget-friendly, provides a smooth surface ideal for painting, and is stable, resisting warping. While slightly heavier than solid wood or plywood, its consistent density and ease of machining make it an excellent choice for a sturdy, painted finish that looks professionally crafted.
Essential Materials for Your Custom Storage Cubby:
Crafting a robust and beautiful storage cubby starts with gathering the correct materials. Here’s a detailed breakdown of the lumber and backing needed, modified to fit most standard refrigerator spaces (always measure your specific area first, as dimensions can vary!):
- 3 pieces of 1×12 @ 33 inches: These will form the crucial top, bottom, and one key vertical support of your cubby’s main frame. If using 3/4-inch MDF, you’ll typically need to have a standard sheet ripped down to a 1×12 equivalent (which is actually around 11 1/4 inches wide) at your local lumberyard.
- 2 pieces of 1×12 @ 24 inches: These pieces will serve as the strong side supports, defining the overall height and structural integrity of your cubby.
- 4 pieces of 1×12 @ approximately 11 3/4 inches: These are your crucial cubby dividers, creating the individual compartments. It’s highly recommended to build the main shelf frame first, then precisely measure the interior distances for these individual dividers to ensure a perfect, snug fit for each section. Exact measurements here are key to achieving a professional, gap-free finish.
- 2 pieces of 1×3 (furring strips) @ 33 inches: These strips provide critical reinforcement for mounting the cubby securely to the wall and add additional structural stability to the overall frame.
- 1 piece of 1/4-inch MDF @ 24 inches x 33 inches: This thinner, lighter-weight MDF will form the backing of your cubby. It gives the unit a clean, finished appearance and further enhances its stability once assembled.
Before diving into construction, it’s always a good practice to double-check all your measurements and cuts against your actual space. Precision at this stage will save significant time and frustration later in the assembly process. Don’t hesitate to ask your lumber supplier to make the initial rips for you if you lack the tools or confidence for handling large sheet goods, as this ensures straight and accurate starting cuts.
Tools and Techniques for Sturdy Construction:
Building a robust storage unit requires a few essential tools, particularly for creating strong, concealed joints that contribute to a polished final product. The Kreg Jig is an indispensable tool for DIYers, enabling the creation of strong, angled pocket holes that make assembly straightforward and result in a clean, professional finish. Coupled with a reliable cordless drill, pocket hole joinery forms the backbone of this project, offering exceptional strength without visible hardware on the finished surface.
To begin the assembly, pocket holes were carefully drilled at the ends of each of the 33-inch boards that form the main frame. A crucial tip for achieving a seamless aesthetic: ensure these pocket holes face upwards or inwards during assembly. This simple trick ensures that once the cubby is installed above the refrigerator, the screws are completely hidden from view, maintaining the clean lines and polished look of your custom build. Use appropriate screws for pocket holes (typically coarse-thread for MDF or softwood, fine-thread for hardwood) and always clamp your pieces firmly before driving screws.
The main structure was meticulously assembled, utilizing high-quality Gorilla Glue Wood Glue for enduring strength. Wood glue is paramount in furniture construction, as it creates joints that are often stronger than the wood itself once fully cured and allowed to dry properly. For the internal dividers, which require precise placement and immediate hold while the glue sets, a brad nailer proved invaluable. This tool allows for quick, secure fastening without leaving large, unsightly nail holes, ensuring the dividers stay perfectly aligned as the wood glue dries. This two-pronged approach of glue and fasteners contributes significantly to the cubby’s overall rigidity, durability, and professional appearance.
Finishing Touches and Secure Installation:
Once the structural integrity of the cubby was complete, the focus shifted to aesthetics and, critically, secure mounting. The chosen finish was a beautiful cream-colored latex paint, specifically Behr Cozy Cottage in a satin sheen. This soft, neutral tone provides a timeless look that complements various kitchen decors, creating a bright and inviting feel while ensuring durability against kitchen elements. When painting MDF, always remember to apply a good quality primer first. MDF is very porous and will “drink” the first coat of paint, so priming ensures optimal adhesion and a smooth, even topcoat. Light sanding between coats will achieve a professional, glass-like finish.
Adding small details can dramatically elevate a DIY project from homemade to custom-made. In this case, charming card holders found conveniently on Amazon were the perfect accent. These not only add a touch of “general store” character and farmhouse chic appeal but also provide a practical way to label the contents of each cubby. This enhances both its visual appeal and organizational functionality, making it easy to identify spices, grains, or other stored items at a glance. Their quick delivery was an added bonus, allowing the project to progress swiftly to its final stages.
The backing of the cubby was created using the 1/4-inch MDF, providing a clean, finished look and adding further structural rigidity to the entire unit. However, the most critical step for any wall-mounted storage unit, especially one made from MDF which can be quite heavy, is secure installation. Safety must be the top priority to prevent accidents. To hang this substantial piece, the only recommended method is to locate the wall studs using a reliable stud finder. Screws were then driven directly through the backing of the cubby and into these solid wood studs. This technique ensures that the cubby is anchored directly into the structural framework of your home, preventing any risk of it pulling away from the wall, even when fully loaded with kitchen essentials. Never rely solely on drywall anchors for heavy shelves or those that will hold considerable weight; studs provide unmatched security.
Transforming Your Kitchen: Functionality Meets Farmhouse Chic
With the cubby securely mounted and beautifully finished, the truly exciting part began: transforming this empty space above the fridge into a functional and charming kitchen hub. The goal was twofold: to maximize storage in a notoriously tricky area and to add a touch of personalized style that complements the kitchen’s aesthetic. Who couldn’t use a little extra, beautifully organized storage in the kitchen, especially for commonly used items that often clutter countertops or pantries? This cubby becomes a stylish, accessible solution for everyday needs.
The search for the perfect storage containers led to a delightful discovery: generously sized glass canisters at Target, priced incredibly affordably at just $5.30 each. These weren’t just economical; their impressive size meant they fit perfectly within each cubby compartment, creating a cohesive and visually appealing display. Glass canisters are an excellent choice for kitchen storage, offering transparency to easily identify contents, an airtight seal to keep perishables fresh, and a classic aesthetic that never goes out of style. They effortlessly blend practicality with elegance.
Styling Your Cubby: Practical and Pretty Storage Ideas
Filling the cubbies became an enjoyable exercise in both practicality and aesthetics. The chosen items were everyday kitchen staples, transforming mundane ingredients into decorative elements that are both useful and visually appealing. Here are some ideas for filling your new cubby compartments:
- Coffee Beans: For the daily brew, keeping them fresh, aromatic, and easily accessible for your morning routine.
- Flour: A baking essential, beautifully displayed and ready for all your culinary adventures.
- Rice: For quick and easy meals, a versatile pantry item that looks great in a clear jar.
- Sugar: Both for baking and sweetening beverages, adding a touch of sweetness to your kitchen decor.
- Noodles/Pasta: Various shapes and colors can add visual interest and texture to your cubby display.
- Chalk: While perhaps unconventional, this is a charming idea if you have a chalkboard in your kitchen for notes, recipes, or menus, adding a personal, rustic touch. Other fun decorative ideas could include colorful baking sprinkles, cookie cutters, small decorative plants, or even a collection of unique spices.
The result was nothing short of transformative. The once-empty, awkward space now felt purposeful, vibrant, and perfectly integrated into the kitchen’s design. The “monkey on my back” – the lingering frustration of that neglected spot – was finally gone, replaced by a sense of accomplishment and visual harmony. This custom DIY storage cubby wasn’t just a functional addition; it was a beloved new feature, enhancing both the utility and the aesthetic appeal of the entire kitchen. The satisfaction of building something both beautiful and incredibly useful, tailored precisely to your needs, is truly unparalleled.
Affordable Elegance: The Cost of Your Custom DIY Storage Solution
One of the most appealing aspects of tackling a DIY project like this custom storage cubby is the incredible value it offers compared to purchasing a pre-made, custom-sized unit. Finding off-the-shelf solutions that perfectly fit awkward spaces like the one above a refrigerator can be nearly impossible, and custom cabinetry comes with a hefty price tag. The total cost for the raw materials for this particular cubby was a remarkably low $15. This budget-friendly figure was achievable largely due to the strategic use of a half-sheet of 3/4-inch MDF, a remnant from another project, underscoring the benefits of efficient material utilization in DIY endeavors. Furthermore, the charming decorative cardholders, which add so much character and organizational functionality, were acquired for only $15, including shipping! This brings the grand total for a beautifully customized, highly functional piece of kitchen furniture to a mere $30. When considering the cost of custom cabinetry or even off-the-shelf alternatives that don’t quite fit, this DIY solution represents extraordinary savings and personalized appeal. The remaining portion of the MDF sheet was saved for future projects, further maximizing value and reducing waste.
Beyond the Kitchen: Versatile Applications for Your DIY Cubby Design
While this particular cubby found its perfect home above the refrigerator, the fundamental design principles and the satisfaction of building it are incredibly versatile. The same concepts of custom sizing, thoughtful organization, and creative problem-solving can be applied to countless other areas throughout your home, tackling various storage dilemmas with style and efficiency.
- Craft Room Organization: Imagine a similar cubby system in a craft room, perfectly sized to hold skeins of yarn, craft paints, fabric scraps, or various tools. Labeling with the cardholders would make finding supplies a breeze and keep your creative space tidy.
- Bathroom Storage: Small bathrooms often lack adequate storage. A custom cubby could fit snugly above the toilet, holding extra towels, toiletries, or decorative items, freeing up precious counter space and adding a touch of elegance.
- Entryway or Mudroom: A cubby near the entrance could be transformed into an ideal drop-zone for keys, mail, hats, or small bags, keeping clutter at bay and creating a welcoming, organized entry point for your home.
- Kids’ Rooms or Playrooms: Adapt the dimensions to create cubbies for toys, books, or art supplies. This not only helps teach children about organization but also keeps their spaces tidy and functional, making clean-up time easier.
- Home Office: For a more organized workspace, these cubbies can hold office supplies, binders, reference materials, or decorative elements, creating a custom built-in look without the custom price tag, enhancing productivity and aesthetics.
- Laundry Room: Utilize vertical space in the laundry room to store detergents, stain removers, or other cleaning supplies neatly within custom-sized cubbies, keeping essentials within reach but out of sight.
The adaptability of this DIY cubby design truly highlights the power of handmade solutions. Each project becomes an opportunity to express your personal style, meet specific storage needs, and add unique, custom-fitted pieces that enhance the functionality and beauty of your entire home. The confidence gained from successfully completing one project often inspires a cascade of new ideas and transformations throughout your living spaces, proving that a little effort can go a long way in creating the home of your dreams.
Conclusion: Embrace the Power of DIY Home Transformation
The journey from an awkward, empty space above the refrigerator to a beautifully organized and highly functional custom storage cubby is a testament to the power of DIY. It demonstrates that with a little inspiration, careful planning, and the right tools, you can solve common home design challenges creatively and affordably. This project not only brought much-needed storage and visual harmony to our kitchen but also instilled a deep sense of accomplishment and pride in a space that once felt incomplete.
We encourage you to look at those overlooked spaces in your own home with fresh eyes. Is there an area waiting for a similar transformation? Dive into a DIY project, customize it to your heart’s content, and experience the profound satisfaction of creating something truly unique and practical. The transformation of your living space, combined with the pride of craftsmanship, is an incredibly rewarding experience that makes your house truly feel like home. Thanks for joining us on this creative journey; we hope it inspires your next home improvement adventure!