
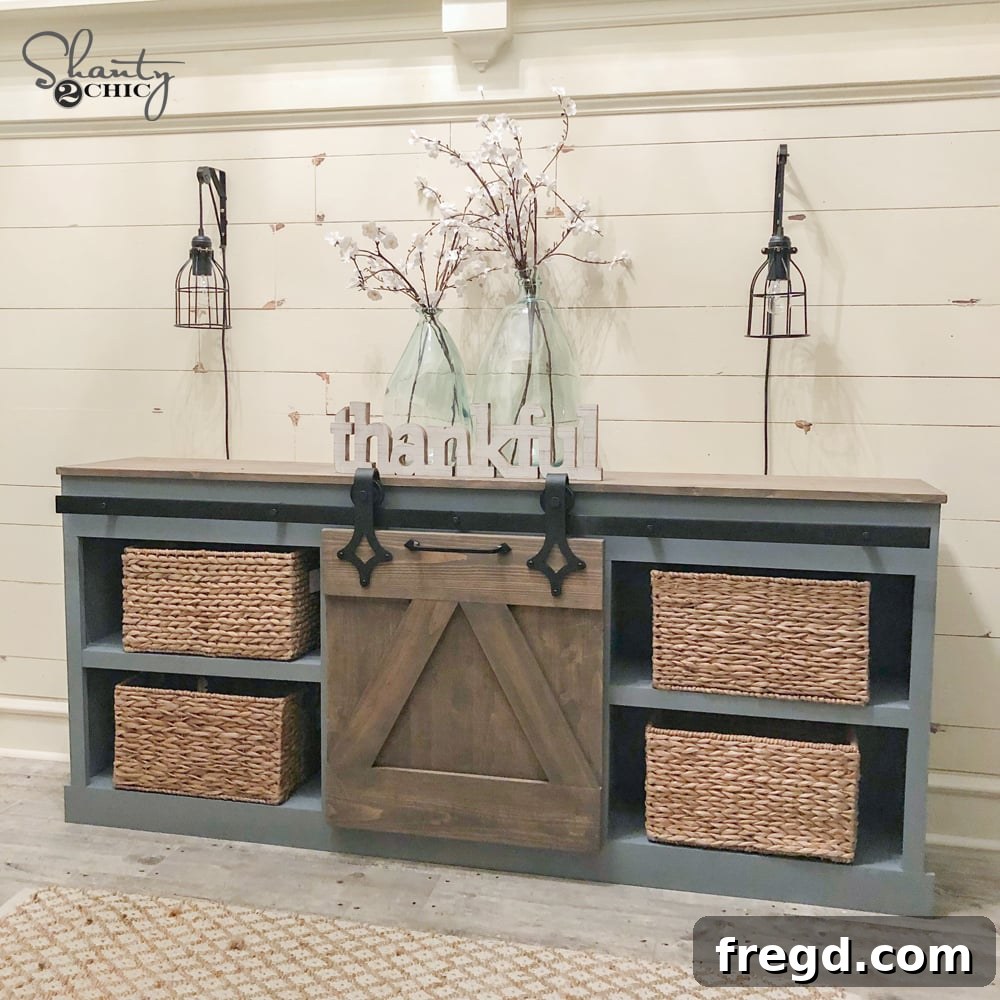
Embark on an exciting journey to transform your living space with a custom-built piece of furniture! My absolute adoration for this project is through the roof. Just look at this incredibly charming DIY Sliding Barn Door Console! It’s not just a console; it’s a statement piece that blends rustic elegance with practical functionality, perfect for any entryway, living room, or hallway. This project proves that with the right tools and a little dedication, you can create something truly spectacular. We proudly partnered with Purdy, a name synonymous with professional-grade painting tools, to demonstrate precisely how using high-quality supplies makes a world of difference in the final product’s appearance and durability. Prepare to be inspired as we guide you through crafting your very own farmhouse-style console that will impress everyone who sees it. Get ready to dive into the details and unlock the secrets to achieving a flawless finish!
To ensure you have all the visual guidance you need throughout this ambitious yet rewarding DIY project, we’ve prepared a comprehensive video tutorial. You can effortlessly follow along with every step of the build by checking out the detailed YouTube video tutorial HERE. This video offers an invaluable resource, showcasing techniques, tips, and tricks that will make your building process smoother and more enjoyable. Whether you prefer to watch the entire process before you begin or follow along section by section, our video is designed to clarify any uncertainties and build your confidence. Just click the link below to start watching and visualizing your beautiful new console coming to life!
Before you even pick up your first tool, laying a solid foundation with clear instructions is key to a successful DIY project. We’ve simplified this for you by providing meticulously detailed plans. These plans are your blueprint, guiding you through every cut, joint, and attachment point. To ensure you have all the measurements and assembly details right at your fingertips, be sure to download and print the FREE PLANS by clicking HERE! Having these plans printed out allows you to easily refer to them as you work, make notes, and double-check your progress, dramatically reducing the chances of errors and making the entire process more efficient and enjoyable. Don’t skip this crucial preparatory step – it’s the cornerstone of a successful build!
The journey to constructing your elegant DIY sliding barn door console begins with the fundamental step of assembling the core frame, essentially the sturdy box that forms the console’s body. For this critical component, we recommend using high-quality 3/4″ hardwood plywood. Hardwood plywood offers superior strength, stability, and a smoother finish, which is essential for furniture that will see daily use. To make transporting these large sheets of plywood more manageable and to ensure perfectly straight edges, I had the friendly associates at my local hardware store rip my plywood into precise 12″ wide boards. This simple step can save you considerable time and effort, especially if you don’t have a large table saw at home. Once the plywood was ripped to width, I then meticulously made all my cross cuts to the specified lengths using my miter saw. A miter saw is ideal for making accurate, clean crosscuts, which are crucial for square corners and a professional-looking frame. Precision in these initial cuts will pay dividends in the overall quality and stability of your console.
For joining the plywood panels, I relied on the indispensable Kreg Jig to create robust 3/4″ pocket holes. If you’re new to woodworking, a Kreg Jig is a game-changer, allowing you to create strong, concealed joints that are both aesthetically pleasing and structurally sound. The beauty of pocket hole joinery lies in its simplicity and effectiveness, creating a virtually invisible connection that holds tight. Our comprehensive plans clearly indicate where to strategically place each pocket hole, ensuring optimal support and stability for your console’s frame. After drilling all the necessary pocket holes, I proceeded to assemble the frame, using a generous amount of wood glue in conjunction with 1.25″ pocket hole screws. The combination of wood glue and screws creates an incredibly strong bond, preventing any wobbling and ensuring your console will stand the test of time, enduring years of use and admiration. This careful attention to detail in the frame assembly sets the stage for the rest of your build.
With the primary vertical and horizontal framework of your console firmly established, the next crucial step involves attaching the top 1×6 board. This piece is not merely decorative; it serves a vital structural purpose as the anchor for the sliding barn door hardware, which will be installed in a subsequent step. Its placement along the front and top of the console box needs to be precise and incredibly secure to reliably support the weight and movement of the barn doors. To achieve maximum strength and stability for this essential component, attach it meticulously using both wood glue and 1.25″ pocket hole screws. The wood glue provides an immediate strong bond and fills any microscopic gaps, while the pocket hole screws clamp the board firmly in place, ensuring a rock-solid connection that won’t loosen over time. This robust attachment guarantees that your barn door mechanism will operate smoothly and reliably for years to come, making it a truly functional and durable piece of furniture.
Moving gracefully towards refining the console’s aesthetics, it’s now time to install the bottom trim. This addition plays a significant role in giving your DIY barn door console a finished, polished appearance, neatly concealing the raw edges of the plywood and adding a touch of custom craftsmanship. Begin by attaching the two side trim pieces first. Carefully apply wood glue along the edges where the trim will meet the console frame, ensuring even coverage for a strong bond. Then, secure these pieces firmly in place using nails. Once the side pieces are set, proceed to attach the longer front board. Just like with the side pieces, apply wood glue generously before positioning the front trim. Using nails will quickly hold it in place while the glue dries, creating a seamless and sturdy connection. This methodical approach ensures that your bottom trim is perfectly aligned and robustly attached, contributing significantly to the console’s overall structural integrity and visual appeal, elevating it from a simple box to a sophisticated furniture piece.
With the console’s outer framework taking shape, our focus now shifts to the interior functionality by adding the shelves. These shelves are essential for organizing your belongings, whether it’s media components, books, or decorative items, maximizing the utility of your sliding barn door console. To ensure these shelves are incredibly secure and present a clean, professional appearance, they will be attached using a combination of wood glue and 1.25″ pocket hole screws. The clever placement of these pocket holes is key: they are strategically drilled on the bottom side of each shelf board. This ingenious positioning means that once the shelves are installed, the screw heads will be completely hidden from view when looking into the console, maintaining a seamless and uncluttered aesthetic. Apply wood glue along the edges where the shelves meet the console frame, then firmly secure them with the pocket hole screws. This method provides a superior hold, ensuring your shelves can bear significant weight without sagging or shifting, making your console both beautiful and highly functional.
With the main structure and internal shelving in place, it’s time to add the front trim boards, which will significantly enhance the console’s overall aesthetic and give it that custom, built-in appearance. These trim pieces are typically 1×2 boards, which provide a clean, crisp frame for the console’s openings. For the best possible fit and a truly professional finish, we strongly advocate for a “measure and cut at this point” approach rather than pre-cutting all the pieces. This ensures that each trim board is precisely tailored to the specific dimensions of your console, accounting for any minor variations that might have occurred during previous assembly steps. Begin by attaching the vertical trim boards first, securing them with a combination of wood glue for a strong, lasting bond, and finish nails to hold them snugly in place while the glue cures. Once the vertical pieces are affixed, measure and cut the horizontal boards to span the exact distance between them. This meticulous process guarantees tight joints and a perfectly framed look. The front trim is where attention to detail truly shines, elevating your DIY console to a piece of furniture that looks professionally crafted.
The crowning glory of your console is the top board, which provides a durable and attractive surface for displaying decor, holding a television, or simply adding to the room’s ambiance. For this, we selected a pine project panel, a popular choice readily available in the common board aisle at most hardware stores. Pine project panels are favored for their smooth surface, ease of working, and consistent grain, making them ideal for furniture tops. Although I used my table saw to rip my panel down to the precise width needed for the console, remember that many hardware stores offer cutting services. Don’t hesitate to ask them to make the rip cuts for you if you don’t have access to a table saw or prefer the convenience. For the exact length, I employed my miter saw to make the clean cross cut. Once your top board is cut to perfection, a clever assembly trick ensures a flawless finish: lay the top board down with its best side facing the floor. Then, carefully invert your console body and place it upside down directly on top of the pine panel. This method allows you to attach the two components securely from the underside using 1.25″ pocket hole screws, creating a seamless top surface without any visible fasteners. This thoughtful approach ensures both structural integrity and a beautifully finished aesthetic for your console.
Now, let’s turn our attention to constructing the charming barn doors, which are surprisingly simple to build and add that signature farmhouse touch to your console. These doors also start with a pine project panel, cut to the specific size outlined in your plans. The real character comes from the decorative trim, which we create using inexpensive pine craft boards. These thin boards are perfect for adding dimension and style without adding significant bulk or cost. Begin by attaching the horizontal craft boards to the pine panel. Apply wood glue to the back of the trim pieces, then secure them with small 5/8″ nails. These nails are discreet and hold the trim firmly while the glue dries, ensuring a durable bond. Next, for the iconic “X” or diagonal barn door design, carefully line up your diagonal craft boards. This step requires a bit of patience and precise marking to achieve a tight, clean fit where the diagonal pieces meet the horizontal ones. Once you’ve marked your cut lines, use a miter saw to make accurate angled cuts. Again, use wood glue and 5/8″ nails to attach these diagonal pieces. The result is a beautifully paneled door that perfectly embodies the rustic charm of a sliding barn door, ready to glide gracefully across your console.
And now for the truly transformative step – the finish! This is undeniably the most exciting and rewarding part of any woodworking project, as it’s where your console truly comes alive and reveals its unique character. It’s utterly amazing how a well-chosen coat of paint or stain can completely alter the entire look and feel of a piece, turning raw wood into a masterpiece. To achieve a stunning contrast and highlight the natural beauty of the wood, I began by staining the sliding barn door and the console top. For this task, I reached for a Purdy 2.5” Syntox brush – and let me tell you, it made all the difference. The Syntox brush is a master-class synthetic brush specifically engineered to deliver an exceptionally smooth, mirror-like, and even finish with a variety of coatings, including latex and oil-based stains, paints, varnishes, and clears. Its fine, soft bristles ensure precise application and eliminate unsightly brush marks, allowing the rich grain of the wood to shine through beautifully on the door and console top. The precision and control offered by this brush truly elevated the staining process, guaranteeing a professional-quality result.
To create a cohesive yet dynamic look, I decided to paint the main body of the console. This decision allowed for a beautiful interplay between the stained wood elements and a fresh, contrasting color. To make this part of the finishing process incredibly fast, simple, and efficient, I opted for another set of exceptional tools from Purdy. I utilized a Purdy NEST 9” Paint Tray, which is designed for stability and ample paint capacity, minimizing refills and maximizing workflow. Paired with this, I used the Purdy Revolution Jumbo Mini Roller Frame outfitted with their Ultra Finish Roller Covers. This combination is a dream come true for achieving a factory-like finish with minimal effort. The mini roller’s compact size allowed for excellent maneuverability in all the console’s nooks and crannies, while the Ultra Finish Roller Cover ensured an incredibly smooth application without any texture or stippling. For the paint itself, to truly enhance the rustic, farmhouse feel of the console, we consciously selected HGTV HOME by Sherwin-Williams INFINITY® Interior Complete One-Coat Paint & Primer in the sophisticated shade of Software (HGSW1463), finished with a beautiful satin sheen. This particular paint was chosen for its exceptional one-coat coverage, eliminating the need for a separate primer, which saved valuable time and effort. The color “Software” provided a subtle, earthy tone that perfectly complemented the stained door, while the satin finish added a touch of elegance and durability, making the console not just visually appealing but also easy to clean and maintain.
Seriously, I absolutely fell in love with this Purdy roller system! The microfiber roller cover is nothing short of amazing, often referred to as “the bomb” in DIY circles for its superior performance. I was genuinely astonished to find that I had the entire console cabinet painted in under 30 minutes – a testament to the efficiency and quality of these tools. What truly impressed me was how effortlessly it picked up and distributed the paint. Every stroke was consistent, applying an incredibly even coat across all surfaces. This meant I never once had to contend with frustrating paint drips, unsightly streaks, or the roller dragging or catching on the wood, which can often mar a perfect finish. The combination of the Purdy Revolution Jumbo Mini Roller Frame and the Ultra Finish Roller Covers provided unparalleled control and a smooth glide, making the painting process not just fast, but genuinely enjoyable. This roller system truly delivered a professional-grade finish that would typically require hours of meticulous work, proving that investing in quality painting tools from Purdy is a wise decision for any DIY enthusiast aiming for flawless results.
After allowing everything to thoroughly dry, the moment arrived to add the hardware – the final touch that truly brings the sliding barn door console to life. The hardware selection is pivotal in completing the rustic aesthetic and ensuring the smooth functionality of the doors. I embarked on a quest to find the perfect set, and I was absolutely thrilled to discover the MOST amazing barn door hardware kit. What made this find truly extraordinary wasn’t just its impeccable style, which perfectly complemented the farmhouse design, but its unbelievable affordability. Can you believe it was under $40? That’s truly crazy for such a high-quality and visually striking set! High-quality hardware doesn’t have to break the bank, and this discovery proved that you can achieve a premium look without the premium price tag. Finding such a gem was a definite highlight of the project, ensuring the console’s barn doors glide effortlessly and look fantastic doing it. You can find it HERE!
And here she is, proudly standing all finished up in my entryway! The sense of accomplishment and the sheer joy of seeing this DIY project come to fruition are immeasurable. I am absolutely delighted with how this sliding barn door console turned out; it’s even more stunning than I had envisioned. It seamlessly blends functionality with beautiful farmhouse aesthetics, offering both storage and a captivating focal point in my home. A significant part of this success, especially in achieving such a professional and polished appearance, can be attributed directly to the Purdy tools we used throughout the finishing process. The quality of the Purdy Syntox brush for staining and the Purdy Revolution Jumbo Mini Roller with Ultra Finish Roller Covers for painting truly made all the difference in the look and feel of the final product. The paint finish is incredibly smooth and perfectly even, with absolutely no streaking, bubbling, or brush marks in sight. This console stands as a testament to what can be achieved with thoughtful design, careful craftsmanship, and the unparalleled performance of high-quality painting tools. It’s more than just a piece of furniture; it’s a labor of love that now enhances my home, embodying the charm and character of a true farmhouse masterpiece.