
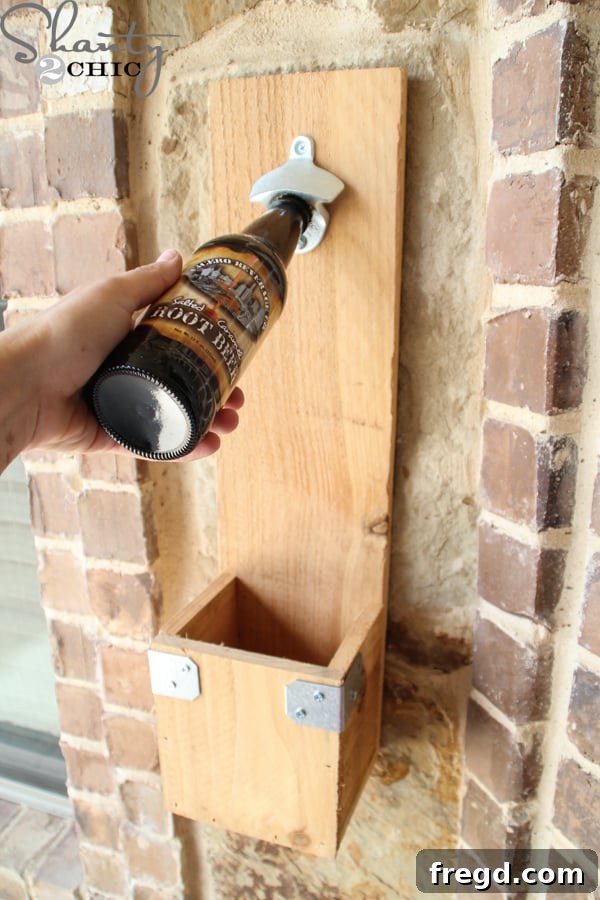
DIY Bottle Opener with Cap Catcher: The Perfect Easy Woodworking Project
Looking for a project that’s both fun to make and incredibly practical? This guide will walk you through creating a stylish and functional DIY bottle opener complete with a convenient cap catcher. It’s an ideal project for beginners, budget-friendly, and makes a fantastic personalized gift for occasions like Father’s Day, birthdays, or just because. Imagine the satisfaction of crafting something useful for your home bar, patio, or kitchen – a piece that truly reflects your personal touch. This isn’t just a tool; it’s a statement piece that will gather appreciation (and bottle caps!) for years to come.
Why Build Your Own Custom Bottle Opener?
The appeal of a DIY bottle opener extends beyond mere functionality. Firstly, it offers a unique opportunity to create a custom item that perfectly matches your home decor or reflects the personality of its recipient. Unlike mass-produced alternatives, your handmade version will possess character and a story. Secondly, it’s an incredibly satisfying project that even novice woodworkers can complete with confidence. The steps are straightforward, and the materials are readily available. Finally, it’s a gift that keeps on giving – practical for entertaining, a conversation starter, and a constant reminder of your thoughtful effort. Plus, the integrated cap catcher keeps things tidy, preventing stray bottle caps from cluttering your space.
Gathering Your Materials: What You’ll Need
One of the best aspects of this project is its affordability and flexibility. You can often use scrap wood, keeping costs to a minimum. For this specific build, we utilized cedar fence plank scraps, left over from a previous project like our popular DIY Planters. If you don’t have cedar scraps lying around, a single 1x6x6 common board from your local hardware store (like Home Depot) is an excellent and inexpensive alternative, typically costing around $3. Cedar is fantastic for its natural resistance to rot and insects, making it ideal for outdoor use, but pine or spruce will work just as well, especially if you plan to paint or seal it. Beyond the wood, you’ll need a few essential pieces of hardware to bring your bottle opener to life:
- Wood (cedar fence plank scraps or a 1x6x6 board)
- Wood glue (a strong, reliable bond is key)
- Finishing nails (various lengths, suitable for your wood thickness)
- Wall-mounted bottle opener hardware (zinc or cast iron are popular choices)
- Decorative metal brackets (optional, but add a nice rustic touch)
- Small screws (for attaching brackets and the bottle opener)
Essential Tools for the Job
This project is designed to be accessible, meaning you don’t need a full workshop of power tools. A simple hand saw will suffice for all your cutting needs, making it perfect for those new to woodworking or who have limited tools. However, if you do have access to power tools, they can certainly speed up the process and improve precision. Here’s a list of tools that will come in handy:
- Saw (hand saw, miter saw, or circular saw)
- Measuring tape
- Pencil
- Wood clamps (optional, but helpful for gluing)
- Hammer (for finishing nails) or a finishing nailer (e.g., Ryobi Airstrike Nailer)
- Drill (for pilot holes and attaching screws)
- Safety glasses
Step-by-Step Guide: Building Your Bottle Opener
1. Prepare Your Wood Pieces
Accuracy in cutting is important for a clean finish. Start by carefully measuring and marking your wood. For this design, you will need five individual pieces. If you’re working with a 1×6 board, measure and cut the following:
- Three pieces at 4 inches long (these will form the sides and back of your cap catcher)
- One piece at 6 inches long (this will be the front of your cap catcher)
- One piece at 21 inches long (this is the main backboard that everything attaches to)
When cutting, ensure your lines are straight and your cuts are clean. If using a hand saw, take your time. A miter saw will provide the most precise and square cuts, which are crucial for the tight joints of the cap catcher. Once cut, give the edges a light sanding to remove any splinters and prepare the wood for assembly. This attention to detail contributes to a professional-looking finished product.
2. Assemble the Bottle Cap Catcher Box
This part involves creating a small box that will efficiently collect all those discarded bottle caps. Take your three 4-inch pieces. You’ll use wood glue and finishing nails to join them together into a ‘U’ shape. Apply a generous, even layer of wood glue to the ends where the pieces will meet. Then, secure them with finishing nails. If you have a finishing nailer, this step is quick and easy. If using a hammer, make sure to use a nail set to sink the nail heads slightly below the surface for a cleaner look. Ensure the corners are square as you assemble; clamps can be helpful here to hold the pieces while the glue sets and you drive the nails.
3. Attach the Front Panel of the Cap Catcher
Now, take the 6-inch piece you cut earlier. This piece will form the front of your bottle cap catcher, completing the box structure. Apply wood glue along the edges of the assembled ‘U’ shape where the 6-inch piece will connect. Carefully align the 6-inch piece with the front of your 4-inch sections and secure it firmly with finishing nails. Again, using a nailer makes this process incredibly fast, but a hammer and careful aim will yield the same sturdy result. Once this step is done, you’ll have a fully assembled box ready to catch caps!
Your bottle cap catcher box should now be fully formed and resemble a small, open-top container. This little compartment is specifically designed to collect and store the caps, keeping your area tidy and making cleanup a breeze. Give the glue a few minutes to set before moving on to ensure a strong bond.
4. Mount the Cap Catcher to the Main Backboard
Now it’s time to integrate your cap catcher with the main structure of the bottle opener. Take your longest piece of wood, the 21-inch backboard. Apply wood glue to the back surface of the assembled bottle cap catcher. Ensure full coverage for maximum adhesion. Carefully position the cap catcher onto the 21-inch board, typically centered towards the bottom, leaving enough space at the top for the bottle opener hardware. Once positioned, secure the cap catcher from the back of the 21-inch board using finishing nails, driving them into the back of the cap catcher. This method ensures a clean look from the front and provides a robust connection.
5. Install the Bottle Opener Hardware
With the cap catcher firmly in place, it’s time to add the crucial element: the bottle opener itself. We opted for a durable zinc bottle opener, similar to the one used in our popular DIY Cooler project, easily sourced from online retailers like Amazon. Position the bottle opener hardware towards the top of the 21-inch backboard, ensuring there’s ample space above the cap catcher for bottles to be opened without obstruction. Mark the screw holes with a pencil, then pre-drill pilot holes using a drill bit slightly smaller than your screws. This prevents the wood from splitting, especially with cedar. Finally, secure the bottle opener firmly with the appropriate screws. Make sure it’s mounted straight and tight, as it will endure repeated use.
6. Add Decorative Metal Brackets
To give your DIY bottle opener a finished, rustic, or industrial look, consider adding decorative metal brackets to the corners. We found ours for under $1 each at Home Depot, proving that small details don’t have to break the bank. These brackets aren’t just for aesthetics; they can also add a minor degree of structural reinforcement, though the wood glue and nails provide the primary strength. Position a bracket on each of the four corners of the 21-inch backboard. Mark the screw holes, pre-drill pilot holes, and then attach them with small screws. This step adds a professional and visually appealing touch that elevates the entire project from simple woodcraft to a polished home accessory.
With the brackets securely attached, your DIY bottle opener is now fully assembled and ready for its finishing touches. The combination of wood and metal creates a charming aesthetic that fits well in various settings, from a rustic farmhouse kitchen to a modern outdoor patio. Take a moment to admire your handiwork!
Finishing Touches and Customization Ideas
While your bottle opener is functional right after assembly, applying a finish can significantly enhance its durability and appearance. For outdoor use, a weather-resistant sealant or spar urethane is highly recommended, especially for woods like pine that aren’t naturally weather-resistant. For indoor use, a simple stain to bring out the wood grain, followed by a clear topcoat like polyurethane, can make it truly shine. You could also paint it to match your decor, use stencils for personalized messages, or even try wood burning for a unique artistic flair. Consider adding a small hook at the bottom for keys or bottle openers that aren’t mounted.
Mounting Your DIY Bottle Opener
The final step is to hang your newly crafted bottle opener in its chosen spot. For maximum stability and longevity, always aim to mount it directly into a wall stud. Use a stud finder to locate studs and mark them. If mounting to drywall where a stud isn’t available, use appropriate heavy-duty drywall anchors. For masonry walls (like a brick patio), you’ll need a hammer drill and masonry anchors. Select screws that are long enough to penetrate the wall and anchor securely, without going through the front of your bottle opener. Ensure it’s hung at a convenient height, typically around eye level or slightly below, for comfortable use. Our bottle opener found its perfect home on our back patio, ready for outdoor gatherings!
Isn’t it fantastic how a simple project can yield such a rewarding and functional item? This DIY bottle opener is not just a tool; it’s a testament to the joy of creating something with your own hands. You can whip this up in about 10 minutes for around $10, making it one of the most satisfying and budget-friendly DIY endeavors you’ll undertake. My husband absolutely loves our new DIY bottle opener, and we’re sure you and your family will too!
Conclusion: Start Your Next DIY Adventure!
We hope this detailed guide inspires you to tackle your own DIY bottle opener project. It’s a perfect blend of simplicity, utility, and personalization, demonstrating that impressive results don’t always require extensive skills or expensive tools. Whether you’re making it for yourself, as a thoughtful gift, or as a fun activity with the kids, the satisfaction of completing this project is immense. Dive into the world of DIY, and discover the endless possibilities of creating beautiful and functional items for your home. Thanks so much for stopping by! For more inspiring DIY and budget-friendly projects, especially those perfect for sprucing up your outdoor spaces, be sure to explore our other categories by clicking HERE!
~Ashley