
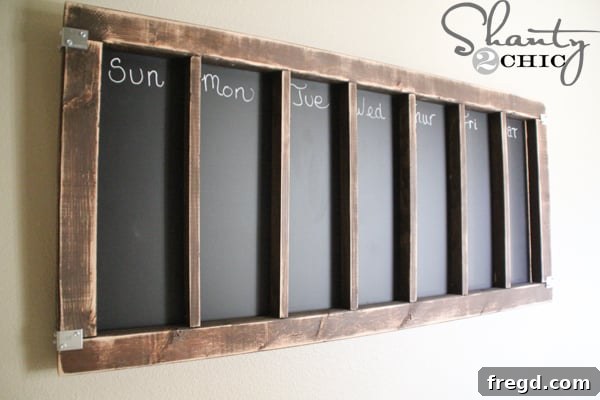
Welcome, fellow DIY enthusiasts and organization seekers! This year, I’m more determined than ever to bring order to my life, family schedules, and home environment. If you’ve ever felt overwhelmed by juggling appointments, important dates, or simply the mental load of daily tasks, you’re not alone. That constant feeling of forgetting something crucial can be incredibly stressful. But what if there was a charming, handmade solution that not only keeps you organized but also adds a beautiful rustic touch to your home decor?
I’m thrilled to share a project that promises to transform your approach to daily planning: a stylish **DIY Chalkboard Days of the Week Calendar**. This custom weekly planner isn’t just functional; it’s a stunning piece of wall art that will brighten any room. The best part? It’s incredibly easy to build and surprisingly affordable, coming in at around just $20 in materials!
Forget generic planners that lack personality. This **homemade chalkboard calendar** combines practicality with farmhouse-chic aesthetics, making it a perfect addition to your kitchen, mudroom, or home office. Let’s dive into how you can create this organizational masterpiece.
There it is – a truly gorgeous and functional **weekly chalkboard organizer**! I’m absolutely in love with the finished look. It was not only simple to construct but also incredibly budget-friendly, costing me approximately $20 to bring this vision to life. This project proves that achieving an organized and stylish home doesn’t require a hefty investment or advanced woodworking skills.
Essential Materials for Your DIY Chalkboard Calendar
Before we begin building, gathering all your materials is crucial for a smooth and efficient project. Here’s what you’ll need to create your own personalized **home organization calendar**:
- Chalkboard Sheet: One 2’x4’ sheet of chalkboard material. I found mine at Home Depot for about $10. This will serve as the main writing surface for your daily tasks and notes.
- 2×3 Boards: Three 2×3 boards, typically 8 feet long. These will form the sturdy outer frame of your calendar.
- 1×2 Board: One 1×2 board, 8 feet long. This will be cut into smaller pieces to create the individual day dividers.
- Wood Glue: A strong wood adhesive to reinforce all your joints.
- Pocket Hole Screws:
- 2 1/2-inch pocket hole screws for attaching the main frame pieces.
- 1 1/4-inch pocket hole screws for attaching the day dividers.
- Wood Stain: Rust-Oleum Dark Walnut stain (or your preferred shade) to give your frame a rich, finished look.
- “L” Brackets: Several small “L” brackets (approximately $0.50 each) for decorative and structural corner support.
- Screws for “L” Brackets: Flat-head screws that fit your “L” brackets for a cohesive, rustic aesthetic.
- Saw Tooth Hangers: Two or more for securely mounting your calendar to the wall.
- Wall Anchors: Appropriate wall anchors for the type of wall you’ll be hanging your calendar on, ensuring stability and safety.
Tools You’ll Need for This Woodworking Project
Having the right tools makes any DIY project significantly easier and more enjoyable. Here’s a list of the tools that will help you construct this **custom chalkboard planner**:
- Measuring Tape: For accurate measurements of all your wood pieces.
- Pencil: For marking cuts and pocket hole locations.
- Miter Saw or Circular Saw: Essential for making straight and precise cuts on your 2×3 and 1×2 boards.
- Kreg Jig: A pocket-hole joinery system (like the Kreg Jig K4 or K5) is highly recommended for strong, hidden joints in your frame and dividers. You can find more information about them here.
- Drill/Driver: A cordless drill is essential for drilling pocket holes and driving screws. A 12-Volt drill is perfect for smaller tasks like attaching hardware.
- Drill Bits: Specific drill bits for your Kreg Jig and pilot holes for screws.
- Foam Brush: For applying wood stain evenly.
- Rags: For wiping off excess stain.
- Sander: A power sander like the Ryobi Corner Cat Sander (or a regular orbital sander) with 80-grit sandpaper for distressing the wood.
- Stapler: A cordless stapler, such as the Ryobi Cordless Airstrike Stapler, for attaching the chalkboard panel to the frame quickly and securely.
- Safety Glasses: Always wear eye protection when cutting, drilling, or sanding.
Step-by-Step Guide to Building Your DIY Chalkboard Calendar
Step 1: Preparing Your Chalkboard Base
The foundation of our **DIY weekly calendar** is the chalkboard itself. I purchased a 2’x4’ sheet of chalkboard material from Home Depot. The beauty of this step is its simplicity – no cutting or special preparation was needed for the chalkboard panel itself. It’s ready to go as is, which saves a significant amount of time and effort. This standard size provides ample space for each day’s notes without being overly cumbersome on your wall.
Step 2: Cutting the Frame Pieces
Next, we’ll create the sturdy outer frame that will hold your chalkboard. I purchased three 2×3 boards for this purpose. From these, you’ll need to cut four pieces: two at 52 13/16 inches long, and two at 19 1/4 inches long. Precision is key here, so use a measuring tape and a pencil to mark your cuts accurately. A miter saw will give you the cleanest, most precise cuts, ensuring your frame fits together perfectly. Double-check your measurements before making any cuts to avoid waste.
Step 3: Creating Pocket Holes for the Frame
For strong and concealed joints, I used my Kreg Jig to attach the 2x3s for the frame. Pocket-hole joinery is a fantastic technique that creates robust connections without visible fasteners on the front face of your project. For each of the shorter 2×3 pieces (19 1/4 inches), drill two 1 1/2-inch pocket holes at both ends. Ensure your Kreg Jig is set to the correct depth for 1 1/2-inch thick material (which is standard for 2x3s). This precision will ensure your screws drive in perfectly flush and create a secure joint.
Step 4: Marking Pocket Holes for Easy Assembly
As you can see in the image above, marking the precise locations where I drilled my pocket holes helped immensely during assembly. This small step ensures that you’re joining the pieces correctly and that the pocket holes are positioned for optimal strength. It’s an easy but effective way to maintain accuracy and prevent mistakes, especially when you’re dealing with multiple pieces.
Step 5: Assembling the Outer Frame
With all your pocket holes drilled, it’s time to assemble the main frame of your **DIY chalkboard organizer**. Use 2 1/2-inch pocket hole screws to attach the short frame pieces to the long ones. Apply a small amount of wood glue to the joint surfaces before screwing them together for added strength and durability. Use clamps to hold the pieces flush and square while driving the screws. This creates a robust and seamless frame that will stand the test of time and hold your chalkboard securely.
Step 6: Preparing the Day Dividers
Now we’ll create the internal dividers that separate each day of the week on your **custom weekly planner**. For these, I purchased one 1×2 board, 8 feet long. You’ll need to cut six pieces from this board, each 19 1/4 inches long. These six dividers will create seven distinct sections for your calendar – one for each day. Again, ensure your measurements are precise for a clean and professional look.
Step 7: Drilling Pocket Holes for Dividers
Similar to the frame, the dividers will also be attached using pocket holes. For each of the six 1×2 dividers, drill one 3/4-inch pocket hole at each end, specifically on the “skinny side” of the board. Drilling on this edge allows the screws to enter the frame from the side, making them virtually invisible once the calendar is complete. This attention to detail contributes to the overall clean and professional finish of your **DIY organization board**.
Step 8: Attaching the Dividers to the Frame
With the frame and dividers ready, it’s time to bring them together. Attach the dividers to the main frame using 1 1/4-inch pocket hole screws and a generous application of wood glue. For even spacing, I recommend attaching your dividers approximately 6.5 inches apart from center to center. Start by measuring and marking the position of your first divider, then use that as a reference point to ensure all subsequent dividers are equally spaced. Eyeball it as well to double-check symmetry. Once all dividers are secured, the basic structure of your **rustic chalkboard calendar** is complete, and it’s ready for the finishing touches.
Step 9: Staining for a Rustic Finish
To give the wood frame a rich, warm, and inviting appearance, I applied one coat of Rust-Oleum Dark Walnut stain to the entire frame and dividers. Use a foam brush for easy and even application, working in the direction of the wood grain. After applying the stain, allow it to penetrate for a few minutes (refer to the product instructions) before wiping off any excess with a clean rag. This process brings out the natural beauty of the wood and provides a beautiful contrast to the dark chalkboard surface, enhancing the **farmhouse decor** aesthetic of your calendar.
Step 10: Achieving the Distressed Look
For that charming, worn, and rustic appeal that many DIY projects embrace, I gently distressed the stained wood. Using my Ryobi Corner Cat Sander with 80-grit sandpaper, I lightly ran it all over the frame, focusing on edges, corners, and any raised areas. The 80-grit paper is coarse enough to remove small amounts of stain and wood, creating a natural “aged” look by revealing glimpses of the lighter wood beneath. This step adds character and depth, making your **custom home planner** feel like a treasured antique rather than a brand-new build.
Step 11: Attaching the Chalkboard to the Frame
Once the stain had fully dried and the distressing was complete, it was time to attach the chalkboard panel to the back of our beautiful wooden frame. I used my Ryobi Cordless Airstrike Stapler for this task, and I honestly can’t recommend it enough! This tool is a lifesaver for backing pieces like this because it drives staples perfectly without pushing through the material. Plus, it uses the same 18-Volt battery as the rest of my Ryobi tools, making it incredibly convenient. Simply place the chalkboard panel flush against the back of the frame and secure it with staples along all edges, making sure it’s taut and firmly attached. If you don’t have a stapler, small brad nails or construction adhesive could also work, though the stapler offers unmatched speed and ease.
Step 12: Adding Decorative and Functional Hardware
To complete the rustic charm and ensure secure mounting, we’ll add the final hardware. I purchased several small “L” brackets for about $0.50 each and selected flat-head screws to complement their aesthetic. These brackets not only add a decorative touch to the corners but also provide additional structural support. For mounting the calendar to the wall, I used saw tooth hangers and appropriate wall anchors. Saw tooth hangers are easy to install on the back of the frame, and anchors ensure your calendar stays securely in place, regardless of your wall material.
Step 13: Attaching Hardware with Precision
When attaching small pieces of hardware like the “L” brackets and saw tooth hangers, I prefer to use my 12-Volt drill. Its compact size and lighter weight offer greater control and precision, minimizing the risk of over-tightening screws or damaging the wood. Carefully position your “L” brackets at the corners and the saw tooth hangers on the top back edge of the frame, then secure them with the appropriate screws. Remember to pre-drill pilot holes for your screws if you’re concerned about splitting the wood, especially in harder sections.
Making the Most of Your New DIY Chalkboard Calendar
Congratulations! You’ve successfully built a beautiful and functional **DIY chalkboard calendar** that will revolutionize your home organization. But the journey doesn’t end with construction; it extends to how you utilize this fantastic tool. Here are some tips to maximize its potential:
- Choose the Right Writing Utensils: While traditional chalk works well, consider liquid chalk markers for a cleaner look, vibrant colors, and less dust. They write smoothly and are easily erasable with a damp cloth.
- Designate Sections: Beyond just marking days of the week, you can dedicate specific columns or areas for categories like “Meal Plan,” “To-Do List,” “Appointments,” “Kids’ Activities,” or “Shopping List.”
- Regular Updates: Make it a habit to update your calendar weekly, perhaps every Sunday evening, to prepare for the week ahead. This consistency is key to staying on top of your schedule.
- Color-Coding: Use different colored chalk markers to assign specific family members, event types, or priorities to various entries. This visual cue can make a busy schedule much easier to decipher at a glance.
- Creative Flair: Don’t be afraid to get creative with your handwriting or add small doodles. This is your custom piece, so let your personality shine!
- Cleaning and Maintenance: For traditional chalk, a dry cloth or eraser works. For liquid chalk markers, a damp cloth or specialized chalkboard cleaner will keep your surface pristine. Avoid abrasive cleaners that could damage the chalkboard finish.
Why This DIY Project is a Game-Changer for Home Organization
This **custom chalkboard calendar** is more than just a pretty face; it’s a powerful tool for bringing peace and order to a chaotic household. Its benefits extend far beyond simply listing appointments:
- Enhanced Visibility: Unlike digital calendars hidden on screens, this large, physical planner is constantly visible, serving as a persistent reminder for everyone in the family.
- Family Communication Hub: It becomes a central communication point where all family members can quickly see plans, chores, and important messages, reducing misunderstandings and forgotten tasks.
- Stress Reduction: By externalizing your schedule, you free up mental space, reducing the anxiety of trying to remember everything. You literally write it down and let your board remember for you.
- Budget-Friendly Solution: For a fraction of the cost of store-bought organizational systems, you get a custom, high-quality piece that perfectly fits your style and needs.
- Eco-Friendly & Reusable: No more paper waste from disposable planners. This chalkboard can be wiped clean and reused week after week, year after year.
- Personalized Home Decor: This project isn’t just about utility; it’s about adding a unique, handcrafted element to your home that reflects your taste and effort. It elevates your space while serving a vital function.
That was IT! Seriously, I am NOT-EVEN-KIDDING! How easy was that **DIY home organization project**? Hopefully, this simple yet impactful build provides you with the motivation you need to kick your organization efforts into high gear for the new year and beyond. Creating this **rustic weekly planner** was not only a rewarding experience but also a significant step towards a more organized and harmonious home. Give it a try – you’ll be amazed at the difference it makes!