
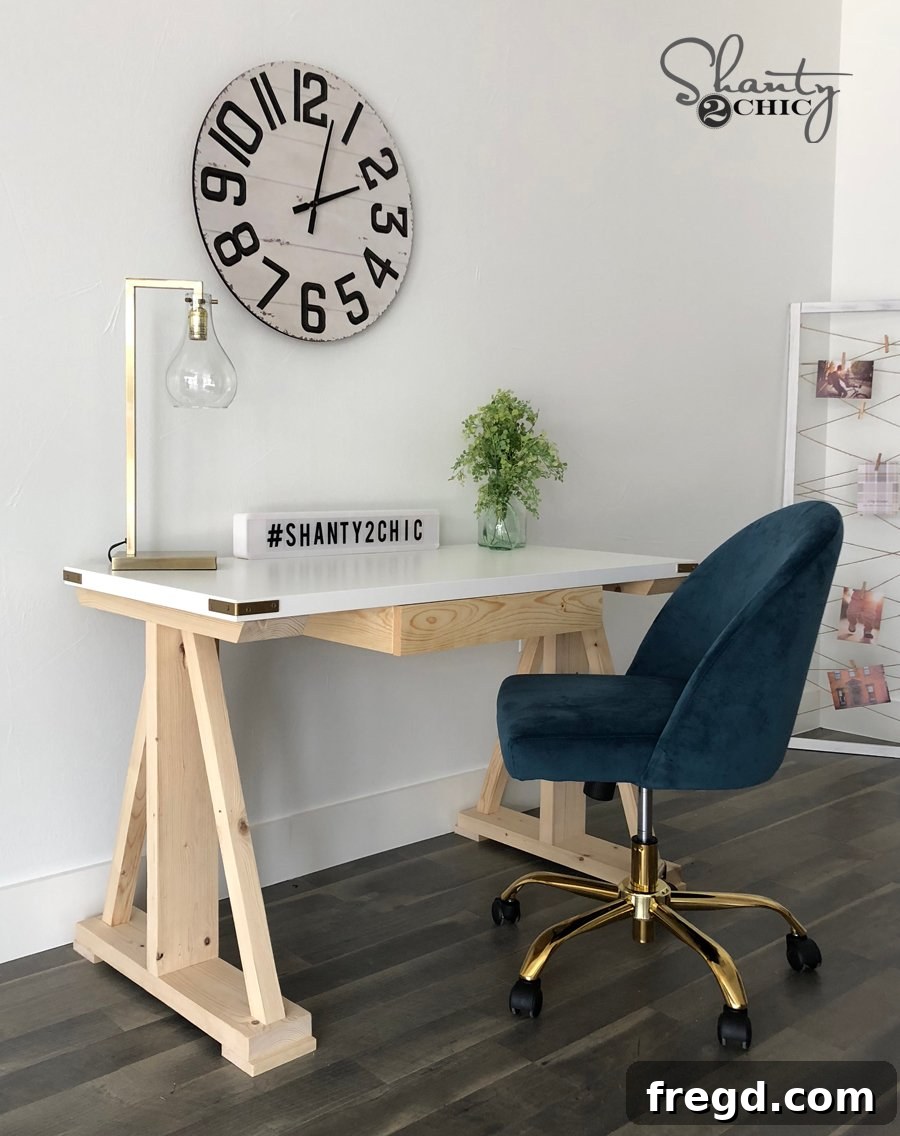
Welcome, fellow DIY enthusiasts! We are absolutely thrilled to share a monumental milestone for our brand: the grand opening of our very first dedicated office space and studio! This venture marks an exhilarating new chapter, and naturally, it brought with it the joy and challenge of decorating. Top on our list of essentials were functional and stylish desks for each of us. We envisioned something that blended modern aesthetics with a touch of rustic charm, leading us to design what we affectionately call the DIY Rustic Modern Writing Desk. What makes this project even more exciting? You can easily build this stunning piece for under $80, proving that high-end style doesn’t have to come with a hefty price tag. Before we delve into the step-by-step instructions, we highly recommend watching our comprehensive video tutorial on YouTube HERE. It offers invaluable visual guidance that complements this written guide perfectly.
To ensure you have all the precise measurements and cutting diagrams, don’t forget to download and print theFREE PLANS by clicking HERE! These detailed plans are your blueprint to success, making every cut and every joint a breeze. Building your own home office furniture can be incredibly rewarding, offering a sense of accomplishment and a piece of furniture perfectly tailored to your space and needs. This rustic modern desk project is not just about saving money; it’s about crafting a functional art piece that enhances your productivity and inspires your creativity.
Crafting the Foundation: Building the Leg Assemblies
The journey to your beautiful new writing desk begins with constructing two robust leg assemblies. These form the stable foundation of your entire desk. For this project, we opted for 2×6 boards, which we precisely ripped down to a 5-inch width. While you certainly don’t have to rip your boards if you prefer a different aesthetic or simply want to save a step, it’s crucial to note that any changes in the board width will affect the overall dimensions and visual proportions of the finished desk. This initial cut is vital for achieving the sleek, modern profile that defines our desk’s design. Precision here will pay off immensely in the final product. Always ensure your cuts are clean and square for optimal joinery and stability. Safety is paramount when using power tools, so take all necessary precautions and wear appropriate protective gear.
Once your boards are perfectly sized, you’ll attach the bottom and top horizontal boards to the vertical support piece. For a lasting and incredibly strong bond, utilize a high-quality wood glue along with 2.5-inch Spax screws. Spax screws are renowned for their superior gripping power and ease of driving, making them an excellent choice for DIY furniture projects. Apply a generous, even layer of wood glue to all mating surfaces before driving your screws. This combination of mechanical fasteners and adhesive creates a joint that will withstand years of daily use, making your custom writing desk exceptionally durable. For best results, use a powerful drill/driver to sink the screws firmly.
A critical detail for the leg assemblies is ensuring the vertical support board is perfectly centered on both the top and bottom horizontal pieces. This careful alignment is essential for both structural integrity and aesthetic balance. The top horizontal board features sides cut at a precise 30-degree angle. This intentional angle isn’t just for show; it contributes significantly to the desk’s unique rustic modern flair and prepares the leg assembly for future joinery, ensuring a seamless and visually appealing connection later in the build. Take your time with these angle cuts using a miter saw or a circular saw with a guide to guarantee accuracy. Any slight deviation here can affect the overall symmetry of your desk, so measure twice and cut once.
Adding Stability and Style: Foot Pads and Decorative Accents
With the core leg assemblies taking shape, the next step involves adding the foot pads. These are crafted from 1×6 boards, cut into precise 5-inch squares. Beyond their “cute” aesthetic contribution, these foot pads serve a vital functional purpose: they significantly enhance the stability of the desk by providing a broader base, preventing wobbling and ensuring a solid stance on any surface. They also help protect your flooring from potential scratches or dents that could occur from the raw edges of the lumber. To attach each foot pad securely, use both wood glue and 1.25-inch Spax screws. The smaller screws are ideal here, providing ample holding power without risking splitting the relatively thinner material of the foot pads. Ensure they are flush with the bottom of the vertical support for a clean finish.
Now, it’s time to integrate the decorative horizontal pieces that truly define the rustic modern appeal of this desk. These angled pieces not only add visual interest but also reinforce the leg structure. The most effective way to achieve perfectly aligned cuts for these components is to position them directly on the leg assembly and mark precisely where the cuts need to be made. This method accounts for any minor variations and ensures a custom fit for each piece. Once cut, attach these boards using wood glue and 2.5-inch Spax screws. A key technique here is to drive the screws at a slight angle, going through the top and bottom horizontal boards and into the diagonal decorative pieces. This angled approach prevents the screws from “popping out” through the front face of the decorative pieces, maintaining a clean, professional appearance, and providing an exceptionally strong, concealed connection. This attention to detail elevates the overall craftsmanship of your DIY writing desk.
Connecting the Legs: Creating the Desk Frame
With both leg assemblies meticulously constructed, the next critical step is to join them together to form the main structural frame of your writing desk. This is achieved using a “runner board” that connects the two leg sections. For this connection, we utilize 2.5-inch pocket hole screws, driven through 1.5-inch pocket holes. Pocket hole joinery, made easy with a Kreg Jig, is a fantastic method for furniture building as it creates incredibly strong joints that are also discreetly concealed. When attaching the runner, it is absolutely essential to line it up as specified in the free plans. This precise alignment is paramount because it leaves the necessary space for your drawer assembly, which will be integrated later. Misalignment here could result in a drawer that doesn’t fit or operate smoothly, so take your time, measure carefully, and double-check your spacing before driving the screws. A sturdy frame is the backbone of your desk, ensuring stability and longevity for your functional home office furniture.
Building the Desktop and Drawer Housing
Moving on to the desktop – the primary work surface of your rustic modern writing desk! For our office, we opted for a convenient white desktop from Ikea, chosen for its clean aesthetic and immediate availability. However, the beauty of DIY lies in customization! You can just as easily use a project panel from a home improvement store, or even craft a custom desktop from plywood or solid wood, as demonstrated in our video tutorial. Once you’ve selected your desktop, turn it upside down on a clean, protected surface. This allows you to comfortably work on the underside to build the frame that will meticulously house the drawer. This frame not only provides the structure for your drawer but also adds significant rigidity and support to the desktop itself. Attach the frame components together and then to the desktop using wood glue and 1.25-inch pocket hole screws. Using pocket holes on the underside ensures a clean, fastener-free top surface, maintaining the sleek design of your custom desk. This method provides a strong, concealed connection that contributes to the desk’s overall stability and aesthetic appeal.
Constructing the Drawer: Functionality Meets Design
Now, let’s build the drawer, a key functional element of any writing desk. For the drawer box, we utilized 3/4-inch plywood, carefully ripped from the same board that would serve as our drawer base. Alternatively, you could use 1×4 lumber for a slightly different construction approach. When building drawers, precision is paramount, especially concerning the spacing for your drawer slides. If you’re using the same slides we did, you’ll want to ensure a half-inch spacing on each side of the drawer box once it’s installed within the frame. However, if you choose different drawer slide hardware, be sure to meticulously check their specific spacing requirements, as these can vary significantly between brands and types. Any inaccuracies here will result in a drawer that sticks, binds, or doesn’t operate smoothly. Attach the drawer sides using wood glue for a strong bond and 1.25-inch pocket hole screws through 3/4-inch pocket holes. This creates a robust and durable drawer box ready for action in your new home office desk.
Once the drawer box is assembled, attach the drawer base to each side using 1.25-inch pocket hole screws and wood glue. This creates a solid bottom for your drawer, ready to hold all your office essentials. With the drawer box complete, you can proceed to attach your drawer slides. This step can sometimes be a bit tricky, so we highly recommend referring to our video tutorial for a detailed, visual demonstration of how we effectively attach ours. Seeing the process in action can clarify any uncertainties and ensure proper installation for smooth, effortless drawer operation. Finally, to complete the drawer, attach the drawer front to the front of the drawer box. This is where the aesthetic truly comes together. Secure it using wood glue and 1.25-inch nails for a clean, strong, and visually appealing finish. This final touch brings the entire drawer assembly to life, ready to become a useful storage solution for your DIY writing desk.
Final Assembly: Uniting Base and Top
The moment of truth has arrived – the final step in assembling your DIY rustic modern writing desk is attaching the base to the desktop. For this crucial connection, we again laid the desktop upside down. This provides the best angle and leverage for securely fastening the desk’s base to its top. Utilize both wood glue for an unbreakable bond and 2.5-inch Spax screws, driving them through the tops of the leg assemblies and the runner board directly into the tabletop. Distribute these screws strategically to ensure even pressure and maximum stability across the entire surface. This combination of adhesive and strong fasteners guarantees that your writing desk will be incredibly sturdy and ready to handle whatever tasks you throw its way. Once this step is complete, flip your desk upright, and behold – your very own custom-built, budget-friendly home office furniture is nearly complete!
The Finishing Touches: Personalization and Beyond
That’s it for the construction! Your DIY Rustic Modern Writing Desk is now structurally complete and ready for its aesthetic transformation. This is where your personal style truly shines! Whether you envision a deep, rich stain to enhance the wood’s natural grain, a vibrant paint color to add a pop of personality, or a distressed finish for that perfectly aged farmhouse charm, the possibilities are endless. Consider sanding the entire piece thoroughly to prepare the surface for your chosen finish. Applying a primer before painting will ensure better adhesion and a more durable coating. If staining, multiple coats might be needed to achieve your desired depth of color, always following the manufacturer’s instructions. A topcoat, such as polyurethane or a clear varnish, is highly recommended to protect your desk from daily wear and tear, ensuring its beauty lasts for years to come. Congratulations, you’ve built an incredible piece of custom furniture!
For more inspiration on how to style and dress up your new desk, or to find direct links to the specific products and décor items we used in our own office, be sure to revisit our video tutorial and explore our website. We love seeing your creative builds! Share your completed desks with us on social media using the hashtag #shanty2chic. It’s incredibly rewarding to see how our community takes these plans and makes them uniquely their own. Your DIY journey doesn’t end with the build; it continues with the joy of using a piece of furniture you crafted with your own hands. This budget-friendly, custom writing desk is more than just a place to work; it’s a testament to your creativity and skill.
And now, feast your eyes on how wonderfully these DIY Rustic Modern Writing Desks complement our brand new office space!