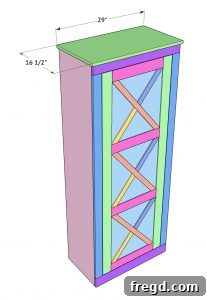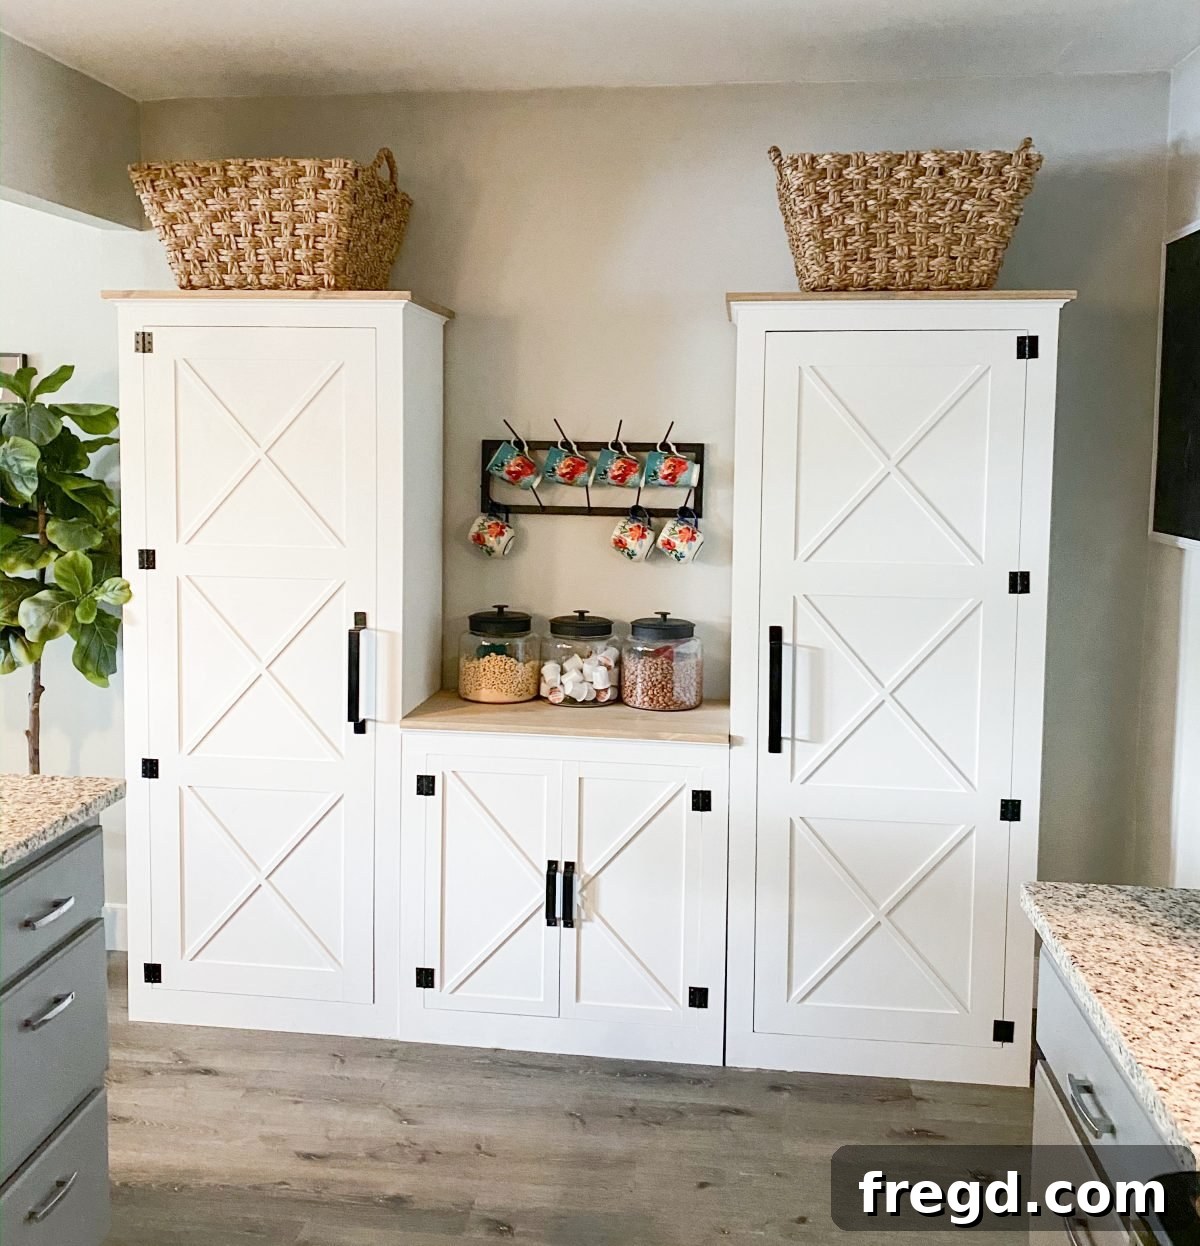
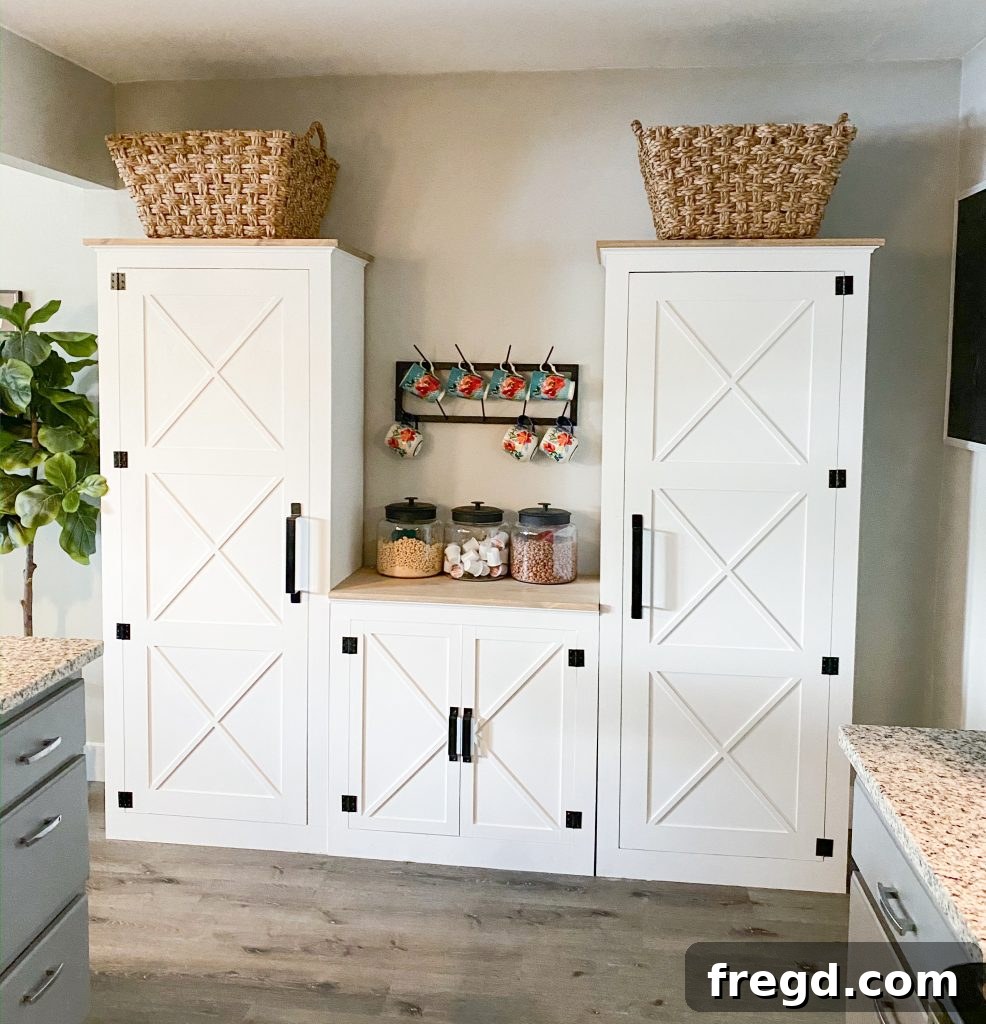
Transform your kitchen with enhanced organization and ample storage! Every home chef and busy family needs a well-designed pantry cabinet to keep ingredients, small appliances, and dinnerware neatly organized. In this comprehensive guide, we’ll walk you through the entire process of how to build a DIY pantry cabinet with free woodworking plans. This versatile and budget-friendly storage solution is an absolute game-changer, perfectly suited for small kitchens, rental properties where permanent alterations aren’t an option, or anyone simply looking to maximize their storage potential without breaking the bank.
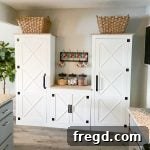
We embarked on this project for our sister, who desperately needed additional storage in her rental home. Despite a decent number of kitchen cabinets, a dedicated pantry was conspicuously absent. With five lively children, she faced a constant challenge finding space for dry goods, various kitchen gadgets, and extra dishes. This DIY cabinet pantry proved to be the ideal solution, providing much-needed relief and organization. After seeing the remarkable transformation, we’re now inspired to build one for our own home!
Ready to start building? You can find all the essential resources right here:
- > Download the free printable pantry cabinet plans at the bottom of this post.
- > Watch the step-by-step video tutorial to see every detail of the build in action.
Don’t miss out on the detailed instructions! You can download and print your FREE PLANS by navigating to the bottom of this post and clicking the provided link.
Jump to Free Plans!
Table of Contents
Why Build a DIY Pantry Cabinet?
In countless homes, kitchen storage is a precious commodity. Many kitchens, especially in older homes or rentals, lack a dedicated pantry, leading to cluttered countertops and overflowing cabinets. A DIY pantry cabinet offers an intelligent, customizable, and often more affordable alternative to expensive custom installations or generic store-bought units. It’s not just about adding space; it’s about creating a highly functional and integrated storage solution that genuinely meets your household’s unique needs.
Imagine a kitchen where every ingredient, every utensil, and every small appliance has its designated spot. A DIY pantry empowers you to achieve this level of organization, making meal prep smoother and your kitchen a more enjoyable place to be. Beyond the kitchen, a well-built storage cabinet can serve multiple purposes throughout your home.
Key Benefits of Building Your Own Pantry Cabinet
Choosing to construct your own DIY pantry cabinet provides a distinct set of advantages over pre-fabricated options. Here’s why investing your time and effort into this project is incredibly rewarding:
- Custom Size to Fit Your Space: This is arguably the biggest benefit. Instead of trying to squeeze a standard-sized unit into an awkward corner or an unused wall, you can design your pantry to perfectly fit the dimensions of your available space. This means maximizing every inch, whether it’s a narrow wall in a small apartment or a large, open area in a spacious kitchen.
- Solid Wood Construction for Durability: Unlike many mass-produced cabinets that use particle board or thin MDF, building your own allows you to use high-quality hardwood plywood and solid lumber. This results in a robust, sturdy cabinet that can withstand the weight of countless canned goods, heavy appliances, and daily wear and tear for years to come. It’s an investment in longevity.
- Adjustable Shelves for Flexible Storage: A static shelf layout can quickly become inefficient as your storage needs change. Our plans incorporate adjustable shelves, giving you the freedom to reconfigure the interior to accommodate items of varying heights, from tall cereal boxes and wine bottles to shorter spice jars and plates. This adaptability is crucial for optimal organization.
- Versatile Design for Any Room: While designed as a kitchen pantry, the inherent flexibility of this cabinet means it can be adapted for a multitude of storage needs throughout your home. Consider using it in a laundry room for detergents and linens, a garage for tools and supplies, a craft room for materials, or even as a stylish linen closet in a hallway. Its functional design transcends specific room limitations, making it a truly versatile storage solution.
- Budget-Friendly Solution: Building your own cabinet can be significantly more cost-effective than purchasing a custom-built unit or even many high-quality retail options. By sourcing materials yourself and investing your own labor, you gain a premium product at a fraction of the cost, making efficient storage accessible to everyone.
Ultimately, this is more than just a food pantry. It’s a highly functional and adaptable storage cabinet that brings organization and efficiency wherever it’s placed in your home.
Essential Tools and Supplies for Your Project
Before you begin cutting and assembling, gather all the necessary tools and materials. Having everything ready will ensure a smooth and efficient building process. Here’s what you’ll need to successfully construct your DIY pantry cabinet:
Key Tools
These power tools are essential for accurate cuts, strong joinery, and a professional finish:
- Miter Saw: Ideal for precise crosscuts on lumber, ensuring your face frame and trim pieces fit perfectly.
- Table Saw: Crucial for ripping plywood and lumber to exact widths, especially for creating the cabinet box and door components.
- Drill/Driver: Used for pre-drilling holes, driving screws, and performing general assembly tasks. A cordless model offers excellent portability.
- Kreg Jig (Pocket Hole Jig): This tool is vital for creating strong, concealed joinery with pocket holes, perfect for attaching the face frame and internal shelves without visible fasteners.
- Brad Nailer: Excellent for attaching thinner materials like the back panel, door trim, and for securing components while glue dries.
- Sander: Essential for smoothing all surfaces before finishing, ensuring a professional look and feel. Both an orbital sander and sanding blocks will be useful.
Materials and Supplies
Selecting the right materials is key to building a durable and attractive pantry. Our plans utilize high-quality plywood and standard lumber for a robust build:
- 3/4” Hardwood Plywood: This will form the core structure of your cabinet – the sides, bottom, and primary shelves. Hardwood plywood offers superior strength and stability compared to standard construction plywood.
- 1/2” Hardwood Plywood: Ideal for the door panels and the bottom of your drawers, offering good rigidity without excessive weight.
- 1/4” Hardwood Plywood: Used for the cabinet back, providing structural integrity and a clean finish without adding significant bulk.
- 1×3 and 1×4 Boards: These standard lumber dimensions are perfect for constructing the face frame, adding a clean, finished edge to the plywood cabinet.
- Edge-Glued Panel: This pre-assembled wood panel is used for the cabinet top, offering a beautiful, solid wood surface that is easy to finish.
- Bender Board or 1/4” Craft Boards: For the decorative trim on your cabinet doors. Bender board, typically found in landscaping sections, is flexible and easy to work with for decorative patterns. Alternatively, thinner craft boards can be ripped to size.
- Wood Glue: Essential for all joinery, providing strong, lasting bonds between wood pieces.
- Pocket Hole Screws: Specifically designed for pocket hole joinery, ensuring a tight and secure connection.
- Brad Nails: Used with your brad nailer for attaching thinner panels and trim.
- Drawer Slides: High-quality slides ensure smooth and reliable operation for your drawers.
- Hinges: Durable hinges are necessary for the cabinet doors, choose a style that matches your aesthetic.
- Cabinet Pulls: The finishing touch that defines the cabinet’s style and functionality.
- Stain or Paint: To protect and beautify your finished cabinet, matching it to your home’s decor.
Step-by-Step Guide: How to Build Your DIY Pantry Cabinet
Follow these detailed steps to construct a sturdy and beautiful DIY pantry cabinet. Take your time with each stage, ensuring accuracy for a professional-looking result.
Step 1: Construct the Pantry Box Foundation with Plywood
The main body of your pantry cabinet will be built from robust 3/4” hardwood plywood, forming the sides, bottom, and fixed internal shelves. This material choice ensures structural integrity and durability.
- Begin by precisely cutting your plywood pieces to the dimensions specified in the free plans. Accuracy here is paramount for a square and level cabinet.
- If you plan to incorporate adjustable shelves – a highly recommended feature for maximum flexibility – now is the time to drill your shelf pin holes into the side panels. Doing this before assembly is significantly easier and more accurate. Refer to our video tutorial for expert tips on creating these holes cleanly and consistently.
- Assemble the main box structure. Apply a generous bead of wood glue along all joining edges for a strong bond. Secure the shelves to the side panels using 1 1/4” pocket hole screws driven through 3/4” pocket holes. Pocket hole joinery creates incredibly strong, hidden connections, resulting in a clean finish. Ensure the cabinet remains square throughout this assembly process by using clamps and checking with a speed square.
Pro Tip: Achieving perfectly aligned shelf pin holes can be tricky. Consider using a shelf pin jig for consistent spacing and depth, or watch our detailed video for a step-by-step demonstration to ensure your adjustable storage works flawlessly.
Step 2: Reinforce the Back – Adding the Support Board
This critical step adds rigidity to the cabinet and provides a secure anchoring point for wall mounting.
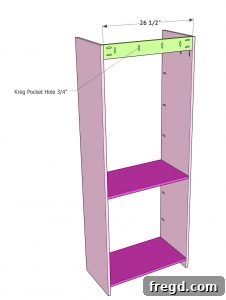
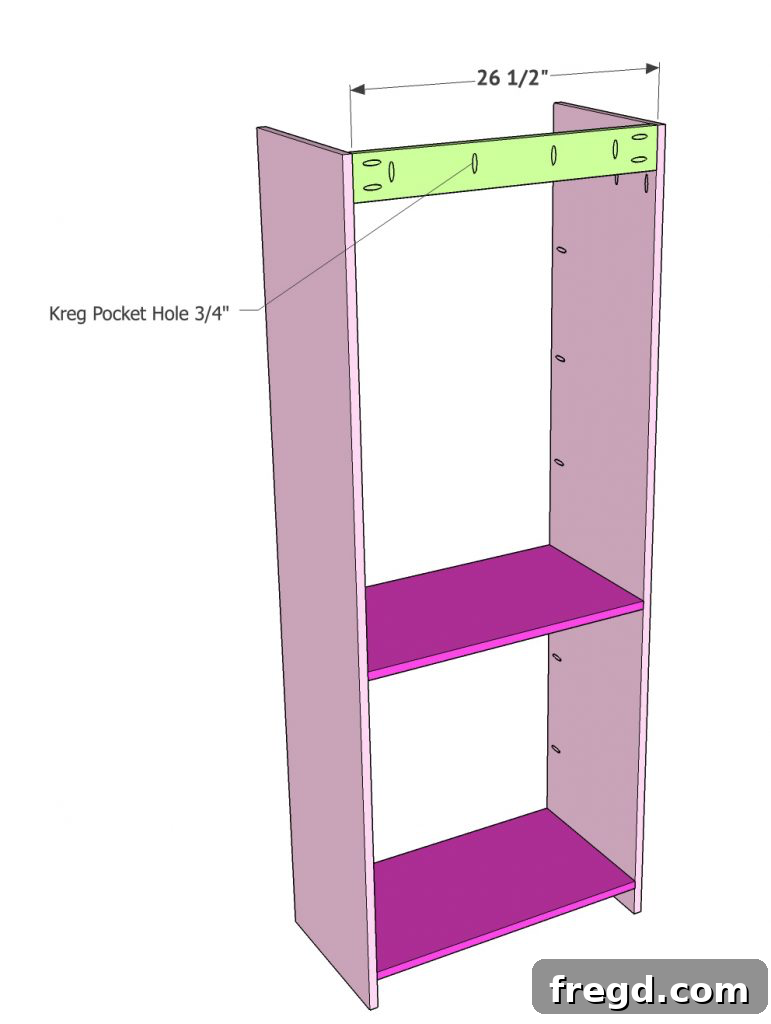
- Cut a support board to fit across the top rear section of your cabinet. This board will brace the top and integrate with the cabinet’s structure.
- Drill 3/4” pocket holes along the top edge and on the ends of this support board. These holes will be used for two purposes: to attach the support board to the cabinet sides, and later, to secure the cabinet top.
- Apply wood glue to the contact surfaces and secure the support board to the cabinet sides using 1 1/4” pocket hole screws. Ensure it’s flush with the top edge of the plywood box. This sturdy board will play a crucial role in firmly anchoring your finished cabinet to the wall, preventing tipping and ensuring safety, especially in homes with children or pets.
Step 3: Create and Attach the Stylish Face Frame
The face frame adds structural integrity and a beautiful finished appearance to the front of your cabinet, concealing the plywood edges and providing a solid surface for hinges and drawer slides.
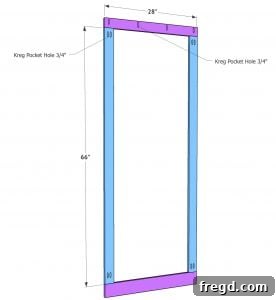
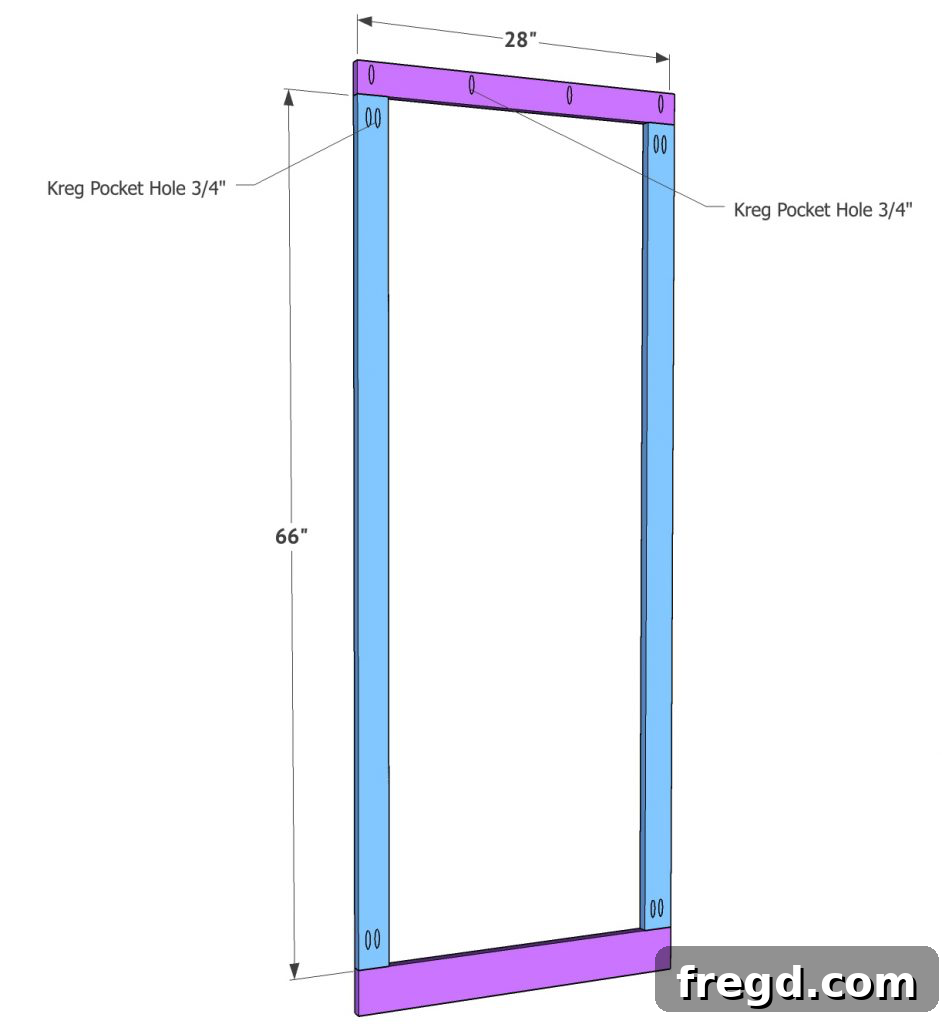
- Cut your lumber: Use 1×3 boards for the vertical stiles (sides) and the top rail of the face frame, and a slightly wider 1×4 board for the bottom rail. This wider bottom rail adds a more substantial look and can help conceal any imperfections at the base.
- Drill pocket holes on the ends of the horizontal rails (top and bottom) to join them to the vertical stiles. Also, drill pocket holes along one long edge of the assembled face frame, which will be used to attach it to the cabinet box.
- Assemble the face frame using wood glue and 1 1/4” pocket hole screws. Ensure all joints are tight and the frame is perfectly square before proceeding.
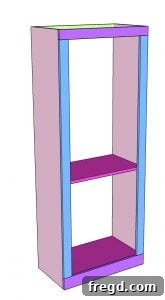
- Attach the completed face frame flush to the front of the cabinet box. Apply wood glue to the edges of the plywood where the frame will sit, then secure it with 1 1/4” pocket hole screws driven from the inside of the cabinet into the frame. Take care to align it precisely with the cabinet’s top and sides for a seamless look.
Step 4: Crafting Your Custom Cabinet Doors
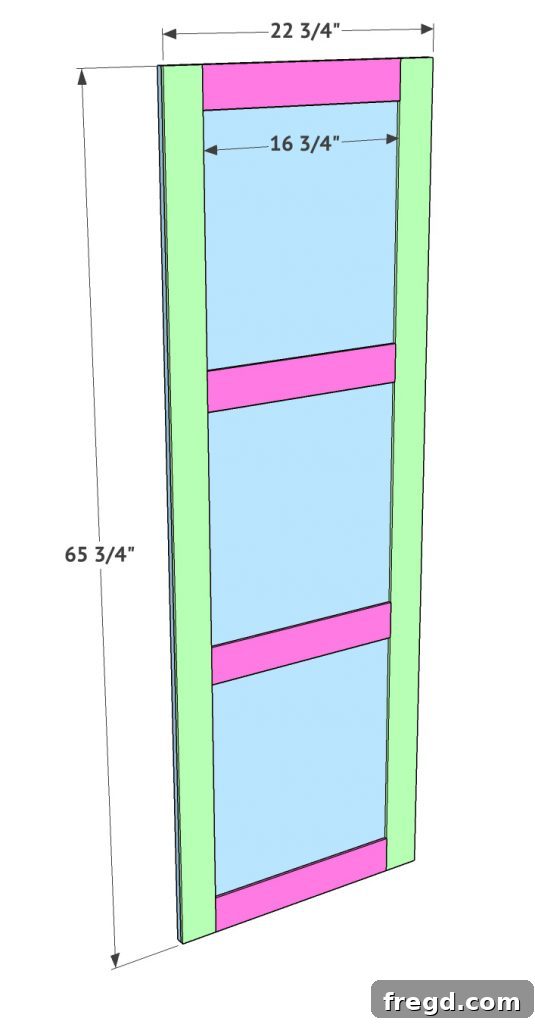
The doors are a focal point of your pantry, offering both functionality and aesthetic appeal. Our design features a sturdy panel with decorative trim.
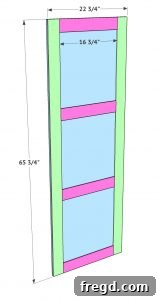
- Begin with the door’s back panel, cut from 1/2” hardwood plywood. This provides a stable and flat surface for the trim.
- For the decorative trim, you have two excellent options:
- Bender board: This flexible material is often found in the landscaping section of hardware stores. Its pliability makes it easy to work with for intricate or curved designs, offering a unique look.
- 1/4” craft boards: If bender board isn’t available or you prefer a simpler, straight-line design, 1/4” craft boards can be ripped down to your desired trim width using a table saw.
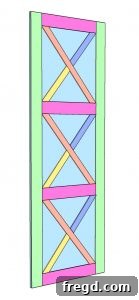
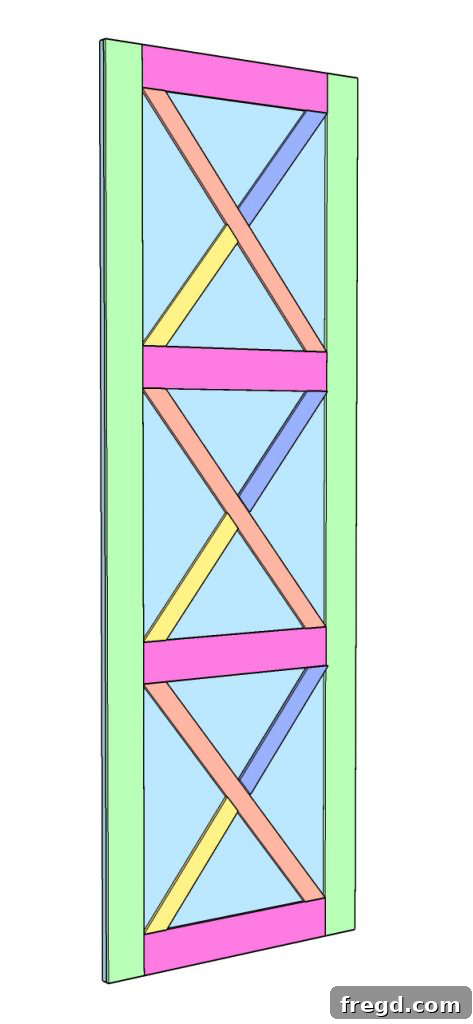
- Rip your chosen trim material into vertical and horizontal pieces. For the diagonal elements, rip boards to about 1.5” wide. Instead of fixed dimensions, it’s easiest to hold these diagonal pieces in place on the door panel and mark your cut lines with a pencil to ensure a perfect fit.
- Attach all trim pieces to the 1/2” plywood door panel using a combination of strong wood glue and 5/8” brad nails. The brad nails will hold the trim securely while the glue cures, creating a durable and attractive door.
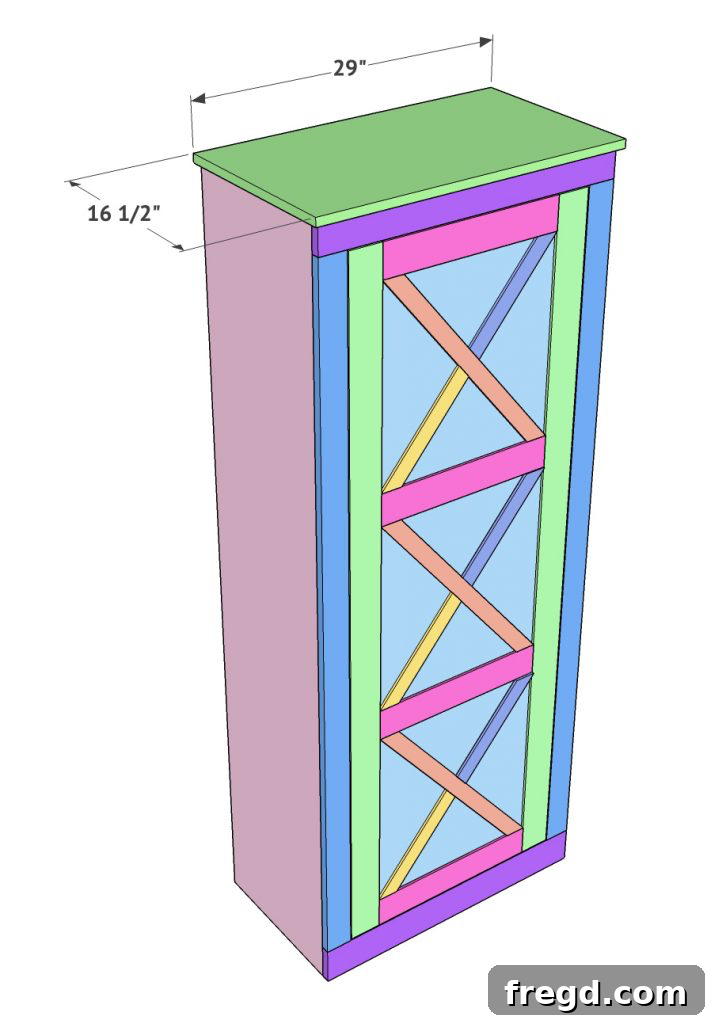
- Finally, prepare the cabinet top. Our plans utilize a pre-made edge-glued panel, which offers a beautiful, solid wood appearance without the need for complex glue-ups. Attach this panel to the top of your cabinet using wood glue and 1 1/4” pocket hole screws driven through the previously drilled pocket holes in the back support board and into the underside of the panel. Ensure it’s centered and flush.
Step 5: Secure the Back Panel for Structural Integrity
The back panel not only encloses the cabinet but also significantly contributes to its overall rigidity and squareness, preventing racking.
- Cut the back panel from 1/4” hardwood plywood to perfectly fit the rear opening of your cabinet box.
- Carefully align the panel, ensuring the cabinet remains square as you attach it.
- Secure the back panel into place using 3/4” brad nails or staples. Drive fasteners along all edges and into any internal shelves or support boards to maximize stability.
- Optional timing tip: You might find it easier to install this back panel *after* you have built and installed the drawers. This can offer better access to the interior for drawer slide installation. However, installing it now provides immediate structural benefits.
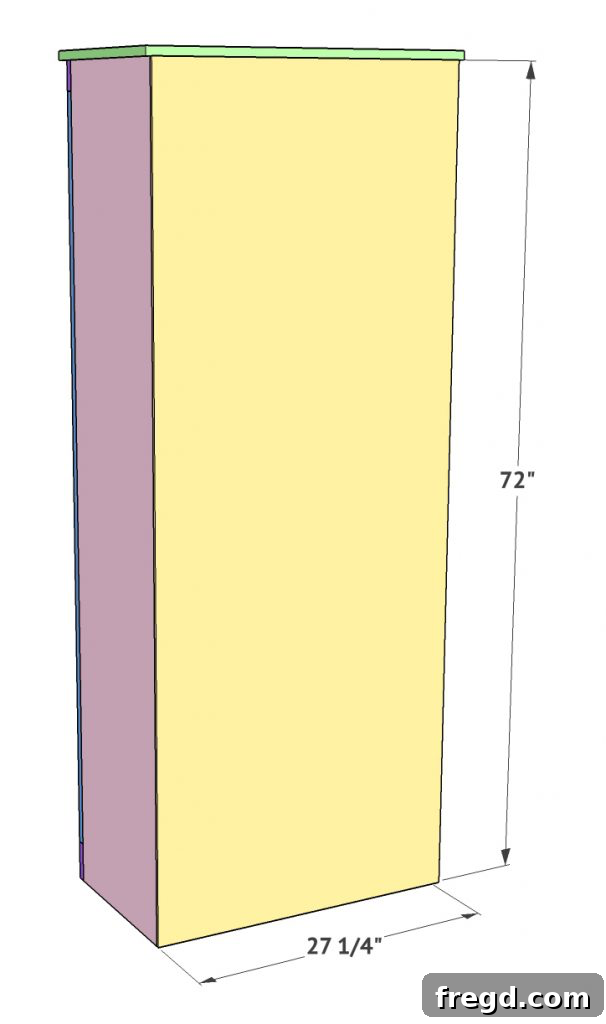
Step 6: Installing Versatile Adjustable Shelves
Adjustable shelves are a cornerstone of a functional pantry, allowing you to adapt storage to your evolving needs.
- Cut your shelves from 3/4” plywood. The number of shelves you create is entirely dependent on your specific storage requirements. Our plans suggest three, but you can add more or fewer.
- If you opted for shelf pins (as recommended in Step 1 for adjustable storage), ensure your shelves are cut approximately 1/4” shorter in width than the internal cabinet dimensions. This slight reduction provides adequate clearance for the shelf pins and makes insertion and removal effortless.
- If you chose not to use shelf pins and prefer fixed shelves, you can attach them permanently using 1 1/4” pocket hole screws driven through 3/4” pocket holes on the underside of each shelf. This offers maximum rigidity but sacrifices adjustability.
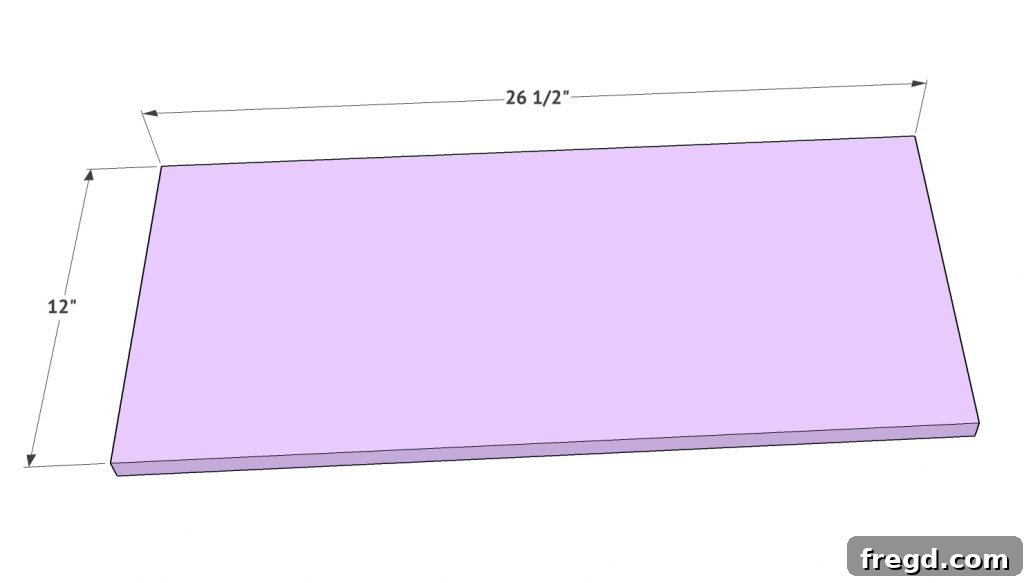
Step 7: Build and Integrate Functional Drawers
Drawers provide invaluable organized storage for smaller items, spices, linens, or even produce. This step requires precision for smooth operation.
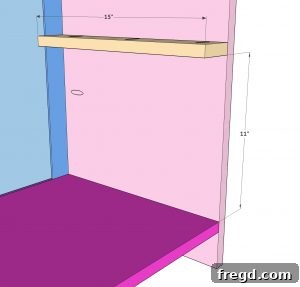
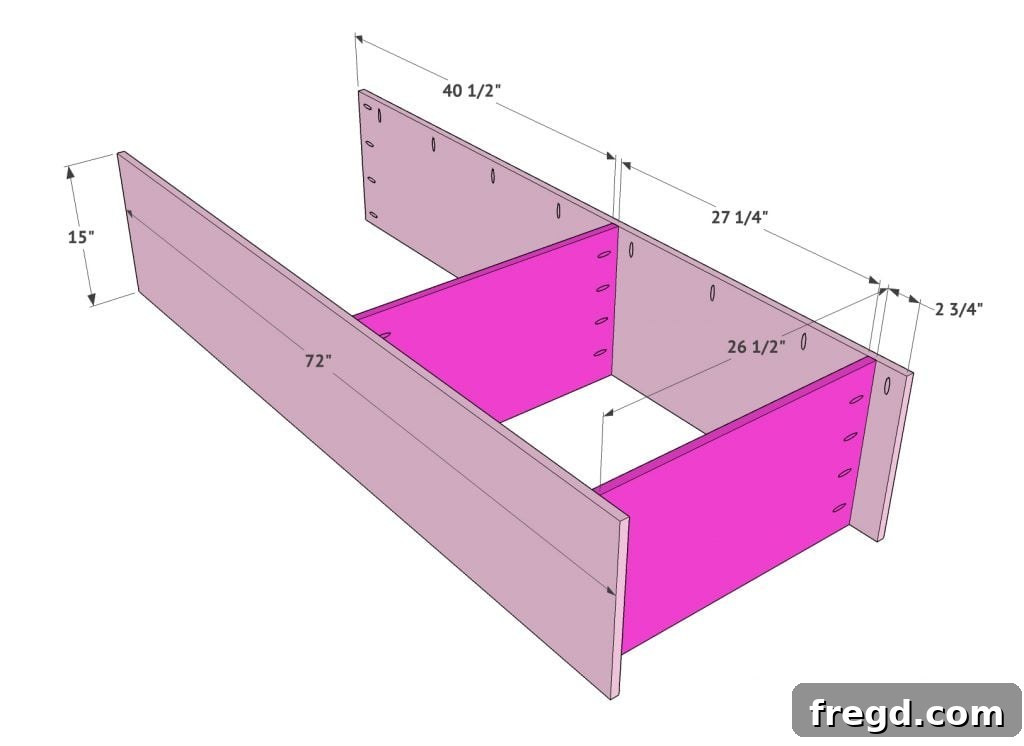
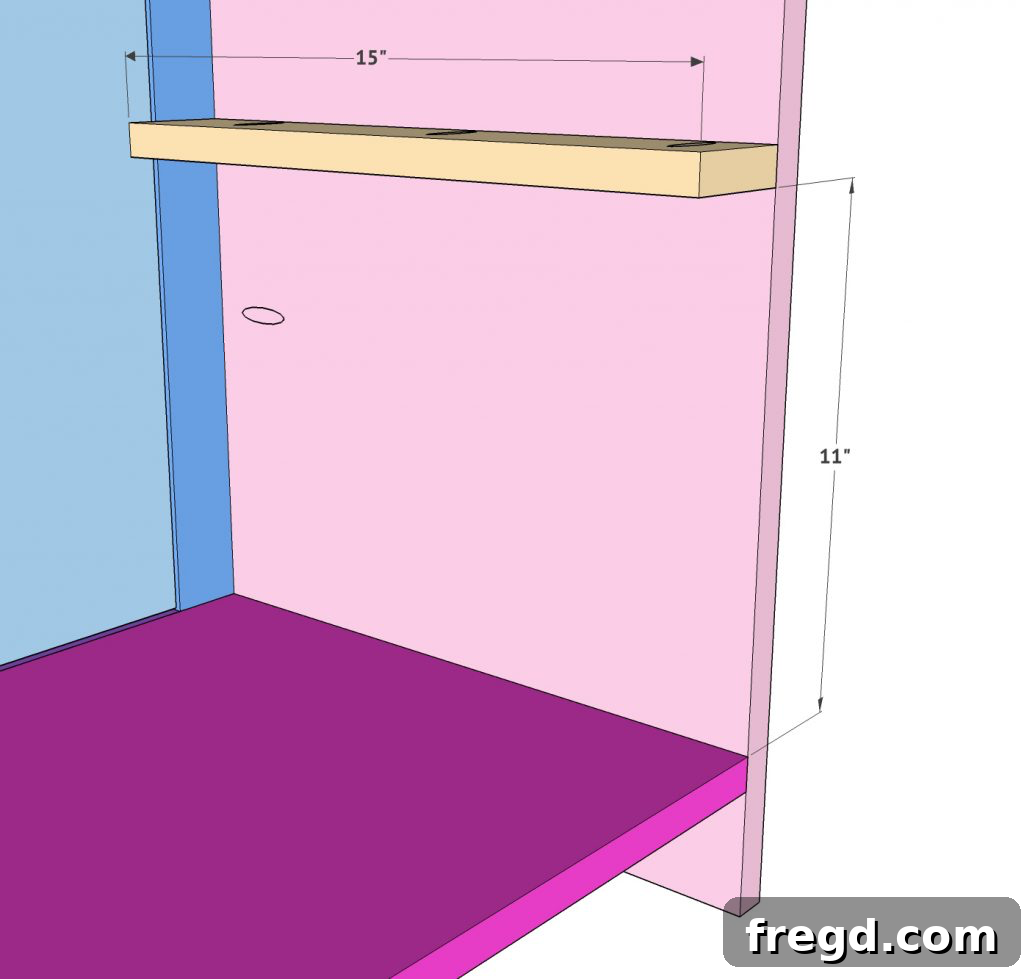
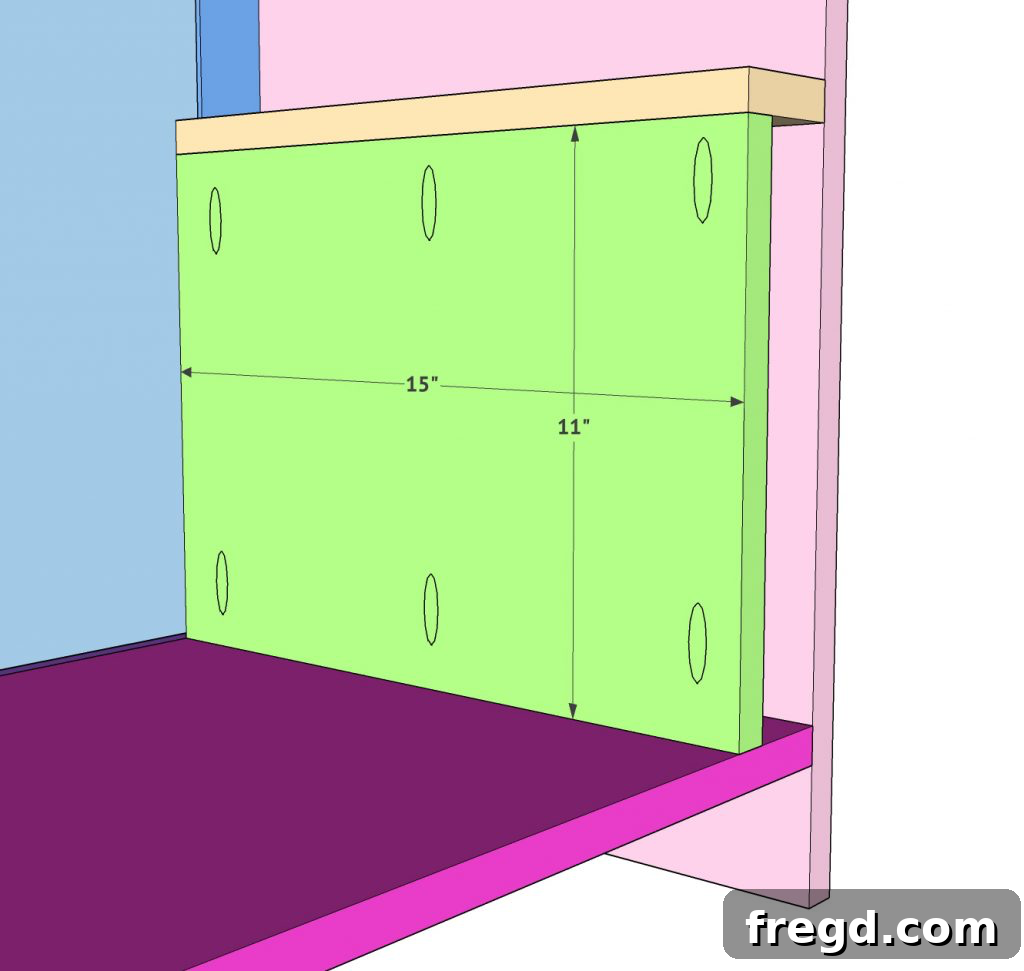
- First, create the drawer supports. Cut these from 3/4” plywood. These supports will be attached to the interior sides of the cabinet and serve as the mounting points for your drawer slides.
- Drill 3/4” pocket holes into the top edge of the upper support board. Attach this board to the cabinet sides using wood glue and 1 1/4” pocket hole screws. Repeat this for the corresponding support on the opposite side of the cabinet.
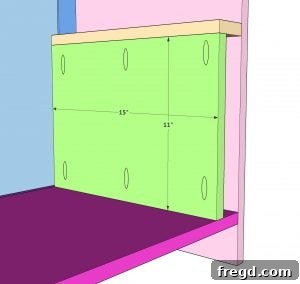
- For the vertical support boards, drill 3/4” pocket holes on both the top and bottom ends. Attach these into place between the horizontal supports, again using wood glue and 1 1/4” pocket hole screws. These structures create the framework for your drawer slides.
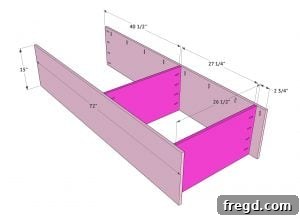
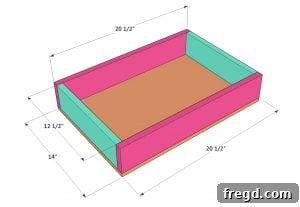
- Next, construct the drawers themselves. Use 3/4” plywood for the drawer sides – alternatively, 1×4 boards can be used for a slightly different aesthetic and construction method. For the drawer bottom, use 1/2” plywood.
- Assemble each drawer box. Apply wood glue to all joining edges and secure the corners using 1 1/4” brad nails. Ensure each drawer box is perfectly square. Then, attach the 1/2” plywood bottom to the assembled box with wood glue and 1 1/4” brad nails.
- Finally, install the drawer slides. Carefully mount the cabinet-side portion of the drawer slides onto the plywood supports you just installed. Then, attach the drawer-side portion of the slides to your completed drawer boxes. Refer to our video tutorial for precise guidance on aligning and installing drawer slides for smooth and effortless drawer function.
Finishing Touches: Personalizing Your Pantry
With the construction complete, it’s time to bring your DIY pantry cabinet to life with the finishing details. This is where your personal style shines through and transforms a functional piece into a beautiful addition to your home.
First, select and install your choice of drawer pulls, door hinges, and cabinet hardware. These elements are not just functional; they are crucial decorative accents that define the overall aesthetic of your pantry. Whether you prefer modern, farmhouse, traditional, or eclectic styles, there’s hardware to match. Ensure all hardware is installed securely and operates smoothly.
Once the hardware is in place, prepare your cabinet for its final finish. Sand all surfaces thoroughly, working your way up through progressively finer grits of sandpaper (e.g., 120-grit, 180-grit, 220-grit) to achieve a perfectly smooth and blemish-free surface. Wipe away all dust before applying your chosen finish.
Finally, apply your desired stain or paint. A stain will highlight the natural beauty of the hardwood plywood and solid lumber, while paint offers endless possibilities to match or contrast with your existing kitchen decor. Apply several thin coats, following the manufacturer’s instructions for drying times and recoating. A protective topcoat, such as polyurethane or lacquer, is highly recommended to ensure long-lasting durability and protection against spills and wear.
Here are some popular hardware options to consider:
- [Find high-quality drawer slides here!]
- [Discover stylish door pulls here!]
- [Browse durable cabinet hinges here!]
Download Your Free DIY Pantry Cabinet Plans
Ready to embark on your woodworking journey and create the perfect storage solution for your home? 🎉
Don’t wait! Grab your tools and make that extra kitchen storage a reality. These free printable DIY pantry cabinet plans are designed with the home builder in mind, making them incredibly beginner-friendly and fully customizable. Even if you’re new to woodworking, our detailed instructions and accompanying video tutorial will guide you every step of the way.
By utilizing readily available materials like plywood and basic dimensional lumber, along with a few common woodworking tools, you can construct your very own affordable kitchen storage solution. The end result will be a beautifully crafted cabinet that not only serves its purpose but also looks like a high-end custom piece, tailored precisely to your needs and aesthetic preferences. Say goodbye to clutter and hello to organized bliss!
👉 [Click here to download the free printable pantry cabinet plans instantly!]
DIY Pantry Cabinet: Detailed Building Instructions
Instructions
-
The foundation of this robust pantry is constructed using 3/4” hardwood plywood. Begin by cutting the two long side panels, the bottom shelf, and any additional fixed middle shelves to their precise dimensions as outlined in your plans. Before assembling, if you intend to include adjustable shelving (highly recommended for versatility), drill all necessary shelf pin holes into the interior faces of the side panels at this stage. This is considerably easier and more accurate to do while the panels are flat. For guidance on creating perfectly spaced shelf pin holes, refer to our accompanying video tutorial. Once prepped, attach the bottom and fixed middle shelf boards to the side panels. Use a strong wood glue on all mating surfaces for durability, securing the joints with 1.25” pocket hole screws driven through 3/4” pocket holes. Ensure the assembly remains square throughout this process.

-
Next, you will attach the crucial back support board to the top and rear section of the cabinet. This board serves a dual purpose: it adds significant structural rigidity to the cabinet box and provides a secure point for anchoring the finished cabinet to a wall, preventing tipping. Drill 3/4” pocket holes along the top edge and on the ends of this support board. Apply wood glue to the contact areas, then firmly attach it to the side panels using 1.25” pocket hole screws through the drilled 3/4” pocket holes. The pocket holes along the top edge of this board will be utilized in a subsequent step to securely fasten the cabinet’s top panel.
-
Proceed to construct the face frame, which will provide a finished edge to your cabinet and a solid surface for hinges and hardware. For the vertical stiles (sides) and the top horizontal rail, use 1×3 boards. The bottom horizontal rail should be a 1×4 board, providing a more substantial look. Drill 3/4” pocket holes on the ends of the top and bottom rails where they will join the side stiles. Additionally, drill 3/4” pocket holes along one long edge of the assembled face frame; these will be used to attach the frame to the main cabinet box. Assemble the frame using wood glue on all joints and secure it with 1.25” pocket hole screws. Ensure the frame is perfectly square before the glue sets.
-
With the face frame fully assembled, it’s time to attach it to the front of your plywood cabinet box. Apply a continuous bead of wood glue along the front edges of the cabinet where the face frame will sit. Carefully position the face frame, ensuring it is perfectly flush with the top and side edges of the cabinet box. Once aligned, secure the face frame permanently using 1.25” pocket hole screws driven through the previously drilled pocket holes on the inside face of the cabinet and into the back of the face frame. This method creates a strong, clean connection without visible fasteners on the front.
-
Now, turn your attention to building the cabinet doors, which will define the aesthetic of your pantry. The main back panel of each door will be crafted from 1/2” hardwood plywood. For the decorative trim on the front of the door, you can use “bender board,” which is often found in the outdoor landscaping section of hardware stores due to its flexibility. Alternatively, 1/4” craft boards can be used and ripped to size. Begin by ripping your chosen material for the vertical and horizontal trim pieces. Cut each piece to size to create the outer frame of your door design, then attach them to the plywood panel using strong wood glue and 5/8” brad nails. These nails will hold the trim in place while the glue dries, ensuring a secure bond.
-
For the interior decorative elements, particularly the diagonal boards, rip them to a width of 1.5” each. Precise measurements for these diagonal pieces are best obtained by test-fitting them directly onto your door panel. Hold each piece in its intended position and carefully mark the cut lines with a pencil to ensure a perfect mitered fit. Once cut, attach these diagonal pieces in the same manner as the other trim: apply wood glue generously to the mating surfaces and secure them with 5/8” brad nails. This method allows for a custom, tight-fitting design that truly enhances the door’s appearance.
-
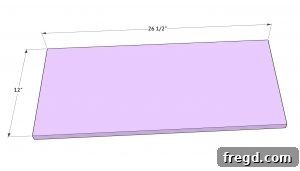
Now, it’s time to add the finishing touch to the top of your cabinet: the edge-glued panel. These panels are conveniently available in various sizes at most hardware stores and are pre-assembled, making them ready for immediate staining or painting. Position the edge-glued panel on top of your cabinet, ensuring it is properly centered and flush with the front and sides of the face frame. Secure the top to the cabinet using wood glue on the contact surfaces and 1.25” pocket hole screws. Drive these screws up through the pocket holes you previously drilled in the back support board and into the underside of the edge-glued panel, creating a strong and concealed attachment.
-
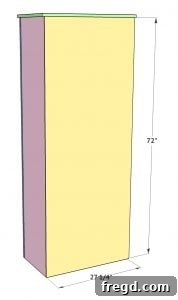
The back of your pantry cabinet will be enclosed with a 1/4” hardwood plywood panel. Measure and cut this piece precisely to fit the entire rear opening of your cabinet box. Once cut, carefully position the panel, ensuring the cabinet remains perfectly square as you attach it. Secure the back panel into place using 3/4” brad nails or staples, driving them along all edges and into any internal framing or support boards. This step adds significant rigidity to the entire structure, preventing racking. For an easier process, especially if you’re planning on installing many drawers, you might find it more convenient to attach this back panel after all internal drawer components and slides are in place.
-
Now, prepare your internal shelves from 3/4” hardwood plywood. The number of shelves can be customized to your specific storage needs, but our plans suggest three for optimal functionality. If you pre-drilled shelf pin holes in Step 1 for adjustable shelving, cut these shelf boards approximately 1/4” shorter in width than the internal cabinet opening. This slight reduction provides essential clearance for easy placement and adjustment of the shelf pins. If you chose not to use shelf pins and prefer fixed shelving, you can attach these shelves permanently using 1.25” pocket hole screws driven through 3/4” pocket holes on the underside of each shelf, securing them into the cabinet sides.
-
To prepare for the drawers, you’ll first build and install the necessary supports. These supports will be crafted from 3/4” plywood and will serve as the mounting points for your drawer slides. Begin by cutting the horizontal support pieces to size using your table saw. Drill 3/4” pocket holes into the top edge of the top horizontal support board. Attach this board securely to the cabinet sides using wood glue and 1.25” pocket hole screws. Repeat this process for the corresponding support on the opposite side of the cabinet, ensuring they are perfectly level and parallel. Next, cut the vertical support board. Drill 3/4” pocket holes into both the top and bottom ends of this vertical board. Attach it firmly in place between the horizontal supports using wood glue and 1.25” pocket hole screws. Again, replicate this setup on the opposing side of the cabinet. These carefully positioned supports form the essential framework onto which your drawer slides will be mounted.
-
-
The final construction step is crafting your functional drawers. For the drawer sides, utilize 3/4” plywood, or opt for 1×4 boards if preferred, cutting them to the specified dimensions. Assemble each drawer box by applying wood glue to all corner joints and securing them firmly with 1.25” brad nails. It’s crucial that each drawer box is perfectly square to ensure smooth operation once installed. For the base of each drawer, cut 1/2” plywood to size. Attach this bottom panel to the assembled drawer box using wood glue and 1.25” brad nails. Once your drawers are built, carefully install the drawer slides. Mount the cabinet-side portions of the slides onto the previously installed plywood supports, and then attach the drawer-side portions to your completed drawer boxes. We highly recommend referring to our comprehensive video tutorial for detailed tips and visual guidance on the precise alignment and installation of drawer slides, ensuring your drawers glide effortlessly.