
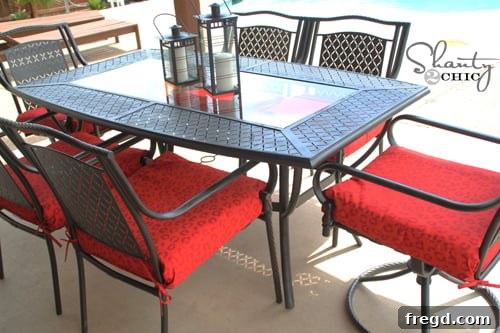
Reimagining Your Outdoor Oasis: A Stunning Patio Set Makeover on a Budget
There’s nothing quite like the warmth of summer, bringing with it opportunities for delightful BBQs, refreshing swim parties, and cherished moments spent relaxing on the patio with family and friends. Our outdoor space, however, had started to tell a different story. After just two years, the relentless Texas sun and the occasional chlorine splash from the pool had taken a heavy toll on our beloved patio table and chairs. They were far from inviting, greeting the new season with faded, flattened cushions and unappealing rusty metal frames. This wasn’t the welcoming scene I envisioned for our summer gatherings.
The Faded Reality: Why Our Patio Set Needed a Refresh
Initially, I considered purchasing an entirely new patio set. However, a quick glance at the market, coupled with the realization that our current set had deteriorated so quickly, made me reconsider. Investing in a brand new, expensive set only for it to show significant wear in a couple of years seemed like a poor financial decision and simply wasn’t within our current budget. While I’m certainly a fan of DIY projects and could potentially build a new set from scratch, the immediate desire to enjoy and entertain in our outdoor space this very summer trumped the ambition for a long construction project. We wanted instant gratification, a quick fix that would bring back the charm without breaking the bank or taking weeks to complete.
The Budget-Friendly Solution: Why DIY Wins
My sights quickly shifted to a good, old-fashioned revamp. This approach not only aligns with sustainable living by repurposing existing furniture but also offers immense satisfaction in transforming something old into something new with your own hands. The key to this successful transformation lay in discovering a little “miracle in a can” – a product that promised durability, ease of use, and a stunning finish, all while staying within a sensible budget. This decision was pivotal, allowing us to achieve a high-end look without the high-end price tag.
Introducing the “Miracle in a Can”: Rust-Oleum Universal Metallic Paint & Primer in One
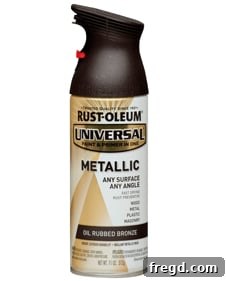 Rust-Oleum Universal Metallic Paint and Primer in One proved to be the perfect choice for this revitalization project. I selected the “Oil Rubbed Bronze” finish for its sophisticated, timeless appeal, and I couldn’t be happier with the rich, deep color it imparts. What makes this product truly remarkable is its all-in-one formula, eliminating the need for separate primers and streamlining the entire painting process. This saved both time and money, making the project incredibly efficient.
For our entire patio set – comprising a table and four chairs – I only needed five cans of this fantastic spray paint. At an approximate cost of $7 per can, the total expenditure for the paint was a mere $35. This incredibly low cost for achieving a virtually brand-new looking patio set was nothing short of astonishing. It truly underscored the power of a thoughtful DIY approach, proving that a significant aesthetic upgrade doesn’t require a significant financial outlay.
The transformation was immediate and dramatic. The image above clearly shows the “before” on the right, displaying the old, rusty, and faded appearance, contrasted with the “after” on the left, radiating a fresh, metallic sheen. What’s even more impressive is that it only took one coat of paint to achieve this stunning effect, showcasing the excellent coverage and pigment of the Rust-Oleum product. This meant less time spent painting and more time admiring the results.
The Transformation Process: Giving Our Patio Set a New Lease on Life
A successful paint job, especially on outdoor furniture, hinges on proper technique and preparation. While the Rust-Oleum spray paint offers incredible convenience, a few simple steps ensure a flawless and long-lasting finish.
Step 1: Preparation is Key
Before any painting began, I ensured the patio set was thoroughly cleaned. This involved wiping down all surfaces to remove dirt, dust, and any loose rust. For stubborn areas, a light scrubbing with a wire brush and soap and water can be beneficial. It’s crucial to allow the furniture to dry completely before proceeding to the next step. While a primer is built into this specific paint, for exceptionally rusty or flaking surfaces, a quick, light sanding can further improve adhesion and create a smoother base for the paint. I also laid down drop cloths to protect the surrounding area from overspray, a vital step when working with spray paint outdoors.
Step 2: The Art of Spray Painting
When applying spray paint, technique matters. Instead of attempting to achieve full coverage with one heavy coat, which can lead to drips and an uneven finish, I opted for several light, even passes. Holding the can about 8-12 inches from the surface and moving it in steady, sweeping motions ensures uniform coverage. Overlapping each pass slightly helps to avoid streaking. The beauty of this Rust-Oleum product is its fast drying time, allowing for subsequent coats (if needed) to be applied relatively quickly. For my set, as mentioned, one coat was sufficient due to the paint’s excellent opacity and my careful application technique.
Step 3: Drying and Curing
While the paint was dry to the touch within an hour, it’s essential to allow ample time for the paint to fully cure and harden. This curing process strengthens the paint film, making it more resistant to scratches, chips, and the elements. I let the patio set sit undisturbed for at least 24-48 hours before handling it extensively or exposing it to heavy use. This patience pays off in the longevity and durability of your newly painted furniture.
Completing the Look: Splurging on Style with New Cushions
After the fresh coat of spray paint brought the metal frames back to life, the next step was addressing the flattened, faded cushions. With the significant savings from choosing to revamp rather than replace the entire set, I had the freedom to “splurge” a little on new cushions, which truly complete the refreshed aesthetic. I found these super cute outdoor seat pads online from Walmart.com. The convenience of ordering them online and having them delivered to my local store with free shipping was an absolute “SCORE!” It saved me time browsing aisles and eliminated delivery fees, making the whole process incredibly smooth. What’s even better for those looking to replicate this project, these cushions were on sale for $16 each at the time of purchase, making them an incredible value for the quality and style they offered!
Smart Shopping for Outdoor Comfort
Choosing the right cushions is as important as the paint job. Not only do they add comfort, but they also contribute significantly to the overall aesthetic of your outdoor space. When shopping for outdoor cushions, consider:
- Material: Look for weather-resistant fabrics like polyester or olefin that are designed to withstand sun, rain, and mildew.
- Comfort: Check the thickness and fill of the cushion. A denser fill will offer better support and last longer.
- Color & Pattern: Select colors and patterns that complement your newly painted furniture and the overall design scheme of your outdoor area.
- Durability: Ensure the stitching is strong and the zippers (if any) are robust, allowing for easy cleaning if needed.
Online shopping often provides a wider selection and competitive pricing, and services like in-store pickup can offer the best of both worlds – convenience and cost savings.
The Jaw-Dropping Before & After: Witness the Magic
Sometimes, words aren’t enough to convey the full impact of a transformation. The before and after shots speak volumes about the power of a simple, cost-effective DIY project. From dull and rusty to sleek and inviting, the change is truly remarkable.
Before the magic…
After:)
Our Revitalized Outdoor Space: Ready for Summer Entertaining
I am absolutely thrilled with the outcome and now feel completely ready for a season full of entertaining! The entire project, from preparation to the final coat of paint, took me approximately an hour to complete. Add in the cost of the five cans of spray paint at just $35, and the transformation is not only stunning but incredibly economical. The money saved by opting for a DIY revamp allowed me to comfortably invest in those beautiful new cushions, elevating the comfort and style of our patio without stretching our budget. It’s a testament to how a small investment of time and resources can yield such magnificent results.
This project has been so successful that I plan on making this a regular ritual, perhaps even yearly, to keep our patio space fresh, inviting, and ready for whatever the Texas weather throws its way. It’s an easy, low-commitment way to maintain an attractive outdoor living area without the constant worry of premature wear and tear.
Beyond This Project: Tips for Maintaining and Sourcing Outdoor Furniture
Annual Refreshes: A Sustainable Approach
Incorporating an annual refresh into your outdoor living routine is a fantastic way to extend the life of your furniture and keep it looking pristine. A quick clean and a touch-up with spray paint can easily remedy minor scratches or fading. For cushions, consider seasonal covers or bringing them indoors during harsh weather to preserve their vibrancy and integrity. This mindful approach not only saves money in the long run but also reduces waste by delaying the need for full replacements.
Finding Your Next Project: Hunting for Hidden Gems
If you’re inspired by this transformation but don’t currently have a patio set in need of a revamp, don’t despair! There are countless opportunities to find discarded or inexpensive outdoor furniture that could be your next project. Websites like Craigslist.com, Facebook Marketplace, local garage sales, and even thrift stores are treasure troves for old patio sets just waiting for a new lease on life. When searching, look for sturdy frames – metal or solid wood are ideal – even if they appear worn. Surface rust, chipped paint, and faded fabrics are all minor issues that can be easily addressed with a little paint and new cushions, as this project demonstrates. You might be surprised by the high-quality pieces you can find for a fraction of the cost of new furniture, offering both character and a unique story to your outdoor space.
Share Your Own Patio Transformation!
I hope this journey of transforming our tired patio set into a vibrant outdoor oasis inspires you to tackle your own home improvement projects. If you love this revamp, I’d absolutely LOVE for you to share it with your friends and followers! Your pins and shares help spread the word and encourage others to embrace the joy of DIY. Let’s create beautiful, functional outdoor spaces together!
Happy Summer & Happy DIYing!
~Ashley