
Unleash Your Creativity: A Detailed Review of Plaid’s Simply Screen DIY Silk Screen Kit
Hey creative souls and DIY enthusiasts!
There’s nothing quite like the satisfaction of bringing a custom design to life on fabric, and for years, screen printing seemed like a daunting task reserved for professionals. However, the world of crafting has revolutionized with accessible tools for everyone. Recently, I had the exciting opportunity to sample and review Plaid’s Simply Screen DIY Silk Screen Kit, a product designed to make screen printing at home incredibly simple and fun. As a seasoned crafter who always seeks out projects that are quick, cheap, and easy, I was eager to see if this kit lived up to the hype. For my inaugural project, I decided to create a special, personalized item for my newest little man – a charming, custom-designed onesie. It felt like the perfect small-scale project to test the waters and share my honest experience with you.
Our crafting philosophy has always revolved around efficiency and affordability without compromising on quality or creativity. This ethos guides my exploration of any new product, and the Plaid Simply Screen Kit promised to align perfectly with these values. In this comprehensive review, I’ll walk you through each step of using this innovative kit, share my insights, and highlight why it might just become your next favorite crafting tool.
What is the Plaid Simply Screen DIY Silk Screen Kit?
The Plaid Simply Screen DIY Silk Screen Kit is an all-in-one solution designed for home crafters to create custom screen-printed designs on various fabrics. It eliminates the need for complex darkrooms or expensive equipment, making screen printing accessible even for absolute beginners. The kit typically includes a light box (which often doubles as the product packaging – a clever design!), screen frames, screen emulsion sheets, a squeegee, fabric paint, and a sponge, providing everything you need to get started on your creative journey. The beauty of this kit lies in its simplicity: you print your design, expose it to light, wash out the unexposed emulsion, and then you’re ready to print on fabric.
My Experience: Crafting a Custom Onesie for My Little One
Embarking on this project was a delightful experience. The idea of creating something unique and handmade for my baby boy was incredibly appealing, and the Simply Screen Kit made that dream a reality. I approached it with the mindset of testing its user-friendliness for someone who, like many of you, values straightforward and rewarding craft projects. Here’s a detailed breakdown of the steps I followed and what I learned along the way.
Getting Started: Setting Up Your Light Box
The first step in using the Plaid Simply Screen Kit is setting up the light box. What I immediately appreciated about this product is its ingenious packaging: the box itself transforms into the light box! This design is incredibly practical, saving valuable storage space once your crafting session is over. Instead of having another bulky piece of equipment to store, you can simply tuck all the kit components back into their original container. The setup was quick and intuitive, requiring just a couple of simple folds and insertions to assemble a sturdy, functional light box ready for action. This thoughtful design immediately impressed me, underscoring the kit’s focus on user convenience.
In just a few moments, my light box was ready to go, demonstrating the kit’s commitment to a hassle-free start. The instructions were clear, making this initial phase remarkably straightforward, even for a first-timer. It truly sets the stage for a smooth crafting experience.
Designing Your Masterpiece: Digital Artwork Creation
One of the most exciting aspects of the Plaid Simply Screen Kit is the unparalleled creative freedom it offers. You begin by creating your own artwork on your computer and printing it on standard printer paper. This means you’re not limited to pre-made designs or stencils; your imagination is truly the only boundary! You can use virtually any program that allows for graphic design or even simple word processing to bring your vision to life. Want to use clip art? Go for it! Have a specific font in mind? The choice is yours. For my project, being a big fan of “wienie dogs,” I found an adorable dachshund clip art image and printed it out. This entire process took only a few minutes, highlighting the efficiency of the kit.
The internet is a treasure trove of free clipart files, offering a myriad of options for every conceivable theme and style. This vast resource, combined with the ability to utilize any font already installed on your computer, translates into endless possibilities for personalization. Whether you’re designing a quirky graphic for a t-shirt, a sophisticated pattern for a tote bag, or a cute character for a baby onesie, the power to create is entirely in your hands. This digital freedom is a significant advantage, allowing for truly unique and meaningful projects.
Exposing Your Screen: The Magic of Light
Once your artwork is printed, the next step involves preparing your screen for exposure. You take one of the included screen emulsion sheets and carefully place it over your printed artwork. To ensure everything stays perfectly aligned during the exposure process, I recommend taping the edges of the artwork to the screen. This small but crucial step prevents any shifting, which could lead to a blurry or misaligned design. The screen is designed to react to light, creating the stencil that will allow paint to pass through only where your design dictates.
The combined screen and artwork assembly then goes into the light box for a precise duration – 25 minutes, as per the kit’s instructions. A vital detail, one that I learned the hard way, is to ensure your artwork is facing DOWN into the light box. This orientation is critical for the light to properly expose the emulsion, solidifying the areas around your design while leaving the design itself unexposed. Forgetting this step can result in a screen that doesn’t develop correctly, so pay close attention! The light exposure process hardens the emulsion everywhere except where your printed design blocked the light, setting the stage for the next exciting step.
Developing Your Screen: Washing Away the Unwanted
After the screen has been exposed in the light box for the recommended 25 minutes, it’s time for the “development” phase. This is where your design magically appears! Using the included sponge and a tray of water (conveniently provided within the kit), you gently rub the blue emulsion material off the screen in the areas where your artwork was. Because your artwork blocked the light from reaching these specific spots, the emulsion there remained soft and will wash away easily. As you rub, you’ll see your design gradually emerge as clear, open mesh on the screen.
This process is incredibly satisfying, watching your digital design physically manifest as a stencil. The areas that were exposed to light remain hardened, forming the structure of your screen, while the unexposed areas where your artwork was, become permeable, allowing paint to pass through. This crucial step leaves you with a perfectly blank screen in the shape of your artwork, ready for printing. Take your time with this step to ensure all the unexposed emulsion is completely removed, resulting in crisp, clean lines for your final print.
Printing Your Design: Bringing it to Life
With your screen now perfectly developed, it’s time for the most thrilling part: transferring your design onto fabric. I carefully placed the screen onto my baby onesie, positioning it exactly where I wanted the dachshund design to appear. This is arguably the most critical step where precision truly pays off. You absolutely need to be meticulous about securing the screen firmly in place on your fabric. I used tape to create a strong, stable bond between the screen and the onesie, ensuring there was no room for movement. Any slight shift of the screen during the printing process can result in a smudged, blurry, or messy design, undermining all your previous efforts.
However, I found that with sufficient taping and careful placement, the screen stayed perfectly in position, providing a stable surface for printing. Once secured, I took the included black screen paint and, using the provided brush (or a squeegee for a more even coat), applied a generous amount over the clear areas of the artwork. The kit typically includes a few basic colors, but Plaid offers a truly extensive selection of fabric paints that you can purchase separately, allowing for endless color combinations and creative expression. With a smooth, even pass of the squeegee or brush, the paint seeped through the open mesh, leaving a crisp, vibrant design on the fabric below. The anticipation during this step is palpable, and seeing the immediate transfer of your design is incredibly rewarding.
The Beautiful Result: A Personalized Touch
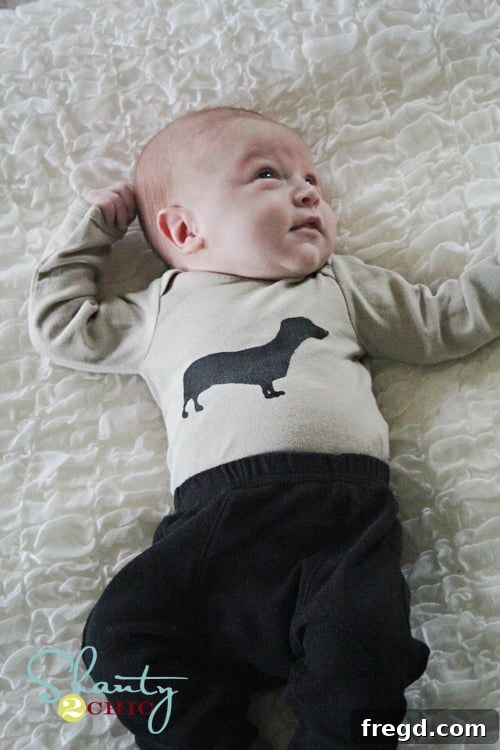
The moment of truth arrived as I carefully lifted the screen from the onesie. The result was simply delightful! A perfectly crisp, black dachshund design adorned the soft fabric, looking exactly as I had envisioned. The satisfaction of seeing a custom piece of clothing brought to life through my own hands was immense. The Plaid Simply Screen Kit truly delivered on its promise of making personalized fabric art achievable at home.
Of course, no review of a baby item would be complete without featuring the adorable model himself! My newest little man was more than happy to show off his custom “wienie dog” onesie, adding an extra layer of charm and personalization to our family’s wardrobe. The joy of seeing him in something I made specifically for him was truly priceless, making the entire crafting process incredibly worthwhile. These images capture the essence of handmade love and the pride that comes with creating something unique for those you cherish most.
While the process involved a few more steps than some of my usual “quick and dirty” crafts, the overall experience was incredibly manageable, and I was genuinely thrilled with the professional-looking results. The initial investment of time in learning the steps paid off handsomely in the quality and personalization of the finished product. This kit proves that even complex-sounding crafts like screen printing can be broken down into approachable steps for anyone to enjoy.
Why I Love the Plaid Simply Screen Kit: Key Benefits for Every Crafter
Beyond the successful onesie project, several aspects of the Plaid Simply Screen Kit truly stand out and make it a highly recommended product for crafters of all levels. It embodies the core values of approachable and rewarding DIY projects.
Affordability and Accessibility
One of the biggest advantages of this kit is its fantastic value. You can typically find it at crafting retail giants like Hobby Lobby, often priced around $39. For those in the know, this is where the real magic happens: Hobby Lobby frequently offers a 40% off coupon, which can bring the price down significantly, making this DIY screen printing kit an incredibly cheap and accessible option for starting a new hobby or adding a new technique to your crafting repertoire. Furthermore, for those who prefer online shopping, Hobby Lobby often runs promotions like a flat $3 shipping fee on your order, making it even easier to get your hands on this kit without breaking the bank. This combination of competitive pricing and readily available discounts makes screen printing a hobby that’s financially viable for many.
Economic Refills and Reusability
Another aspect I absolutely adore about the Simply Screen Kit is its smart design for long-term use and cost-effectiveness. Once you own the main light box component, you don’t need to purchase an entire new kit every time you want to create a new project. Instead, you can simply buy refill packs of the screen papers and additional fabric paints. This not only saves money but also reduces waste, aligning with a more sustainable crafting practice. More impressively, the screens you create are reusable! Much like a traditional stencil, once you’ve developed and used a screen for a particular design, you can clean it thoroughly and save it for future projects. This means you can create a custom design once and print it on dozens of items – think matching t-shirts for an event, personalized tote bags for gifts, or a series of coordinated home decor items. This reusability adds tremendous value and creative potential to the kit, transforming it from a one-time project tool into a versatile, long-lasting crafting asset.
Unmatched Creative Freedom
The ability to use any artwork you can generate or find on your computer is a game-changer. This kit doesn’t restrict you to pre-designed stencils; it empowers you to be the designer. Whether you’re drawing your own whimsical characters, downloading free clipart from the internet (and there are literally millions of options out there!), or simply typing out a custom phrase in your favorite font, the possibilities are boundless. This level of personalization allows you to truly express your unique style and create items that are deeply meaningful. Imagine custom graphic tees for your family, bespoke gifts for friends, or unique decor pieces that perfectly match your home aesthetic. The creative control offered by the Plaid Simply Screen Kit is unparalleled for a home-based screen printing system.
Simplicity for Beginners
Despite the seemingly multi-step process, the Simply Screen Kit is remarkably beginner-friendly. Each step is clearly outlined, and the materials are intuitive to use. The ingenious design of the light box, doubling as storage, showcases the thought put into making the crafting experience as smooth as possible. For anyone intimidated by traditional screen printing methods, this kit offers a gentle introduction, breaking down the process into manageable and enjoyable segments. It demonstrates that you don’t need extensive training or specialized equipment to achieve professional-looking results right in your own home.
Versatility of Projects
While I chose to make a onesie, the applications for the Plaid Simply Screen Kit are vast. Imagine creating custom t-shirts for a family reunion, designing unique tote bags for your groceries or craft supplies, adding personalized touches to throw pillows or tea towels, or even crafting bespoke gifts for birthdays and holidays. From apparel to home decor, the ability to print your own designs opens up a world of possibilities for customizing fabric items. This versatility ensures that the kit will be a valuable addition to any crafter’s toolkit, inspiring countless projects.
Tips for Success with Your Simply Screen Kit
To help you get the most out of your Plaid Simply Screen experience, here are a few additional tips I gathered during my crafting journey:
- Double-Check Artwork Orientation: As I learned, ensuring your printed artwork faces DOWN in the light box is crucial for proper screen development. A quick check before exposure can save you time and materials.
- Secure Your Screen Tightly: When placing the developed screen on your fabric, use ample tape (masking tape works well) to secure all edges. Even a slight wobble can lead to a smudged print. Consider placing a piece of cardboard inside your garment to create a firm printing surface and prevent bleed-through.
- Practice on Scrap Fabric: If it’s your very first time, consider doing a test print on a scrap piece of fabric. This allows you to get a feel for how much paint to use and the best pressure for your squeegee or brush without risking your main project.
- Experiment with Different Paints and Colors: While the kit comes with basic colors, Plaid offers a wide range of fabric paints. Don’t be afraid to try different hues or even mix colors to achieve unique effects. Always ensure they are suitable for screen printing.
- Clean Your Screen Immediately: After printing, clean your screen promptly with water and a soft brush or sponge. This prevents the paint from drying and clogging the mesh, ensuring your screen remains reusable for future projects.
Conclusion
In conclusion, the Plaid Simply Screen DIY Silk Screen Kit is a fantastic product for anyone looking to delve into the world of fabric customization without the complexities of professional setups. It’s affordable, incredibly user-friendly, and offers immense creative freedom. My experience crafting a personalized onesie was not only successful but also deeply satisfying, proving that professional-looking results are well within reach for the average home crafter. If you’re searching for a rewarding DIY project that allows you to express your creativity on textiles, this kit is an excellent choice. It truly embodies the spirit of crafting: making beautiful, unique items in a way that is accessible, enjoyable, and delivers impressive results.
Ready to start your own screen printing adventure? You can learn more about Plaid’s Simply Screen Kit and explore all its possibilities HERE!
Do you have any questions about this product or my experience with it? Feel free to ask in the comments below, and I’ll do my best to provide helpful answers. Happy crafting!
~Whitney