
Build Your Dream DIY Outdoor Lounge Chairs: Free Plans & Step-by-Step Guide
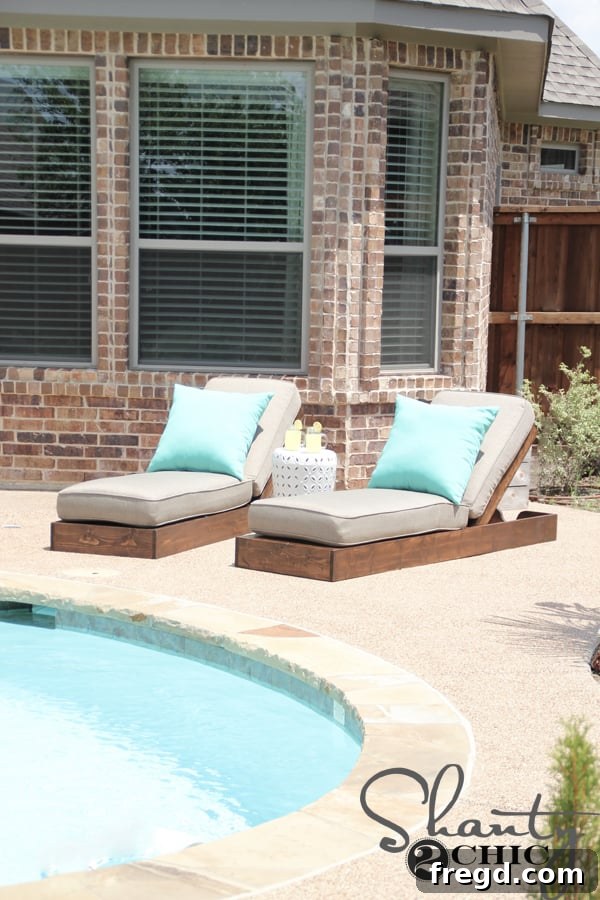
After a much-needed break from the Texas rain, the weather has finally cleared, and I couldn’t be more thrilled to dive into a project I’ve been envisioning since we first built our home: a custom set of outdoor lounge chairs! While last summer was dedicated to furnishing the interior of our new house, these outdoor beauties patiently waited their turn, and I’m ecstatic to report they were absolutely worth every moment of anticipation.
Why Choose DIY for Your Outdoor Lounge Chairs? Unbeatable Value and Custom Style
There’s an undeniable satisfaction that comes with creating something with your own hands, especially when the end result is both functional and beautiful. These DIY outdoor lounge chairs perfectly embody that spirit. They are incredibly comfortable, boast a high-end, custom aesthetic, and perhaps best of all, each chair cost me only about $80 in lumber! When you compare this to similar chairs on the market, which can easily range from hundreds to even thousands of dollars, the savings are simply astounding. This project proves that achieving a luxurious outdoor living space doesn’t have to break the bank.
The Perfect Foundation: Selecting Your Cushions First
When embarking on a project like this, it’s often wise to choose your cushions first, as their dimensions will dictate the precise measurements of your chair frame. For these chairs, I specifically designed them to accommodate these Martha Stewart Living Lake Adela replacement cushions from Home Decorators Collection. I opted for the elegant Heather Beige color, which complements any outdoor decor beautifully. Finding affordable, deep-seated outdoor cushions can be a challenge, as they often come with a hefty price tag. However, the quality and cost-effectiveness of these particular cushions were truly unparalleled, making them the ideal choice for this project.
Ready to Build? Get Your Free Plans and Step-by-Step Tutorial!
We believe everyone should have the opportunity to create their dream outdoor space, which is why we’re providing both free, detailed plans and a comprehensive step-by-step tutorial to guide you through building your very own outdoor lounge chairs. Whether you’re a seasoned woodworker or a passionate beginner, our instructions are designed to be clear and easy to follow. To access your plans, simply click the image below or the link HERE to download and print them. Let’s get building!
Step-by-Step Guide: Crafting Your Custom Outdoor Lounge Chairs
This detailed guide will walk you through each stage of constructing your lounge chairs, from the initial cuts to the final protective finish. We’ve simplified the process to ensure a smooth and enjoyable woodworking experience.
Preparing the Frame: Precision Cuts and Smooth Edges
The foundation of any sturdy furniture piece begins with precise cuts. I started by making all the necessary cuts for the main chair frame as indicated in the plans. A unique design element of these chairs involves a subtle curve on certain frame pieces. To achieve this, I first marked the curve according to the plans. Don’t worry about needing an exact template; often, a round object readily available in your workshop, like a can or a lid, can serve as a perfect tracing guide.
Once the curve was marked, I securely clamped the board to my workbench. This crucial step ensures stability and safety while cutting. Using a jigsaw, I carefully cut along the traced line. Take your time during this step to achieve a clean cut, but remember, perfection isn’t strictly necessary at this stage.
Even with careful cutting, the edges might not be perfectly smooth. This is where sanding comes in. Using my Corner Cat Sander, I quickly and easily smoothed out the cut edges, ensuring a professional and splinter-free finish. A smooth finish not only looks better but also helps prevent injuries.
If you’re planning to build multiple chairs, here’s a time-saving tip: once you’ve cut and sanded your first curved piece, you can use it as a template to trace the curve onto subsequent boards. This ensures consistency across all your chairs and speeds up the cutting process significantly.
Assembling the Main Structure: Strength and Durability
Pocket hole joinery is an excellent technique for creating strong, concealed joints, perfect for furniture that needs to withstand outdoor elements. Following the plans, I drilled 3/4-inch pocket holes into the short 1×6 boards using my trusty Kreg Jig. Ensure your jig settings are appropriate for the thickness of your wood for optimal results.
With the pocket holes drilled, it’s time to assemble the main frame of the chair. Apply wood glue to the mating surfaces for added strength, then secure the pieces together with 1 1/4-inch Kreg pocket hole screws. This combination of glue and screws creates a robust and durable joint that will last for years to come.
Finally, attach the middle support piece to the main frame, ensuring it is properly positioned according to your plans. This piece adds crucial stability and helps support the seating area of the chair.
Adding the Slats: Comfort and Style
The slats form the main seating surface, providing support and allowing for airflow, which is essential for outdoor furniture. Cut all your slats to the specified lengths. Just like the frame pieces, drill 3/4-inch pocket holes at both ends of each slat. This ensures a clean, hidden attachment method from the underside of the chair.
Attach the slats to the chair frame using 1 1/4-inch pocket hole screws and a small amount of wood glue. Ensure even spacing between each slat as you work your way across the frame. Consistent spacing is key for both comfort and aesthetics.
With the main slats in place, the chair is really taking shape! Now, attach the bottom support piece. This piece reinforces the entire structure and provides a finished look. The main body of your lounge chair is almost complete, ready for the adjustable backrest.
Crafting the Adjustable Backrest: Versatility in Design
One of the standout features of these lounge chairs is their adjustable backrest, allowing for customized comfort. To create the pivot point for the backrest, I used a 2-inch Carbon Hole Saw bit to drill a clean, circular hole into the center of the backrest board. While a jigsaw or router could also achieve this, the hole saw bit offers incredible ease and precision for this specific task.
Each chair will require one of these specially cut boards for the backrest mechanism. Once the holes are drilled, take a moment to smooth the edges with your sander. This prevents snagging and gives the backrest a refined appearance.
Now, assemble the backrest frame using 1 1/4-inch pocket hole screws and wood glue, creating a solid structure for the backrest slats. Just like with the main frame, ensuring squareness during assembly is critical for proper function.
Next, cut the slats for the backrest and attach them to the backrest frame. Use the same method as the main frame slats: drill pocket holes at both ends and secure them with pocket hole screws and wood glue. Maintain consistent spacing for both comfort and visual appeal.
The Adjustable Mechanism: Backrest Guide and Spacing Blocks
The backrest guide is a crucial component for the adjustable feature. I built this guide using wood glue and my 18V nailer with 1 1/4-inch brad nails. This provides a secure yet quick assembly for these less structurally critical components.
Here you can see the fully assembled backrest, ready to be integrated into the main chair frame.
Next, I attached the backrest guide to the back of the backrest using wood glue and my nailer. While I initially secured it with pocket hole screws at the bottom, a crucial lesson learned was to ensure top pocket hole screws are spaced sufficiently far apart from the circular cut-out to prevent interference with the pivot mechanism. Always double-check your spacing!
Cut the small blocks for the backrest and attach them using wood glue and 1 1/4-inch wood screws. It’s imperative to pre-drill pilot holes here to prevent the wood from splitting, especially with smaller pieces. This attention to detail ensures the longevity and stability of your chair.
Final Assembly: Arms and Hinges
Construct the arm assembly using wood glue and your nailer. These arms will provide both comfort and structural support. While assembling the arm, I consciously decided not to attach it directly to the 2×4 support piece at this stage. Instead, I attached the 2×4 directly to the chair frame.
This deliberate decision was made to simplify the finishing process. By keeping the arm assembly separate from the 2×4 that connects to the chair, I wouldn’t have to meticulously tape off the metal hinges before applying stain, saving time and ensuring a cleaner finish.
Finishing Touches: Stain and Protection for Outdoor Longevity
To give these chairs their rich, elegant look and to protect them from the elements, I applied one generous coat of Rust-Oleum Dark Walnut stain over all surfaces. Don’t forget to get underneath and into all the nooks and crannies – it might be a tedious task, but it’s essential for complete protection and a uniform finish! After the stain dried, I applied two coats of Rust-Oleum Spar Varnish in a satin finish. This spar varnish is specifically designed for outdoor use, offering superior protection against UV rays, moisture, and temperature fluctuations, ensuring your chairs remain beautiful and durable for years.
The Grand Finale: Attaching Hinges and Enjoying Your Hard Work!
Once the varnish has completely cured and is dry to the touch, it’s time for the final assembly step: attaching your hinges. Carefully align and secure the piano hinges to both the arm assembly and the 2×4 support attached to the chair frame. This mechanism is what allows the backrest to adjust seamlessly to various positions.
And just like that, your stunning DIY outdoor lounge chairs are complete!
Unveiling Your New Outdoor Oasis
Now comes the best part: adding your cushions, sinking in, and truly enjoying the fruits of your labor! There’s nothing quite like kicking back in a piece of furniture you’ve crafted yourself. The adjustable backrest is incredibly versatile and sturdy, allowing you to easily find your perfect recline position for reading, lounging, or simply soaking up the sun.
These chairs are the perfect addition to any back patio, transforming it into a luxurious and comfortable retreat. And for those moments of ultimate relaxation, they even lay completely flat – ideal for an afternoon nap or stargazing! The pride and satisfaction of completing such a rewarding project, then getting to simply relax and enjoy it, is truly unparalleled.
The easily adjustable backrest mechanism is a feature I particularly adore. It’s incredibly user-friendly and robust, ensuring lasting functionality and comfort.
And yes, they absolutely lay completely flat for those moments when you need extreme relaxation or want to sunbathe to the fullest!
I genuinely love these chairs! They are the absolute perfect enhancement to our backyard patio. There’s truly nothing more fulfilling than dedicating your efforts to a project and then getting to fully unwind and appreciate the beautiful, functional result of your hard work.
Complete Your Patio Paradise: Complementary DIY Projects
If you love the aesthetic of these lounge chairs and are interested in other DIY projects to complete your outdoor living space, you’re in luck! Many other elements you see in this space were also handcrafted. The cushions, as mentioned, can be found HERE. The stylish pillows and the charming garden stool were lovely finds from World Market, adding a touch of personal flair.
For those looking to expand their outdoor furniture collection, here are a few other popular pieces I’ve proudly built for our back patio. Each project offers a unique way to enhance your outdoor living experience, combining practicality with custom design.
Our spacious DIY Outdoor Dining Table and coordinating Benches are perfect for al fresco meals and entertaining. You can find the detailed plans and tutorial for these pieces HERE.
Elevate your outdoor entertaining with our stylish DIY Outdoor Bar. This project adds a functional and beautiful focal point to any patio or deck, perfect for mixing drinks and serving guests. The comprehensive guide is available HERE.
For a classic touch with a twist, check out our Bar Height Adirondack Chair. This unique design combines the timeless comfort of an Adirondack with a taller profile, perfect for pairing with a bar or high table. Find the plans and tutorial for this project HERE.
Conclusion
We hope this detailed guide inspires you to take on your next woodworking adventure and create beautiful, functional outdoor lounge chairs that you and your family will cherish for years. Remember, with free plans and a little dedication, a custom, high-end look is within reach for a fraction of the cost. Good luck with your build, and thank you so much for stopping by and being a part of our DIY journey!
~Ashley