
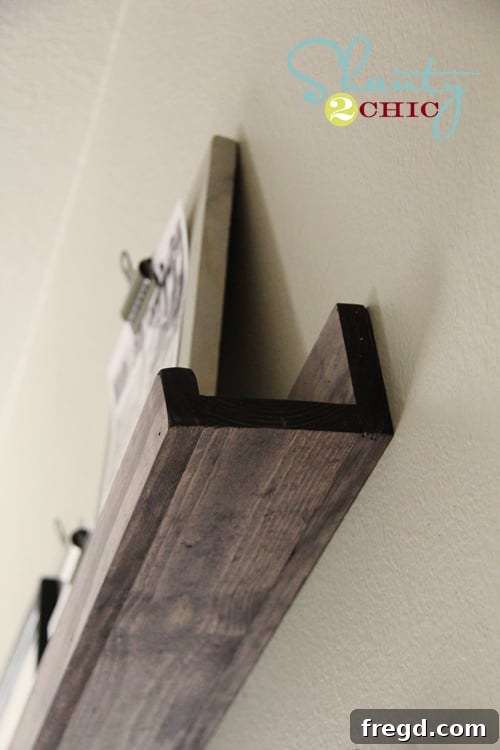
That’s right… ANYONE! These are super simple to build, offering incredible style without the hefty price tag. This project stands out as my absolute favorite, especially given its remarkably low cost and the stunning results it delivers.
Transform Your Space: Build Stunning Shelves Anyone Can Master
Embarking on a home makeover journey, especially for a cherished space like your child’s bedroom, often sparks a desire for personalized, handcrafted touches. Over the past few weeks, I’ve been happily immersed in redoing my oldest son’s room, a journey that has already brought forth some exciting transformations. We’ve already tackled the impressive custom-built platform bed and an eye-catching Pottery Barn-inspired headboard. With these major pieces beautifully in place, my focus naturally shifted to the next essential addition: a functional and stylish desk, complemented by practical yet decorative shelving above it. The right shelving can truly elevate a room, offering both vital storage and a canvas for personal expression.
The search for the perfect shelving solution can sometimes be daunting, with store-bought options often falling short on style, budget, or the ability to perfectly fit a space. This quest led me to an incredible resource that empowers even the most novice DIY enthusiast to create something truly special. I stumbled upon this fantastic plan on Ana White’s renowned website, and I knew instantly that I had found my next rewarding project. What makes this particular design so profoundly appealing is its unparalleled simplicity, its remarkable affordability, and the sheer satisfaction of bringing it to life with your own hands. It’s a true testament to the idea that you don’t need extensive woodworking experience or an expensive, fully-equipped workshop to craft beautiful, functional pieces that enhance your home’s aesthetic and organization.
The Ultimate Beginner-Friendly DIY Shelf Project: Unbelievable Simplicity, Unbeatable Value
Let’s be absolutely clear: if you own a basic power drill – a versatile tool I genuinely believe every household, and indeed every aspiring DIYer, should possess – then you are already equipped with the most essential skill and tool required to construct these elegant wall-mounted shelves. The entire building process is astonishingly straightforward, making it an ideal entry point for anyone looking to dip their toes into the rewarding and creative world of DIY home decor projects. The instructions are intuitive, the cuts are minimal, and the assembly is logical, designed specifically for ease of execution. I was so impressed with the outcome of the first two shelves I built for my son’s room, both in terms of their attractive appearance and the incredible ease of construction, that I enthusiastically proceeded to make two more for my younger sister. The most exhilarating part? Each individual shelf cost an astonishingly low $10 to build, making this an unparalleled, incredibly budget-friendly shelving solution that delivers high-end style without the premium price tag. Imagine customizing multiple rooms with stylish storage without breaking the bank!
This project transcends mere cost savings; it’s deeply rooted in the immense satisfaction of creating something beautiful and functional with your own hands. It’s about the joy of personalizing your living space exactly how you envision it, free from the limitations of mass-produced furniture, and without compromising on quality or aesthetic appeal. It’s an empowering journey that culminates in a tangible, useful product. Now, let’s delve into the minimal materials required and the simple, step-by-step process that makes these DIY wood shelves an absolute game-changer for any home improvement enthusiast, no matter their skill level.
Gathering Your Materials and Tools: Efficiency and Simplicity
One of the most attractive and liberating aspects of this DIY shelf project is the incredibly streamlined materials list. For each individual shelf you plan to construct, you will only need three specific pieces of wood: two standard 1×4 boards and one 1×2 board. That’s genuinely it for the primary materials! This incredibly concise approach not only significantly keeps your project costs down but also dramatically simplifies the wood shopping experience, eliminating the need to navigate complex lumberyards for obscure dimensions. For these particular shelves, I opted for readily available 8-foot long boards, which offered a significant practical advantage: no need for a saw! This eliminated an extra tool requirement and a potentially intimidating step in the building process, making this project even more accessible and appealing for absolute beginners or those with limited tools.
When selecting your lumber, take a moment to choose straight pieces that are free from significant knots, cracks, or warping. While pine is a widely popular and economical choice for projects of this nature, readily available at any hardware store, and takes stain or paint beautifully, you could explore other wood types if you desire a different grain or density. Beyond the core lumber, your essential toolkit will include a good quality wood glue – this adhesive is absolutely crucial for the structural integrity and long-term durability of your shelves, providing a bond often stronger than the wood itself. While I personally enjoy using my Kreg Jig for clean, strong pocket holes, it is by no means a necessity for this project. If you don’t own one, you can simply pre-drill your holes – a vital step to prevent the wood from splitting when screws are driven – and use standard wood screws to securely attach everything. I typically lean towards drywall screws for their excellent grip and ease of use, but general wood screws will work perfectly well too. Just ensure your chosen screws are long enough to create a strong, deep bond without protruding unsightly through the other side. A measuring tape, pencil, and possibly a level will also be invaluable. Now, with your materials and basic tools ready, let’s get into the enjoyable construction phase!
Step-by-Step Construction Guide for Your Easy DIY Shelves
Building these shelves is an incredibly rewarding process, and you’ll be genuinely amazed at how quickly and effortlessly they come together. Follow these detailed steps for a successful build:
Step 1: Forming the Main Shelf Base (The “L” Shape)
Begin by taking your two 1×4 boards. These two pieces will form the fundamental “L-shape” structure that serves as the core of your shelf. One 1×4 board will function as the horizontal shelf surface upon which your items will rest, while the other will become the vertical back piece that mounts securely to the wall. To ensure a robust, lasting bond between these two crucial components, apply a generous and continuous line of high-quality wood glue along the long edge of one of the 1x4s where it will meet the face of the other. Remember, wood glue, once fully cured, provides incredible strength, often surpassing the strength of the wood itself, so this is a critical step that should not be overlooked.
Once the glue is applied, carefully align the two 1×4 boards to form a precise 90-degree corner. The back 1×4 should be perfectly perpendicular to the horizontal shelf piece. Now, it’s time to secure them permanently with screws. Using your power drill, pre-drill several pilot holes through the back face of the vertical 1×4 board, ensuring these holes extend into the edge of the horizontal 1×4. Pre-drilling is absolutely essential to prevent the wood from splitting, which is a common issue, especially when driving screws close to edges. Once your pilot holes are perfectly drilled, drive your chosen wood or drywall screws through these holes to firmly join the boards together. Aim for 3-4 evenly spaced screws per 4-foot section to ensure maximum stability. Ensure the screw heads are flush with the surface or slightly countersunk for a cleaner, more professional finish. This step creates a remarkably robust L-shaped structure that will be the foundational element of your beautiful new shelf.
Step 2: Attaching the Decorative and Functional Front Lip
With your main L-shaped shelf structure robustly complete, the next and final construction step is to attach the 1×2 board. This piece, while seemingly small, serves a crucial dual purpose: it acts as a subtle yet effective lip to prevent items from accidentally sliding off the front of the shelf, providing added security for your displayed objects. Additionally, it significantly enhances the aesthetic, lending a refined, finished, and more substantial look to the entire piece. Apply another continuous line of wood glue along the entire front edge of your horizontal 1×4. Be sure to spread it evenly using your finger or a small applicator to ensure maximum adhesion across the entire contact surface.
Now, carefully position your 1×2 board along this freshly glued front edge. Ensure it is perfectly flush with both the bottom and front edges of the 1×4 for a seamless look. Use finish nails to secure it firmly in place. Finish nails are an excellent choice here because their smaller heads are much less noticeable, contributing to a cleaner, more professional finished appearance. If you happen to have a brad nailer or pin nailer, this step will be incredibly fast and efficient. Otherwise, a traditional hammer and small finish nails will do the trick perfectly. Drive the nails through the 1×2 into the 1×4, spacing them evenly along the entire length of the shelf, typically every 6-8 inches. And just like that, the basic structural construction of your durable and stylish shelf is complete! You’ve already accomplished the core woodworking, and the hardest part is truly behind you.
That’s genuinely it for the primary construction! It’s astonishingly simple, isn’t it? No complex joinery, no intricate cuts, no advanced tools – just straightforward, logical assembly that yields a fantastic result.
Finishing Your Shelves: Adding Style, Protection, and Personal Flair
Once your shelves are fully assembled and the wood glue has had ample time to cure (check the manufacturer’s recommendations, but typically a few hours to overnight), you arrive at the exciting stage of customizing their look with your chosen finish. For this particular project, I deliberately embraced a rustic, “shanty-chic” aesthetic, which meant I didn’t even bother meticulously filling the small nail holes. These minor imperfections, in my opinion, contribute to the handmade character and add a genuine, charmingly imperfect feel that I truly appreciate. However, if your preference leans towards a perfectly smooth, polished, and flawless appearance, you absolutely can fill any nail holes with a quality wood putty, allow it to dry completely, sand it smooth, and then proceed with your chosen finish. The beauty of DIY is tailoring it to your personal taste!
Regardless of whether you fill nail holes, I highly recommend a thorough, light sanding of the entire shelf before applying any stain or paint. Even if you love a rustic look, sanding helps to smooth out any rough edges or splinters, opens up the wood grain for more even absorption of stain, and ultimately ensures a much more professional and pleasant-to-touch final appearance. Start with a medium-grit sandpaper (around 120-150 grit) to effectively remove any major imperfections or mill marks, then follow up with a finer grit (180-220 grit) for a silky-smooth finish. Always remember to sand diligently in the direction of the wood grain to avoid unsightly cross-grain scratches.
For my shelves, I used what has quickly become my new favorite wood stain, a product that truly impressed me with its ease of use and beautiful results:
Rust-Oleum Ultimate Wood Stain in Dark Walnut
I absolutely adore this stain! It dries beautifully and completely within a remarkable one hour, which means you can efficiently move on to applying a second coat or a protective topcoat much faster than with many traditional stains. This rapid drying time is a huge advantage for any DIY project, allowing you to complete your work more quickly. You can typically find this excellent stain readily available at your local Lowe’s home improvement store. Apply it with a good quality brush or a clean, lint-free rag, wiping off any excess after a few minutes to achieve your desired depth and richness of color. For enhanced durability and long-lasting protection, especially if the shelves will be in high-traffic areas or exposed to potential moisture, strongly consider applying a clear topcoat such as polyurethane, polycrylic, or a protective wax once the stain has fully cured. This will seal and protect your beautiful new finish for years to come.
Secure Installation: Mounting Your New DIY Shelves with Confidence
Once your beautifully finished shelves are thoroughly dry and ready for their grand debut, it’s time for the final, incredibly satisfying step: attaching them securely to your wall. This is a critical stage to ensure your shelves are not only visually appealing but also perfectly safe, stable, and capable of holding your treasured items with confidence. The great news is, just like the construction, this installation step is also remarkably straightforward and easy to accomplish!
For maximum strength and stability, I highly recommend using 2-inch drywall screws and driving them directly into the wall studs. Attaching directly to studs is absolutely crucial for any wall-mounted shelving unit, as drywall alone cannot safely support significant weight. To accurately locate your studs, you can utilize a reliable electronic stud finder for precision, or employ the old-fashioned but effective knock test to identify the solid wood framing hidden behind your drywall. Once you’ve clearly marked your stud locations on the wall, hold your finished shelf up to the wall at your desired height, use a level to ensure it’s perfectly straight and plumb, and then mark precisely where your screws will go through the vertical back piece of the shelf, aligning perfectly with your marked stud locations. Next, pre-drill pilot holes through the shelf’s back piece and slightly into the wall (if you’re completely confident in your stud location) to make driving the screws significantly easier and to further prevent any potential wood splitting. Drive two or more sturdy screws per stud, depending on the overall length of your shelf, ensuring they penetrate deep into the stud for maximum, unwavering security. For longer shelves, aim for screws every 16-24 inches to match standard stud spacing.
A wonderful and convenient advantage of this specific DIY shelf design is that you don’t even have to worry about meticulously covering the screw heads. Once your items are placed on the shelves – whether they are books, plants, decorative objects, or photographs – they will naturally and elegantly obscure the screws, maintaining the clean, seamless aesthetic you’ve worked so hard to create. Within a remarkably short time, your beautifully crafted, budget-friendly shelves will be firmly and safely in place, ready to be adorned and admired!
I quickly got them mounted and couldn’t wait to snap some pictures to share the immediate impact and charming transformation with you! Seeing them up on the wall, styled with personal touches, is truly the best part.
And if you’re still not entirely convinced about the immense value, beauty, and cost-effectiveness of this DIY project, please take a decisive moment to look at this compelling comparison picture:
Yes, it looks strikingly familiar, doesn’t it? You can indeed find a beautifully similar ledge shelf at high-end home furnishing retailers like Pottery Barn. However, there’s a monumentally significant difference that sets our DIY version apart: their version costs a staggering $85 for just a 4-foot length! Let’s put that into a clear perspective: that’s half the length of my easily achievable 8-foot DIY shelves and approximately eight times the price for a single shelf. No, thank you! Why would anyone pay such a premium price when you can achieve the very same, if not superior, quality and aesthetic with your own hands for literally a mere fraction of the cost? The choice is clear, and the savings are substantial.
Your DIY Journey Starts Now! Embrace the Power of Handcrafted Home Decor
So, what are your thoughts after seeing how accessible and rewarding this project truly is? Are you feeling inspired and ready to embrace the empowering world of DIY? You OFFICIALLY have absolutely no excuse not to build these incredible, budget-friendly shelves! They are genuinely easier to construct than assembling most notoriously frustrating flat-pack furniture pieces you might find in a big-box store. The profound satisfaction of building something custom, incredibly functional, and undeniably beautiful for your home, all while saving a significant amount of money and gaining valuable skills, is truly unmatched. I absolutely adore these shelves, not just for their appearance but for what they represent – the power of DIY – and I am incredibly confident that you will too once you experience the joy of creating them.
For those who appreciate exceptionally detailed visual guides and more in-depth, step-by-step explanations, you can find the comprehensive plans and a helpful video tutorial HERE on Ana White’s site! She meticulously provides all the measurements, specific material lists, and nuanced tips to ensure your project is a resounding and enjoyable success from start to finish. Don’t hesitate to check out her amazing resources.
Finally, if you thoroughly enjoyed this project, found it inspiring, and feel empowered to start your own DIY journey, would you be a dear and help spread the word by PINNING IT, please? Your support means the world to me, and it plays a huge role in helping other aspiring DIYers discover just how easy, affordable, and incredibly rewarding it can be to create stunning, personalized home decor on a budget. I would appreciate it greatly and it helps our creative community grow! Thank you so much for following along on this building adventure, and here’s to happy crafting and transforming your home!
~Whitney