
DIY Industrial Farmhouse Floating Shelves with Rope and Pipe: A Complete Guide
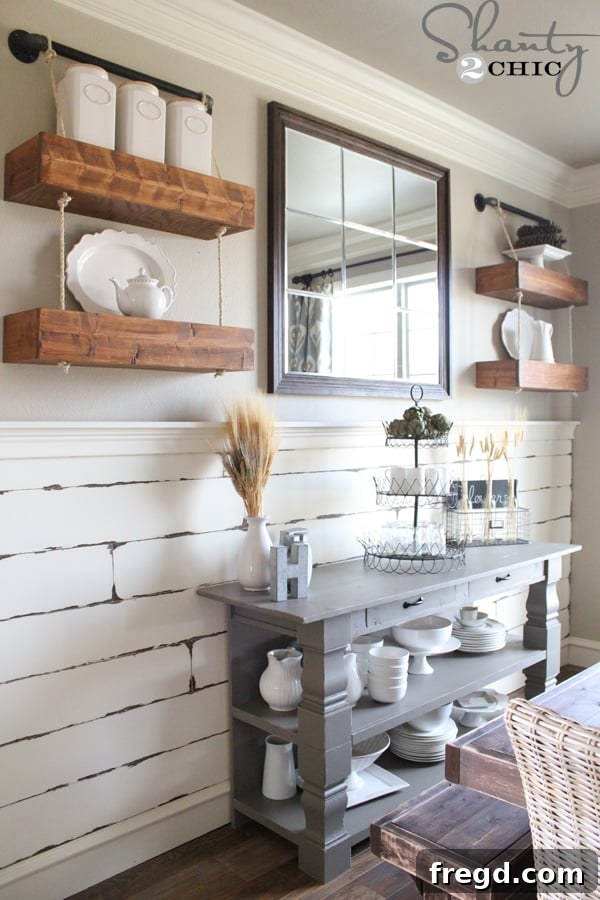
Hello fellow DIY enthusiasts! I’m thrilled to share a recent project that has completely transformed my dining room – a set of gorgeous floating shelves that perfectly blend industrial ruggedness with rustic charm. These aren’t just any shelves; they feature a unique design, appearing to be suspended by sturdy metal pipes and elegant sisal rope. If you’re looking for a statement piece that’s both functional and stylish, you’ve come to the right place!
The combination of wood, pipe, and rope creates an eye-catching design that immediately elevates any space. While these shelves are a spectacular addition to my dining room, their versatile aesthetic means they’d be equally stunning in a kitchen, living room, office, or even a bathroom. The beauty of this project lies in its simplicity and adaptability – they are surprisingly easy to build and can be modified to suit your specific style and dimensions. Let’s dive into how you can create your own custom industrial-chic floating shelves!
Why Choose This DIY Floating Shelf Project?
- Unique Aesthetic: The fusion of metal pipes and natural rope offers a distinct industrial farmhouse vibe that stands out from typical shelving.
- Customizable: Easily adjust dimensions, wood finishes, rope types, and pipe colors to match your home decor.
- Affordable: Building your own shelves is significantly more cost-effective than purchasing similar designer pieces.
- Functional Storage: Add much-needed storage and display space while enhancing your room’s visual appeal.
- Beginner-Friendly: With basic woodworking skills and tools, this project is achievable for most DIYers.
Visual Guide: How to Build a Floating Shelf
To give you a comprehensive overview of the core floating shelf construction technique, here’s a helpful video guide. While this video focuses on the general principles, we’ll expand on these steps specifically for our rope and pipe design:
Now, let’s get into the step-by-step process of creating these stunning shelves!
Materials and Tools You’ll Need
Materials List:
- 2×3 lumber (for the internal frame – specific lengths will be detailed per shelf)
- 1×10 lumber (for the top and bottom of the shelf box – specific lengths will be detailed per shelf)
- 1×6 lumber (for the sides and front face of the shelf box – specific lengths will be detailed per shelf)
- 3″ Spax screws (for attaching frame to studs)
- 2 1/2″ pocket hole screws
- 1 1/4″ pocket hole screws
- 1 1/4″ brad nails or finish nails
- Wood glue (e.g., Gorilla Wood Glue)
- Wood stain (e.g., Varathane Early American) or paint
- Sisal rope (3/8″ thickness recommended, but adjust to your preference)
- Black steel pipe components (per shelf assembly):
- One 1″ x 24″ black steel pipe
- Two 1″ black iron 90-degree street elbows
- Two 1″ black malleable iron threaded floor flanges
- Screws and wall anchors (for attaching pipe flanges to the wall)
Tools List:
- Stud finder
- Measuring tape
- Pencil
- Miter saw or circular saw (for cutting lumber)
- Drill/Driver
- Kreg Jig (or similar pocket hole system)
- Ryobi Forstner bit (matching rope thickness)
- Ryobi 18V Airstrike Nailer (or hammer and finish nails)
- Safety glasses
- Gloves
- Level
Step-by-Step Construction Guide
Step 1: Prepare the Wall and Attach the Internal Frame
The foundation of any strong floating shelf is a securely mounted internal frame. Begin by locating the wall studs, which are essential for bearing the weight of your shelves and any items you place on them. Use a reliable stud finder to pinpoint and mark the center of each stud along your desired shelf line. Marking these spots precisely ensures maximum stability.
Next, cut one 2×3 piece of lumber to 28 1/2 inches for each shelf you plan to build. This will be the main horizontal support. Align this 2×3 with your marked stud locations. Using 3-inch Spax screws, drill two screws into the 2×3 at each stud location. Ensure these screws penetrate deeply into the studs for a robust attachment. A level is crucial here to guarantee your shelf frame is perfectly straight.
Step 2: Build Out the Shelf Frame Structure
To give the floating shelf its depth, you’ll extend the internal frame. For each shelf, cut three additional 2×3 pieces, each measuring 7 3/4 inches. These shorter pieces will form the sides and center support of your shelf’s internal structure.
On one end of each 7 3/4-inch 2×3, drill two pocket holes using your Kreg Jig. Apply wood glue to the ends of these pieces, then attach one at each end of the longer 28 1/2-inch 2×3 already mounted to the wall. Secure them with 2 1/2-inch pocket hole screws. Attach the third 7 3/4-inch piece in the center of the main horizontal support. This creates a strong, three-sided box frame that will support the outer shell of your shelf.
Step 3: Prepare the Shelf Panels and Drill Rope Holes
Now it’s time to prepare the visible parts of your shelves. Cut two 1×10 pieces of lumber to 28 1/2 inches for each shelf. These will form the top and bottom surfaces of your shelf box.
Next, you’ll drill the holes for your decorative rope. This step requires precision. It’s easiest to stack the two 1×10 boards together and drill the holes simultaneously, ensuring they align perfectly. Use a Ryobi Forstner bit that matches the thickness of your chosen rope (e.g., 3/8-inch bit for 3/8-inch rope). Drill one hole in each of the bottom corners of the stacked boards.
For placement, drill your holes approximately 3 inches from the outside edge and 2 inches from the front edge of the boards. You have some flexibility in placement, but always be mindful of the hidden 2×3 internal frame and any pocket holes you’ve drilled, ensuring your rope holes do not interfere with the structural integrity. The goal is to have the rope appear to pass through the solid wood sections.
Finally, drill three pocket holes at each end of both 1×10 boards. These will be used to attach the side pieces and form the complete shelf box.
Step 4: Assemble the Outer Shelf Boxes
With your top and bottom panels ready, it’s time to create the box shape of your shelves. Cut two 1×6 pieces of lumber to 9 1/2 inches for each shelf. These will serve as the side panels.
Apply wood glue to the edges of the 9 1/2-inch 1×6 boards. Then, attach them to the 1×10 boards (the top and bottom panels) using 1 1/4-inch pocket hole screws. This will form a sturdy, open-front box that will slide over your internal 2×3 frame.
Step 5: Craft and Fit the Front Face Boards
Once all your shelf boxes are constructed, measure and cut 1×6 boards to create the front faces. It’s crucial to measure each box individually, as slight variations can occur during assembly. While mine measured 30 inches, always measure as you go to ensure a perfect fit for each shelf.
These face boards will cover the open front of your shelf boxes, giving them a seamless, solid appearance, and hiding the internal frame. Do not attach them yet; they will be the very last step in the construction process after staining and mounting.
Step 6: Stain or Paint for a Beautiful Finish
Before attaching the shelf boxes to the wall, it’s vital to apply your chosen finish. I opted for one coat of Varathane Early American stain, covering all surfaces of the assembled boxes and the separate face boards. This step is critical because once the rope and pipe are attached, staining or painting becomes much more difficult and messy. Ensure even coverage and allow ample drying time according to the product instructions.
Choosing your stain or paint color is a fun part of the customization process. A rich, warm stain like Early American enhances the rustic feel, while a dark espresso or even a distressed paint finish could lean more industrial or farmhouse, respectively. Consider your existing decor and the overall ambiance you want to create.
Step 7: Mount the Stained Shelf Boxes to the Wall
Once the stain or paint has fully dried and cured, it’s time to mount your beautiful shelf boxes. Carefully slide each box over the 2×3 internal frame that you previously attached to the wall studs. Ensure the shelf is perfectly centered and level.
Using your Ryobi 18V Airstrike Nailer (or a hammer and 1 1/4-inch finish nails), drive about three nails through the top and bottom of the shelf box into each 2×3 support. This creates a secure, invisible attachment. Double-check that your shelves are not only centered horizontally with each other but also vertically level, ensuring a professional and polished final look.
Step 8: Install the Decorative Pipe Brackets
With your shelves firmly in place, it’s time to add the distinctive industrial pipe brackets. Before mounting, assemble the pipe components: screw the 1-inch x 24-inch black steel pipe into one 1-inch elbow, then attach a flange to the other end of the elbow. Repeat for the second elbow and flange on the opposite side of the pipe. This creates two L-shaped pipe supports that will appear to hold your shelves.
Carefully position your assembled pipe brackets on the wall above your shelves. Use a level to ensure they are straight. Mark the screw holes on the flanges. If you can hit a wall stud with any of your flange screws, do so for maximum strength. For the remaining screws, or if no studs are available, use appropriate wall anchors to ensure the pipes are securely fastened to the wall. This is crucial for both aesthetics and safety, as these pipes will be part of the visual support for the rope.
Here are links to the specific pipe components I used, purchased from Home Depot:
- One – 1″x24″ pipe
- Two – 1″ elbow
- Two – flange
Step 9: Thread and Knot the Rope
Now for the creative and defining element: adding the rope! I used a roll of 3/8-inch sisal rope, which I found at Home Depot. You won’t need the entire roll, but having extra is always better than running short.
Begin with the bottom shelf. Starting from underneath, thread the rope up through the pre-drilled holes in the bottom corners of each shelf. At this point, do not cut the rope from the main roll; this allows for easier tension adjustment.
When the rope reaches the decorative pipe, loop it around the pipe and tie a secure knot. Slide this knot up so it sits snugly against the pipe. Only now should you cut the rope from the roll, ensuring you leave ample slack (about 12 inches) at the bottom for adjustments.
To ensure the rope is taut between the shelves, pull the rope back out from the bottom of the shelf (from where it’s threaded). Then, tie a firm knot directly under the top shelf. This creates tension and keeps the rope neatly in place.
Finally, run the rope back down through the bottom shelf’s hole and tie another secure knot directly underneath the bottom shelf. Trim any excess rope, leaving a neat tail. Repeat this entire rope-threading and knotting process for the other side of your shelves.
At this stage, your shelves should start looking like the final product, with the rope elegantly integrated into the design.
Step 10: Attach the Face Boards for a Seamless Finish
The final structural step is to attach the pre-stained face boards you prepared earlier. Apply a continuous line of Gorilla Wood Glue along the front edge of each shelf box.
Carefully align each face board with its respective shelf box, ensuring a flush and seamless fit. Secure the face board using your Airstrike Nailer and 1 1/4-inch nails. The combination of wood glue and nails will create a strong, durable, and aesthetically pleasing finish, completely hiding the internal frame.
And just like that, your DIY Industrial Farmhouse Floating Shelves are complete! The hard work is done, and now comes the truly enjoyable part: decorating them!
Decorating and Styling Your New Shelves
Floating shelves are not just for storage; they are prime real estate for showcasing your personal style and adding character to your room. Here are some tips and ideas for decorating your newly installed rope and pipe shelves:
- Mix Textures: Complement the wood, pipe, and rope with various textures. Think ceramic vases, woven baskets, glass bottles, and metallic accents.
- Vary Heights and Sizes: Create visual interest by arranging items of different heights and proportions. Use taller items at the back and shorter ones in front.
- Add Greenery: Plants, especially trailing varieties like Pothos or String of Pearls, bring life and freshness to the shelves. Faux plants are a great low-maintenance option.
- Personal Touches: Display framed photos, meaningful souvenirs, or cherished collectibles that tell your story.
- Books and Art: Arrange a few books, both standing and stacked, alongside small pieces of art or decorative objects.
- Functional Decor: In a dining room or kitchen, consider displaying attractive dinnerware, serving pieces, or spice jars for both beauty and utility.
- Strategic Lighting: Small battery-operated LED puck lights or fairy lights can highlight your display and add ambiance.
For my dining room, I found some lovely white decorative pieces at HomeGoods, which beautifully contrast with the rustic wood. I also incorporated some unique sugar cones from Hobby Lobby for a touch of natural charm.
Explore My Full DIY Dining Room Transformation
I am absolutely enamored with my dining room, and I’m proud to say that every major piece in it is a DIY creation! These rope and pipe floating shelves are the perfect final touch to a space filled with handmade charm and personality. If you’re inspired to take on more home improvement projects, scroll down to find links to all the other DIY pieces you see in this room:
- DIY Turned Leg Buffet Table: A substantial and elegant storage piece.
- DIY Distressed Plank Wall: Adds incredible rustic texture and character to the space.
- DIY Laminate Flooring Installation: Learn how to lay beautiful and durable floors yourself.
- Restoration Hardware Inspired Dining Table for $110: Achieve a high-end look on a budget.
- DIY Benches for My Dining Table: Complementary seating for the custom dining table.
- DIY Large Paneled Wall Mirror: An impressive statement piece that amplifies light and space.
- DIY Lined Window Panels: Custom curtains that add softness and complete the window treatment.
- My Super Cute Chandeliers: Lighting fixtures that enhance the room’s ambiance.
- House Update: Paint Colors: Details on the paint choices that tie the room together.
My beautiful rug is a find from World Market, and the dining chairs were sourced from Pier 1, offering a perfect blend of ready-made and custom elements. I hope this detailed guide empowers you to create stunning industrial farmhouse floating shelves for your own home. Happy building!
Thanks so much for stopping by and taking the time to explore this exciting project!
~Ashley