
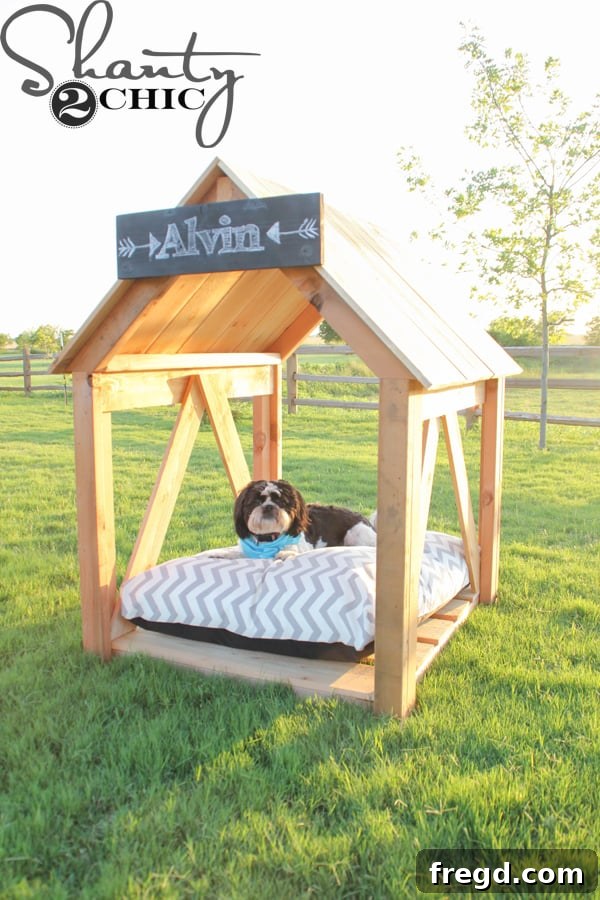
The scorching Texas summer heat has officially arrived, pushing temperatures well over 100 degrees, and it looks like it’s here to stay for a while! For pet owners, this brings a unique challenge: keeping our beloved furry friends cool and comfortable. Our family includes a delightful little Shih Tzu named Alvin – a name chosen by our son, hoping for many opportunities to enthusiastically shout “ALVIN!” While he’s primarily an indoor dog, Alvin has an insatiable desire to be wherever we are. My kids had the sweet idea of building him an outdoor dog house, but I quickly realized that a traditional enclosed structure would simply trap the heat, making it an oven rather than an oasis. That’s when inspiration struck, leading to the creation of this “Breezy Dog House.”
I envisioned a haven complete with a plush, cooling bed, ample shade from the relentless sun, and, of course, a personalized sign proudly bearing his name. This isn’t just any DIY dog house; it’s a carefully considered design aimed at providing optimal comfort and airflow, making those sweltering summer days much more bearable for our four-legged family members. It’s a project that combines practicality with personal touch, ensuring our pets have a dedicated outdoor retreat that genuinely offers respite from the heat.
From the moment Alvin first stepped inside, I knew we had a happy customer! His immediate contentment was the ultimate reward after the hours spent designing and bringing this project to life. The entire build process was surprisingly straightforward and incredibly enjoyable. What truly makes this DIY project stand out, beyond its charming aesthetic and functional design, is its affordability. We managed to construct this entire Breezy Dog House for approximately $70 in lumber, proving that you don’t need to break the bank to provide a luxurious and comfortable outdoor space for your pet.
A key element in the design was finding the perfect foundation for comfort. I specifically designed this house to accommodate THIS PILLOW that I discovered on Overstock. I opted for the medium size, which fit perfectly within the dimensions of the house frame. My goal was to source an affordable, yet durable, outdoor dog pillow that was readily available online, making it easier for anyone to replicate this project. I was particularly pleased with both its stylish appearance and its reasonable price point. Upon arrival, I was genuinely impressed by the quality of the materials and craftsmanship, ensuring it would withstand outdoor conditions while providing exceptional comfort for Alvin.
Creating a truly breezy environment meant integrating specific design elements. The elevated base allows for crucial airflow underneath the structure, preventing heat from building up on the ground. The open sides, while providing structural integrity, are intentionally designed to maximize cross-ventilation, ensuring that warm air doesn’t stagnate inside. Furthermore, the slatted roof not only offers generous shade but also allows for vertical heat escape, replicating the natural cooling effect of an open canopy. The use of robust, weather-resistant lumber ensures longevity, making this an investment in your pet’s comfort for many summers to come. This combination of thoughtful design and material choice makes the Breezy Dog House a genuine sanctuary from the summer heat.
Ready to embark on this rewarding DIY journey yourself? You can easily access the comprehensive plans by clicking on the image below or by simply clicking HERE to download the FREE PDF plans. These detailed plans provide all the measurements and specific cuts you’ll need. Once you have the plans in hand, follow along with our step-by-step tutorial below, which will guide you through each stage of the construction process with clear instructions and accompanying images. Building this isn’t just about creating a structure; it’s about crafting a special place where your pet can relax and feel loved, all while enjoying the satisfaction of a handmade project.
Building Your Breezy Dog House: A Step-by-Step Guide
Tools and Materials You’ll Need:
Before diving into the build, gather your tools and materials. For lumber, you’ll mainly need 2x3s for the frame and legs, 1x6s for the bottom slats, and 1×4 cedar boards for the side accents and roof slats. You’ll also need wood glue, 2 1/2″ finish nails, 1 1/4″ finish nails, and 2 1/2″ wood screws (Spax screws are highly recommended for their self-tapping properties, eliminating the need for pre-drilling). Essential tools include a miter saw for precise cuts, a 16-gauge finish nailer for quick and secure fastening, and a drill/driver for screws. Safety glasses and hearing protection are always a must for any woodworking project.
Step 1: Constructing the Bottom Frame
The foundation of your dog house starts with a sturdy bottom frame. Begin by accurately cutting the pieces for this frame according to the dimensions provided in your PDF plans. Precision here is key for a stable and square base. Using a miter saw will ensure all your cuts are clean and exact, which is crucial for perfect joints later on.
Once your cuts are made, it’s time to assemble the frame. Attach the shorter side pieces to the longer side pieces. For maximum durability and a strong bond, I recommend using a combination of wood glue and 2 1/2″ finish nails. A 16-gauge nailer makes this process incredibly fast and efficient. Aim for three to four nails at each joint to ensure a solid connection that will withstand the test of time and enthusiastic pet use. This creates a robust perimeter for the dog house.
Here you can see the bottom frame fully assembled. Take a moment to check that it is square by measuring diagonally from corner to corner; the measurements should be equal. This ensures that all subsequent steps will align correctly.
Step 2: Adding the Middle Support
With the outer frame complete, the next crucial step is to add the middle support board. This piece provides essential stability to the base and prevents the floor slats from sagging over time. Carefully center this board within the frame and attach it using the same method: a generous amount of wood glue and 2 1/2″ finish nails. Ensure it’s perfectly level with the rest of the frame members.
And there you have it – the complete bottom frame, a testament to straightforward and effective joinery. It’s solid, square, and ready for the next phase of the build. This simplicity is part of what makes this project so accessible, even for beginner woodworkers.
Step 3: Laying the Floor Planks
Now, let’s create the comfortable floor for your pet. Take your 1×6 slats and attach them to the bottom frame. Again, use both wood glue and 2 1/2″ finish nails for a robust and squeak-free floor. Apply glue to all contact points where the slats meet the frame members.
When attaching the planks, start with the front and back boards, ensuring they are flush with the outer edges of the frame. These serve as your anchors. Once those are securely in place, you can evenly space the remaining boards across the frame. Consistent spacing not only looks good but also allows for better airflow, contributing to the “breezy” aspect of the design. A few small spacers can help you achieve perfect gaps between planks.
The completed bottom structure now provides a solid, elevated platform for your pet. This raised design is crucial for keeping your dog off the hot ground and promoting air circulation, which is a cornerstone of the Breezy Dog House concept.
Step 4: Crafting the Legs
Now, let’s move on to the legs, which will elevate the entire structure and provide the necessary height for your dog house. Cut the lumber for the legs according to your plans. Each leg will consist of two pieces joined together. Assemble these pieces with precision, again using 2 1/2″ finish nails and wood glue for maximum strength. These legs are fundamental to the overall stability and open design.
When assembled, each leg will have a distinctive “L” shape. This configuration is specifically designed to provide strong support and a clean look once attached to the main frame. Ensure all four legs are identical for even support.
Step 5: Attaching the Legs to the Frame
With the legs assembled, it’s time to secure them to the bottom frame. Use 2 1/2” wood screws for this connection, as they provide superior holding power. I highly recommend Spax screws because they are self-tapping, which means you won’t need to pre-drill pilot holes, saving you time and effort. Position the legs so that the full face of the 2×3 is on the front and back (shorter) sides of the frame, and the seam of the “L” is oriented towards the longer sides of the house. This alignment ensures both structural integrity and a clean exterior finish.
Here you can see the dog house structure now elevated on its legs. This height not only makes it easier for your pet to enter and exit but also, as mentioned, significantly improves airflow, which is paramount for a breezy design. The structure is really starting to take shape!
Step 6: Adding Side Support Boards
Next, we’ll add structural support and a touch of aesthetic appeal with the 1×4 cedar boards on each side of the house. Attach these boards to the top of the legs, ensuring the top edge of the 1×4 is perfectly flush with the top of the legs. This creates a continuous line and provides a strong anchor for subsequent components. Secure these with 1 1/4” finish nails and wood glue for a durable and seamless connection. Cedar is an excellent choice here for its natural resistance to rot and insects, ideal for an outdoor structure.
Step 7: Cutting and Attaching Angled Side Pieces
Now for the side angled pieces, which add a distinctive flair to the design. These pieces require careful cuts: both ends will have 45-degree miter cuts, and they will not be parallel to each other. Double-check your measurements from the plans to ensure these cuts are precise, as they define the aesthetic of the open sides. This angled design contributes to the ‘breezy’ aspect by directing airflow.
Begin by attaching the first angled board to the inside corner (towards the side of the dog house) of the leg. Use 1 1/4” nails and a generous amount of wood glue. This provides a strong, initial anchor point. Next, attach the second angled board to the opposite corner, mirroring the first. Ensure a snug fit at both ends.
Finally, carefully pull the top ends of the angled boards up so they are flush with the top edge of the 1×4 board that runs across the legs. The angled boards will overlap slightly at this point. Apply wood glue generously between all contact surfaces to create a strong laminate. Then, drive 1 1/4” nails from the inside of the house, going all the way through the 1×4 and into the angled pieces. This technique ensures that all three boards are securely fastened together, creating an extremely durable and stable side assembly.
With these steps complete, your dog house sides will feature this unique and functional angled design. This open structure is key to maximizing airflow, preventing heat buildup and making the interior genuinely cool and inviting for your pet.
Step 8: Assembling the Roof Frame
The roof is not just for shade; it’s an integral part of the breezy design. Assemble the roof frame strictly according to the provided plans. Pay close attention to the side pieces, which will also require 45-degree miter cuts on both ends and will not be parallel. These angled cuts are essential for creating the pitched roof. Attach the mitered pieces to the central 2×4 support using robust wood screws (again, Spax screws are highly recommended for their efficiency) and a strong wood glue. This combination ensures the roof frame is solid and capable of supporting the cedar slats.
Here’s the roof frame, fully assembled and ready for integration onto the dog house structure. Its symmetrical design and strong joints are critical for proper support and weather resistance.
Step 9: Attaching the Roof to the House
Now, carefully position the assembled roof frame onto the main dog house structure. Attach the roof securely with 2 1/2” wood screws and wood glue. Drill from the top of the roof frame down into the 2×3 legs located on the front and back of the house. You’ll notice that the long point on the mitered 2×3 of the roof frame will slightly overhang the leg, allowing the inside edge of the mitered 2×3 to be perfectly flush with the exterior face of the leg. This precise fit ensures both strength and a neat finish.
Step 10: Adding Side Roof Supports
To prepare for the roof slats, run a 2×3 board along the top of the legs on the sides of the house, positioned just above the newly installed angled pieces. Attach these with 2 1/2” nails and wood glue. Crucially, the top edge of this 2×3 should be flush with the roofline created by the roof frame. This provides a continuous and solid surface to which you will nail the roof slats, ensuring they are evenly supported and aligned.
Step 11: Installing the Roof Slats
Now for the final touch on the roof – attaching the cedar slats. Start by installing the planks on one side of the roof. Allow them to overhang slightly at the peak of the roof. This overhang is essential because it will meet and interlock with the planks from the other side, creating a clean and secure ridge. Begin with a central board and then work your way outwards, ensuring even spacing between each slat. This slatted design isn’t just aesthetic; it’s a critical component for heat dissipation and shade, reinforcing the “breezy” concept.
Once one side is complete, follow up by attaching the planks to the other side of the roof, ensuring they meet perfectly at the apex. Use 1 1/4” finish nails and wood glue everywhere the planks touch the underlying wood structure. This secures each plank firmly and prevents any movement or rattling, creating a robust and attractive roof. Take pride in the clean lines and solid construction – you’re nearly done!
Personalize and Enjoy Your Pet’s New Oasis!
Congratulations, you’ve built an amazing Breezy Dog House! Now comes the fun part: adding those final personal touches that will make it truly special for your furry friend. Consider a charming chalkboard sign, like the one we made for Alvin, where you can write your pet’s name or a sweet message. Most importantly, don’t forget to furnish it with a cute and comfy pillow, perhaps even a cooling mat if your climate demands it, ensuring your pooch has the ultimate spot to relax. Imagine your pet lounging in style, enjoying the shade and the breeze, completely oblivious to the summer heat.
Alvin absolutely adores his new breezy dog house – it’s his favorite spot in the backyard. The kids think it’s awesome, proudly showing off their contribution to his comfort. And for me, I love how perfectly it blends into our backyard, adding a touch of rustic charm while serving a practical purpose. It’s truly a win-win-win situation: a happy pet, proud kids, and a beautiful, functional addition to our outdoor space. This project is a testament to the joy of DIY, allowing you to create something truly meaningful and beneficial for your family. Start building your pet’s perfect summer retreat today!