
Transform Your Tree: DIY Ruffled Christmas Tree Skirt Tutorial
Hello fellow craft enthusiasts! I hope you’re all enjoying the festive season. It’s been a truly special week here, marked by a rare snowfall that brought a magical touch to our surroundings. Such moments often inspire new projects, and for me, it was finally time to tackle a long-standing decor dilemma: the unsightly Christmas tree base.
For weeks, the plain, functional tree stand had been a thorn in my side, detracting from the otherwise joyful holiday display. I envisioned something far more enchanting, something handmade, fluffy, and full of character. With a clear vision in mind and a desire for a touch of personalized elegance, I finally dusted off my sewing machine and embarked on a delightful crafting adventure. The result? A stunning, budget-friendly ruffled tree skirt that truly elevates our holiday decor. Join me as I walk you through each step of creating your very own!
Why Craft Your Own Christmas Tree Skirt?
In a world of mass-produced decorations, there’s a unique charm and satisfaction that comes with creating something by hand. A DIY Christmas tree skirt offers numerous advantages beyond just covering a tree stand:
- Personalization: You get to choose the fabric, colors, and style, ensuring it perfectly complements your existing holiday theme and personal taste.
- Cost-Effectiveness: As you’ll see with this project, you can achieve a high-end look without breaking the bank. Store-bought ruffled skirts can be surprisingly expensive!
- Unique Design: Stand out from the crowd with a one-of-a-kind piece that reflects your creativity and adds a special touch to your festive home.
- The Joy of Crafting: There’s immense satisfaction in seeing a project come to life from raw materials, especially when it becomes a cherished part of your seasonal traditions.
- Sustainability: By choosing durable materials and making something built to last, you contribute to a more sustainable approach to holiday decorating.
Gathering Your Materials: The Foundation of Your Festive Skirt
One of the best parts of this project is how cleverly we can source affordable yet effective materials. Here’s what you’ll need to get started:
The Main Fabric: A Versatile Drop Cloth
For the primary fabric of my tree skirt, I opted for a 9×12 foot drop cloth from Lowe’s. These humble painter’s cloths are an absolute gem for DIY projects due to their incredible affordability, natural texture, and remarkable durability. While a 9×12 foot cloth is significantly larger than what’s needed for a single tree skirt, the excess material is perfect for future projects, offering fantastic value. Its neutral canvas color provides a versatile base that can be left as is for a rustic look or even dyed to match specific color schemes if you desire. Alternative fabric choices could include canvas, duck cloth, or even heavy linen for a similar aesthetic.
The Smart Pattern Hack: A Dollar Store Find
To create the perfect circular base, I employed a brilliant pattern hack: a $1 tree skirt purchased from the Dollar Tree. This incredibly inexpensive find served as an ideal template. While its original size was fine, I wanted my finished skirt to be a bit grander and fuller, so I added approximately two inches around the entire perimeter when cutting my fabric. This subtle enlargement makes a significant difference in how the skirt drapes and provides a more generous foundation for the ruffles. If you can’t find a cheap tree skirt, you can easily create your own circular pattern using a string and a pencil anchored at the center of your fabric, or by tracing a large round object.
Step-by-Step Guide: Crafting Your Ruffled Tree Skirt
Step 1: Preparing Your Main Skirt Piece
Lay your drop cloth flat and smooth it out thoroughly. Place your dollar store tree skirt pattern on top, ensuring it’s centered and that you have enough fabric around it to add your extra two inches. Carefully mark your cutting line, adding that additional two inches all the way around for a more substantial skirt. Once the outer circle is marked, trace the inner circle for the tree trunk opening and mark a straight line from the outer edge to the inner circle, which will be the opening for wrapping the skirt around the tree. Use sharp fabric scissors to cut along your marked lines precisely. A clean cut here will make subsequent steps much easier.
Step 2: Crafting the Ruffles – The Heart of the Skirt
Now, for the “super cute ruffles”! To achieve the desired fullness, I cut four separate strips of fabric from the remaining drop cloth. Each strip was approximately 9 feet long. The width of these strips will determine the depth of your ruffles – I recommend a width of about 6-8 inches, allowing for seam allowances and the ruffle’s final appearance. Ensure your strips are cut as straight as possible to avoid uneven ruffles. These four strips combined give us a total of 36 feet (or 12 yards) of raw fabric strips, which will be transformed into our luxurious ruffles.
Step 3: Edging for a Professional Finish
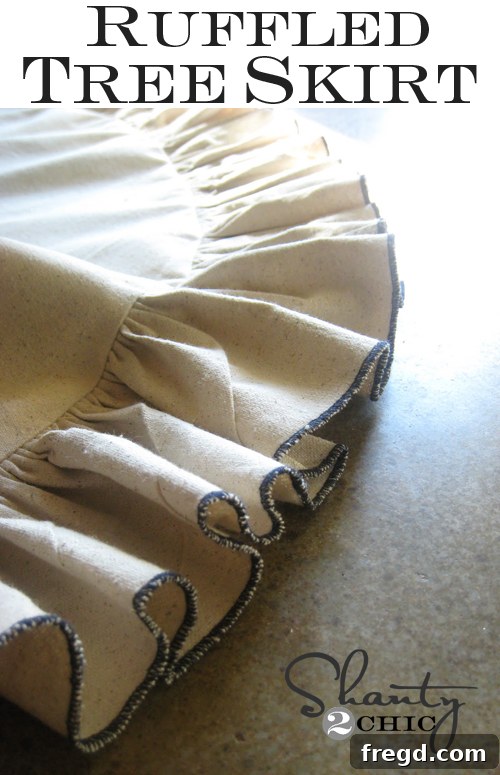
Instead of a traditional bulky hem for the ruffles, I opted for a rolled hem using my serger. A rolled hem creates a beautiful, neat, and delicate edge that’s perfect for ruffles as it adds minimal bulk and a professional finish. If you own a serger, this is incredibly fast and efficient – you simply feed the fabric through, and the machine does the rest, trimming and neatly rolling the edge simultaneously. It’s a true time-saver and delivers a superior aesthetic. For those without a serger, don’t despair! You can achieve a similar narrow hem by doing a double-fold hem with your regular sewing machine, or even a zigzag stitch close to the edge to prevent fraying, especially with a rustic fabric like a drop cloth.
Step 4: The Magic of the Ruffler Foot
Allow me to introduce you to my absolute favorite sewing machine accessory: the ruffler foot! If you sew and don’t own one of these, it’s time to add it to your wish list (or perhaps subtly mention it to Santa). This ingenious attachment makes creating uniform ruffles incredibly fast and effortless. You simply guide your fabric, and it automatically pleats and gathers it into perfect ruffles in a fraction of the time it would take with traditional gathering stitches. The best part? It usually comes with adjustments, allowing you to control the depth and frequency of your pleats, ensuring your ruffles are as full or as subtle as you desire. With this “baby,” I transformed my 12 yards of fabric strips into beautiful, gathered ruffles in what felt like mere minutes.
This is what my ruffle looked like immediately after processing, before it was attached to the main skirt piece. The consistent gather is truly a testament to the ruffler foot’s efficiency.
Step 5: Assembling Your Ruffles
Once all your ruffle strips are prepared, it’s time to attach them to your main circular skirt piece. Starting from the outer edge and working your way inward, pin your ruffles securely to the skirt base. I applied my ruffles in multiple layers to achieve a very full and luxurious look. Use a straight stitch on your sewing machine to carefully sew the ruffles onto the skirt. Take your time, especially around the curved edges, to ensure a smooth and even attachment. Overlapping the ruffle layers slightly will create that dense, professional appearance we’re aiming for.
Step 6: The Finishing Touches
With the ruffles attached, the skirt is almost complete! The final steps involve neatening the raw edge of the opening that wraps around the tree and adding the closure mechanism. I finished this raw edge with a simple hem, though a binding or a neat zigzag stitch would also work well. For the ties, I attached two pieces of natural twine at the top and bottom of the opening. Twine complements the rustic charm of the drop cloth beautifully, but you could easily use ribbon, fabric strips, or even Velcro for a different look. These ties ensure the skirt stays securely wrapped around the tree, concealing the stand entirely. And with that, the sewing is complete!
Admiring Your Handiwork: The Grand Reveal
The moment of truth arrives when you finally place your handmade ruffled tree skirt around your Christmas tree. Covering up that “shanty” tree stand with a creation born from a simple drop cloth and a little sewing magic is incredibly satisfying. For a total cost of around $9 (mostly for the drop cloth and dollar store pattern) and approximately 30 minutes of active sewing time, this project delivers an incredible impact. It transforms the base of your tree from an eyesore into a delightful focal point, adding texture, charm, and a whole lot of festive cheer.
What do you think? Not too shabby for such a small investment of time and money, right? It truly goes to show that with a bit of creativity, you can achieve stunning decor without splurging on expensive store-bought items. The joy of a handmade Christmas is truly priceless!
Tips for Personalization and Care
Your new ruffled tree skirt is a blank canvas for further creativity! Consider these ideas to make it even more uniquely yours:
- Add Embellishments: Sew on festive buttons, beads, or small jingle bells. You could also incorporate lace trim along the ruffle edges or attach appliqué shapes like stars or snowflakes.
- Color Play: While the natural drop cloth offers a rustic appeal, you could dye your fabric before starting the project for a burst of color. Alternatively, use different colored fabrics for different layers of ruffles for a multi-toned effect.
- Fabric Painting: Use stencils and fabric paint to add personalized messages, patterns, or holiday motifs to the plain sections of the skirt.
- Seasonal Scents: Lightly spray your finished skirt with a fabric freshener that has a pine or cinnamon scent to add an extra sensory layer to your holiday decor.
Caring for your drop cloth tree skirt is simple. Most drop cloths are washable, so you can gently machine wash it on a cold cycle and line dry or tumble dry on low. This ensures your beautiful, handmade creation remains fresh and ready to adorn your tree year after year, becoming a cherished part of your family’s Christmas traditions.
I hope this detailed guide inspires you to create your own beautiful, budget-friendly ruffled Christmas tree skirt. It’s a rewarding project that adds a truly personal and festive touch to your home. Happy sewing, and happy holidays!