
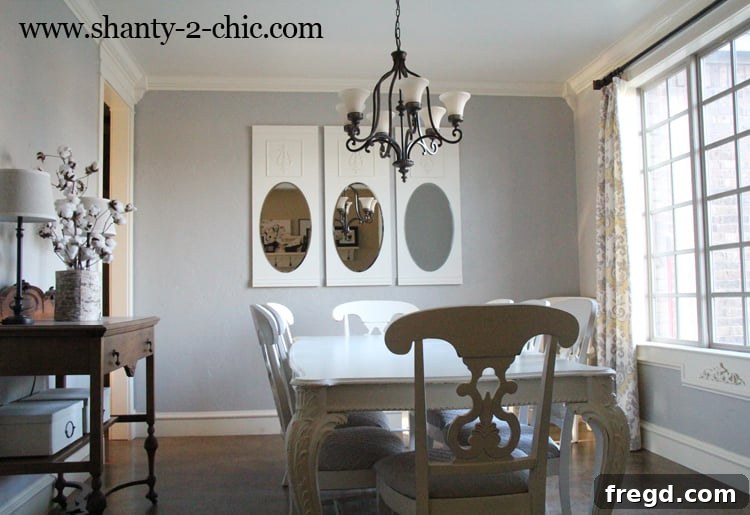
Transform Your Dining Room: Easy & Elegant DIY Decorative Mirrors
Welcome back, fellow DIY enthusiasts! After a refreshing holiday break, I’m thrilled to dive back into building,
and what better way to kick off the new year than with a project that promises both style and simplicity? If you’ve been
looking for an affordable yet impactful way to elevate your home decor, you’re in the right place. Today, I’m excited to share
how I crafted three stunning decorative mirrors for my dining room – a project that proves you don’t need to break the bank
or be an expert carpenter to achieve professional-looking results.
This endeavor has been a long time coming. I acquired the supplies for these mirrors back in September, and I’ve been
eagerly anticipating the moment I could finally bring them to life. The wait was worth it! These mirrors are not only
incredibly easy to make, but they’re also remarkably budget-friendly, embodying everything I love about a great DIY project.
Get ready to transform your space with custom pieces that reflect your personal style and craftsmanship, creating a brighter,
more open feel in your dining area.
Gather Your Supplies: What You’ll Need for Your DIY Mirrors
Before we dive into the construction, let’s ensure you have all the necessary materials and tools readily available.
Having everything organized beforehand will make the building process smooth, efficient, and enjoyable.
Most of these items can be conveniently sourced from your local hardware store, such as Lowe’s, helping you gather everything in one trip.
- 1/2″ MDF Sheet (4×8 feet): This serves as the sturdy and smooth backing for your mirrors. MDF (Medium-Density Fiberboard) is highly recommended for its cost-effectiveness, uniform surface, and stability, making it ideal for painting and intricate designs.
- Decorative Wood Trim: Select a trim profile that complements your home’s existing aesthetic. I chose an affordable 8-foot piece for approximately $3, which adds significant visual appeal.
- Basic Base Molding: Two 8-foot pieces of inexpensive base molding will be used to frame the top and bottom of each mirror, adding a refined, finished edge. Expect to pay around $5 per piece.
- Wood Medallions: These ornamental pieces elevate the design, introducing a touch of classic elegance. I sourced mine from Lowe’s, costing about $6 each.
- Miter Saw (or Hand Saw with Miter Box): Essential for achieving precise, angled cuts on your trim pieces, which are crucial for seamless corners. A hand saw paired with a miter box is an excellent, budget-friendly alternative for beginners, typically available as a set for around $12. A suitable hand saw and miter box set can be found at Lowe’s.
- Gorilla Wood Glue: Provides an incredibly strong and durable bond for all wood components, ensuring the longevity of your mirrors.
- Brad Nailer (and Brad Nails): Significantly speeds up the assembly process and offers a secure hold. If a brad nailer isn’t an option, a hammer and small finishing nails can be used with careful placement.
- Rust-Oleum Painter’s Touch in Heirloom White: My preferred choice for a timeless, elegant finish that imparts a subtle warmth and classic charm. Feel free to select any paint color that aligns with your interior design scheme. Explore more about this versatile paint here.
- Paint Brushes or Roller: For smooth and even application of paint.
- D-Rings and Metal Wire: Robust hardware required for securely hanging your finished decorative mirrors.
- Wall Anchors and Screws: Essential for safely mounting the mirrors to various wall types, ensuring stability and preventing damage.
- Mirrors (approx. 15″ x 45″ or similar dimensions): I found ideal mirrors at Ikea, but practical and affordable “behind-the-door” mirrors from stores like Walmart (often around $5 each) are also excellent choices and will fit perfectly within our framed openings. The key is to find mirrors that fit your chosen frame dimensions.
- Liquid Nails Mirror Adhesive: A specialized adhesive formulated for mirrors. It’s crucial to use this specific type of adhesive to prevent damage to the mirror’s reflective backing, which can occur with standard construction adhesives.
- Measuring Tape, Pencil, Safety Glasses, and Work Gloves: Fundamental tools for accurate measurements, marking, and ensuring personal safety throughout the project.
Step-by-Step Guide: Crafting Your Custom Decorative Mirrors
With all your materials and tools at hand, let’s begin the exciting process of building your beautiful dining room mirrors. Follow these clear, detailed steps for a successful DIY experience.
Step 1: Preparing Your MDF Backing Boards
Our project starts with a standard 4×8 foot sheet of 1/2-inch MDF. As mentioned, MDF is an excellent foundation due to its stability and smooth finish, perfect for painting and creating a clean look.
To make handling easier and ensure precise initial cuts, I highly recommend utilizing the cutting services offered by your local hardware store, such as Lowe’s.
For this specific project, I had them rip the large sheet into three equally sized 20-inch wide pieces. This resulted in three main boards, each approximately 20 inches by 49 inches, along with a small residual scrap piece.
The total cost for the MDF sheet was around $20, and many stores provide complimentary cutting services, saving you the hassle and equipment needed for large-scale cuts.
This initial preparation is the only significant cutting required for the MDF itself, setting a perfect stage for the subsequent decorative work.
Step 2: Cutting and Attaching the Decorative Trim Frame
Once your MDF boards are prepared, the next step is to add the decorative trim that will beautifully frame your mirrors.
I selected a simple yet impactful trim style, which I found for an incredibly affordable price of approximately $3 for an 8-foot piece. This small investment makes a huge difference in the finished aesthetic.
For precise and clean cuts, a miter saw is the ideal tool. However, if you are new to woodworking or prefer a more manual approach, a hand saw paired with a miter box – a set typically costing around $12 – will also yield excellent results for cuts of this nature.
The key here is accuracy in your cuts, particularly the angles, to ensure tight, professional-looking corners.
You will need four equal pieces of trim for each mirror frame. I cut each of my trim pieces to 10.5 inches in length.
It is crucial that all these cuts are made at a precise 45-degree angle. This ensures that when the pieces are joined, they form perfect 90-degree mitered corners.
To begin assembly, apply a generous, continuous bead of Gorilla Wood Glue along the back surface of your first trim piece. Then, position this piece 4.5 inches from the top edge of your MDF board and secure it firmly using a brad nailer. The combination of strong wood glue and brad nails creates a robust and lasting bond, preventing any movement or separation over time.
Proceed to attach the remaining three trim pieces, carefully forming a complete rectangular frame.
As you attach each piece, ensure that the 45-degree angled corners align perfectly flush with each other, creating seamless joints.
Apply wood glue to the back of each piece and secure them with your brad nailer, spacing nails strategically for optimal hold. Take your time during this step to achieve maximum precision in alignment, as this meticulous attention to detail will significantly enhance the overall quality and finished appearance of your decorative mirrors.
Step 3: Embellishing with Elegant Wood Medallions
To infuse an extra layer of sophistication and visual interest into your mirror frames, I recommend incorporating beautiful wood medallions.
These intricate details can dramatically transform a simple frame into a bespoke, high-end decorative piece.
I was delighted to find these charming medallions at Lowe’s, priced at approximately $6 each – a fantastic value for the custom look they provide.
Carefully position a medallion at the exact center of the square opening created by your decorative trim.
Apply wood glue to the entire back surface of the medallion for maximum adhesion, then secure it firmly in place with a few strategically placed brad nails. This step creates a compelling focal point and imparts a truly custom, handcrafted feel to each mirror.
Step 4: Adding Base Molding for a Polished Finish
The penultimate touch for our mirror frames involves integrating a simple yet effective base molding along the top and bottom edges of each mirror.
This molding serves to fully encapsulate the entire piece, creating a more substantial, integrated, and professionally finished appearance. It’s a subtle detail that significantly contributes to that coveted high-end look without the associated premium cost.
I purchased two pieces of inexpensive base molding from Lowe’s, with each piece costing around $5.
Measure and cut the molding precisely to fit the full width of your MDF boards.
As with the decorative trim, use Gorilla Wood Glue for a robust bond and then secure the molding in place using your brad nailer.
Ensure the molding is perfectly flush with the edges of your MDF board, creating a clean, seamless transition that enhances the overall elegance of the mirror.
Step 5: Painting Your Custom Mirror Frames
Now for one of the most transformative steps: bringing your meticulously crafted frames to life with color!
I chose Rust-Oleum Painter’s Touch in Heirloom White for its exquisitely classic finish. This particular shade offers a beautiful, subtle warmth that effortlessly complements a wide range of interior decors, lending a touch of farmhouse chic elegance.
Before you begin painting, ensure that your frames are impeccably clean and completely free of any dust or debris. For a truly flawless, factory-like finish, it’s advisable to fill any visible nail holes with wood putty and then lightly sand them smooth once dry.
Apply a minimum of two even coats of paint, allowing ample drying time between each application. Proper drying is crucial for durability and a smooth, even appearance.
If you’re aiming for a charming distressed or vintage look, a light sanding with fine-grit sandpaper after the final coat has dried can create beautiful, artfully aged effects.
Rust-Oleum Painter’s Touch in Heirloom White
Step 6: Attaching Secure Hanging Hardware
Once your paint has completely dried and fully cured, it’s time to prepare your decorative mirrors for safe and stable hanging.
Securely attaching the appropriate hardware to the back of each MDF board is a critical step for both safety and proper display.
I recommend using sturdy D-rings and durable metal picture wire. Install two D-rings near the top corners on the back of each MDF board. Then, thread and tightly twist the metal wire between these D-rings, forming a strong, reliable hanging loop that can bear the mirror’s weight evenly.
When it comes time to hang the mirrors on your wall, always use appropriate wall anchors and screws. It is vital to consider the combined weight of your finished mirrors (MDF board plus mirror glass) to select anchors that are rated to safely support them, especially if you are mounting into drywall rather than wall studs. Safety should always be your top priority.
Step 7: Installing Your Mirrors with Specialized Adhesive
Now for the most satisfying part: integrating the actual mirrors into your beautifully crafted frames!
Finding suitable mirrors is often simpler and more affordable than you might think. While I found my mirrors at Ikea, you don’t necessarily need expensive custom-cut glass.
Many retail stores, like Walmart, offer inexpensive “behind-the-door” mirrors, often priced around $5 each, that are perfectly sized for projects like this and fit beautifully into our 20″x49″ frames.
Always measure your frame’s opening carefully and select mirrors that fit snugly or with a minimal margin for error.
To securely attach the mirrors to your painted MDF boards, it is absolutely essential to use a specialized mirror adhesive, such as Liquid Nails Mirror Adhesive.
Using an adhesive specifically designed for mirrors is crucial because standard construction adhesives contain chemicals that can react adversely with and damage the silver reflective backing of mirrors over time, leading to unsightly black spots or degradation.
Apply the mirror adhesive in a wavy or zig-zag pattern onto the MDF board where the mirror will be placed.
Carefully position your mirror onto the adhesive, ensuring it is perfectly centered and aligned within the frame.
Gently press it down to ensure excellent contact with the adhesive, then allow the adhesive to dry and cure completely according to the manufacturer’s instructions. This typically takes anywhere from 24 to 72 hours. Avoid moving or disturbing the mirrors during this critical curing period to ensure a strong, lasting bond.
The Grand Reveal: Enjoying Your Custom Decorative Mirrors
With the adhesive fully cured and the hanging hardware securely in place, your magnificent DIY decorative mirrors are now ready to grace your dining room walls!
The final, immensely satisfying step is to hang them up and proudly admire your handiwork.
I am absolutely delighted with how these mirrors visually expand my dining space, effortlessly adding brightness, depth, and a touch of sophisticated charm without ever feeling overwhelming.
They truly were remarkably easy to construct, with the entire process for building all three frames taking approximately an hour, even with my energetic little helpers – affectionately nicknamed “crazies” – bustling around.
And, of course, a little extra assistance with the actual hanging always makes the final installation process smoother and more enjoyable!
My youngest helper, adorably clad in her jammies, with a charming “pretty” accessory on her head and sporting one of my oversized house shoes,
certainly added to the memorable and heartwarming moments of the day. These are the precious interactions that truly make DIY projects even more special and fulfilling!
Pro Tips for a Flawless DIY Mirror Project
To ensure your DIY decorative mirror project proceeds as smoothly as possible and yields truly stunning, professional-looking results, consider incorporating these additional expert tips into your process:
- Measure Twice, Cut Once: This timeless carpentry adage is especially crucial when cutting trim for mitered corners. Precision in your measurements and cuts will prevent unsightly gaps and ensure a seamless, high-quality finished appearance.
- Prioritize Safety: Always wear appropriate safety glasses whenever you are cutting wood, using power tools, or working with adhesives. Protective gloves can also safeguard your hands during assembly and painting tasks.
- Practice Patience with Adhesives and Paint: Allow ample drying and curing times for both wood glue and paint. Rushing these essential steps can compromise the structural integrity, durability, and flawless finish of your mirrors.
- Perform a Dry Fit Before Gluing: For your trim pieces, always perform a dry fit (assembling without glue) to ensure all corners meet perfectly and the overall frame is square before applying any glue or nails. This allows for adjustments without rework.
- Fill and Sand for Perfection: For an exceptionally smooth, factory-like finish, meticulously fill any visible nail holes with high-quality wood putty. Once dry, sand the entire frame lightly with fine-grit sandpaper before painting. This creates a perfectly even and receptive surface for the paint.
- Embrace Customization: While Heirloom White offers a beautiful, classic look, do not hesitate to explore and choose paint colors, stains, or finishes (e.g., metallic, distressed, glossy) that perfectly align with your home’s unique aesthetic. You can also experiment with different trim profiles or incorporate additional decorative elements to truly personalize your mirrors.
- Verify Level During Hanging: When it’s time to hang your finished mirrors, always use a reliable level to ensure they are perfectly straight. This small detail makes a significant difference in the overall presentation and visual harmony of your decorated space.
Ready to Create Your Own Masterpiece?
I genuinely hope this comprehensive and detailed guide has provided you with the inspiration and confidence to embark on your very own DIY decorative mirror project.
There is a deeply rewarding satisfaction that comes from creating something both beautiful and functional for your home with your own hands.
These bespoke mirrors not only fulfill their practical purpose but also serve as charming, impactful statement pieces that effectively brighten, visually expand, and add a touch of timeless elegance to your dining room or any space you choose to adorn.
The harmonious combination of cost-effectiveness, straightforward construction, and stunning visual impact unequivocally makes this project a standout winner in my book.
Thank you so much for joining me on this creative and fulfilling journey!
If you have any questions, valuable tips to share, or would love to showcase your own completed mirror projects, please do not hesitate to reach out. I’d love to hear from you!
Happy building and happy decorating!
~Whitney