
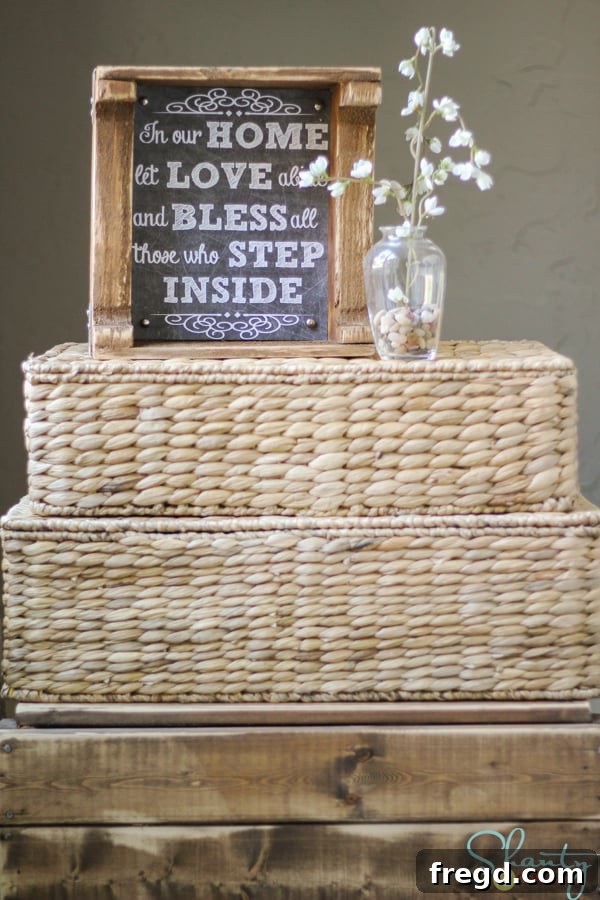
Transforming ordinary into extraordinary doesn’t have to break the bank. In fact, some of the most charming and unique pieces of home decor can be crafted from materials others might overlook. This weekend, I was thrilled to salvage a fantastic pallet from my husband’s truck – a true treasure trove of free, rustic wood just waiting to be reimagined! I’ve been eyeing a beautiful quote I wanted to frame, and with this reclaimed wood, inspiration struck. The result? A stunning, personalized piece of pallet art that brings a touch of warmth and character to any space. And the best part? You can create one just like it, mostly for free!
There’s a special kind of satisfaction that comes from creating something beautiful with your own hands, especially when it involves giving new life to discarded materials. This project simply makes my heart sing! It’s a testament to the power of DIY, showing that with a little effort and creativity, you can achieve remarkable results without spending a fortune. Ready to embark on your own woodworking adventure and craft a similar rustic masterpiece? Let’s dive into how you can make your very own pallet art frame, almost entirely on a zero-dollar budget!
The Undeniable Charm of Pallet Wood: Why DIYers Love It
Pallet wood has become a beloved material in the DIY community, and for good reason. It’s readily available, often free, and inherently possesses a unique rustic aesthetic that’s hard to replicate with new lumber. Using reclaimed pallets isn’t just budget-friendly; it’s also an environmentally conscious choice, reducing waste and giving wood a second life. Each plank tells a story, with unique grain patterns, imperfections, and weathering that add incredible character to your finished piece. This project is a fantastic entry point into the world of pallet crafting, demonstrating how a humble pallet can be transformed into a stylish home accent.
Sourcing Your Pallet: A Treasure Hunt for Wood
Finding a suitable pallet is the first exciting step. Look for pallets that are marked with an “HT” stamp, which indicates they have been heat-treated rather than chemically treated. This ensures the wood is safer to work with for indoor projects. Avoid pallets with spills, strong odors, or excessive mold. Many local businesses, construction sites, or even community recycling centers might have pallets they’re willing to give away. Just be sure to ask permission before taking any! From one standard pallet, you can often salvage enough good wood to create not just one, but potentially three frames, making it an incredibly efficient and resourceful material source.
Step-by-Step Guide: From Pallet to Picture Frame
Once you’ve secured your pallet, the real fun begins. This project requires a bit of elbow grease and a few common tools, but the process is straightforward and incredibly rewarding. Remember to always prioritize safety when working with tools and reclaimed wood.
1. Deconstructing the Pallet: Demolition Time!
The first step is to carefully dismantle the pallet to extract the usable wooden planks. This can be a bit tedious, but it’s a fantastic workout and absolutely worth it for the free lumber you’ll gain. I primarily used a hammer for this task, leveraging the claw end to work the nails out from the boards. For stubborn nails, a pry bar or crowbar can be immensely helpful. Take your time, as the goal is to remove the boards intact without splitting them. Wear sturdy gloves to protect your hands from splinters and eye protection to guard against flying debris. This initial demolition phase sets the foundation for your entire project, transforming rough industrial wood into manageable pieces ready for crafting.
2. Precision Cuts: Preparing Your Frame Components
With your pallet boards carefully removed, it’s time to cut them to size for your frame. Accuracy here is key for a well-fitting and professional-looking finished product. I utilized my cordless circular saw for these cuts, which offers excellent portability and precision for this type of task. If you don’t have a circular saw, a miter saw or even a sturdy hand saw can work, though it may require more effort and careful measurement.
For the sides of the frame, which are often derived from the thicker “2x” stringer pieces of the pallet, cut two pieces each to 10 inches in length. These pieces will form the structural sides of your frame. An important tip for adding character: when measuring and cutting these frame sides, try to include a portion of the original curves or notches found on the pallet stringers. This detail beautifully highlights the reclaimed nature of the wood and adds a distinctive, rustic charm to the finished frame.
Next, you’ll need five boards for the back of the frame, which will create the solid surface for mounting your photo or printable. Cut these five boards down to 10 3/4 inches each. This slight difference in length ensures they will fit perfectly within the 10-inch side pieces, allowing for a small overlap to secure them. Double-check your measurements before making your final cuts to minimize waste and ensure a snug fit.
3. Assembling Your Frame: The Art of Joinery
Now comes the exciting part: bringing all your cut pieces together to form the frame! For durable and strong joints, I recommend using a high-quality wood glue, such as Gorilla Glue Wood Glue. Apply a generous bead of glue to each joint before securing the pieces together. This creates a bond stronger than the wood itself and ensures your frame will withstand the test of time.
After applying glue, I reinforced each joint with my cordless brad nailer. A brad nailer is an invaluable tool for projects like this; it quickly and securely fastens pieces of wood together, allowing the glue to set without needing clamps for extended periods. This particular model, a Ryobi AirStrike Cordless Brad Nailer, is fantastic for its ease of use and portability, truly making assembly a breeze. The combination of glue and brad nails creates an incredibly robust and stable frame structure.
Begin assembly by attaching two of the 10 3/4-inch boards to the top and bottom ends of your 10-inch “2x” side pieces. Ensure everything is square and flush as you glue and nail them into place. These two boards form the basic rectangular opening of your frame. Think of it as creating the front border for your future artwork.
Next, take the remaining three 10 3/4-inch boards and attach them to the back of the frame, spanning the two side pieces. These boards will create a solid backing for your photo or printable. Apply wood glue along the edges of the side pieces where the back boards will connect, then secure them with your brad nailer. Space them evenly for a neat finish, or slightly staggered for a more rustic look. This step completes the structural integrity of your frame, making it a robust and ready canvas for your creative vision.
It’s truly a piece of cake once you get into the rhythm! The frame quickly takes shape, transforming from individual planks into a cohesive, sturdy structure.
4. Preparing for Finish: Sanding and Smoothing
Before applying any stain or finish, a thorough sanding is absolutely essential, especially when working with reclaimed pallet wood. This step serves multiple purposes: it smooths out any rough edges or splinters from the demolition and cutting process, removes accumulated dirt and grime (often referred to as “muck”) from the pallet’s previous life, and, critically, opens up the wood grain to allow the stain to absorb evenly and deeply. I used my Corner Cat sander for this, which is excellent for reaching corners and detailed areas, but any orbital sander or even hand sanding with a sanding block will work.
Start with a coarser grit sandpaper (e.g., 80 or 100 grit) to tackle any major imperfections and rough spots. Then, progress to a finer grit (e.g., 150 or 220 grit) to achieve a beautifully smooth surface. Don’t skip this step; it makes a huge difference in the final appearance and feel of your frame. After sanding, wipe the entire frame down with a clean, slightly damp cloth to remove all dust particles, ensuring a clean surface for staining.
5. Adding Character: Staining and Distressing for a Rustic Look
The choice of finish can dramatically alter the appearance of your pallet frame, allowing you to customize it to your personal style. For this project, I chose an “Early American” stain, which provides a rich, warm, and authentic aged look that perfectly complements the rustic nature of the pallet wood. This particular shade enhances the wood’s natural grain and gives it a timeless appeal.
Apply the stain using a foam brush, ensuring an even coat across all surfaces of the frame. Don’t be shy, but avoid pooling. After application, let the stain sit for about 5 minutes to allow it to penetrate the wood fibers. This brief dwell time ensures a good color saturation. Following this, use a clean, lint-free cloth to wipe off any excess stain. Wiping off the excess is crucial for achieving a smooth, even finish and preventing a tacky residue. Allow the stain to dry completely according to the manufacturer’s instructions, which typically takes several hours.
Once the stain was thoroughly dry, I decided to add a touch of industrial-chic elegance with decorative corner pieces. I found these charming metal accents at The Home Depot, and they immediately elevated the frame’s aesthetic. These corner pieces not only add visual interest but also reinforce the rustic, handcrafted feel of the project. I attached them securely to all four corners of the frame using small flat head screws, which blend seamlessly with the hardware’s style. This small detail makes a big impact, transforming a simple frame into a statement piece.
To enhance the weathered, aged appeal, I went back with my Corner Cat sander (or any fine-grit sandpaper would work) and lightly sanded all the corners and edges of the frame. This technique, known as distressing, subtly removes some of the stain and wood fibers from the high points, mimicking the natural wear and tear that occurs over years of use. It highlights the texture of the wood and creates a softer, more authentic vintage look, perfectly aligning with the reclaimed material.
The Versatile Charm of Your New Pallet Art Frame
And just like that, your rustic pallet art frame is complete! This project truly embodies the spirit of DIY – taking raw, discarded materials and transforming them into something beautiful and functional. The finished frame is perfectly sized to fit an 8×10 inch photo or any printable artwork you wish to display. Its versatility is one of its greatest assets; whether you choose to showcase a cherished family photograph, an inspiring quote, or a piece of botanical art, this frame will add a unique, handmade touch to your home decor.
Imagine it adorning a gallery wall, standing proudly on a mantelpiece, or gracing a bedside table. The distressed finish and reclaimed wood offer a warmth and authenticity that store-bought frames often lack. Each knot, grain, and imperfection tells a story, making your frame not just a decor item, but a conversation starter.
This particular frame features a lovely printable quote that truly resonates. If you’re inspired to use the same design, you’re in luck! You can click HERE to print your own for FREE and personalize your pallet art frame with this beautiful message.
We hope this detailed guide has inspired you to explore the exciting world of pallet wood crafting. It’s a fantastic way to create budget-friendly, eco-conscious, and truly unique pieces for your home. Thank you so much for stopping by and taking the time to read about this project. If you enjoyed this post and found it helpful, we would absolutely LOVE for you to share it with your friends and fellow DIY enthusiasts! Your pins on Pinterest are always cherished and help us reach more creative minds.
Happy crafting!
~Ashley