
Crafting Dreams: Building a DIY Twin Platform Chevron Bed
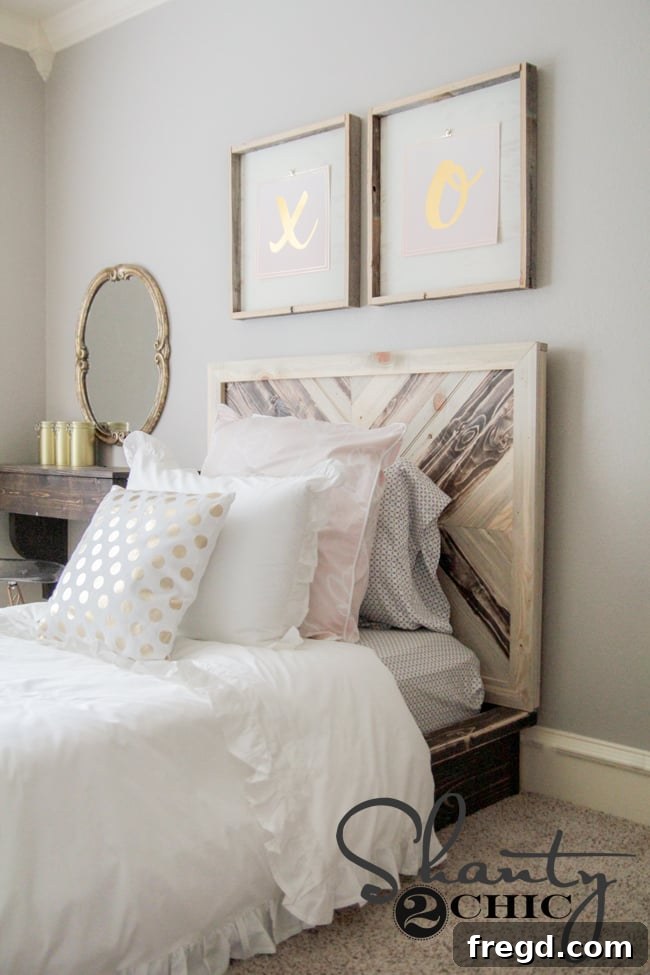
Hello fellow DIY enthusiasts! Get ready to be inspired by our latest woodworking adventure. As my eldest daughter approaches her teenage years – a truly monumental milestone (wish me luck!) – she’s been dreaming of a room transformation. Her brother’s new DIY bed, which I proudly built, became the catalyst for her own bedroom makeover aspirations. The result? A stunning and unique DIY Twin Platform Chevron Bed, perfectly tailored to her style and designed to elevate any bedroom space. This project proves that custom furniture doesn’t have to be complicated, and with our detailed guide and free plans, you can bring this beautiful piece to life in your own home, adding a touch of personalized charm to any kid’s or teen’s bedroom.
Isn’t it absolutely charming? I couldn’t be more delighted with how this chevron platform bed turned out! Despite its custom, high-end appearance, this is genuinely a straightforward build, accessible even for those with moderate woodworking experience. I’ll guide you through every step of the construction process below, offering insights and tips to ensure your success. For your convenience, you can also download and print the comprehensive free plans by clicking the image below or accessing them HERE. These plans include detailed cut lists and measurements, making your project planning seamless and hassle-free.
Building the Foundation: Your Sturdy Platform Bed Frame
This twin platform bed is a scaled-down version of the popular design Ashley crafted for her son, which was a full-sized bed. If your needs lean towards a larger mattress, be sure to explore that fantastic project via this link: Ashley’s Easy DIY Platform Bed. For our twin-sized creation, we primarily utilize robust 2×8 boards for the external frame, ensuring excellent durability and support. All the necessary lumber for this project was conveniently sourced from Home Depot. You’ll find 2×8 dimensional framing lumber alongside other standard 2x boards and studs in the lumber aisle. Specifically, I used 2x8x96 boards, which are ideal for cutting down to size for a custom bed frame.
For precise and clean cuts, a miter saw is an indispensable tool in any woodworking shop. I personally rely on a Ridgid 12″ miter saw, which consistently delivers exceptional results, making intricate cuts a breeze. Ryobi also offers excellent alternatives, including a powerful 12″ saw and a more compact 10″ option, perfect if space or portability is a concern. Investing in a quality miter saw will significantly enhance the accuracy and efficiency of your woodworking projects. For more insights on our recommended tools, don’t forget to visit our comprehensive TOOL PAGE. A crucial tip for any cutting project: always begin by trimming a very small slice off the end of each board. This ‘squaring off’ technique ensures you have a perfectly straight edge as your reference point for all subsequent cuts, leading to a much more professional and seamless finish for your DIY platform bed.
Mastering Pocket Holes with the Kreg K5 Jig
To securely join the 2×8 boards, I employed the highly efficient Kreg K5 Pocket-Hole Jig. This tool is a game-changer for creating strong, concealed joints, essential for the clean look of a platform bed. You’ll use it to drill pocket holes at the corners of your side boards and along the top edge of each board. The Kreg jig comes with a specialized drill bit, which I used to create precise 1.5-inch pocket holes. These angled holes allow screws to be driven in without being visible from the outside, resulting in a clean, professional aesthetic for your bed frame without compromising structural integrity.
For robust and lasting connections, I secured the boards using a combination of wood glue and 2.5″ pocket hole screws. For our projects, we’ve recently been advised by our good friend and incredibly talented woodworker, Clint Harp, to try Titebond 3 wood glue. I can’t recommend this product enough! It boasts incredible strength and a more manageable consistency compared to some other glues, which means less mess during application. Remember, wood glue doesn’t accept stain, so apply it judiciously and wipe away any excess immediately to prevent unsightly marks on your finished piece. You can observe how I used my Kreg driver to effortlessly fasten the 2.5″ pocket hole screws through the pre-drilled pocket holes and into the adjoining boards. For this critical step, a Kreg Right Angle Clamp proved invaluable. This specialized clamp features one end that hooks perfectly into a pocket hole, firmly holding the joining board at a precise 90-degree angle. It’s truly like having an extra pair of hands, making assembly significantly easier and more accurate, especially when working solo. Trust me, invest in one – you’ll be grateful for its assistance in all your woodworking projects!
Following the successful construction of the main bed frame, your next task will be to build the side top boards. These components utilize a combination of 2×4 and 2×2 lumber, which you can easily locate alongside the 2×8 boards at Home Depot. Just like with the main frame, I created 1.5-inch pocket holes for these connections to maintain consistency and strength in the overall structure. While we provide detailed cut lists in our free plans, I highly recommend taking the time to measure for these specific cuts directly from your project. Even a slight variation of 1/8″ can impact the final fit and aesthetic, and precise measurements will undoubtedly lead to a more refined and professional end result for your DIY platform bed.
Once assembled, the side frames will align precisely, forming a robust and well-integrated structure for your platform bed. The photograph below illustrates this alignment, showcasing how the various components come together seamlessly to create the core bed frame.
Here’s a clear view of the bed frame after all four sides have been securely joined using pocket holes. Notice how all the pocket holes are strategically hidden on the interior of the frame, contributing to the clean, finished look. Next, I proceeded to attach the crucial support pieces on each side. These supports are vital as they will firmly hold the rails, which in turn will support the mattress. For this section, I opted for a combination of durable wood glue and robust 2.5″ Spax screws, ensuring maximum stability and longevity for the bed’s core structure and a comfortable night’s sleep.
The central runner, an essential component for providing additional mattress support, is then attached. This connection is made using 2.5″ pocket hole screws and a generous application of wood glue, reinforcing the bed frame’s structural integrity and ensuring a stable, wobble-free foundation for the mattress for years to come.
At this stage, the primary construction of the bed frame was complete. I purposefully waited until the frame was moved into its designated room to install the final mattress rails. This approach simplifies transportation and maneuvering, especially in tight spaces. Now, let’s move on to the artistic centerpiece: the headboard, which will truly define the character of this DIY bed!
Designing the Decorative Chevron Headboard
Before diving into the headboard construction, I must candidly share a minor hiccup I encountered during this phase – a common occurrence in DIY projects, reminding us that even experienced builders learn along the way! The back of the headboard is crafted from a durable 3/4″ hardwood plywood, providing a solid foundation for the chevron design. I carefully cut my plywood to the specified dimensions as outlined in the plans. For those without access to a table saw or who prefer added convenience, many Home Depot stores offer a cutting service, which can make transporting large sheets of plywood much easier and save you time.
This is precisely where my small mistake occurred. A crucial detail for anyone following these plans: ensure you accurately place the necessary notches on the correct ends of this backboard. Unfortunately, I initially made an error in placement. Fortunately, I had a spare piece of MDF on hand, which swiftly averted a crisis and allowed me to proceed without significant delay. This highlights the importance of double-checking your measurements and orientation before making cuts, especially for intricate pieces like headboard notches. You may notice a slight change in the baseboard in upcoming pictures, a direct result of this correction – I simply want to ensure there’s no confusion and you understand the adaptive nature of DIY!
To cut the notches cleanly and precisely, I utilized my reliable Ryobi Jig Saw. This versatile tool allows for intricate cuts and curves, making it perfect for shaping the headboard’s features. Before cutting, remember to mark your lines clearly using a pencil and a straight edge to guide your saw, ensuring accuracy and a professional finish.
Once your headboard back piece is accurately cut and prepared, you’re ready for the exciting part: creating the distinctive chevron pattern. This process is surprisingly simple but yields a high-impact visual effect that instantly elevates the bed’s design. For utmost accuracy, I highly recommend using a speed square. This invaluable tool significantly reduces measuring errors and saves a considerable amount of time, ensuring perfectly straight and angled cuts for your chevron design.
To achieve a dynamic and interesting texture for the chevron pattern, I incorporated two distinct types of wood. The first was standard 1×4 common boards, typically pine or whitewood, readily available at most hardware stores and perfect for staining. The second material I used was an extraordinary blue stain wood, a unique offering now carried by Home Depot. My sister, Ashley, discovered this gem a few weeks ago, and I instantly fell in love with its character and aesthetic. You can see her Instagram post featuring it HERE! You can also find this distinctive wood on Home Depot’s website HERE. These blue stain boards were initially larger than required, so I ran each one through my table saw to precisely cut them down to the same width as the 1×4 common boards. My intention was to leverage the beautiful finish of the blue stain wood, using both its smooth side and its grooved side to create a captivating visual depth and a truly unique, fun look for the bed. Of course, if you prefer a simpler approach, you can easily achieve a stunning chevron pattern using only 1×4 boards, stained or painted to your preference.
To simplify the assembly process and ensure a consistent finish, I pre-stained my pine boards before attaching them to the headboard. This allowed for easier application and prevented stain from bleeding onto other components or the headboard base. To achieve a varied and rich finish, I used two different Varathane brand stains, both readily available at Home Depot. Varathane stains are fantastic because they typically require only one coat and dry incredibly quickly, often in under an hour, which significantly speeds up project completion. I also used the rich Kona stain on the main bed frame, tying the entire piece together with a cohesive color palette that adds warmth and sophistication to the room.
Once the stain had thoroughly dried, I employed my Ryobi Corner Cat sander to meticulously sand down each piece of wood. This crucial step not only smoothed the surfaces but, more importantly, imparted a beautifully distressed, aged finish, adding character and depth to the chevron pattern. The varying shades of stain combined with the distressed texture created a truly captivating effect that makes this DIY bed truly unique.
To begin forming the chevron pattern, first accurately draw your guide lines on the board as detailed in the plans. Using your miter saw, carefully cut four pieces to these precise dimensions. These four pieces will serve as your initial starting point, forming the central “V” of the chevron design. It’s often easiest and most accurate to work on one corner of the headboard at a time, allowing you to maintain focus and ensure flawless alignment.
These carefully cut pieces will form the four starting points for your chevron pattern. Observe how they are designed to line up, creating the initial angles. It’s most efficient to tackle one corner of the headboard at a time, meticulously fitting each piece. This methodical approach ensures precision and a clean, appealing chevron design across the entire headboard surface, truly showcasing your craftsmanship.
To firmly attach the chevron pattern boards to the plywood back of the headboard, I utilized a combination of strong wood glue and my trusty Ryobi Airstrike Brad Nailer. The brad nailer makes quick work of securing the pieces, holding them in place while the wood glue sets, ensuring a durable and seamless bond that will last for years. This combination provides both immediate hold and long-term structural integrity, making your headboard not only beautiful but also robust.
Once all the chevron boards were meticulously glued and nailed down, the headboard began to truly take shape, revealing its striking pattern. The visual below gives you a clear indication of how the pattern emerges, transforming simple wood strips into an artistic statement. (Please kindly overlook the temporary absence of notches in this image – they were added later due to my earlier adjustment, but for the purpose of this visual, imagine them already present for a perfect fit!)
Next, I used my circular saw to neatly trim the edges of the headboard, ensuring a clean and flush finish for the chevron pattern. It’s crucial to set the depth of your circular saw to precisely 3/4″ from the bottom. This prevents accidentally cutting through the plywood back of the headboard, preserving its structural integrity while achieving a professional edge that looks factory-made. Always prioritize safety and double-check your saw’s settings before making any cuts.
Following the trimming of the main chevron panel, I moved on to applying the edge trim. For this, I again chose the beautiful blue stain pine, cutting it down to the specified width outlined in the plans using my table saw. I meticulously attached all the trim pieces using a combination of durable wood glue and my trusty nailer, loaded with 1.25″ brad nails. This trim not only frames the chevron pattern beautifully but also conceals any raw edges, giving the headboard a refined and polished look that speaks volumes about attention to detail.
To complete the headboard, I added the final top trim piece, which elegantly conceals any remaining exposed edges or imperfections, providing a completely clean and finished appearance. I once again used the stunning blue stain pine for this, carefully cutting the corners at precise angles as detailed in the plans, ensuring a perfect mitered joint. This final trim piece not only adds a touch of sophistication but also reinforces the overall structure and durability of the headboard, making it a true centerpiece that will stand the test of time.
Final Assembly & Bedroom Transformation
With the bed frame and headboard meticulously crafted, it was time for the exciting final assembly in my daughter’s room. I carefully moved the components upstairs and began installing the mattress slats. Using my nailer with 1.25″ brad nails, I securely fastened each slat in place, ensuring a solid and supportive base for the mattress. Next, the beautiful chevron headboard was attached to the bed frame using robust 2.5″ Spax screws. We prefer Spax screws for their superior holding power and star-shaped tips, which minimize cam-out. While I used my dedicated driver, a standard drill with appropriate wood screws will work perfectly well for this step. This final connection brings the entire bed together, transforming a collection of wood pieces into a functional and stylish furniture centerpiece that will be cherished for years.
And here she is, in all her finished glory! A DIY Twin Platform Chevron Bed, ready to be adorned with beautiful bedding and bring joy to its new owner. The satisfaction of seeing a project through from raw lumber to a stunning piece of custom furniture is truly unmatched, and the pride in creating something so special for your loved ones is immeasurable.
We absolutely adore the final look, and we’re confident you will too! The blend of rustic charm and modern design creates a truly captivating focal point in any room.
The Art of Accessorizing: Beautiful Bedding & Decor
Now for perhaps the most enjoyable part – accessorizing and bringing the entire room together, turning a crafted bed into a complete sanctuary! I had the pleasure of collaborating with Crane & Canopy to select the exquisite bedding for this project, and I cannot express enough how thrilled I am with my choices. I typically shy away from duvet covers, often finding them cumbersome to manage, but this one is a true exception. Its innovative zipper closure at the end makes a colossal difference in ease of use, simplifying the process of inserting and removing the duvet. Furthermore, it irons beautifully, maintains a super-soft texture, resists wrinkles remarkably well, and – to the delight of my mild OCD – is entirely machine washable! It’s the perfect blend of luxury, practicality, and effortless style, ideal for a busy teen’s room.
Beyond their exceptional quality, Crane & Canopy offers fantastic value, making luxurious bedding accessible to everyone. Here’s a breakdown of the selections I made to perfectly complement the new platform bed and create a serene yet stylish retreat for my daughter, emphasizing comfort and aesthetic appeal:
Duvet Cover – Vienna Soft White: A timeless choice for a fresh, clean aesthetic, providing a bright foundation.
Soft White Sham – Vienna: Matching shams to complete the elegant duvet set, ensuring a cohesive look.
Pink Euro Pillow – Mariposa Blush Pink: A delicate pop of color to add warmth and softness, creating visual interest.
Fitted Sheet and Pillow Cases – Morning Glory Grey: A subtle, sophisticated contrast that beautifully balances the pink and white elements, adding depth.
I highly encourage you to explore their extensive collection – Crane & Canopy truly offers an array of exquisite bedding options to suit every taste and bedroom theme, transforming any bed into a haven!
To further personalize the space, I discovered the charming gold dot accent pillow at Hobby Lobby, adding a touch of playful sparkle and texture to the bed ensemble. And for the custom wall signs, these were meticulously crafted using my incredible Silhouette Cameo. Stay tuned, as a detailed tutorial on how to make these stylish frames will be coming soon, allowing you to add your own personal touches to your DIY bedroom projects!
Phew! Sharing this comprehensive DIY journey has been quite the endeavor, but immensely rewarding. I sincerely hope this detailed guide has addressed all your potential questions regarding the construction of your own DIY Twin Platform Chevron Bed. Should any further inquiries arise, please don’t hesitate to ask – I’m always happy to help and share my insights! We would be absolutely thrilled if you would share these photos and free plans with your friends, family, and fellow DIY enthusiasts. Your support and sharing mean the world to us and help inspire more creative home projects!