
Hello, fellow crafters and home decor enthusiasts!
Today, I am absolutely thrilled to share a project that perfectly blends affordability, simplicity, and personalized charm: creating your very own DIY photo displays. These custom wooden photo holders are not only incredibly easy to make but also serve as a beautiful and unique way to showcase your favorite memories and elevate your home decor. If you’re looking for a quick and budget-friendly craft that yields stunning results, you’ve come to the right place.
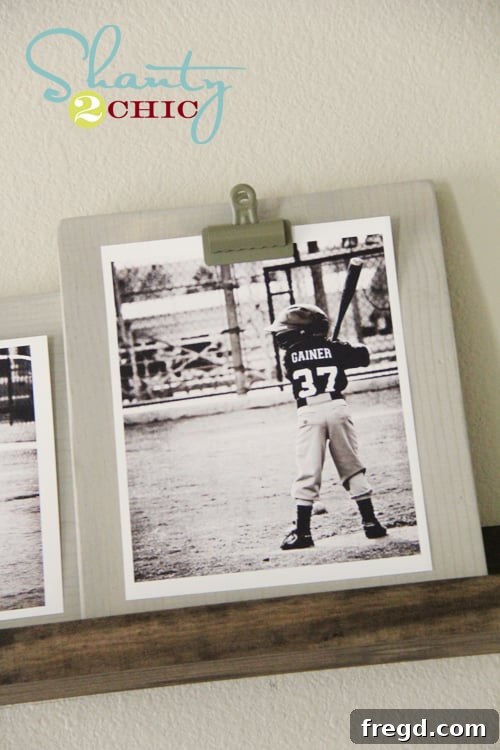
In my previous post, I showcased my incredibly economical $10 shelves. Many of you might have noticed the charming photo displays adorning those shelves – and yes, those are precisely what we’re going to dive into today! They instantly add a touch of rustic elegance and personal flair to any space, making them a fantastic addition to your living room, bedroom, office, or even as thoughtful handmade gifts. The best part? You have complete creative freedom to customize them to perfectly match your unique style and existing decor.
Why Choose DIY Photo Displays for Your Home?
In an era dominated by digital screens, there’s something truly special about physical photographs. They capture moments, evoke emotions, and tell stories in a tangible way. While traditional photo frames are lovely, these clip-style wooden displays offer a dynamic and versatile alternative. Here’s why you’ll love making them:
**1. Unbeatable Affordability:** This project is designed with your budget in mind. By utilizing common materials and smart sourcing, you can create multiple stunning photo displays for less than the cost of a single store-bought frame. Imagine transforming a simple piece of wood into multiple decor pieces for under $5 each!
**2. Effortless Personalization:** From the color of the wood stain to the hue of the clips, every element can be tailored. Want a farmhouse look? Go for a distressed white or natural wood. Prefer a modern minimalist vibe? Opt for sleek black clips and a lighter stain. The possibilities are endless, allowing your personality to shine through.
**3. Quick and Easy Crafting:** You don’t need advanced woodworking skills or a workshop full of tools. This project is beginner-friendly and can be completed in just a few hours, mostly waiting for stain and glue to dry. It’s the perfect weekend activity or a rewarding project for an afternoon.
**4. Versatile Decor:** These displays aren’t just for photos! Use them to hold postcards, art prints, inspirational quotes, children’s drawings, or even small notes. Their design makes it incredibly easy to swap out items, allowing you to refresh your display as often as you like without any hassle.
**5. Sustainable and Creative Reuse:** Many crafters will find that they can use scrap wood pieces for this project, reducing waste and giving new life to materials that might otherwise go unused. It’s a satisfying way to engage in eco-friendly crafting.
Gathering Your Materials: The Foundation of Your Custom Photo Display
Before we embark on the step-by-step creation, let’s ensure you have all the necessary components. The beauty of this project lies in its simplicity and the readily available nature of the materials:
**1. The Wood Board:** For my displays, I used a piece of scrap 1×12 whitewood. This type of wood is fantastic for DIY projects because it’s inexpensive, easy to cut, and takes stain beautifully. You can easily purchase a 4-foot piece at your local hardware store, like Lowe’s, for around $5.98. The friendly staff at most hardware stores will even cut the board for you for free! A single 4-foot board is usually enough to create 3 to 4 photo displays, depending on your desired size, making it incredibly cost-effective.
**2. Wood Stain:** My new absolute favorite stain, and the one I used for this project, is Rust-Oleum Ultimate Wood Stain in “Sunbleached.” I was eager to try a stain that would impart a beautiful gray hue to the wood, and this product delivered perfectly. It dries in less than an hour, making the project move along swiftly, and it’s incredibly easy to apply, even for beginners. The “Sunbleached” shade creates a lovely, weathered look that provides a wonderful contrast with brightly colored photos or clips, and it’s fantastic for achieving a modern farmhouse or coastal aesthetic. Don’t be afraid to experiment with other stain colors to match your personal style – Rust-Oleum offers a wide range of options.
**3. Bulldog Clips:** These industrial-chic clips are the star of our display. I found mine at Walmart for a very reasonable price of $1.88 each. You might also find them at office supply stores, craft stores, or even online. Look for clips that are sturdy and have a strong grip. The size can vary based on your preference; larger clips make a bolder statement, while smaller ones offer a more subtle touch. We’ll be customizing these, so the original color isn’t critical.
**4. Spray Paint for Clips:** To add a pop of color and match your existing decor, you’ll need spray paint. I used Rust-Oleum Painter’s Touch in a beautiful shade called “Oregano” to complement a quilt I had. Choose a color that ties into your room’s palette or provides a striking accent. Rust-Oleum Painter’s Touch is known for its excellent coverage and durability, perfect for these small accents.
**5. Strong Adhesive:** For a permanent and durable bond, I highly recommend Gorilla Glue Epoxy. This product is a powerhouse. It possesses a texture and thickness similar to hot glue but offers an incredibly strong, permanent hold that will keep your clips securely in place for years to come. While it does have a distinct odor during the drying process, ensuring good ventilation will mitigate this, and the exceptional strength it provides is absolutely worth it. If Gorilla Glue Epoxy isn’t available, look for other strong two-part epoxy glues designed for wood and metal.
**Optional Materials:**
* **Sandpaper:** Fine-grit sandpaper (120-220) is great for smoothing any rough edges on your cut wood for a more professional finish.
* **Protective Gloves:** Essential when working with stain and epoxy to protect your hands.
* **Sawtooth Hangers:** If you plan to hang your photo displays on a wall instead of placing them on a shelf, a sawtooth hanger or D-ring hanger will be needed.
Step-by-Step Guide to Crafting Your DIY Photo Displays
Step 1: Preparing and Cutting Your Wood Board
Start by deciding the size of your photo displays. As mentioned, I cut mine to approximately 14 inches in length. This size is versatile and works well for displaying various photo sizes without overwhelming a shelf. If you purchased a 4-foot board, you can get at least three 14-inch pieces, with a small piece leftover for another small project or test stain. If you’re having the hardware store cut the wood, be sure to clearly communicate your desired lengths. If cutting at home, use a miter saw or handsaw and ensure your cuts are straight and precise. Once cut, give the edges a light sanding with fine-grit sandpaper to remove any splinters or rough spots, preparing the surface for staining.
Step 2: Staining for Style and Character
Now for the fun part – adding color! With your wood pieces ready, it’s time to apply the Rust-Oleum Ultimate Wood Stain in Sunbleached. Make sure you are working in a well-ventilated area and wearing protective gloves. Stir the stain thoroughly before use. Using a clean rag or a foam brush, apply a thin, even coat of stain to all surfaces of your wood board. Wipe off any excess stain after a few minutes to prevent it from pooling and creating an uneven finish. The “Sunbleached” color will immediately begin to transform the wood, giving it that desirable gray, weathered appearance. The beauty of this particular stain is its quick-drying formula, meaning you won’t have to wait long to move to the next step. I absolutely adore the color it imparts and how beautifully it contrasted with my existing shelves, creating a cohesive yet striking look.
Rust-Oleum Ultimate Wood Stain in Sunbleached
Step 3: Allowing the Wood to Dry
Patience is a virtue in crafting, and while this stain dries quickly, it’s essential to let it fully cure. As the product boasts, it typically dries to the touch in less than an hour. However, for best results and to ensure the stain is fully set before handling extensively or applying adhesives, allow it to dry completely according to the manufacturer’s instructions, often a few hours. This is the perfect time to work on other components of your project. Here is my board drying, soaking up the gorgeous Sunbleached hue.
Step 4: Customizing Your Bulldog Clips with Spray Paint
While your stained wood boards are drying, you can turn your attention to the bulldog clips. This step allows for another layer of personalization. Find a well-ventilated outdoor area or a designated spray painting zone. Lay your bulldog clips on a drop cloth or old newspaper. Using Rust-Oleum Painter’s Touch spray paint in your chosen color (I used “Oregano” to match a quilt), apply light, even coats. It’s always better to apply multiple thin coats rather than one thick coat to prevent drips and ensure smooth coverage. Rotate the clips to ensure all sides are covered. Allow ample drying time between coats and for the final coat to fully cure. This process transforms simple metal clips into integrated elements of your decor.
Step 5: Securely Attaching the Clips with Epoxy
Once both your stained wood boards and painted bulldog clips are completely dry, it’s time to bring them together. For this crucial step, we’ll use Gorilla Glue Epoxy. Epoxy glues are incredibly strong and provide a permanent bond, essential for holding your clips firmly in place. Always read the instructions on your epoxy packaging, as mixing ratios can vary. Typically, you’ll dispense equal parts of two components onto a disposable surface and mix them thoroughly until a uniform color is achieved. Work quickly, as epoxy has a limited working time once mixed.
Apply a small, generous amount of the mixed epoxy to the back of each bulldog clip, specifically on the flat surface that will make contact with the wood. Remember, this epoxy has the texture and thickness of hot glue but offers a vastly superior, permanent hold. Be mindful of the strong odor during the drying process; ensure your workspace is well-ventilated. The robust bond achieved with this epoxy makes it well worth the temporary smell.
Step 6: Positioning and Final Adhesion
Carefully press each epoxy-coated bulldog clip onto the stained wood board. I chose to attach my clip to the top-middle section of the board. This placement provides a balanced look and allows photos of various sizes to hang aesthetically. Apply firm, steady pressure for a few moments to ensure good contact. Once positioned, leave the displays undisturbed and allow the epoxy to cure fully, which can take several hours depending on the specific product. Refer to your epoxy packaging for precise curing times. Do not be tempted to move or use the display before the epoxy has completely hardened; a strong, permanent bond requires patience.
Step 7: Adding Your Cherished Photos and Displaying Your Creations
That’s it! Your custom DIY photo displays are complete and ready for their starring role. The final and most rewarding step is to simply add a few of your favorite pictures to the bulldog clips. This project was designed for versatility. I didn’t need to add any hanging hardware to the back of mine because I intended to display them freestanding on my shelves. If you wish to hang your photo displays on a wall, simply attach a sawtooth hanger to the back of each board using small nails or screws. This is a very simple addition that takes only minutes but expands your display options considerably.
The Fun Part: Breaking Down the Cost of Your Custom Photo Holders
One of the most appealing aspects of this project is its incredible cost-effectiveness. Let’s crunch the numbers:
Assuming you purchase a 4-foot whitewood board for approximately $5.98 and cut it into three equally sized displays, your wood cost per display is roughly $2.00. Add in the bulldog clip at $1.88, and a tiny fraction for the stain and spray paint (which you’ll have plenty of leftover for other projects), and you’ll find that **this project will cost you well under $5 per display!** That’s an astonishingly low price for a completely custom, handmade piece of decor that looks far more expensive than it actually is. This makes it an ideal project for those on a tight budget, or for anyone looking to create multiple personalized gifts without breaking the bank.
Endless Customization Ideas for Your DIY Photo Displays
While the “Sunbleached” gray stain and “Oregano” clips offer a specific aesthetic, the true power of this project lies in its adaptability. Here are just a few ideas to spark your creativity and make your displays truly unique:
* **Vary the Wood Finish:** Instead of stain, consider painting the wood boards in solid colors like crisp white, matte black, or a vibrant accent color. You could also try a distressed look by painting, then sanding back the edges. For a natural feel, simply seal the bare wood with a clear topcoat.
* **Experiment with Clip Colors:** The spray paint options are limitless! Match your clips to your favorite throw pillows, artwork, or even the colors within the photos you plan to display. Metallic gold, rose gold, or silver clips can add a touch of glamour.
* **Add Stencils or Hand-Painted Designs:** Before attaching the clips, use stencils to add monograms, dates, or small decorative patterns to the wood. You could also freehand paint simple designs like geometric shapes, floral motifs, or a subtle border.
* **Incorporate Different Wood Types:** While whitewood is economical, consider using reclaimed wood, pallet wood, or even a piece of live-edge wood for a more rustic or organic feel (though these might be more expensive). Each wood type will take stain differently and offer unique grain patterns.
* **Embellish with Extra Details:** Glue small decorative elements onto the wood board, such as small metal tags, dried flowers, twine wrapped around the top, or small fabric scraps. Just ensure they don’t interfere with the clip’s function.
* **Consider Different Clip Styles:** While bulldog clips are popular, you could also experiment with other clip types like binder clips (though their spring mechanism might be less aesthetically pleasing) or even small clothespins for a more playful, casual vibe.
I wanted something that resembled a stylish clipboard but offered the freedom of customization, and I couldn’t be happier with the results! These displays are genuinely achievable for anyone, regardless of their crafting experience.
Tips for Crafting Success
To ensure your DIY photo display project goes smoothly and yields the best possible results, keep these tips in mind:
* **Work in a Well-Ventilated Area:** This is crucial when using wood stain, spray paint, and epoxy glue, as these products can emit strong fumes. Outdoors or in a garage with open doors are ideal.
* **Read Product Instructions:** Always take a moment to read the specific instructions on your stain, paint, and epoxy. Drying times, application methods, and safety precautions can vary.
* **Prepare Your Workspace:** Lay down drop cloths, old newspapers, or cardboard to protect your surfaces from spills and overspray.
* **Practice on Scraps:** If you’re new to staining or spray painting, consider practicing on a small scrap piece of wood or an old item to get a feel for the application before working on your main project pieces.
* **Don’t Rush Drying Times:** While this project uses quick-drying materials, respecting the recommended drying and curing times for stain and epoxy is vital for a durable and professional finish.
* **Clean Up Immediately:** Wipe up any stain or epoxy spills quickly before they dry and become harder to remove.
Final Thoughts: Elevate Your Home with Handmade Charm
Creating these DIY photo displays is more than just a craft project; it’s an opportunity to infuse your living space with personality, warmth, and cherished memories. They are a testament to the power of handmade decor – beautiful, meaningful, and incredibly rewarding to create. Whether you’re enhancing your own home or crafting a thoughtful gift for a loved one, these custom wooden photo holders are sure to impress.
I truly hope this detailed guide inspires you to pick up some wood and get creative. These displays are a testament to how easy and affordable it can be to add bespoke touches to your home. Enjoy the process, revel in the customization, and delight in the beautiful results.
Finally, if you love this project as much as I do, would you consider PINNING it below, pleaseeeeee ;-)? Your support helps me continue to share these fun and easy DIY ideas with our crafting community. I would genuinely appreciate it!
Have a wonderful weekend, and happy crafting!
~Whitney