
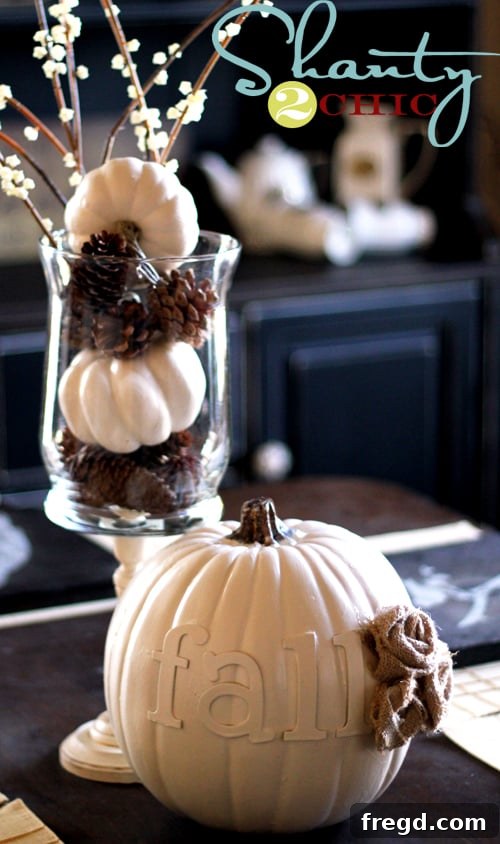
DIY Elegant Fall Pumpkin Decor: A Simple & Affordable Fall Craft for Your Home
As the leaves begin to turn vibrant shades of red, orange, and gold, and the crisp autumn air whispers through the trees, there’s a certain magic that envelops our homes. Fall decorating is one of my favorite ways to embrace the season’s cozy charm, and I’ve been having an absolute blast transforming my living space. Today, I’m thrilled to share a recent addition to my fall decor collection: a beautiful, custom-made fall pumpkin that was not only incredibly fun to create but also surprisingly quick and budget-friendly!
This charming fall pumpkin project is a testament to how a few simple supplies and a dash of creativity can yield stunning results. It’s perfect for adding a personalized touch to your entryway, mantel, or as a centerpiece for your autumn gatherings. If you’re looking for an easy DIY craft that truly captures the spirit of fall without breaking the bank, you’ve come to the right place. Let’s dive into how you can create your very own!
Why Choose DIY Fall Pumpkin Decor?
In a world saturated with mass-produced decorations, DIY projects offer a unique opportunity to infuse your home with personality and warmth. Crafting your own fall pumpkin decor comes with a multitude of benefits:
- Personalization: You get to choose the colors, words, and embellishments that perfectly match your home’s aesthetic and your personal style.
- Cost-Effective: Often, DIY projects are far more affordable than buying pre-made decor, especially when you utilize sales or existing craft supplies.
- Creative Outlet: It’s a wonderful way to express your creativity, de-stress, and enjoy the satisfaction of making something beautiful with your own hands.
- Unique Results: Your creation will be one-of-a-kind, adding an exclusive touch to your seasonal displays that no store-bought item can replicate.
- Sustainability: By upcycling or repurposing faux pumpkins, you contribute to less waste and can enjoy your decor for many seasons to come.
Gathering Your Essential Crafting Supplies
Before we embark on this creative journey, let’s ensure we have all the necessary materials. One of the best parts about this project is that most of these items are readily available at your local craft store like Michael’s, or even online. Here’s what you’ll need:
The Foundation: A Faux Pumpkin
I started with a fake pumpkin I purchased at Michael’s for around $7, which is a fantastic base for this project. Faux pumpkins are ideal because they are durable, lightweight, and can be reused year after year. Look for a pumpkin with a smooth surface that will take paint well. They come in various sizes and materials, from foam to plastic, so choose one that suits the scale of your intended display. If you’re feeling adventurous, you could even try this on a real pumpkin for a temporary display, but the artificial kind offers longevity.
Preparing for Paint: Taping the Stem
To ensure a clean, professional finish, you’ll want to protect the stem of your pumpkin from paint. Painter’s tape or masking tape works perfectly for this. The goal is to create a crisp line where the paint ends and the natural (or original) stem color begins. This small detail makes a big difference in the overall polished look of your finished pumpkin.
Adding Your Message: Chipboard Letters
For the lettering, I opted for chipboard letters, also conveniently found at Michael’s. They are lightweight, easy to paint, and adhere well to the pumpkin’s surface. Consider what word or phrase you’d like to feature. “FALL” is a classic choice, but you could also use “GATHER,” “THANKFUL,” “BLESSED,” or even a single initial for a monogrammed touch. If chipboard isn’t your preference, vinyl letters, stencils, or even hand-painted calligraphy with a paint pen are excellent alternatives.
The Color Palette: Cream Spray Paint
My go-to choice for this project was a favorite cream-colored spray paint. Spray paint offers excellent coverage and a smooth, even finish, which is crucial for a polished look. When selecting your paint, consider your home’s decor. A matte white or a soft greige could also be stunning, offering a sophisticated neutral backdrop. For a more rustic vibe, a muted gold or even a soft metallic could add a touch of glamour. Always ensure your spray paint is suitable for plastic or foam surfaces, depending on your pumpkin’s material.
Adhesive: Hot Glue Gun
A hot glue gun is indispensable for this project. It provides a strong, quick-drying bond, perfect for securing the chipboard letters and any embellishments you choose to add. Make sure you have plenty of glue sticks on hand.
Elegant Embellishments: Rolled Rosettes
To elevate the pumpkin from “plain” to “chic,” I added three beautiful flat rolled rosettes. I followed Whit’s easy tutorial for her flat rolled rosettes, and they were the perfect finishing touch. These fabric rosettes add texture, dimension, and a touch of softness to the design. If you prefer, you could use paper rosettes, burlap flowers, faux berries, or even small pinecones for a different look.
Step-by-Step Guide to Crafting Your Fall Pumpkin
Step 1: Preparing Your Pumpkin
Begin by cleaning your faux pumpkin with a damp cloth to remove any dust or debris, ensuring a smooth surface for paint adhesion. Once dry, carefully tape off the stem using painter’s tape. Press the tape down firmly along the base of the stem to prevent any paint from seeping underneath. This attention to detail will give your pumpkin a professional, finished look.
Step 2: Attaching Your Chosen Message
Layout your chipboard letters on the pumpkin to determine the best placement and spacing. You want the word to be centered and visually balanced. Once you’re satisfied with the arrangement, apply a small amount of hot glue to the back of each letter, one at a time, and firmly press it onto the pumpkin. Hold each letter in place for a few seconds until the glue sets. Work carefully to keep the letters straight and evenly spaced.
Step 3: The Art of Spray Painting
Take your pumpkin to a well-ventilated area, preferably outdoors or in a garage with open doors. Place it on a drop cloth or old newspaper to protect your work surface. Shake your cream-colored spray paint can vigorously for about a minute. Hold the can about 6-8 inches away from the pumpkin and apply light, even coats using a sweeping motion. It’s better to apply several thin coats than one thick coat, which can lead to drips. Rotate the pumpkin as you spray to ensure complete coverage, getting into all the crevices around the letters. Allow each coat to dry according to the manufacturer’s instructions before applying the next. You’ll likely need 2-3 coats for full opacity. Once you’re happy with the coverage, let the pumpkin dry completely, which might take several hours or even overnight, before proceeding.
Step 4: Embellishing with Rosettes
Once your pumpkin is thoroughly dry, carefully remove the painter’s tape from the stem. Now it’s time to add those beautiful rosettes! If you followed a tutorial like Whit’s, you’ll have your rosettes ready. Arrange them on the pumpkin to find a pleasing composition. I chose to cluster three rosettes near the stem, which creates a lovely focal point and adds a soft, organic texture. Apply a dab of hot glue to the back of each rosette and gently press it onto the pumpkin until secure. Step back and admire your handiwork!
And that’s it! Super quick, easy, and incredibly cheap to make. The transformation is remarkable, turning a simple craft store pumpkin into a sophisticated piece of fall decor.
Customization and Styling Tips for Your Fall Pumpkin
The beauty of DIY is the endless possibilities for customization. Don’t feel limited to the exact design presented here. Here are some ideas to make your fall pumpkin truly unique:
- Color Schemes: Experiment with different paint colors. Consider warm metallics like copper or gold, a rustic distressed look with brown undertones, or bold jewel tones like deep burgundy or forest green for a contemporary twist.
- Alternative Messages: Instead of “FALL,” try “GRATEFUL,” “AUTUMN,” “HARVEST,” “WELCOME,” or even your family’s initial. You could also use different fonts for your letters to change the overall style.
- Embellishments Galore: Beyond fabric rosettes, explore other decorative elements. Think about gluing on small artificial fall leaves, miniature pinecones, acorns, twine wrapped around the stem, or a simple burlap bow. A touch of glitter spray paint could add subtle sparkle for a more festive feel.
- Distressing for Character: For a vintage or farmhouse look, lightly sand parts of the painted surface after it’s dry to reveal some of the pumpkin’s original color underneath. You can also apply a thin wash of dark wax for an aged effect.
- Display Ideas: Place your finished pumpkin on your fireplace mantel, as a welcoming accent on your entryway table, or as the stunning centerpiece for your dining table. Cluster it with other fall elements like candles, real mini pumpkins, gourds, or a few scattered autumn leaves for a complete vignette.
Maintenance and Longevity for Years of Enjoyment
One of the best advantages of decorating with faux pumpkins is their durability. To ensure your beautiful creation lasts for many fall seasons:
- Gentle Cleaning: If it gets dusty, simply wipe it down with a soft, dry cloth. Avoid harsh cleaners or excessive moisture, which could damage the paint or glue.
- Careful Storage: When the fall season concludes, store your pumpkin in a sturdy box, preferably wrapped in tissue paper or bubble wrap, to protect it from dust and damage. Keep it in a climate-controlled area, away from extreme temperatures or humidity, which can affect paint and adhesive over time.
I hope this detailed guide inspires you to create your own personalized fall pumpkin. Did I mention I LOVE fall? The satisfaction of making something beautiful for your home, especially something that celebrates such a wonderful season, is truly rewarding. Thanks so much for stopping by and happy crafting!
~Ashley