
We are absolutely thrilled and deeply grateful for the incredible outpouring of support you showed for our pilot episode, “Open Concept”! This journey was not only immensely fun but also incredibly rewarding, allowing us to create functional and beautiful spaces for families in need. If you happened to miss the premiere or any of the repeat airings, don’t worry! You can delve deeper into the project, explore the design inspirations, and view all the captivating before-and-after transformations right HERE on HGTV’s official page. We poured our hearts into this project, and seeing the positive reception has been truly heartwarming, inspiring us to continue sharing our passion for DIY and functional design.
At the core of every “Open Concept” project is a real family with unique needs. For Dack and Brooke, the challenge was clear: their children desperately needed dedicated spaces for schoolwork. With everyone sharing a single desk, focus and organization were constant struggles in their busy household. We understood that a comfortable, personal workspace is paramount for children’s academic success and overall well-being. Our vision immediately honed in on their family room as the perfect canvas for a transformation. This often-underutilized space held immense potential to become a vibrant, multi-functional hub where learning and family life could coexist harmoniously.
Transforming Study Spaces: The Open Concept Floating Student Desk Project
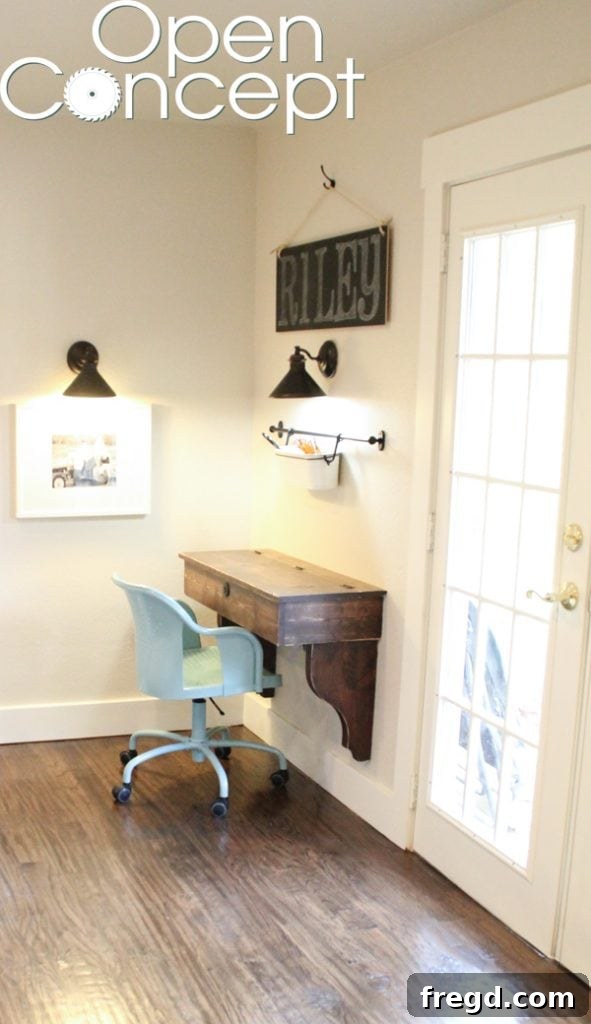
Our solution for Dack and Brooke’s family was as innovative as it was practical: custom-built floating desks. This design choice was deliberate, aiming to integrate the workspaces seamlessly into the existing family room decor. Rather than introducing bulky, freestanding desks that could overwhelm the space, we designed these desks to appear as natural extensions of the room, almost like built-in furniture pieces. The floating design offers a clean, modern aesthetic, maximizing floor space and contributing to an open, airy feel. This approach not only solved the immediate problem of shared desk space but also elevated the entire room’s design, making it more versatile and visually appealing for the whole family.
Discover more about the HGTV Open Concept project and its innovative solutions HERE!
Designing for Productivity and Organization: The Flip-Top Advantage
Beyond simply providing individual surfaces, our design incorporated a crucial feature to ensure long-term functionality and maintain the room’s pristine appearance: flip-top lids. We know firsthand how quickly a student’s desk can become a magnet for clutter – textbooks, notebooks, pens, and various school supplies can easily accumulate, turning a workspace into an “eyesore.” The integrated flip-tops offered an ingenious solution, allowing Reece and Riley to effortlessly hide away their belongings at the end of the day. This hidden storage was a massive win for us and for Dack and Brooke, as it meant the desks could be an integral part of the family room without compromising its clean lines or becoming a source of visual chaos. It’s a testament to our design philosophy: functionality should never overshadow beauty, and smart storage is key to a serene living environment.
Build Your Own: Free Plans and Step-by-Step Tutorial
Inspired to create your own organized study space? The best part is, we’re sharing all our secrets! We’ve meticulously put together a comprehensive set of free plans and a detailed step-by-step tutorial, empowering you to replicate this fantastic floating student desk in your own home. Embarking on a DIY project like this isn’t just about saving money; it’s about the immense satisfaction of creating something truly custom and perfectly suited to your needs. Our clear, easy-to-follow instructions will guide you through every stage, ensuring that even intermediate DIYers can achieve professional-looking results. Get ready to transform your living space and provide a dedicated, clutter-free zone for learning and creativity!
Click HERE to instantly download the FREE Floating Student Desk Plans!
Essential Tools and Materials for Your Floating Desk Project
Before diving into construction, gather your essential tools and materials. Having everything at hand will make the building process smoother and more enjoyable. This project requires a few key power tools for precision and efficiency, along with quality wood products to ensure durability and a beautiful finish. We’ll walk you through the primary tools used, highlighting their benefits for this specific build, and discuss the materials chosen for their performance and aesthetic appeal.
Precision Cuts with a Miter Saw
Our journey began with precise cuts, and for this, a miter saw is invaluable. This tool excels at making accurate crosscuts and angle cuts, which are crucial for the various components of your floating desk. When operating any power tool, remember to prioritize safety: always wear eye protection, keep your hands clear of the blade, and ensure your workpiece is securely clamped. Take your time with each cut, measuring twice and cutting once to achieve the exact dimensions specified in our plans. Precision at this stage ensures all your pieces fit together perfectly later on, minimizing gaps and maximizing structural integrity.
Strong Joinery with the Kreg Jig K5
Next, we moved to creating incredibly strong and virtually invisible joints using the Kreg Jig K5. This innovative tool allows you to drill “pocket holes” – angled holes that hide screws within the wood, creating a clean finish. For the short sides of the desk, we drilled 3/4″ pocket holes. The Kreg Jig makes joinery accessible even for beginners, providing a fast and efficient way to build sturdy furniture. Always follow the manufacturer’s instructions for setting the jig to the correct depth based on your wood thickness. The resulting joints are incredibly robust, forming the backbone of your desk’s frame.
Enhance your woodworking projects with the Kreg Jig K5 – find it here!
As you can clearly observe in the accompanying image, the precisely drilled pocket holes are strategically positioned, ready for the next crucial step of assembling the desk’s main framework. This careful placement ensures maximum strength and a clean appearance once the pieces are joined.
Assembling the Desk Frame
With the pocket holes drilled, it was time to bring the desk frame together. We meticulously attached the shorter side pieces to the longer front pieces. For an exceptionally strong bond, we combined a generous application of wood glue with 1 1/4″ pocket hole screws. The wood glue provides significant shear strength, preventing the joint from twisting, while the pocket screws pull the pieces tightly together as the glue cures. This combination creates an incredibly durable and stable main frame for the desk, capable of withstanding daily use. Always ensure your frame is square during assembly, using a carpenter’s square to check corners before fully tightening the screws.
Cutting the Plywood Bottom with Kreg Rip-Cut
For the desk’s bottom panel, we needed a piece of 3/4″ Purebond Plywood cut to fit precisely within the frame. The Kreg Rip-Cut proved to be an indispensable tool for this task. It’s an excellent, cost-effective alternative to a full-sized table saw, especially for those with limited workshop space. By simply attaching it to your circular saw, the Rip-Cut’s adjustable guide arm ensures perfectly straight and precise cuts every time. We propped our plywood sheet up on 2x4s to prevent cutting into the floor and to allow the saw blade to clear the workpiece. Purebond Plywood is an ideal choice for furniture components due to its strength, stability, and eco-friendly attributes, being formaldehyde-free. Careful measurement and a steady hand with the Rip-Cut will result in a perfectly fitting bottom panel.
Securing the Desk Bottom
With the plywood bottom perfectly cut, the next step was to integrate it into the desk frame. Our detailed plans illustrate the precise placement for drilling additional 3/4″ pocket holes into the plywood itself. These holes are critical for securely attaching the bottom panel to the inside edges of the desk frame, creating a strong and stable base for the storage compartment. Once the pocket holes are drilled, use appropriate pocket hole screws to fasten the plywood firmly in place. This step effectively completes the structural box of the desk, forming the base of its robust construction.
Adding Style and Support: Osborne Wood Products Corbels
To elevate the aesthetic appeal and provide additional structural support for our floating desks, we chose exquisite knotty pine corbels from Osborne Wood Products. While these corbels represented the bulk of the desk’s material cost, their impact on the overall design was immeasurable. They aren’t just functional; they truly “make” the desk, adding a touch of classic craftsmanship and visual weight that transforms a simple floating shelf into a sophisticated piece of furniture. The rustic charm of the knotty pine complements a variety of decor styles, and their robust construction ensures lasting durability. Investing in quality architectural details like these corbels is a worthwhile decision for any piece you want to stand out and endure.
Discover these beautiful Osborne Wood Products corbels on Amazon HERE.
Installing the Corbels
Attaching the corbels requires both strength and precision. We used 3″ Spax screws, known for their excellent holding power and ability to drive into wood without pre-drilling (though pre-drilling a pilot hole is always a good practice to prevent splitting, especially with harder woods or near edges). In addition to screws, we applied wood glue to create an even stronger bond between the corbels and the desk bottom. The key technique here is to drill from the inside of the desk, through the plywood bottom, and directly into the corbels. This method ensures that the screws are hidden from view once the desk is mounted, contributing to its clean, finished look.
A critical detail during corbel installation is ensuring that the top edge of each corbel is perfectly flush with the end of the plywood desk bottom. This alignment is not just for aesthetics; it guarantees that the corbels provide even and consistent support for the entire desk structure, contributing to its stability and integrated appearance.
For maximum stability and peace of mind, we used two 3″ Spax screws per corbel. This dual-screw approach provides ample strength to hold the corbels firmly in place, distributing the load and preventing any potential loosening over time. This meticulous attention to detail in securing the corbels is paramount for a floating desk that is both beautiful and robust.
Current Build Status: Top and Bottom Views
At this stage, looking down on the desk, you can see the sturdy framework taking shape, complete with the elegant corbels providing both support and character. The foundation for a functional and beautiful workspace is now firmly established, ready for the next layers of construction.
And from the bottom, the robust construction and secure attachment of the corbels are evident. The craftsmanship shines through, promising a desk that is not only visually appealing but also incredibly durable. It’s certainly looking good!
Crafting the Desk Top and Cleat System
Precision Desk Top Assembly
Now, it’s time to create the crucial top surface of the desk. This involves carefully measuring and cutting two pieces of wood for the desk top. Our design incorporates a deliberate 3/4″ overhang on both the sides and the front of the desk. This overhang is not merely aesthetic; it provides a comfortable ergonomic edge for users, prevents items from easily rolling off, and gives the desk a substantial, finished appearance. Precision in these cuts and measurements is key to achieving a professional look and a comfortable working surface.
To securely attach one of the desk top pieces, we used wood glue for a strong, lasting bond, complemented by our Airstrike 18 gauge nailer. The 1×4 piece was attached flush with the back edge of the desk. Using a nailer makes this step incredibly fast and leaves minimal evidence of fasteners, which can be easily filled and sanded for a smooth finish. The combination of glue and nails ensures the top piece is firmly affixed and contributes to the overall rigidity of the desk structure.
Building the Robust Wall Cleat
The strength and stability of any floating desk lie significantly in its wall-mounting system, and for this project, a robust cleat is paramount. We measured and cut 2×4 pieces to construct this cleat. Referencing the detailed plans is crucial for the precise placement of pocket holes. You’ll drill 1 1/2″ pocket holes into each shorter piece of the cleat, then attach them to the longer 2×4 piece using 2 1/2″ pocket screws and wood glue. Ensure the outer pieces are flush with the edges of the long 2×4, and carefully center any middle pieces. This construction creates a strong, three-dimensional cleat that will bear the desk’s weight and keep it securely against the wall.
Before proceeding, always perform a dry fit. Temporarily position the cleat against the wall or desk to confirm that all measurements are correct and that it slots perfectly into place. This simple step can save significant time and effort in correcting errors later on.
Finishing Touches: Stain, Seal, and Hardware
Preparing for a Flawless Finish
Here’s a crucial tip for achieving a professional-quality finish: do not attach the second top piece (the flip-top lid) until after you have stained and sealed the main desk body and the lid separately. Trying to work around hinges and other hardware while applying stain and polyurethane can be incredibly challenging and often leads to uneven coverage or messy results. Prior to staining, ensure all wood surfaces are thoroughly sanded smooth, removing any pencil marks, glue squeeze-out, or imperfections. This preparation is paramount for the stain to penetrate evenly and for the final finish to look flawless.
This image provides a clear visual of what the desk should look like at this stage – a beautifully crafted structure, awaiting its protective finish and the final touches of hardware. The separate flip-top is ready for its own finishing treatment.
Applying Varathane Dark Walnut Stain
For a rich, deep hue that enhances the natural beauty of the wood, we applied one coat of Varathane Dark Walnut stain to the entire desk. The application process is straightforward: simply wipe the stain onto the wood surface with a clean, lint-free cloth. Allow the stain to penetrate for about five minutes, then, using a fresh, clean cloth, gently blend and wipe off any excess. This technique ensures an even saturation and prevents a blotchy appearance. Always apply stain in a well-ventilated area and follow the manufacturer’s specific drying times before proceeding to the next step.
Protecting with Varathane Triple Thick Polyurethane
Once the stain was completely dry, we moved on to protecting the wood with a single coat of Varathane Triple Thick Polyurethane. This product is a game-changer for DIYers because one coat delivers the equivalent durability and protection of three traditional coats of polyurethane, saving significant time and effort. Apply it evenly with a high-quality bristle brush. Don’t be alarmed if it appears white or milky while wet; it will dry to a crystal-clear, exceptionally smooth, and hard finish. We absolutely adore this product for its efficiency and the silky-smooth feel it imparts, providing superior resistance against scratches, moisture, and daily wear and tear, perfect for a student’s desk.
Final Assembly: Hardware and Lid
With the stain and protective finish cured, it’s time for the final assembly of the flip-top lid. We carefully added three hinges along the back edge of the lid and desk body, ensuring smooth operation and even weight distribution. Additionally, to enhance the desk’s unique character and give it a touch of vintage charm, we incorporated a decorative keyhole piece. This particular piece was a leftover from the Campaign Hardware collection by Liberty Hardware, proving that sometimes the best details come from repurposing existing materials or choosing unique accents to personalize your build. This small detail adds significant personality to the finished desk.
Secure Installation: Mounting Your Floating Desk
Locating Wall Studs with Precision
The success of a floating desk hinges entirely on its secure attachment to the wall. This is not a step to rush or guess at. The first and most critical action is to accurately locate your wall studs. Studs are the vertical framing members within your walls that provide structural support, and they are the only safe and reliable points to anchor heavy items like a floating desk. We highly recommend using a reliable stud finder; marking the center of each stud will ensure maximum holding power. Never attempt to mount a floating desk directly into drywall without hitting studs, as it will inevitably pull away from the wall.
Ensure a secure installation by getting a reliable stud finder HERE.
Attaching the Cleat to the Wall
With the studs clearly marked, it’s time to attach the cleat to the wall. Position the cleat at your desired desk height, ensuring it is perfectly level using a spirit level. Then, use long 3″ Spax screws to drill through the 2×4 cleat and firmly into the center of each stud behind the wall. For this task, an impact driver is a powerful ally; it drives screws with minimal effort, especially through dense materials and into studs, making the job much easier than a standard drill. However, a basic drill can still accomplish the task with a bit more torque. The key is to ensure each screw bites deeply and securely into the stud, creating an unshakeable anchor for your floating desk.
Mounting the Desk onto the Cleat
The final step in installation is to mount the desk itself onto the cleat. Carefully lift the assembled desk and slide it over the installed cleat on the wall. The design of the cleat and the desk ensures a snug fit. Once the desk is seated correctly and resting on the cleat, secure it permanently by drilling 2 1/2″ Spax screws from the bottom of the desk up into the 2×4 cleat. These screws will lock the desk onto the cleat, preventing any lifting or shifting and creating a truly integrated, sturdy floating workspace. Double-check for levelness one last time to ensure everything is perfectly aligned.
Your Completed Floating Student Desk with Storage!
And there you have it! What started as a basic floating shelf concept has been ingeniously modified and transformed into the perfect floating student desk, complete with invaluable hidden storage. This project embodies smart design, offering a dedicated and clutter-free workspace that integrates seamlessly into any room. It’s a testament to how creative thinking and DIY effort can result in custom furniture solutions that are both highly functional and beautifully designed, solving real-world challenges for families like Dack and Brooke’s.
Behind the Scenes and Our Gratitude
Here’s a little behind-the-scenes glimpse into the effort and dedication that went into bringing these desks to life. It’s always a privilege to share a piece of our creative process with you, demonstrating that with the right tools and a clear plan, transforming your home is entirely within reach. These moments are what make the journey so fulfilling!
We were genuinely honored to undertake this project and construct these beautiful desks for Reece and Riley, creating a lasting impact on their daily lives. For those who want to see every step of the transformation in action, please ensure you tune in tonight at 11 PM EST! You’ll witness firsthand our design process, the building techniques we employed, and the full installation of these desks, along with a whole lot more exciting revelations from the “Open Concept” episode. We’re incredibly proud of what we achieved and deeply appreciate your continued support and interest in our work. Thank you so much for taking the time to stop by and join us on this creative journey!
~Ashley and Whitney