
Craft Your Own Charming $10 DIY Succulent Mason Jar Frame!
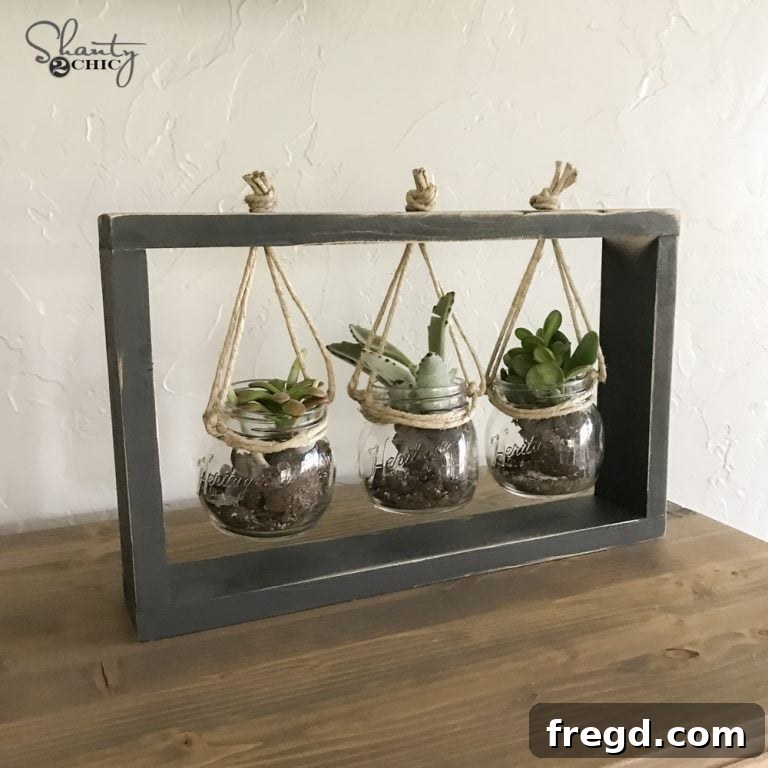
Hello fellow DIY enthusiasts! We’re thrilled to share another wonderfully creative and budget-friendly project that combines our love for lush succulents with the rustic charm of mason jars. Get ready to transform a simple piece of wood into an eye-catching display for your favorite greenery. This elegant, custom-made succulent frame is not only incredibly easy to build but also astonishingly affordable, costing around just $10 in materials. Perfect for adding a touch of natural beauty to any room, it’s a delightful way to bring the outdoors in, no matter your crafting skill level. Imagine a unique, handmade piece of decor that breathes life and freshness into your space – this DIY succulent frame is exactly that, offering both aesthetic appeal and a sense of accomplishment.
Isn’t that absolutely delightful? The blend of industrial glass and natural wood creates a captivating focal point for any wall. Before we dive into the detailed step-by-step instructions below, we highly recommend watching our comprehensive video tutorial. It provides a visual guide that clarifies each stage of the building process, from cutting your wood to expertly hanging your mason jars, ensuring you can follow along with utmost ease and confidence. Seeing the steps in action can often make a world of difference for DIY projects, so don’t miss out! You can access the complete DIY Succulent Frame how-to video HERE or simply click on the embedded player directly below!
Your Comprehensive Guide to Building a Stunning DIY Succulent Mason Jar Frame
Creating this beautiful succulent frame is a straightforward process that requires minimal materials and tools, making it an ideal project for crafters of all skill levels. We’ve meticulously designed these plans to be accessible for everyone, whether you’re a seasoned woodworker eager for a quick project or a beginner looking for a rewarding weekend endeavor. The core of this project revolves around a single 1x3x6 wood board, which will form the robust and stylish structure of your frame. Let’s gather everything you’ll need to embark on this exciting and greenery-filled DIY adventure!
Essential Materials You’ll Need:
- One 1x3x6 Wood Board: This is the fundamental building block for your frame. Opt for a straight, knot-free piece of common pine or a similar wood for the best results and easiest workability. Its dimensions make it perfect for a lightweight yet sturdy frame.
- Wood Glue: A high-quality wood glue is indispensable for creating strong, durable joints that will stand the test of time, far beyond the hold of nails alone.
- 1.25″ Brad Nails: These nails are perfect for securing your frame pieces together quickly and efficiently, providing immediate hold while the wood glue sets.
- 3/8″ Drill Bit: Specifically chosen to create the ideal size holes for threading your hanging mechanism for the mason jars.
- Three Standard Mason Jars: Pint-sized jars are recommended as they are perfectly proportioned for displaying small succulents within the frame.
- Assorted Succulents: Select a variety of small, healthy succulents that will fit comfortably into your mason jars and offer diverse textures and colors for visual interest.
- Fast-Draining Potting Soil: This specialized soil mix, typically labeled for cacti and succulents, is crucial for preventing root rot, especially in containers without drainage holes like mason jars.
- Paint or Wood Stain (Optional): For customization. We chose Rust-Oleum Chalked Paint in Charcoal for a modern farmhouse aesthetic, but you can pick any color or stain that matches your home decor.
- Small Hooks or Durable Wire (Optional, for hanging jars): While the video demonstrates the exact method, these items are key for securing your mason jars to the frame’s top piece.
Recommended Tools for the Project:
- Miter Saw: Highly recommended for making precise, clean, and angled cuts with ease, significantly speeding up the frame assembly process. (If a miter saw isn’t available, an inexpensive yet effective hand saw like THIS ONE on Amazon can certainly get the job done with a little more manual effort and care).
- Power Drill: Essential for efficiently drilling the holes in the top frame piece where your mason jars will hang.
- Brad Nailer (or Hammer): A brad nailer offers a quick and effortless way to secure the frame pieces, while a hammer and nails are a traditional and perfectly viable alternative.
- Sanding Block or Electric Sander: For smoothing any rough edges and preparing the wood for painting or staining. Also used to create a distressed look if desired.
- Measuring Tape and Pencil: Crucial for accurate measurements and precise marking of all your cuts and drill points, ensuring your frame is square and balanced.
- Safety Glasses: Always prioritize safety! Wear eye protection when operating any power tools or when cutting wood to prevent injury.
Step-by-Step DIY Succulent Frame Construction: Bringing Your Vision to Life
Step 1: Making Your Precise Wood Cuts
The foundational step in creating your beautiful succulent frame is to prepare your wood pieces. From your single 1x3x6 board, you will need to make four specific cuts that will form the robust rectangular structure of your frame. Precision at this stage is absolutely crucial for ensuring a neat, sturdy, and aesthetically pleasing final product. We utilized a miter saw for its unparalleled accuracy and efficiency, which makes quick work of these cuts and guarantees perfectly square ends. However, if you’re working with a more limited toolset or adhering to a strict budget, a simple hand saw can accomplish the same task with a little more patience and careful measurement. Ensure all cuts are clean, straight, and true to size:
- Two 15″ pieces: These will form the crucial top and bottom sections of your frame.
- Two 10″ pieces: These will serve as the vertical side supports, connecting the top and bottom pieces.
Step 2: Drilling Holes in the Top Frame Piece
Once your wood pieces are accurately cut and smoothed, identify one of your 15-inch boards. This particular piece will serve as the top section of your frame and is where the innovative hanging mechanism for your mason jars will be integrated. Using a 3/8″ drill bit – chosen for its optimal size to accommodate typical hanging wires or hooks – carefully drill three evenly spaced holes along the length of this board. These holes are absolutely essential for threading the chosen hanging accessories that will securely suspend your mason jars. Take your time during this step to ensure the holes are clean, free of splinters, and properly aligned along the center of the board. This meticulous approach will contribute significantly to the overall professional finish and functionality of your succulent frame.
Step 3: Guiding Precise Hole Placement for Balance
For a perfectly balanced, symmetrical, and aesthetically pleasing display of your succulent jars, accurate hole placement in the top board is paramount. Begin by measuring and marking the precise center of your 15-inch top board; this spot will be for your middle hole. From this central point, measure out 4 inches to each side and carefully mark those two additional spots. These two marks indicate where your remaining two holes should be drilled. This specific 4-inch spacing ensures that your three mason jars will hang uniformly and beautifully within the finished frame, providing not only ample room for your succulents to grow and thrive but also creating an attractive, evenly distributed visual arrangement. Double-checking your measurements before drilling will prevent any off-center surprises.
Step 4: Assembling the Bottom Section of the Frame
Now, with your pieces cut and drilled, let’s begin the exciting process of assembling the frame’s core structure. Take one of your 15-inch boards – this will serve as your sturdy bottom piece – and prepare to attach it to the two 10-inch side boards. Before physically joining the pieces, apply a thin, even bead of high-quality wood glue to each joint where the boards will meet. Wood glue is absolutely critical here as it provides crucial strength and long-lasting stability, creating a bond that will far outlast a simple nail-only connection. After applying the glue, carefully align and secure the pieces together using 1.25″ brad nails. For the best and fastest results, a brad nailer is highly recommended, but a hammer and nails can also achieve a strong joint with careful execution. Take extra care to ensure your corners are perfectly square for a professional and visually appealing finish.
Step 5: Completing the Frame with the Top Piece
With the bottom and side pieces now firmly in place, creating a robust ‘U’ shape, it’s time to add the final structural component: the top piece (the one you previously drilled the three holes into). Just as you did in the previous step, apply a generous yet even line of wood glue to the top ends of the side pieces where they will meet the top board. Carefully align the top piece, ensuring it is flush with the sides and that the pre-drilled holes are facing upwards or outwards as intended. Secure this final piece with 1.25″ brad nails, matching the technique used for the bottom section. This step completes the basic rectangular structure of your DIY succulent frame. Before the glue fully cures, double-check all joints to ensure they are tight and that the frame is perfectly square. Wipe away any excess glue with a damp cloth immediately for a cleaner finish.
Step 6: Admire Your Completed Frame Structure
Congratulations are in order! At this point, you’ve successfully assembled the foundational wooden frame for your magnificent succulent display. Take a moment to step back and truly appreciate your handiwork. The frame should now be a sturdy and well-constructed rectangular box, perfectly prepared for its embellishments and finishing touches. This simple yet robust structure serves as the ideal canvas for your creative vision, providing the perfect enclosure and support for your future hanging mason jar succulents. Once the wood glue has completely dried – allowing it to cure for several hours or overnight is recommended – the frame will be incredibly strong and durable, ready to move onto the next exciting stage: decoration and personalization!
Step 7: Painting and Personalizing Your Frame
Now for the truly fun and creative part – personalizing your frame to match your unique style and home decor! We opted for a sophisticated and beautifully rustic look by painting our frame with Rust-Oleum Chalked paint in Charcoal. This chalk-style paint is an excellent choice as it provides a desirable matte finish, offers exceptional coverage, and adheres wonderfully to wood without much prep. Apply one or two thin, even coats, ensuring you allow adequate drying time between each application for the best results. Chalk paint is particularly forgiving and effortlessly creates a lovely aged or distressed look. You are, of course, free to choose any color, stain, or finish that complements your existing home decor – from bright and bold contemporary shades to natural wood stains that highlight the grain, the possibilities for customization are truly endless!
Step 8: Distressing, Adding Succulents & Mason Jars for the Final Touch
Once your paint or stain is completely dry and cured, you have the option to add a charming touch of character by lightly sanding the edges and corners to achieve a lovely distressed finish. This step subtly highlights the frame’s natural texture and gives it a wonderfully vintage or weathered feel, enhancing its rustic appeal. After distressing (or if you prefer a clean, solid color finish), it’s finally time to introduce the stars of the show: your vibrant succulents and elegant mason jars! The method for securely hanging the mason jars is cleverly and clearly demonstrated in our detailed video tutorial, providing step-by-step instructions on how to use wire or small hooks through the pre-drilled holes in the top board. Fill your jars with a layer of well-draining succulent soil, carefully plant your selected succulents, and then meticulously hang them in their new home within the frame. This final step truly brings your DIY succulent frame to magnificent life, transforming it into a miniature, flourishing indoor garden.
Curious to see precisely how we expertly hung the mason jars to ensure they are both secure and beautifully displayed? Make sure to check out the detailed video HERE! We walk you through every nuance of this crucial step, providing visual clarity and confidence.
Showcasing Your Finished Succulent Masterpiece: Placement and Care
And just like that, your stunning DIY succulent frame is complete! This project is far more than just a simple craft; it’s a living piece of art that effortlessly brings natural beauty, organic texture, and a unique handmade touch to your home decor. Whether proudly displayed in your living room, adding freshness to your kitchen, offering a warm welcome in your entryway, or even gracing a covered patio space, this frame is guaranteed to be a delightful conversation starter and a constant source of visual joy. The thoughtful combination of rustic painted wood, clear glass mason jars, and resilient, vibrant succulents creates a harmonious aesthetic that complements a wide array of interior design styles, from modern farmhouse and industrial chic to bohemian and minimalist decor.
Optimal Tips for Succulent Care in Mason Jars
While succulents are famously celebrated for being low-maintenance and resilient, keeping them happy and thriving in containers like mason jars, which naturally lack drainage holes, requires a few specific considerations. By following these simple guidelines, you can ensure your beautiful plants flourish and continue to enhance your living space:
- Water Sparingly and Wisely: Succulents are adept at storing water in their leaves, making them highly drought-tolerant. Water only when the soil is completely dry to the touch, typically every 2-4 weeks, depending on your climate and home environment. Use a small amount of water, just enough to moisten the soil without saturating it, to avoid the risk of root rot in the absence of drainage.
- Provide Abundant Bright Light: Succulents are sun-loving plants! Place your frame in a location that receives ample bright, indirect light throughout the majority of the day. A few hours of gentle direct morning sunlight can also be highly beneficial for their growth and vibrant coloration.
- Choose the Right Soil Composition: This is paramount for succulent health. Always use a fast-draining potting mix specifically designed for cacti and succulents. This specialized soil prevents water from sitting around the roots, which is the primary cause of root rot in environments without proper drainage.
- Ensure Adequate Air Circulation: Good airflow around your succulents helps to dry out the soil faster and prevents fungal issues. Avoid placing them in overly humid or stagnant environments.
- Avoid Over-Potting: Choose small succulents that fit comfortably within the mason jars, leaving a little room for their natural growth without allowing them to become overcrowded. Smaller plants are generally easier to manage in limited-drainage containers.
Further Personalize Your Succulent Frame: Ideas for Customization
One of the most rewarding aspects of embarking on any DIY project is the inherent freedom to customize and personalize it, making it truly unique to your taste and home. Here are a few inspiring ideas to make your DIY succulent frame distinctively yours:
- Explore Diverse Paint Colors & Finishes: Don’t limit yourself to charcoal! Experiment with vibrant colors like a sunny yellow or a calming sage green. Consider metallic paints for a touch of glamour, or a classic crisp white for a timeless farmhouse look. You could even stencil a delicate pattern or a favorite quote onto the frame for added character.
- Embrace Natural Wood Stains: If you prefer to celebrate the inherent beauty of natural wood grain, opt for a light, medium, or dark wood stain. A stain enhances the wood’s texture and color, followed by a protective topcoat for durability and shine.
- Experiment with Different Jars or Containers: While mason jars offer a quintessential charm, you could creatively adapt the design to hang small ceramic pots, sleek glass bottles, or unique decorative vessels that match a particular theme.
- Cultivate a Variety of Succulents: Mix and match various types of succulents with different leaf shapes, textures, and color variations for a dynamic and visually rich display. Consider incorporating air plants (Tillandsia) for an even more minimalist and maintenance-friendly approach, as they don’t require soil.
- Add Thoughtful Embellishments: Enhance your frame with small decorative elements. Think about wrapping twine or rustic ribbon around the jar necks, adding small artificial flowers for seasonal touches, or attaching miniature decorative charms to the frame itself.
Final Thoughts on Your Empowering DIY Succulent Project
Thank you so much for joining us on this wonderfully creative journey! We sincerely hope you’ve thoroughly enjoyed learning how to craft this charming, affordable, and incredibly rewarding DIY succulent mason jar frame. It’s a project that beautifully exemplifies how simple, readily available materials can be transformed with a bit of effort and creativity into something truly beautiful, functional, and personal for your home. We’re confident that you’ll not only love the process of building it but will also cherish the stunning, living result for years to come. Your new frame isn’t just decor; it’s a testament to your hands-on skill and a vibrant addition to your living space. Don’t hesitate to reach out if you have any questions at all about the steps, required materials, or ongoing succulent care. Happy crafting, and enjoy the serene beauty of your magnificent new living decor piece!