
DIY Bar Cart: Craft a Stylish and Affordable Entertaining Essential
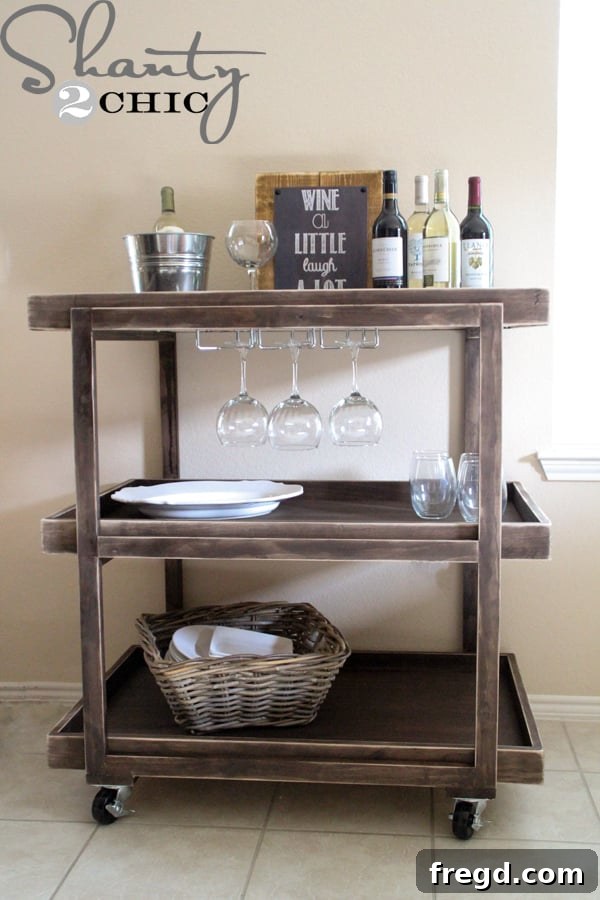
Are you dreaming of a chic bar cart to elevate your entertaining, but balk at the high price tags of designer versions? You’re in the right place! Today, I’m thrilled to share a project that brings luxury home without breaking the bank: my very own DIY Bar Cart. Inspired by expensive models – like an $800 Crate and Barrel cart – I designed and built this stunning piece for roughly $150, including all the hardware. It’s an incredibly rewarding project that delivers both style and significant savings.
Isn’t she a beauty? This versatile piece is perfect for any occasion, from holiday gatherings to casual weeknight entertaining. The satisfaction of crafting something so functional and stylish with your own hands is truly immense, and the cost savings are just the icing on the cake!
More Than Just a Bar Cart: Your Ultimate Beverage & Serving Station
Beyond cocktails and spirits, this DIY cart boasts incredible versatility. Imagine it as a charming coffee and hot chocolate station, ready to serve your guests with warm beverages on a chilly evening. It can also transform into a dessert trolley, a craft cart, or even a portable serving station for appetizers. This adaptability makes it an indispensable addition to any home, providing functionality and flair wherever it’s needed.
Don’t let the professional look intimidate you. This DIY Bar Cart is surprisingly simple to build. Even if you’re a beginner woodworker, you’ll find these step-by-step instructions easy to follow. Let’s gather our materials and get started on creating your very own custom piece!
Essential Shopping List for Your DIY Bar Cart
To begin this exciting project, you’ll need to collect the following materials. Quality lumber and hardware will ensure your bar cart is sturdy and lasts for years to come. Remember to always double-check measurements and consider purchasing a little extra for any unforeseen cuts or mistakes.
- Wood:
- 3 – 1×2’s @ 8ft.
- 1 – 1×2 @ 10 ft.
- 4 – 1×3 @ 8 ft.
- 1 – 1×4 @ 6 ft.
- 1 – 4’x8’ sheet of 3/4″ Purebond Plywood (birch is often the most economical choice). For convenience, have your hardware store rip this sheet lengthwise at 21 1/2″ wide. You can then make the cross cuts at home, or have them cut three pieces at 21 1/2″ x 34″ each.
- Hardware & Accessories:
- 4 – 2 1/2″ locking casters (essential for mobility and stability)
- 2 – decorative pulls (to add a touch of style and make moving the cart easier)
- 1 1/4″ pocket hole screws
- Wood glue
- 1 1/4″ nails (for secure attachment)
- Finishing Supplies:
- Wood stain (e.g., Rust-Oleum Dark Walnut)
- Polyurethane (e.g., Rust-Oleum Polyurethane in Matte finish)
- Foam brush or clean cloths for staining
- Bristle brush for polyurethane application
- Optional: Stemware rack, cup hooks
Tools You’ll Need: While not on the shopping list, these tools are crucial for a successful build: a miter saw or circular saw for accurate cuts, a drill/driver, a Kreg Jig for strong pocket hole joinery, a nailer (like a Ryobi Airstrike Nailer for speed and precision), measuring tape, safety glasses, and hearing protection.
Let’s Build Your Custom Bar Cart! Step-by-Step Instructions
A friendly reminder before we start: wood boards can vary slightly in actual dimensions. Always measure and cut as you build for the best fit, rather than pre-cutting all pieces based solely on a list. This approach ensures precision and a professional finish for your DIY bar cart.
Step 1: Constructing the Side Frames
We’ll begin by building the two main side frames of your bar cart. These frames will provide the primary vertical structure.
- Cut four 1×2 boards to 33″ in length. These will be your vertical posts.
- Cut six 1×2 boards to 26 1/4″ in length. These will be your horizontal supports.
- Using your Kreg Jig, drill 3/4″ pocket holes into both ends of each of the six 26 1/4″ boards. These pocket holes will allow for strong, hidden joinery.
Now, assemble the frames. For each frame, you’ll attach three short horizontal boards between two long vertical boards. Apply wood glue to the joints before securing with 1 1/4″ pocket hole screws.
- Attach one horizontal board flush with the top of the two vertical boards.
- Attach another horizontal board flush with the bottom of the two vertical boards.
- The third horizontal board should be positioned in the middle, at 15 3/4″ from the top of the long vertical boards. This spacing ensures proper support for your trays.
Repeat this process to create a second identical frame. These two frames will form the front and back of your bar cart, providing a solid foundation for the entire structure.
Step 2: Attaching the Tray Support Rails
Next, we’ll add the rails that will support your bar cart’s trays. These horizontal pieces connect your two side frames.
- Cut four 1×2 boards to 23″ in length.
- Drill 3/4″ pocket holes at both ends of each of these four boards.
Now, attach these rails between the two frames you just built. Use wood glue and 1 1/4″ pocket hole screws. Position these rails just below where the horizontal boards were attached on the frames – one pair at the top and one pair at the middle level. For a cleaner look, attach them with the pocket holes facing downwards, so they’ll be hidden when the cart is upright.
At this point, you should have a solid, open framework for your cart, with the two initial frames at the front and back, and the four rails connecting them horizontally.
Step 3: Creating the Base and Attaching Bottom Boards
Unlike the upper sections, we’ll attach solid boards to the very bottom to provide a sturdy foundation for the casters and overall stability. For this step, it’s often easiest to flip the cart upside down.
- Cut two 1×4 boards to 24 1/2″ in length.
Attach these two 1×4 boards to the very bottom of the frame, ensuring they are flush with the existing 1×2 boards. Use wood glue for a strong bond and then secure them with 1 1/4″ nails. A nailer, such as the Ryobi Airstrike Nailer, makes this step quick and efficient. This creates a robust base for the casters.
With the base secured, the main cart structure is complete! Now, let’s move on to building the functional and stylish trays.
Step 4: Crafting the Three Trays
The trays are a key functional element of your bar cart, providing surface area for drinks, glassware, and decor. You’ll build three identical trays for maximum utility.
- Cut six 1×3 boards to 21 1/2″ in length. These will be the short sides of your trays.
- Cut six 1×3 boards to 35 1/2″ in length. These will be the long sides of your trays.
- Drill 3/4″ pocket holes into both ends of each of the six short 1×3 boards.
Assemble the tray frames: for each tray, attach two short 1×3 boards between two long 1×3 boards using wood glue and 1 1/4″ pocket hole screws. This will form a rectangular frame for each of your three trays. Before proceeding, it’s highly recommended to do a dry fit by placing these frames into your cart. This is the ideal stage to make any minor adjustments to ensure a perfect fit for each tray.
Once the frames are confirmed, measure the interior space of each tray frame to ensure your plywood bottoms will fit perfectly.
The plywood pieces for the tray bottoms should be cut to 21 1/2″ x 34″. Drill 3/4″ pocket holes along all four edges of each plywood piece – approximately four holes on the shorter sides and six on the longer sides. These holes will attach the plywood securely to the tray frames.
Finally, attach the plywood bottoms to the tray frames using 1 1/4″ pocket hole screws and wood glue. Ensure the plywood sits flush with the frame for a smooth surface.
Now that you have three beautifully constructed trays, your bar cart is really taking shape! It’s time to add the finishing touches that will transform it into a piece you’ll be proud to display.
Finishing Touches: Staining, Protecting, and Personalizing
The right finish not only protects your bar cart but also enhances its aesthetic appeal. This is where your personal style truly shines through!
Step 5: Staining for a Rich, Elegant Look
For this project, I opted for a classic and rich finish using Rust-Oleum Dark Walnut Stain. This stain provides a beautiful, deep color that complements almost any home decor. To apply, simply wipe on a single, even coat with a foam brush. Allow it to sit for about 5 minutes, then gently wipe the stain with a clean, lint-free cloth. The goal isn’t to remove the stain entirely, but to blend it and remove any excess, ensuring an even tone. Always follow the manufacturer’s instructions for drying times.
Step 6: Applying Polyurethane for Durability
Once the stain is thoroughly dry, it’s crucial to protect your bar cart with a durable topcoat, especially since it will be around liquids. I used Rust-Oleum Polyurethane in a Matte finish, applied with a bristle brush. Apply two thin, even coats, allowing adequate drying time between each coat as per product instructions. Polyurethane will seal the wood, providing excellent protection against spills, scratches, and general wear, preserving your beautiful finish for years to come.
Step 7: Adding Mobility with Locking Casters
A portable bar cart is key for entertaining, allowing you to move your beverage station wherever the party is. This requires sturdy, reliable casters.
I purchased four 2 1/2″ locking casters for this cart. The locking feature is vital – it ensures your cart stays securely in place when serving, preventing any accidental rolls or spills during festivities.
Attach the casters to the bottom of the cart, ensuring they are flush with the 1×4 boards you installed earlier. Use appropriate screws for the casters, making sure they are securely fastened for smooth movement and stability.
Step 8: Installing Decorative Pulls
Adding decorative pulls not only enhances the cart’s appearance but also makes it much easier to maneuver. I selected two charming pulls for about $2 each, which I attached to the top tray. These small details contribute significantly to the overall aesthetic and functionality of your DIY bar cart.
Step 9: Adding Smart Storage – Stemware Rack or Cup Hooks
Now for a bit more fun and functionality! These additions will make your bar cart truly ready for serving.
To store wine or cocktail glasses elegantly, I purchased a stemware rack for about $12. These are widely available online and at home improvement stores.
Installation is straightforward. Simply attach the rack underneath the top tray. I recommend marking the middle point of the tray and setting the rack back slightly from the front 1×3 frame for a clean look. This keeps your stemware secure and easily accessible.
If you’re leaning into the coffee cart versatility, consider installing cup hooks for mugs! This is a simple yet effective addition.
Predrill small pilot holes for your cup hooks to prevent wood splitting.
Then, simply screw about eight cup hooks into place under the first tray. For ultimate versatility, you could even install the stemware rack on one side of a tray and cup hooks on the other, allowing you to easily switch between bar cart and coffee station functionalities.
Step 10: Securing the Trays in Place
To ensure your trays are stable and won’t shift during use, secure them to the internal rails. Drill 1 1/4″ wood screws through the rails and into the bottom of each tray. Two screws per rail should be sufficient to hold each tray firmly in position.
And just like that, your custom DIY Bar Cart is complete! It’s now ready for some serious entertaining, bringing both style and functionality to your home.
Your Finished DIY Bar Cart: Ready for Entertaining
Congratulations on completing your beautiful, custom-built bar cart! This project not only saves you hundreds of dollars but also gives you a unique, handmade piece that reflects your personal style. From holiday entertaining to everyday use, this versatile cart is sure to be a focal point in your home.
This cart is perfect for serving cocktails, displaying your favorite spirits, or even transforming into a mobile coffee station. Its sturdy construction and elegant finish make it a durable and attractive addition to any room.
Imagine hosting guests and effortlessly rolling this stylish piece from your kitchen to your living room. The locking casters ensure it stays put when needed, and the multiple trays offer ample space for everything you need to entertain with ease.
Whether you choose to style it as a sophisticated wine cart or a lively beverage station, its versatility is unmatched.
The dark walnut stain provides a timeless look, but feel free to customize yours with different stains or paints to match your home’s aesthetic. The options are limitless!
Envision lazy Sunday mornings with your personalized coffee bar, complete with mugs hanging from the hooks and all your favorite blends readily available. This cart truly adapts to your needs and lifestyle.
The elegance and practicality of this DIY Bar Cart speak for themselves. It’s a testament to what you can achieve with a little effort and the right instructions.
From the first cut to the final stain, every step brings you closer to owning a custom piece of furniture that rivals high-end store-bought options.
The joy of entertaining is amplified when you have a dedicated, stylish space for your beverages and snacks. This cart truly serves as the heart of your hospitality.
Remember those charming printables in some of the pictures? Stay tuned! I’ll be sharing them with all of you for FREE very soon, so you can add even more personalized flair to your new bar cart or beverage station.
I genuinely hope you love building and using your DIY Bar Cart as much as I loved designing and crafting mine! It’s an investment in your home and your entertaining future that you won’t regret.
We always appreciate your shares and pins! Help spread the word and inspire others to create their own beautiful, budget-friendly furniture pieces. Thanks for stopping by and happy building!
Ashley