
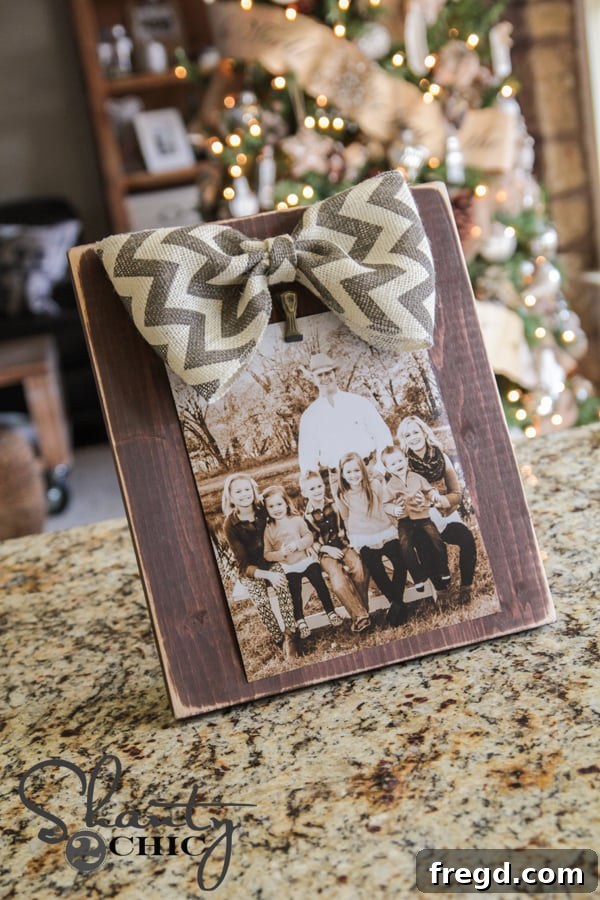
Welcome, crafting enthusiasts, to an exciting installment of our “12 Days of Christmas” series! Today, we’re thrilled to share a project that’s not only incredibly charming but also wonderfully affordable, making it the perfect heartfelt gift or a delightful addition to your own festive home decor. If you love creating personalized presents that truly stand out, then you’re in for a treat with these DIY Burlap Bow Photo Frames.
DIY Burlap Bow Photo Frames: Create Charming & Affordable Gifts
There’s something uniquely special about giving and receiving photographs. They capture precious memories, evoke warm sentiments, and truly make the most cherished gifts. Every year, I enjoy finding creative and budget-friendly ways to display these treasured snapshots. This year, I’m absolutely delighted with how these adorable Burlap Bow Photo Frames turned out!
Aren’t they absolutely charming? My favorite aspect of this project, hands down, is the incredibly low cost. Each of these beautiful frames can be made for less than $3 in materials! You simply can’t beat that for a custom, handmade item that looks far more expensive than it is. These frames combine rustic elegance with a personal touch, making them perfect for Christmas gifts, housewarming presents, or adding a cozy feel to your own home decor.
This DIY project is remarkably straightforward and suitable for crafters of all skill levels. If you’ve been looking for a simple yet impactful woodworking project, or just a creative way to use burlap ribbon, this is it! We’ll walk you through every step, from cutting the wood to creating those adorable “faux” burlap bows. Let’s gather our supplies and get started on crafting these memorable frames.
Essential Supplies for Your Burlap Bow Photo Frames
This supply list is optimized to create approximately six frames. You can easily adjust the quantities of wood and other materials based on how many frames you plan to make. Remember, the beauty of DIY is tailoring projects to your specific needs!
Supply List for 6 Frames:
- 1 – 1x12x4 Wood Board (for the frame back)
- 1 – 1x3x6 Wood Board (for the bottom photo ledge)
- Burlap Ribbon (wired edge is recommended for better shape retention)
- Twine (natural or colored, to complement your design)
- Metal Clips (to hold your photos securely)
- Gorilla Wood Glue (for strong, lasting wood bonds)
- Gorilla Super Glue Gel (for attaching clips and bow details)
- Hot Glue Gun and Glue Sticks (for assembling the bows)
- Optional: Wood Stain or Spray Paint (for finishing your frames)
- Optional: Kreg Jig and 1 1/4″ pocket hole screws (for easy assembly)
Step-by-Step Guide to Crafting Your Frames
1. Precision Wood Cuts for Your Frames
The first step in bringing your photo frames to life is precise wood cutting. We’re offering dimensions for two popular photo sizes: 5×7 inches and 8×10 inches, allowing you to create a versatile collection of frames. Careful measurement ensures a professional finish.
For smaller frames (designed for 5×7 photos):
Cut your 1×12 board piece to an 8-inch length. This will form the main back panel of your frame.
Cut your 1×3 board piece to a 7-inch length. This piece will serve as the bottom ledge, supporting your 5×7 photo.
For larger frames (designed for 8×10 photos):
Cut your 1×12 board piece to a 12-inch length. This will be the robust back panel for your larger photos.
Cut your 1×3 board piece to an 11-inch length. This piece will create the sturdy bottom ledge for your 8×10 photo.
2. Assembling the Frame Base
Now, it’s time to bring your wood pieces together to form the frame. I highly recommend using a Kreg Jig for this step; it truly simplifies the process, especially for beginners. This is a perfect starter project if your Kreg Jig is still waiting to be used!
Using a Kreg Jig: Set your Kreg Jig for 3/4-inch pocket holes and use 1 1/4-inch pocket hole screws. Start by drilling two pocket holes into one end of your 1×3 piece, as shown:
Next, position the 1×3 piece at the base of your larger 1×12 back panel. Use a pencil to draw a faint line across the 1×12, marking where the 1×3 piece will be attached. This ensures perfect alignment.
Apply a generous line of Gorilla Wood Glue along the edge of the 1×3 where it will meet the 1×12. Carefully align the 1×3 with the line you just drew. Using your Ryobi drill and the pocket hole screws, securely fasten the 1×3 piece to the 1×12 back panel. The Kreg Jig method offers a strong, hidden joint that’s quick and easy!
Alternative Assembly Methods: If you don’t have a Kreg Jig, you can still achieve a sturdy frame. You can simply use wood glue and clamps, allowing ample drying time for a strong bond. Alternatively, you can use wood glue in combination with wood screws. If choosing this method, you’ll need 2.5-inch wood screws. Make sure to pre-drill pilot holes through the back of the 1×3 and into the 1×12 to prevent the wood from splitting. While these methods work, the Kreg Jig really does make this part a breeze, and you’ll thank me later for the recommendation!
3. Drilling Holes for Twine
Once your frame base is assembled, you’ll need to drill two small holes at the top. These holes will be used to thread the twine from which your photo clips (and photos) will hang. Place these holes approximately 1.5 inches apart, centered horizontally on the frame. There’s no need for absolute perfection here, as the decorative burlap bow will beautifully conceal these holes.
4. Finishing Your Wood Frames: Stain or Paint
With the structural building complete, it’s time to add character and color to your frames. This step allows for a lot of personalization, so choose finishes that match your style or the recipient’s decor. I opted for a rich stain on one and a classic paint on the other.
For my larger frame, I applied Rust-Oleum Wood Stain in Carrington. This shade offers a gorgeous, deep, and luxurious finish that truly enhances the natural wood grain, giving the frame a sophisticated and timeless appeal. Apply with a cloth, allow it to penetrate, then wipe off any excess according to the product instructions for best results.
For the smaller frame, I used Rust-Oleum Painter’s Touch spray paint in Canyon Black. Spray paint provides a smooth, even coating and dries quickly, making it a fantastic option for a crisp, modern look. Be sure to work in a well-ventilated area and apply multiple light coats for a flawless finish. Allow your frames to dry completely before moving on to the next step.
5. Crafting Your Signature “Faux Bows”
While your beautifully finished frames are drying, you can begin making the signature burlap bows. I affectionately call these “faux bows” because they achieve a full, elegant look with minimal effort – no complex tying required! All you really need is a hot glue gun, and a wired-edge burlap ribbon for best results, as the wire helps the bow maintain its lovely shape.
Making the Smaller Bow (with tails):
- Begin by cutting two pieces of burlap ribbon, each approximately 16 inches long. I found my wired burlap ribbon at Hobby Lobby, which makes a huge difference in the final shape.
- Take one 16-inch piece. Fold both ends towards the center, overlapping slightly, to form a loop on each side. Secure these folds in place with a few dabs of hot glue at the center.
- Pinch the very center of this folded piece together to create the bow shape. Add a few drops of hot glue to secure the pinch. Exercise caution here! Hot glue can cause burns, so work carefully.
- Take your second 16-inch piece of ribbon. Fold it in half lengthwise, then fold it again to create two “tails” for your bow. Secure this folded piece with a dab of glue at its center.
- Now, hot glue the main bow piece onto the folded “tails” piece.
- To create the center knot, cut a smaller piece of burlap ribbon, about 3-4 inches long. Fold this piece twice, then tie it into a simple knot.
- Glue this knot to the very top center of your assembled bow.
- Wrap one end of the knot ribbon around to the back of the bow and secure it with hot glue. Trim any excess ribbon. For a finishing touch, attach a small piece of decorative twine over the wrapped ribbon on the back, then glue the other end of the knot ribbon over the twine. Trim all excess for a neat finish.
- Neatly trim any remaining stray pieces of ribbon or glue, and your beautiful faux bow is complete!
Making the Large Bow (without tails):
For a larger, fuller bow, you can simplify the process by skipping the separate “tail” piece altogether. Simply create your main bow as described in steps 1-3. Instead of tying a knot for the center, cut a small piece of ribbon, fold it two times, and then wrap it snugly around the pinched center of your bow. Secure it firmly with hot glue at the back. It’s an easy-peasy way to get a different, equally lovely look!
6. Attaching the Photo Clips
To elegantly display your cherished photos, you’ll need to attach a metal clip to the bottom ledge of your frame. I discovered these super cute vintage metal clips that add an extra touch of charm, though any small metal clip will work beautifully. You can often find similar clips at craft stores like Hobby Lobby.
To ensure the clips are securely fastened, use a strong adhesive like Gorilla Glue Super Glue Gel. Apply a small amount of glue to the back of the clip and firmly press it onto the center of the 1×3 bottom ledge of your frame. Hold it in place for a few seconds to allow the glue to set, and then let it cure completely before handling. This super glue provides a durable bond that will keep your clips (and photos!) firmly in place.
7. Distressing and Final Assembly
For an added touch of rustic charm and character, I recommend distressing the edges and corners of your frames. This step gives them a beautifully worn, antique look that complements the burlap bows perfectly. I used my beloved Ryobi Corner Cat sander for this, a tool I use on almost every project for its precision in tight spaces. Simply lightly sand the edges and corners until you achieve your desired distressed effect, revealing some of the natural wood beneath the stain or paint.
The very last step is to attach your handcrafted burlap bow to the top of the frame. Thread your twine through the two holes you drilled earlier at the top of the frame. Loop it through, bring the ends to the back, and tie a secure knot. You can then glue your faux bow directly over the front of the twine, concealing the knot and holes. And just like that, your personalized Burlap Bow Photo Frame is complete!
Your Beautiful Burlap Bow Photo Frames Are Ready!
Take a moment to admire your handiwork! These frames are not just functional pieces; they are works of art, imbued with the personal touch of your creativity. The rustic charm of the burlap bows combined with the elegantly finished wood creates a timeless aesthetic perfect for any home. And remember, each one cost you less than $3 to make!
These frames are a testament to the power of DIY – creating something beautiful, personal, and incredibly budget-friendly. They make perfect personalized Christmas gifts, thoughtful birthday presents, or simply a charming way to display your favorite family photos. Imagine filling them with pictures from a recent vacation or a cherished family gathering!
I hope you enjoyed this tutorial and are inspired to create your own burlap bow photo frames! If you loved this project, I would be so grateful if you could share it with your friends and fellow crafters by pinning it on Pinterest and sharing on social media. Your support helps us continue to bring you more exciting DIY ideas!
Discover More Festive Projects from Our “12 Days of Christmas” Series!
This project is just one of many wonderful ideas in our “12 Days of Christmas” series. Be sure to explore these other fantastic holiday posts from our friends to get your home holiday-ready and find more unique gift ideas!
Simple Doily Ornaments
Inspired By Charm
Thistlewood Farm
Funky Junk Interiors
Remodelaholic
More Holiday-Ready Projects from Shanty2Chic!
Looking for more inspiration to deck your halls this holiday season? Here are a few other popular projects we’ve shared recently that can help you transform your home into a festive wonderland!
DIY Rectangle Wreath
DIY Bar Cart
Free Printable Merry Christmas Banner
DIY Christmas Tree Stands
Thank you so much for joining us on this creative journey! We hope you feel empowered to tackle these charming DIY Burlap Bow Photo Frames and add a personal, handmade touch to your holiday celebrations. Remember, the best gifts are often those made with love, and these frames certainly fit the bill!
Happy Crafting!
~Whitney