
Transforming a “Big Boy” Room: DIY Distressed Wood Wall Letters Tutorial
Hello, wonderful readers!
As many of you who follow along our renovation journeys already know, our home is a constant hub of creative projects. Currently, my focus is entirely on a very special transformation: redoing my little guy’s room. It’s an exciting time, filled with new adventures, yet it also brings a touch of bittersweet nostalgia. Witnessing him grow into a “big boy” is truly heartwarming, but I confess, I sometimes miss the days of his crib – that cozy, secure little ‘cage’ that kept him safely tucked in all night. The transition has had its moments, and some nights are definitely more challenging than others! Nevertheless, creating a space that truly reflects his blossoming personality and makes him feel special is a rewarding endeavor. For all the latest updates, behind-the-scenes peeks, and project reveals from start to finish, don’t forget to follow us on Instagram!
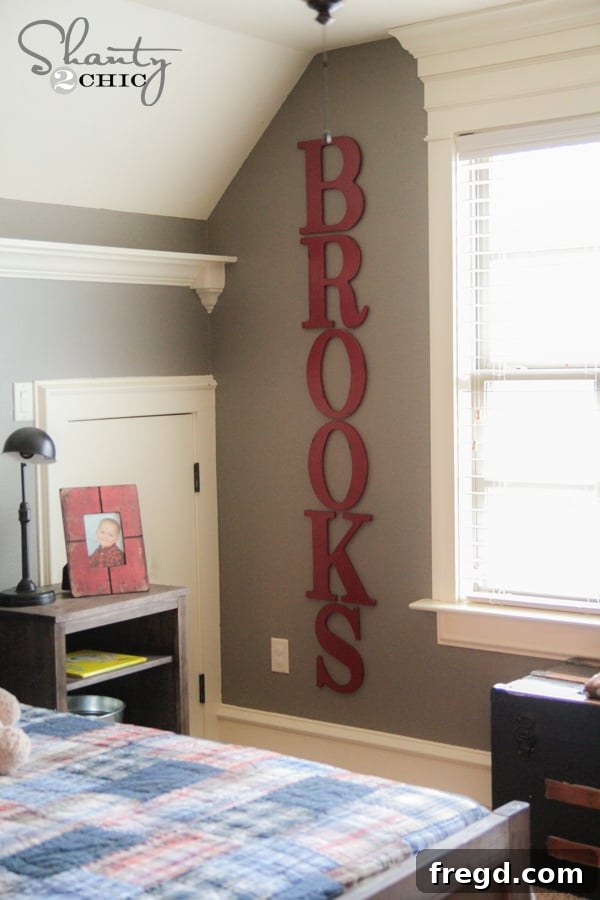
One of the key elements I envisioned for his new room was a personalized touch – specifically, displaying his name prominently on the wall. After searching for the perfect spot, I found an ideal corner that practically begged for this custom detail. The result? I absolutely adore how it turned out! It adds so much character and a unique, personal flair to his newly designed space, making it truly his own. This simple DIY project proved to be not only incredibly budget-friendly but also surprisingly quick to complete, perfect for tackling during nap time or a quiet afternoon. The joy of seeing his name proudly displayed makes all the effort worthwhile.
Crafting Personalized Wall Art: Your Guide to Distressed Wood Letters
Are you looking for an easy, impactful, and affordable way to add a personalized touch to a child’s room, nursery, playroom, or even a home office? Custom wall letters are a fantastic solution! They bring warmth, character, and a unique focal point to any space. This tutorial will walk you through creating beautiful, distressed wood wall letters that look professionally crafted but are incredibly simple to make yourself. The best part is how customizable this project is – you can adapt the colors, level of distressing, and even the type of letters to perfectly match your decor.
Gathering Your Materials for DIY Wall Letters
This project requires just a few basic supplies, most of which you can find at your local craft store or hardware store. What truly makes this DIY project stand out is how unbelievably easy and budget-friendly it is. You don’t need extensive crafting experience or a huge investment to achieve a high-end look.
- **Wood Letters:** I found these fantastic black wooden letters at Hobby Lobby, priced at an incredible $4 a piece. Don’t worry if yours have a few scuffs or scratches; that actually works in our favor for the distressed look we’re aiming for! Craft stores like Michaels, Joann, or even online retailers are excellent sources for a wide variety of unfinished wood letters in different fonts and sizes. Consider the style of your room when choosing the font – a classic serif or a fun, bold sans-serif can dramatically change the feel.
- **Vaseline (Petroleum Jelly):** This is our secret weapon for achieving that coveted “chippy paint” distressed effect without a lot of effort.
- **Spray Paint:** For this project, I opted for Rust-Oleum Colonial Red Satin spray paint. The satin finish provides a lovely, subtle sheen. When choosing your paint, think about the overall color scheme of the room. Rust-Oleum offers a wide range of colors and finishes, from matte to gloss, so you can easily find something that complements your existing decor. Remember to use paint suitable for wood surfaces.
- **Spray Paint Comfort Grip:** This little gadget is a lifesaver! It attaches to the top of your spray paint can, making it much easier and more comfortable to spray for extended periods. It saves your fingers from cramping and, as a bonus, keeps your manicure intact! I highly recommend investing in one – or a few, like me!
- **Small Sanding Pad or Sandpaper (fine to medium grit):** This will be used for the final distressing step. A sanding block or a piece of sandpaper (around 120-220 grit) will work perfectly.
- **3M Command Strips (Picture Hanging Strips):** These innovative strips are perfect for hanging lightweight items like our letters without damaging your walls. They offer a strong hold and are incredibly easy to remove without leaving residue, making them ideal for renters or those who like to change their decor frequently.
As you can see, the black letters had a few minor imperfections – a scratch here, a scuff there. But I knew these “flaws” would only enhance the rustic, distressed look I had in mind. Sometimes, the most beautiful transformations begin with imperfect pieces!
Step-by-Step Guide to Creating Distressed Wall Letters
Let’s dive into the creative process! This tutorial is designed to be straightforward and achievable for anyone, regardless of their DIY experience. Remember to work in a well-ventilated area, especially when using spray paint.
Step 1: Preparing for the Distressed Look with Vaseline
The secret to our effortlessly “chippy” paint effect lies in Vaseline. This simple household item acts as a resist, preventing the spray paint from adhering completely to certain areas. To start, take a small amount of Vaseline on your finger and lightly rub it onto various spots on each letter. Focus on the edges, corners, and any raised areas where natural wear and tear would typically occur. Don’t overdo it – a thin, uneven application is perfect. The goal is to create random patches where the paint won’t stick, allowing the original color (or in this case, the underlying black of the letters) to peek through later.
This strategic application of Vaseline is what will give your letters that authentic, weathered charm. The areas treated with Vaseline will be easier to distress later, revealing the base color underneath and adding depth to your finished project.
Step 2: Spray Painting Your Letters
Now it’s time for the color! Make sure you are in a well-ventilated space, ideally outdoors or in a garage with open doors. Lay down a drop cloth or old newspaper to protect your work surface. Attach your comfort grip to the Rust-Oleum Colonial Red Satin spray paint can. This grip makes a huge difference in control and comfort, especially when you have multiple letters to paint.
Give each letter a good, even coat of spray paint. Hold the can about 8-12 inches away from the surface and use steady, sweeping motions. It’s better to apply two thin coats than one thick coat, as this prevents drips and ensures a smoother finish. Allow the first coat to dry completely before applying a second coat if needed, following the drying times recommended on your spray paint can. The rich Colonial Red color immediately began to transform the simple black letters, hinting at the beautiful finished product.
Step 3: Creating the “Chippy” Distressed Effect
Once the paint is completely dry – and I mean *completely* dry to the touch – it’s time to reveal the distressed look. Take your small sanding pad or a piece of sandpaper. Lightly rub the edges and the areas where you applied Vaseline. You’ll notice that where the Vaseline was, the paint will lift and chip off with very little effort, exposing the original black color underneath. This creates a wonderfully authentic “chippy” or “aged” appearance, making your new letters look like beloved, vintage finds. Vary the pressure and direction of your sanding to create a natural, uneven distressed effect, focusing on areas that would naturally show wear. This step is incredibly satisfying as you watch the character of each letter emerge.
Step 4: Hanging Your Beautiful New Wall Letters
This final step is perhaps the easiest and most versatile, thanks to 3M Command Strips. These strips are truly brilliant for wall decor because they offer a strong hold without the need for tools or worries about wall damage. They’re perfect for decorating nurseries, kids’ rooms, or anywhere you might want to easily change up your decor.
To use the Command Strips, first, take two matching strips and press them firmly together until you hear a click. This interlocking mechanism is what provides the strong, reliable hold.
Next, peel off one of the protective liners from a joined pair of strips. Attach this exposed adhesive side to the back of your wood letter. For most standard-sized letters, I recommend using two strips per letter to ensure maximum stability and prevent any sagging or movement. Place them towards the top and bottom of the letter for even support.
Once the strips are securely attached to the back of the letters, peel off the remaining protective liners on the side facing the wall. Carefully position your letter on the wall. Before pressing firmly, step back and ensure it’s perfectly aligned. For multiple letters forming a name, use a level to ensure they are straight and evenly spaced. Once you’re happy with the placement, press the letter firmly against the wall for about 30 seconds. The strips will bond securely, and your personalized wall art is complete!
The Beautiful Finish: Personalized Room Decor Made Easy!
And that’s truly all there is to it! I wasn’t kidding when I said this project was easy. The finished letters add such a vibrant and personal touch to his room, instantly making the space feel more curated and special. The distressed Colonial Red stands out beautifully against the wall, and the subtle hints of black peeking through give them an endearing, rustic charm. This project is a testament to how a few dollars and a little creativity can yield truly stunning results. It’s exactly the kind of satisfying, quick-win DIY that makes home decorating so enjoyable.
For just $4 a letter, and getting the entire thing done during nap time, these truly are my favorite kind of projects – maximum impact with minimal time and cost. What do you think? Doesn’t it add so much to his room? I’d love to hear your thoughts in the comments below!
Explore More Room Transformations!
Thank you so much for stopping by and checking out this fun and simple DIY. I hope this tutorial inspires you to create some personalized wall art for your own home! If you have any questions at all about the process, the materials, or anything else, please don’t hesitate to ask. I’m always happy to help.
This personalized wall letter project is just one piece of the puzzle in creating his ultimate “big boy” room. We’ve been busy tackling several other exciting projects to complete his space. If you’re looking for more inspiration for children’s room decor or other home improvement ideas, be sure to check out these related tutorials:
Painting the Room: A Foundation for Style!
Discover our tips and tricks for achieving a flawless paint job, transforming the entire atmosphere of the room with just a few coats of paint. Choosing the right color and technique is crucial for setting the mood.
DIY Nightstands: Functional and Chic Bedside Companions
Learn how we built custom nightstands that perfectly complement his new bed, offering both style and essential storage space right by his side. A nightstand is key for holding bedtime stories and a trusty lamp.
DIY Twin Bed: Pottery Barn Inspired Style on a Budget
Say goodbye to the crib and hello to a stylish and sturdy DIY twin bed! We’ll show you how to construct a beautiful bed inspired by high-end designs, without the hefty price tag. It’s the centerpiece of any “big boy” room.
DIY Toy Storage: Keeping Clutter at Bay with Style
Every child’s room needs effective storage solutions! See how we created practical and attractive toy storage, keeping his growing collection organized and the room tidy. This IKEA Trofast inspired hack is a game-changer for organization.
Happy crafting!
~Whitney