
Hello, fellow home enthusiasts! I’m absolutely thrilled to finally dive into a much-needed project: our guest bathroom. This often-overlooked space hasn’t received a speck of attention since we moved into our home three years ago. It’s quite ironic, really, given that it’s the room our visitors use most frequently! It’s high time it transitioned from being a mere utility room to a truly welcoming and comfortable sanctuary for our guests.
The Journey Begins: Transforming Our Neglected Guest Bathroom
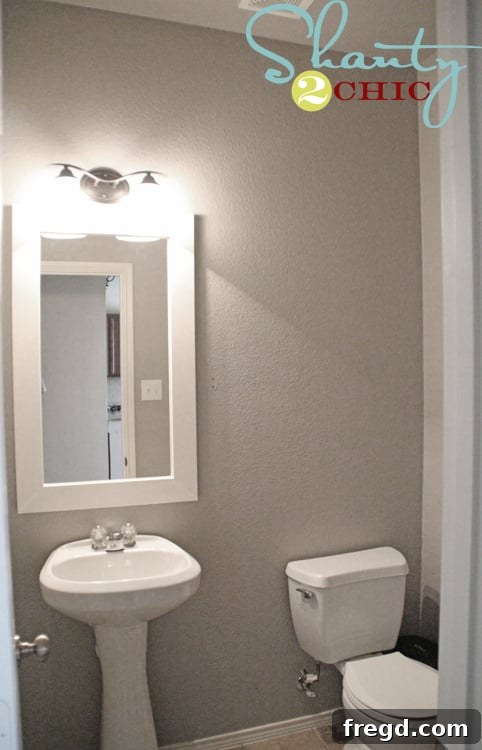
Every great transformation starts with a “before” picture, and ours is no exception. Take a look at the state of affairs before we even picked up a paintbrush or a saw:
As you can see, it was far from inspiring. The paint color felt flat and uninviting, contributing to an overall dull atmosphere. This bathroom also presents a common challenge: a complete lack of natural light. Without windows, it always felt dark and somewhat claustrophobic. It truly looked and felt like the afterthought it was during the home’s initial construction, lacking any personal touch or design flair. Our goal was clear: to infuse this space with light, style, and a sense of thoughtful hospitality, even on a budget.
Phase One Complete: A Breath of Fresh Air
I’m excited to share the initial results of our efforts! This first phase has already made a dramatic difference, laying a bright and stylish foundation for future updates. It’s amazing what a few strategic changes can do to redefine a space.
Choosing the Perfect Palette: Brightening with Paint
The first and most impactful change we made was to the walls. For a room as small and naturally dark as this one, selecting the right paint color was paramount. I chose Dutch Boy Route 66-f14-3 in a satin finish. This specific shade is a beautiful, sophisticated gray that leans slightly towards a greige, offering warmth without feeling heavy. I was actually inspired by my friend Whit’s gorgeous living room walls, and I knew a similar hue could work wonders in our compact bathroom.
The satin finish was a deliberate choice for a bathroom environment. Not only does it offer a subtle sheen that helps reflect light, but it’s also incredibly durable and easy to clean – a definite plus in a high-traffic area prone to moisture and splashes. This color has proven to be absolutely perfect for our windowless bathroom; it dramatically lightens and brightens the space, making it feel significantly larger and more inviting than before. It’s a testament to how the right paint color can completely transform the mood and perception of a room.
When selecting paint for small, dark spaces, consider shades that have a reflective quality or a subtle warmth. Cool grays can sometimes make a room feel colder, but those with a hint of beige or “greige” undertones, like Route 66, prevent this by adding a cozy touch. Always test swatches on your walls, observing them at different times of day, as artificial light can drastically alter how a color appears. For bathrooms, opt for paints with good mildew resistance to ensure longevity and maintain a fresh look.
Elevating the Essentials: The DIY Mirror Frame
Another significant upgrade during this initial phase involved the existing builder-grade mirror. You know the type – large, frameless, and often glued directly to the wall, adding absolutely no character to the space. Instead of replacing it entirely (which can be costly and labor-intensive), I opted for a simple, budget-friendly DIY framing project.
I used pre-primed, 1×4-inch MDF boards to create a custom frame around the mirror. MDF (medium-density fiberboard) is an excellent material for this kind of project because it’s smooth, stable, and takes paint beautifully. Since it was pre-primed, it saved me an extra step! After cutting the boards to size and assembling the frame (usually with mitered corners for a seamless look), I painted them with a high-quality latex paint that I had carefully matched to our existing trim work. This small detail creates a cohesive and polished look, making the mirror appear built-in and far more expensive than it actually was.
If you’re interested in the full, detailed tutorial for this exact project, you’re in luck! I’ve documented the process extensively when I tackled our master bathroom mirror. You can check out my Master Bathroom Mirror framing tutorial here. It truly is a cheap, easy, and incredibly effective way to fancy up those otherwise bland builder-grade mirrors, instantly elevating the entire bathroom’s aesthetic. It’s a beginner-friendly project that yields professional-looking results and adds significant value and style without a hefty price tag.
More Than Just a Mirror: The Impact of DIY
The combination of fresh paint and the custom-framed mirror has already made an incredible impact. The bathroom feels cleaner, brighter, and far more intentional. It no longer looks like an afterthought but rather a space that has been carefully considered. These two projects, while seemingly simple, have laid a fantastic foundation for the rest of the makeover. They prove that you don’t need a massive budget or a complete gut renovation to make a significant positive change in your home.
DIY projects like framing a mirror are empowering. They allow you to personalize your home, save money, and gain new skills. The sense of accomplishment that comes from transforming a space with your own hands is truly rewarding. Plus, a custom touch like this instantly makes a guest bathroom feel more luxurious and welcoming, signaling to your visitors that you care about their comfort.
Looking Ahead: What’s Next for the Guest Bathroom
This is just the beginning of our guest bathroom’s transformation story! I’m so incredibly motivated by the progress we’ve made so far, and I can’t wait to continue adding more layers of style and functionality to this space. Future plans include exploring new lighting fixtures to further enhance brightness and ambiance, sourcing creative storage solutions to maximize the small footprint, and selecting decor and accessories that add personality and warmth. Think plush towels, a stylish shower curtain, perhaps some natural elements like a plant, and a few curated art pieces to complete the inviting atmosphere.
We’ll also be considering upgrades to smaller fixtures, like the faucet or towel bars, to tie the whole look together. The idea is to create a cohesive and harmonious design that feels thoughtful and comforting for anyone using the space. I’ll be sure to share all the updates as I get to them, so stay tuned for the next phases of this exciting renovation!
Tips for Your Own Small Bathroom Makeover
Inspired to tackle your own small or guest bathroom? Here are a few additional tips to help you achieve a stunning transformation:
- Maximize Lighting: If you lack natural light, invest in good artificial lighting. Consider a vanity light fixture that provides ample, even illumination, and perhaps add recessed lighting or even a small decorative lamp on a shelf for ambiance.
- Strategic Storage: Small bathrooms demand clever storage. Think vertical – floating shelves, over-the-toilet storage units, or a slim rolling cart. Built-in niches are fantastic if you’re undertaking a more extensive renovation.
- Choose Reflective Surfaces: Beyond mirrors, consider glossy tiles, polished chrome fixtures, or even a glass shower door (if applicable) to help bounce light around the room and make it feel larger.
- Declutter Ruthlessly: A small space quickly feels cramped with clutter. Keep only essential items in the guest bathroom and ensure everything has a designated place.
- Add Personal Touches: Even a functional space can be beautiful. Incorporate soft towels, a pleasant scent diffuser, a small piece of art, or a tiny plant to make the room feel more personal and welcoming.
- Mind the Scale: When choosing fixtures, furniture, or decor, pay attention to scale. Oversized items can overwhelm a small bathroom. Opt for sleek, space-saving designs.
- Consider a Pedestal Sink: If space is extremely tight and you don’t need extensive vanity storage, a pedestal sink can free up valuable floor space, making the room feel more open.
Embarking on a home improvement project, especially one that directly impacts the comfort of your guests, is incredibly rewarding. With a bit of planning and some DIY spirit, you can turn even the most neglected space into a beautiful and functional oasis.
Thanks so much for following along on this journey! I’m truly excited about the potential of this little room and grateful for the motivation to make it a truly welcoming guest bathroom.
Warmly,
Ashley