
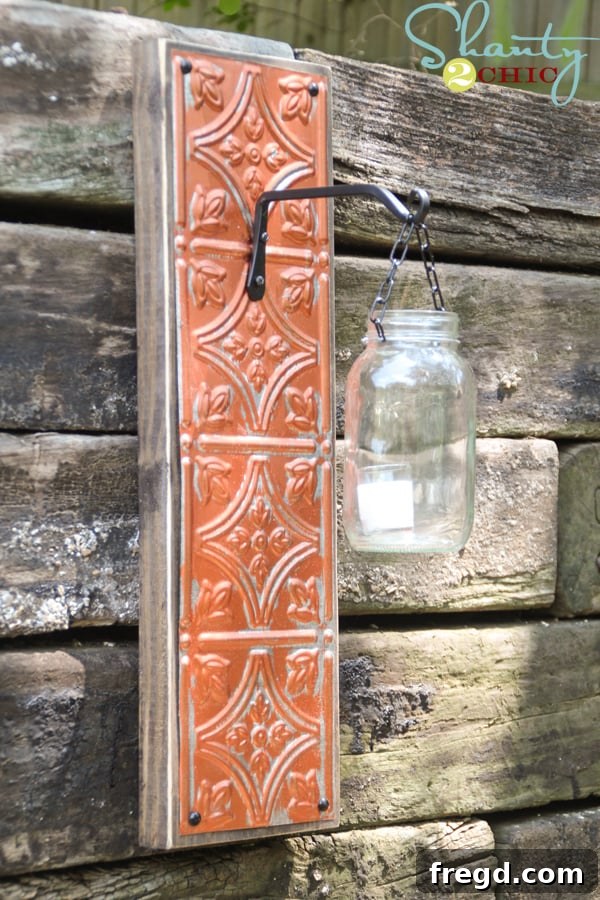
Hey there, fellow DIY enthusiasts! We’re absolutely thrilled to finally unveil a project that has generated so much buzz on our Instagram lately. Get ready to transform your living space with this incredibly stylish, yet surprisingly simple, DIY Wall Sconce Lantern. This isn’t just any wall decor; it’s a statement piece that blends industrial charm with a touch of rustic elegance, all while being incredibly budget-friendly.
We’ve been eager to share the full tutorial for this captivating Wall Sconce Lantern. What truly captivated us about this piece is its distinctive industrial aesthetic, beautifully complemented by the rich, warm copper finish on the metal. It’s a design that feels both modern and timeless, capable of elevating any room. But here’s the best part, the secret sauce to this project: you can craft one of these stunning sconces for under $15! And if you’re looking to make a bigger impact, the supplies you gather are enough to create not just one, but three gorgeous sconces. Imagine creating a cohesive look across your home, or gifting these handmade beauties to friends and family!
So, if you’re ready to dive into a creative venture that promises significant impact without breaking the bank, follow along. We’re about to show you exactly how to bring this industrial-chic masterpiece to life!
Craft Your Own Industrial Chic Wall Sconce Lantern for Under $15!
Are you searching for unique home decor ideas that reflect your personal style without costing a fortune? Look no further! This comprehensive guide will walk you through creating a stunning DIY industrial wall sconce lantern that perfectly combines affordability with high-end aesthetic appeal. With its captivating copper penny finish and sturdy wooden base, this wall sconce is more than just a light fixture; it’s a piece of art that promises to enhance both indoor and outdoor spaces. Whether you’re aiming for a farmhouse look, a modern industrial vibe, or just a touch of rustic charm, this project is designed for you.
Why You’ll Love This DIY Wall Sconce Project
This project stands out for several compelling reasons. Firstly, its remarkable affordability. We’re talking about a significant decor upgrade for less than the cost of a fancy coffee! Secondly, the versatility of its design allows it to seamlessly integrate into various decor styles. The marriage of warm wood and cool metal, accented by a striking copper finish, creates a focal point that draws the eye. Thirdly, the satisfaction of creating something beautiful with your own hands is truly unparalleled. Plus, the efficiency of the material usage means you can easily create a set of three sconces, perfect for a coordinated display or thoughtful handmade gifts. Let’s gather our materials and tools, and transform some simple supplies into dazzling home accents.
Materials You’ll Need for Your Industrial Wall Sconce
The beauty of this project lies in its simplicity and the readily available materials. Here’s what you’ll need to gather:
- One 2×6 Pine Board: An 8-foot length is ideal, providing enough material for multiple sconces. Pine is budget-friendly and easy to work with.
- Brushed Aluminum Tile: A 24.5-inch sheet of brushed aluminum tile. This lightweight and versatile material is often used for DIY backsplashes and is incredibly easy to cut. We sourced ours from Lowe’s, but similar options are available online.
- Metallic Accents Paint in Copper Penny: This specialty paint will give your aluminum tile its distinctive copper glow. Its metallic finish truly captures that industrial charm.
- Dark Walnut Wood Stain: To achieve a rich, deep finish on your wood base, enhancing its rustic appeal.
- Spar Varnish (Optional, for outdoor use): Essential for protecting your wooden sconce from the elements if you plan to display it outdoors.
- Decorative Furniture Nails: These nails not only secure your metal tile but also add an authentic, rugged industrial detail.
- Plant Hanger Hook: A sturdy hook to hold your mason jar lantern or other decorative elements.
Essential Tools for Your Sconce Project
You won’t need an elaborate workshop for this DIY! Most of these tools are standard for any home improvement enthusiast:
- Measuring Tape and Pencil
- Saw (Miter saw or circular saw recommended for precise wood cuts)
- Heavy-duty Scissors or Tin Snips (for cutting aluminum tile)
- Foam Brushes (for paint and stain application)
- Clean Cloths (for wiping off excess stain)
- Hammer
- Drill with small drill bit (for pre-drilling the hook hole)
- Sander or Sanding Block (with fine-grit sandpaper for distressing)
- Safety Goggles and Gloves (always prioritize safety!)
Step-by-Step Guide: Crafting Your Industrial Wall Sconce Lantern
Step 1: Prepare Your Wood Base
Our project begins with the foundation: the wooden backer for your sconce. Start with your 8-foot 2×6 board. Using a measuring tape and pencil, mark a precise 24-inch length. With safety goggles on, carefully cut the board at your mark. A miter saw will provide the cleanest, straightest cut, but a circular saw can also be used effectively. Remember, each 8-foot board can yield several 24-inch pieces, allowing you to create multiple sconces from a single purchase. Once cut, set this piece aside; we’ll return to it for staining later. Ensuring your cut is clean and square will make the rest of the assembly process much smoother, providing a stable and attractive base for your industrial wall sconce.
Step 2: Customizing Your Metal Tile
Next up is the star of our industrial look: the brushed aluminum tile. This particular tile is fantastic because it’s incredibly versatile and, surprisingly, can be cut with heavy-duty scissors or tin snips, making it a dream for DIYers. You’ll need a 6-inch piece for each sconce. Measure and cut a 6-inch section from the end of your 24.5-inch tile sheet. Remember, this sheet provides enough material for three sconces, so carefully save the remaining larger piece for your subsequent projects!
After cutting your 6-inch section, you’ll notice that one end might have a finished edge from the original sheet, while the cut end will be raw. To ensure a uniform and polished look, carefully trim the factory edge off one end of your 6-inch tile piece. This step ensures that both ends of your metal tile match, contributing to a cleaner, more professional finish for your industrial wall sconce.
Now your metal tile piece should have perfectly matching edges, ready for its copper transformation!
Step 3: Infuse with Copper Charm
Time to add that stunning metallic accent! Using a foam brush, lightly coat the aluminum tile with Metallic Accents paint in the gorgeous Copper Penny shade. The key here is a light, almost dry-brush technique. We want the underlying brushed aluminum to peek through, creating a distressed, aged copper effect that truly enhances the industrial appeal of the wall sconce. This paint is incredibly versatile and comes in a wide range of colors, so feel free to experiment with other metallic hues if copper isn’t quite your style. Apply just one thin coat to achieve this subtle yet striking look. Once applied, set your painted tile aside in a well-ventilated area to dry completely. Patience during drying ensures a durable and beautiful finish.
Step 4: Stain for Rustic Elegance
While your copper-painted tile is drying, let’s turn our attention back to the wooden board. We chose Dark Walnut Stain for its rich, deep hue that perfectly complements the copper and enhances the rustic industrial feel. Using another clean foam brush, apply a single, even coat of stain to all surfaces of your wood piece. Allow the stain to penetrate the wood for approximately 5 minutes. This brief waiting period allows the wood to absorb the color. After 5 minutes, use a clean, lint-free cloth to wipe off any excess stain. This technique helps to even out the color and prevents a blotchy appearance, resulting in a beautifully consistent finish. If you desire a deeper, darker tone, you can apply a second coat after the first has thoroughly dried.
Step 5: Protect Your Investment (Outdoor Option)
If your plan is to showcase your magnificent DIY wall sconce outdoors – perhaps on a patio, porch, or in your garden – then this step is crucial for its longevity. Apply two coats of Spar Varnish to the stained wood. Spar Varnish is specifically designed to provide superior protection against harsh weather elements, UV rays, and moisture, preventing the wood from fading, cracking, or deteriorating. Ensure each coat dries completely according to the manufacturer’s instructions before applying the next. This protective layer will ensure your industrial outdoor lantern stands the test of time, maintaining its beauty and structural integrity for years to come.
Step 6: Assemble Your Sconce
Once both your painted metal tile and stained wood base are completely dry, it’s time to bring them together. Carefully position your copper-finished aluminum tile onto the stained wood board, centering it both horizontally and vertically. We opted for decorative furniture nails, which we found at Lowe’s, as they not only securely fasten the tile but also add an authentic, rugged industrial touch to the design. Hammer one nail into each corner of the metal tile, ensuring it goes firmly into the wood. The exposed nail heads contribute significantly to the overall aesthetic, emphasizing the handmade, industrial charm of your wall sconce. Take your time with this step to ensure the tile is straight and securely attached.
Step 7: Achieve That Distressed Look
To further enhance the rustic, aged appeal of your wall sconce, finish by lightly sanding down the edges of the wood board. This distressing technique creates a beautifully worn look, mimicking years of natural aging. Don’t be afraid if your sander, like our favorite Corner Cat, occasionally touches the edge of the metal tile; this only adds to the authentically distressed appearance, blending the materials seamlessly and contributing to the unique character of your industrial wall sconce. Focus on the corners and edges to create soft, rounded, and subtly aged areas that give your piece a story. This step truly elevates the handmade charm of the project.
Step 8: Add the Lantern Hanger
The final functional element of our wall sconce is the plant hanger, which will serve as the hook for our lantern. We purchased a simple, sturdy plant hanger from Lowe’s, but similar hooks are widely available. Determine the desired placement for your hanger, typically centered near the top of the wood board, above the metal tile. Use a drill to pre-drill a small pilot hole where you intend to mount the hanger. This prevents the wood from splitting and makes screwing in the hanger much easier. Once the hole is ready, simply attach the plant hanger securely. This hook is what transforms our decorative piece into a functional Wall Sconce Lantern, ready to hold your chosen light source or embellishment.
And just like that, your beautifully crafted industrial wall sconce is complete and ready to hold a charming Mason Jar Lantern, or any other decorative element you envision!
The Grand Finale: Your Mason Jar Lantern!
If you’re as captivated by the idea of a Mason Jar Lantern as we are, and you missed the previous tutorial for crafting this adorable light source, don’t worry! You can find the complete step-by-step guide to make your own budget-friendly Mason Jar Lantern HERE. Pairing these two DIYs creates an absolutely enchanting lighting solution that’s perfect for any setting.
Versatile Styling Ideas for Your New Wall Sconce
One of the many joys of this industrial wall sconce is its incredible versatility. It’s designed to shine both indoors and out, adapting effortlessly to different environments and decor schemes. Here are a few ideas to inspire you:
- Indoor Ambiance: Hang a pair in your entryway to create a welcoming glow, flank a fireplace in your living room for a touch of rustic sophistication, or add one to your bedroom for cozy, indirect lighting. Instead of a mason jar, you could hang a small decorative plant, a mini birdcage, or even a small frame with a cherished photo.
- Outdoor Charm: If you’ve applied the Spar Varnish, these sconces are ideal for adding character to your outdoor spaces. Imagine them lining a covered patio, illuminating a front porch, or bringing warmth to a garden shed. The mason jar lantern, especially with battery-operated fairy lights or LED candles, is perfect for outdoor use, providing a soft, ambient light without the fuss of open flames.
- Seasonal Decor: Easily switch out what you hang on the hook to match the season or holiday. Think mini pumpkins for fall, evergreen sprigs for winter, or vibrant flowers for spring.
- Functional Art: Beyond lighting, this sconce can serve as a stylish holder for small towels in a bathroom, keys in an entryway, or even lightweight kitchen utensils if placed strategically.
Bring Industrial Charm Home Today!
There you have it – a wonderfully easy, quick, and incredibly rewarding DIY project that yields stunning results. This industrial wall sconce lantern, with its captivating copper finish and versatile design, is a testament to how simple materials can be transformed into beautiful, functional decor. Whether you choose to display it indoors or out, as a standalone piece or paired with a mason jar lantern, its charm is undeniable.
We absolutely love how these budget-friendly sconces add character and warmth to any space. If you’re inspired by this Industrial Wall Sconce Lantern tutorial, we would be incredibly grateful for your shares and pins! Your support helps us continue to bring you more exciting DIY home decor ideas.
Thank you for joining us on this creative journey. We can’t wait to see your own unique creations!
Warmly,
Ashley