
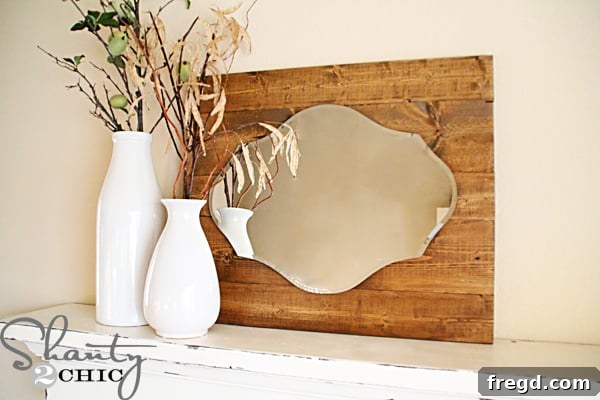
Happy Friday, DIY enthusiasts! Today, we’re embarking on a creative journey to construct a truly unique and charming piece for your home decor: a rustic pallet mirror. This project isn’t just about creating a functional item; it’s about adding warmth, character, and a touch of farmhouse elegance to any space. Imagine this beautiful, handcrafted mirror adorning your wall, perhaps resting perfectly on a DIY Floating Ledge, instantly elevating the room’s aesthetic. The best part? This project is incredibly beginner-friendly, surprisingly quick to complete, and remarkably budget-conscious, costing around just $25 for all materials!
If you’ve ever dreamed of infusing your living space with a personalized, handmade touch without breaking the bank or spending weeks on a project, then this DIY pallet mirror tutorial is for you. We’ll guide you through each simple step, ensuring that even those new to woodworking can achieve stunning results. Get ready to transform ordinary materials into an extraordinary focal point that reflects your style and creativity.
Why Choose a DIY Pallet Mirror?
In a world of mass-produced decor, a DIY pallet mirror stands out as a statement of authenticity and personal flair. Here are a few compelling reasons why this project is a must-try:
- Budget-Friendly: Pallet wood is often free or very inexpensive, and mirrors can be found at great prices at discount stores or even thrift shops. This project proves that stunning home decor doesn’t have to come with a hefty price tag.
- Unique Aesthetic: The inherent character of pallet wood, with its natural imperfections and weathered charm, brings an unparalleled rustic, farmhouse, or industrial vibe to your home. No two pallet mirrors will ever be exactly alike, guaranteeing a truly one-of-a-kind piece.
- Simple & Rewarding: This project requires minimal tools and basic woodworking skills, making it an excellent entry point for beginners. The satisfaction of creating something beautiful and functional with your own hands is incredibly rewarding.
- Customizable: While we’ll be using a specific mirror and stain, the beauty of DIY lies in customization. You can easily adapt the dimensions, choose different stains or paints, or even add embellishments to match your existing decor perfectly.
- Sustainable: Repurposing pallet wood is an eco-conscious choice, giving new life to materials that might otherwise be discarded.
Ready to add this charming piece to your home? Let’s dive into the simple steps to create your very own budget-friendly, rustic mirror!
Gather Your Materials and Tools
Before we begin, it’s essential to gather all the necessary items to ensure a smooth and efficient crafting process. Many of these tools and materials might already be in your garage or easily sourced from local hardware stores or online retailers.
Materials You’ll Need:
- Mirror: We started with a charming mirror found at Target for about $19. Look for one with an interesting shape that catches your eye! Any shape will work, but be prepared to adjust your wood cut measurements accordingly.
- Wood for Pallet Frame: For our project, we used wood scraps, specifically 3 pieces of 1x4s and 2 pieces of 1x6s, all cut to 25.5 inches in length.
- Sourcing Pallet Wood: If you don’t have scraps, old pallets are an excellent free resource! Ensure pallets are marked “HT” (heat-treated) and not “MB” (methyl bromide treated) for safety. Carefully dismantle them to get usable planks. Alternatively, you can buy new common boards from a lumber yard for a cleaner look.
- Adjusting Dimensions: The number and dimensions of your wood pieces will depend on the size and shape of your chosen mirror. Measure your mirror and plan your frame layout to ensure it provides a beautiful border.
- Wood Stain: Our choice was “Early American” stain, which provides a rich, classic, rustic finish. You can experiment with different shades like dark walnut, weathered gray, or even a light natural finish to match your specific decor style.
- Pocket Hole Screws: 1 1/4 inch pocket hole screws are ideal for securely joining the frame pieces.
- Small Screw: A 3/4 inch screw will be used for hanging the mirror onto the pallet frame.
Tools You’ll Need:
- Saw: A miter saw makes quick and precise cuts, but a simple hand saw is perfectly suitable for smaller jobs like cutting these pallet pieces. Always ensure your saw blades are sharp for clean cuts and remember safety precautions.
- Kreg Jig: This fantastic tool simplifies joining wood with strong, concealed pocket hole joints. It’s an investment for any DIY enthusiast and will become your “good ol’ friend” for many projects.
- Cordless Drill: Essential for drilling pocket holes and driving screws quickly and efficiently.
- Measuring Tape: For accurate measurements of your wood pieces and mirror.
- Pencil: For marking cut lines and screw placement.
- Safety Glasses: Crucial for protecting your eyes from wood dust and flying debris during cutting and drilling.
- Gloves: Recommended for protecting your hands during staining.
- Rags or Brushes: For applying wood stain.
Step-by-Step Guide to Crafting Your Pallet Mirror
Step 1: Sourcing Your Mirror and Planning the Frame
The first and perhaps most exciting step is selecting your mirror. We found a lovely round mirror at Target, which served as the perfect base. When choosing a mirror, consider its shape, size, and any unique features it might have, like a specific hanging mechanism. While a round mirror offers a classic appeal, a rectangular, oval, or even an irregular shaped mirror can work beautifully. The key is to find something that inspires you and fits your vision.
Once you have your mirror, lay it out on a flat surface. This will help you visualize how the pallet wood frame will surround it. Our mirror looked elegant on its own, but we envisioned it mounted on a rich, stained pallet frame to add a touch of rustic charm and substance.
Step 2: Preparing and Cutting Your Pallet Wood
This is where your vision starts to take physical form. We were lucky to have the necessary wood scraps readily available in our garage, which is a common scenario for many DIYers! If you’re using reclaimed pallet wood, ensure it’s clean and free of excessive splinters or nails. Give it a light sanding if needed.
For our specific mirror, we cut:
- Three 1×4 boards at 25.5 inches each.
- Two 1×6 boards at 25.5 inches each.
These dimensions were chosen to create a pleasing border around our mirror. The combination of different board widths (1x4s and 1x6s) adds visual interest and mimics the look of authentic pallet construction. Remember, you’ll need to measure your own mirror carefully and adjust these cutting dimensions to fit your specific mirror’s size and the desired width of your frame.
Pro Tip: When making your cuts, always measure twice and cut once. Use a straight edge and a pencil to mark your lines clearly. For a truly rustic look, don’t worry too much about perfectly smooth cuts, but strive for consistent lengths for a stable frame.
Step 3: Assembling the Pallet Frame with a Kreg Jig
Now it’s time to join your wood pieces. This is where our “good ol’ friend,” the Kreg Jig, comes into play. If you’re unfamiliar, a Kreg Jig is a tool that allows you to drill angled “pocket holes” into one piece of wood, which then connects to another piece using special screws, creating incredibly strong and concealed joints. It’s perfect for projects like this where you want a clean, screw-free look from the front.
We drilled pocket holes into four of our five boards. The fifth board will be the outermost plank and won’t require pocket holes on one edge if it’s the end piece. Position your Kreg Jig according to the thickness of your wood (typically 3/4 inch for 1x boards). Drill two pocket holes on one end of each of the four boards. For stronger joints and depending on the width of your boards, you might choose to drill a third hole in the center of wider planks.
Once your pocket holes are drilled, it’s time to assemble the frame. Arrange your five boards side-by-side on a flat surface in the desired order. Use your cordless drill to drive 1 1/4 inch pocket hole screws through the pocket holes and into the adjacent board. Work carefully, ensuring the boards are flush and aligned as you connect them. This will form a solid, uniform pallet panel.
Step 4: Staining the Wood for a Rustic Finish
With the frame assembled, it’s time to add character with stain. We applied one beautiful coat of our favorite “Early American” stain. This particular shade provides a warm, rich, and slightly aged look that perfectly complements the rustic aesthetic of pallet wood. Before applying, ensure your wood surface is clean and free of dust. Use a rag or a foam brush to apply the stain evenly, wiping off any excess after a few minutes to achieve your desired depth of color.
Let the stain dry for approximately one hour, or as recommended on the product label. Drying times can vary depending on humidity and the number of coats. If you desire a deeper, darker finish, you can apply a second coat after the first has thoroughly dried. For a truly unique look, consider distressing the wood before or after staining, or even trying a dry-brush paint technique in a complementary color.
Step 5: Attaching the Mirror to the Pallet Frame
The final step brings your mirror and pallet frame together. For our mirror, we noticed a convenient metal piece in the center on the back designed for hanging. This made attaching it incredibly simple. If your mirror has a similar feature, use it!
Carefully center your mirror on the stained pallet frame. Once you’re happy with its placement, use a pencil to mark the exact spot on the pallet where the mirror’s hanging mechanism will rest. It’s crucial to get this right to ensure your mirror hangs straight and securely.
With the spot marked, take your cordless drill and a 3/4 inch screw. Drill the screw into the marked spot on the pallet frame, leaving a small portion of the screw head exposed. This exposed head will act as the hook for your mirror’s hanging mechanism. Gently slide the mirror’s metal piece over the screw head, ensuring it’s snug and secure.
Alternative Attachment Methods: If your mirror doesn’t have a central hanging piece, you have other options:
- Mirror Clips: These are small clips that screw into the wood frame and hold the edges of the mirror in place.
- Heavy-Duty Adhesive: For a permanent bond, you can use a strong construction adhesive specifically designed for mirrors. Apply a thin bead to the back of the mirror and press it firmly onto the pallet. Allow ample drying time.
- Picture Hanging Wire: Attach D-rings to the back of the mirror frame itself (if it has one) and string picture wire between them, then hang the entire mirror/pallet assembly from a robust hook on your wall.
Your Rustic Mirror is Complete!
That’s it! You’ve successfully created a stunning, rustic pallet mirror. For real! How incredibly easy was that? This project is so straightforward, you could realistically finish it during nap time, leaving you with a beautiful piece of decor and plenty of time to enjoy your weekend.
Styling Your New Pallet Mirror
Now that your DIY pallet mirror is complete, it’s time to integrate it into your home decor. Its versatile rustic charm makes it suitable for a variety of spaces and styles:
- Entryway: Hang it above a console table or a floating shelf for a welcoming touch, perfect for last-minute checks before heading out.
- Living Room: Place it over a fireplace mantel or a sofa to create a focal point, reflecting light and making the room feel larger and brighter.
- Bedroom: Use it as a decorative accent above a dresser, adding warmth and personality.
- Bathroom: A smaller version can serve as a charming vanity mirror, especially in a guest bathroom or powder room.
- Gallery Wall: Incorporate it into a gallery wall arrangement with other framed art and photos for an eclectic and personalized display.
Its natural wood finish complements farmhouse, rustic, industrial, bohemian, and even modern minimalist aesthetics. You can further enhance its appeal by placing small plants, candles, or other decorative items on the floating ledge beneath it, creating a curated vignette.
If you loved creating your DIY Pallet Mirror, we would LOVE to see your creations! Share your finished projects and tag us on social media. And if you found this tutorial helpful, we would truly appreciate your pins to help others discover this fun and easy project! Thanks so much for stopping by, and have a GREAT weekend! Whoop!!
~Ashley