
Important Update: Due to popular demand, we’ve expanded our offering! Many of you requested the complete alphabet, and we’re thrilled to announce it’s now available. You can find the Free Printable Whole Alphabet Banner HERE!
Craft a Heartfelt “Thankful” Banner: A Free & Easy DIY Project for Your Home
Hello, crafting enthusiasts and DIY lovers!
We’re so grateful for the overwhelming response and kind words regarding our recent DIY canned food organizers. Your sweet comments and shares truly inspire us to keep bringing you more creative and practical projects for your home.
Today, we’re taking a delightful pause from organizational projects to dive into something truly special and incredibly simple: a beautiful, FREE printable “Thankful” banner. This heartwarming decoration is perfect for Thanksgiving, adding a touch of rustic elegance to your home, and reminding everyone of the season’s true spirit. What’s even better? We’ve done all the design work for you, making this a project you can complete in minutes, not hours! Get ready to transform your space with a meaningful, handmade touch.
Embracing Gratitude: The Inspiration Behind Our Thanksgiving Banner
Thanksgiving holds a very special place in our hearts. Beyond the delicious feasts and family gatherings, it’s a profound time to reflect on and express gratitude for all the blessings in our lives. In our homes, we consistently strive to instill in our children, and indeed remind ourselves, the importance of being THANKFUL for every big and small moment. This ethos was the driving force behind creating this charming banner. A visual reminder strategically placed in your dining room or entryway can subtly shift the atmosphere, fostering a deeper sense of appreciation among family and guests.
Our “Thankful” banner isn’t just a decoration; it’s a statement, a gentle nudge towards mindfulness and gratitude that resonates deeply during the holiday season. Its neutral color palette and timeless design ensure it will complement virtually any existing decor, making it a versatile addition to your festive setup. Whether your style is farmhouse chic, modern minimalist, or traditionally cozy, this banner will seamlessly blend in, enhancing your space with its heartfelt message. It serves as a beautiful focal point, inviting conversations about what truly matters.
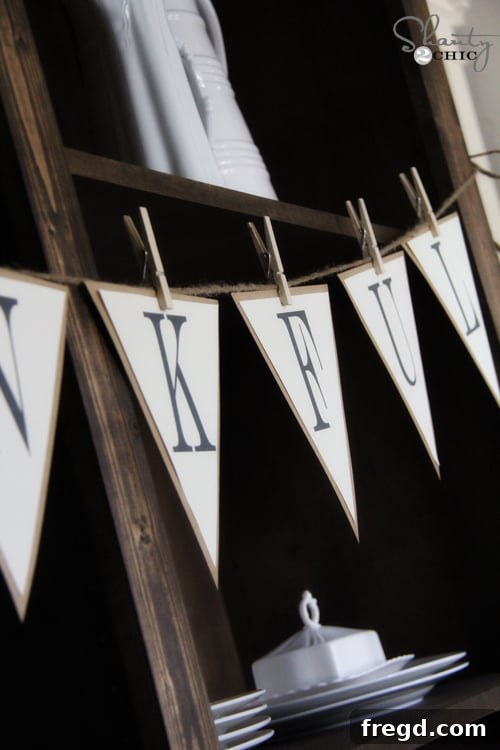
Here’s a sneak peek at how beautifully it turned out in our dining room, showcasing its rustic charm and elegant simplicity:
Isn’t it wonderfully charming? Its understated elegance makes it a perfect fit for any room, ready to uplift your spirits and celebrate the season of thanks with style and sincerity.
Your Easy Guide to Crafting the “Thankful” Banner
This project is designed for simplicity and speed, proving that you don’t need to be a seasoned crafter to create stunning, personalized decor. With our free printables and these straightforward steps, you’ll have a beautiful, meaningful banner ready to display in no time. Follow along to bring your own “Thankful” banner to life:
Step 1: Download and Print Your Free Letters
The very first step is to get your hands on our beautifully designed, free printable letters. We’ve formatted each letter of “THANKFUL” individually for easy printing, ensuring crisp, clear results. All you need to do is click on each corresponding link below, and then select ‘print’ directly from your browser’s menu bar. For optimal results, ensure your printer settings are on high quality.
When it comes to paper, standard letter-sized paper (8.5″ x 11″) is all you need. For our banner, we opted for an off-white paper. This choice lends a softer, more vintage, and less stark look compared to bright white, which we felt perfectly complemented the rustic aesthetic of our dining room. However, feel free to use any paper color or texture that resonates with your personal style and home decor. Cardstock (65-80 lb) is also an excellent option if you desire a more durable banner that can withstand years of festive use, preventing curling and making it easier to handle.
Here are the direct links to each letter:
- Print Banner Letter T
- Print Banner Letter H
- Print Banner Letter A
- Print Banner Letter N
- Print Banner Letter K
- Print Banner Letter F
- Print Banner Letter U
- Print Banner Letter L
Once printed, your individual letters should look something like this, ready for the next step:
Step 2: Carefully Cut Out Each Letter
With your letters printed, the next crucial step is to carefully cut them out. Using a good pair of sharp scissors, simply follow the outline of each letter. Precision here will contribute to a more polished final product, but don’t fret over minor imperfections – a handmade touch often adds to the charm! For those who prefer crisp, straight lines and a professional finish, a craft knife and cutting mat can be an excellent alternative, offering unparalleled accuracy, especially around the internal angles of letters like ‘A’ or ‘K’. Take your time with this step, and you’ll be delighted with the clean, individual letter pennants that form the core of your banner.
Step 3: Adhere Letters to Your Chosen Backing
Now it’s time to give your letters some definition and a sturdy base. We used double-sided tape for its ease of use and clean finish, minimizing mess and drying time. However, any reliable adhesive you have on hand will work perfectly. A glue stick provides a smooth, wrinkle-free bond, ideal for lighter papers, while a craft glue offers a stronger hold for heavier backing materials. Ensure an even application of adhesive to prevent any edges from lifting, creating a neat and secure attachment.
For our banner, we chose brown kraft paper as the backing material. You can readily find this versatile paper at any craft store, such as Hobby Lobby, or even online. The earthy, natural tone of the kraft paper beautifully contrasts with the off-white letters, enhancing the rustic appeal we were aiming for and adding a charming farmhouse vibe. We utilized 12×12 inch sheets, and conveniently, two letters fit perfectly onto each sheet with ample space for trimming. This means you’ll only need four sheets of kraft paper for the entire “THANKFUL” banner, making it an economical choice. If kraft paper isn’t your preference, consider other options like burlap for an even more rustic feel, patterned scrapbook paper for a touch of whimsy, or a solid colored cardstock that complements your holiday palette.
Step 4: Trim for the Perfect Border
Once your letters are securely adhered to the kraft paper, the final cutting step is to create a lovely border around each pennant. We simply “eyeballed” it, cutting about half an inch larger than the printed letters. This method creates a charmingly organic, handmade look that adds to the banner’s character and rustic appeal. If you prefer a more uniform and precise border, feel free to use a ruler and pencil to mark your cut lines before cutting. You can also experiment with different border shapes – a classic straight edge for modern simplicity, a scalloped border for a softer touch, or even a V-notch at the bottom for a traditional pennant flag style. This is where you can truly personalize the banner to your taste, making each pennant unique.
Step 5: Assemble and Display Your Heartfelt Banner
The grand finale! Your beautiful “Thankful” banner is almost ready for its debut. To hang it, we opted for rustic twine, which perfectly complements the kraft paper and off-white letters, enhancing the overall farmhouse aesthetic. We strung the twine across our newly crafted hutch, and then used small wooden clothespins to attach each letter pennant. Clothespins are fantastic because they allow for easy adjustment of spacing between letters and make it simple to reuse the banner year after year, or even change the message by swapping out letters!
Consider various display locations to maximize its impact: a prominent spot over your dining room table for family meals, adorning your fireplace mantel for a cozy feel, greeting guests in your entryway, or even as a focal point in your kitchen. If twine isn’t your style, consider a festive ribbon in a complementary color, or even clear fishing line for a nearly invisible, floating effect. For an alternative to clothespins, you could punch small holes in the top corners of each pennant and thread the twine directly through, tying small knots to keep them in place. This entire assembly process is so quick, truly making it a 10-minute project once your letters are printed and cut! Woohoo! You’ll be amazed at how quickly you can create such a significant piece of decor.
Here are some additional views of the completed banner, showcasing its versatility and charm in different settings:
Personalize Your Banner: Beyond Thanksgiving!
While this “Thankful” banner is perfectly tailored for Thanksgiving, the true beauty of this DIY project lies in its incredible adaptability. Using the same simple techniques, you can easily create custom banners for any occasion, season, or message you wish to convey. Imagine a “Merry Christmas” banner for the festive season, “Happy Birthday” for joyful celebrations, “Welcome Home” for a heartwarming surprise, or even custom names for nursery decor. With our newly released complete alphabet banner printables, the possibilities are truly endless, allowing your creativity to flourish!
Don’t hesitate to infuse your own unique creativity into the process. Experiment with different paper types—think glitter cardstock for sparkle, vibrant patterned papers for a playful touch, or even textured art paper for added depth and sophistication. Consider adding embellishments like small dried leaves or berries for a Thanksgiving theme, or ribbons, bells, and pinecones for Christmas. You could also stamp or stencil additional designs onto your kraft paper backing before attaching the letters, or even layer different shapes of paper behind each letter for a dimensional effect. Let your imagination guide you to create a banner that truly reflects your unique style and the warm, welcoming spirit of your home.
Share Your Creations!
Thank you so much for stopping by and taking the time to explore this fun, free, and incredibly rewarding DIY project. We truly hope you love this “Thankful” banner as much as we do, and that it brings a warm, grateful ambiance to your home this holiday season, serving as a beautiful reminder of all your blessings.
If you decide to make your own banner, we would absolutely adore seeing your finished creations! Please consider sharing pictures of your unique “Thankful” banners on our Facebook page – it brings us so much joy to see how you personalize these projects and make them your own. Don’t forget to share this post with your friends and pin it to your favorite DIY or holiday decor boards on Pinterest to spread the gratitude and crafting inspiration!
Happy crafting and a very thankful season to you!
~ Whitney