
Unleash Creativity: A Vibrant DIY Picture Frame Makeover for Your Playroom
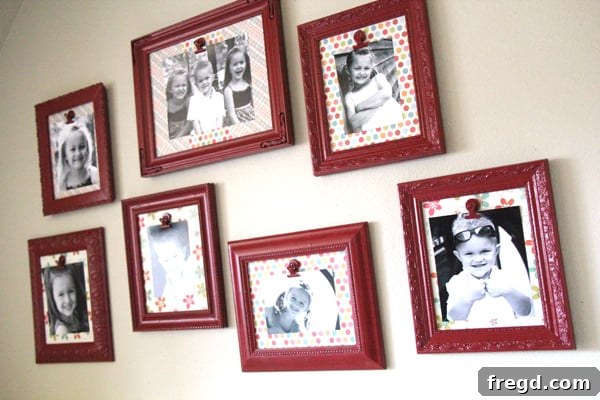
Transforming a home to welcome a new arrival often sparks a wave of creative projects. In my case, preparing for our newest family member meant engaging in a full-scale “musical rooms” shuffle, which included revamping the kids’ playroom. Over the past few weeks, my days have been filled with building, refreshing, and painting various areas to create the perfect spaces for my growing family. Among these endeavors, one of my favorite and most impactful projects involved giving our old frame wall a much-needed facelift. You might recall when I previously shared how I gave these frames a sophisticated touch using fabric mats. This time, however, we’re going for something bolder, brighter, and undeniably fun: a vibrant pop of color!
This project is all about breathing new life into forgotten frames, making them focal points of joy and creativity. It’s a wonderfully budget-friendly way to personalize any space, especially a high-traffic area like a playroom, ensuring it reflects the playful spirit of childhood. Whether you’re an experienced DIY enthusiast or just starting, this guide will walk you through transforming ordinary frames into extraordinary decorative pieces.
Why a DIY Frame Makeover? The Benefits of Bringing Color Home
Beyond the simple act of painting, a DIY frame makeover offers a multitude of benefits. Firstly, it’s incredibly budget-friendly. Instead of buying new, expensive frames, you can repurpose existing ones or find hidden gems at thrift stores for mere dollars. This approach also aligns perfectly with sustainable living, giving old items a second chance and reducing waste. Secondly, it allows for unparalleled personalization. You get to choose every color, every pattern, and every detail, ensuring the final product perfectly matches your home’s aesthetic or the specific theme of a room, like a vibrant playroom. Finally, there’s an immense sense of satisfaction that comes from creating something beautiful with your own hands. It’s a project that builds confidence, encourages creativity, and leaves you with unique decor that tells a story.
Gathering Your Materials: The Foundation of Your Colorful Frame Wall
For this exciting project, I utilized a mix of old frames already on my wall and incorporated a few new additions to create a diverse display. Finding frames doesn’t have to break the bank; I sourced all of mine from retailers like Walmart and Big Lots, each costing less than $3. The key is to look for a variety of styles, shapes, and sizes. This diversity will add visual interest and depth to your finished gallery wall. Don’t shy away from ornate or simple designs; they can all be unified with a fresh coat of paint. Thrift stores, garage sales, and even dollar stores are fantastic places to hunt for inexpensive frames.
Essential Materials & Tools List:
- Picture Frames: A mix of sizes and styles, new or old.
- Spray Paint: High-quality, all-in-one paint and primer. I chose Rust-Oleum Painter’s Touch in Cardinal Red for its vibrant hue.
- Scrapbook Paper: Various patterns and colors to match your decor. Look for packs with coordinating designs.
- Clippies / Mini Clothespins: Small clips to hold pictures.
- Elmer’s Spray Adhesive: For a strong, even bond between paper and glass.
- Hot Glue Gun & Glue Sticks: For attaching the clips.
- Craft Knife or Utility Knife: For precise cutting of scrapbook paper.
- Cutting Mat: Protects your work surface when using a craft knife.
- Protective Drop Cloths or Cardboard: For spray painting.
- Masking Tape (optional): For protecting specific areas during painting.
- Screwdriver or Pliers (if needed): For disassembling frames.
- Cleaning Supplies: Soap, water, and a cloth for frame preparation.
Begin your creative journey by selecting an assortment of frames. The more varied the collection, the more dynamic your finished wall display will be.
Step-by-Step Guide: Crafting Your Colorful Frames
Step 1: Preparing Your Frames for a Splash of Color
The first crucial step is to prepare your frames. Carefully remove the glass, the mat (if present), and any backing or other internal components. It’s essential to work slowly to avoid breaking the glass or damaging the frame itself. Once disassembled, give each frame a thorough cleaning to remove any dust, grime, or old paint flakes. A simple wipe-down with a damp cloth and mild soap is usually sufficient. Allow them to dry completely before proceeding. For older frames, a light sanding might be beneficial to create a smoother surface for the paint to adhere to, though a good quality paint-and-primer-in-one often negates this need.
Next, it’s time for the vibrant transformation! Take your frames to a well-ventilated area, preferably outdoors or in a garage with open doors. Lay them out on a protective drop cloth or old newspaper. I chose Rust-Oleum Painter’s Touch in Cardinal Red for a bold, playful statement. Apply one light, even coat of spray paint to all your frames. Hold the can approximately 8-12 inches away from the surface and use sweeping motions to prevent drips and ensure full coverage. The beauty of a single, solid coat is that it allows the unique textures and shapes of each frame to shine through, unified by color. While you’re at it, don’t forget the clippies! I purchased a couple of packs of these versatile little clips from Walmart, priced at an amazing $1.88 for four. They also received a matching coat of Cardinal Red spray paint, ensuring a cohesive look. Allow ample drying time between coats and before handling.
A fresh coat of vibrant Cardinal Red spray paint instantly rejuvenates the frames and clips, setting the stage for a lively display.
Step 2: Choosing and Preparing Your Colorful Backgrounds
For the backgrounds of my frames, I opted for scrapbook paper – a fantastic choice for several reasons. It’s incredibly inexpensive, comes in an astounding array of colors, patterns, and textures, and is readily available at most craft stores. The versatility of scrapbook paper allows you to easily match any decor theme. For my playroom, I wanted to echo the cheerful palette of the new play kitchen I built, so I found a beautiful coordinating book of scrapbook paper at Hobby Lobby during a 50% off sale. This was a perfect score, providing plenty of variety and extra sheets for future projects (or for the kids to use for their own creative endeavors!). When selecting your paper, consider the overall mood you want to create – bright and bold, soft and subtle, or a playful mix. Don’t be afraid to experiment with different patterns that complement each other.
Scrapbook paper offers endless possibilities for colorful and patterned backgrounds, making it an ideal choice for a playful frame collection.
Step 3: Precisely Cutting Your Scrapbook Paper Backgrounds
Once you’ve chosen your scrapbook paper, it’s time to cut it to size. The easiest way to get a perfect fit is to use the glass or the existing mat from each frame as a template. Place the glass or mat over your chosen scrapbook paper and carefully trace around it with a pencil. Then, using a sharp craft knife and a cutting mat, meticulously cut along your traced lines. Precision is key here to ensure a clean finish inside the frame. Take your time, making sure your cuts are straight and accurate. If you have a steady hand, you can skip tracing and simply use the glass as a guide while cutting. Remember to always cut away from your body for safety.
Utilizing a craft knife with precision ensures each piece of scrapbook paper fits perfectly as a vibrant frame background.
Step 4: Adhering the Paper to the Glass for a Seamless Finish
This step involves attaching your newly cut scrapbook paper to the glass. I used Elmer’s spray adhesive for this, as it provides a strong, even bond without wrinkles. Lay the glass on a protected surface, spray a thin, even coat of adhesive across one side of the glass, and then carefully position your cut scrapbook paper on top, smoothing it out from the center outwards to eliminate any air bubbles. A little tip I learned the hard way: it’s often much easier to attach the glass to the paper *first* and then cut around the glass. This method can save you some frustration and ensure an even cleaner edge. However, if you’ve already cut your paper, simply be extra diligent with your placement and smoothing. Oh, well!
Spray adhesive creates a smooth, bubble-free bond between the decorative paper and the frame glass.
Step 5: Reassembling Your Transformed Frames
Now, it’s time to bring all the elements back together. Carefully place the glass (with the adhered scrapbook paper facing outwards) back into your freshly painted frame. To ensure everything stays snug and tight, I like to reinsert the original mat and any cardboard backing that came with the frame behind the glass. This provides extra support and keeps the glass firmly in place, preventing any rattling or shifting. Secure the backing fasteners, ensuring they are all pushed down or turned to hold the contents securely within the frame. This step brings your frame one step closer to being a finished piece of art.
Reassembling the frame with the new paper background, ensuring all components are secure for a lasting display.
Step 6: Adding the Functional and Stylish Clips
The final touch for these frames, and one that adds both charm and functionality, is attaching the clips. Using a little hot glue, carefully secure your newly red-painted clips to the top edge of each frame. These small additions are incredibly cute and serve a practical purpose: they make changing out pictures incredibly easy. Instead of fumbling with frame backs, you can simply unclip and re-clip new photos, artwork, or notes whenever you desire. This is particularly brilliant for a playroom where kids’ artwork and family photos are constantly evolving. It encourages frequent updates, keeping the display fresh and engaging. Consider the placement of the clips carefully; centrally aligned or slightly off-center can create different aesthetic effects.
Hot glue makes quick work of attaching the vibrant clips, adding both charm and practicality for easy picture changes.
Step 7: Displaying Your Cherished Memories
With your frames complete, all that’s left is the most exciting part: attaching the perfect picture! Whether it’s a cherished family photograph, a masterpiece from your child’s latest art session, or an inspiring quote, the clips make it effortless to showcase. The beauty of this design is its flexibility; you can change the images as often as you like, keeping the display dynamic and reflective of current memories. Imagine a rotating gallery of your children’s drawings, holiday snapshots, or even seasonal themes. This feature alone makes the DIY effort incredibly rewarding, ensuring your frames are always fresh and relevant.
The final step: clipping your chosen photograph into the newly revitalized frame, instantly personalizing your decor.
The Finished Look: A Playroom Transformed
I managed to finish several of these vibrant frames for the playroom wall, and I still have more to go! With five energetic kiddos, you can imagine how many frames it takes to capture all their precious moments and creative expressions. But even with the current batch, the transformation is remarkable. The Cardinal Red frames, paired with the playful scrapbook paper backgrounds, instantly inject a burst of much-needed color and personality into the room. They serve as a cheerful backdrop for the children’s activities and a constant reminder of our family’s vibrant life.
Here are a few glimpses of the finished frames, brightening up our playroom:
A glimpse of the newly revamped frames adding a playful touch to the playroom wall, ready for cherished memories.
Another angle showcasing the harmonious blend of bold color and cheerful patterns within the revamped frame collection.
The vibrant frames inject life and character into the playroom, creating an inviting and inspiring atmosphere.
Each frame stands as a testament to the power of DIY, proving that beautiful decor doesn’t have to be expensive.
Tips for Creating Your Own Gallery Wall
- Plan Your Layout: Before hanging, arrange your frames on the floor to visualize your gallery wall. Experiment with different configurations until you find one that pleases your eye.
- Mix and Match: Don’t be afraid to combine different frame sizes, shapes, and orientations (portrait and landscape) for a dynamic look.
- Cohesive Color Palette: Even with varied frames, using a consistent color for the frames themselves (like our Cardinal Red) or a cohesive color palette for the scrapbook paper backgrounds will tie the whole display together.
- Incorporate Other Elements: Beyond pictures, consider clipping small pieces of your children’s artwork, postcards, or even small fabric swatches to add texture and interest.
- Eye Level Rule: Generally, the center of your gallery wall should be at eye level (around 57-60 inches from the floor) for comfortable viewing.
I hope you love these refreshed frames as much as I do! They truly add just the right amount of color and charm that the playroom needed, and the best part is that I revamped all of them for almost nothing. It’s a powerful reminder that with a little creativity and a few basic supplies, you can completely transform your living spaces without spending a fortune. This project is not just about decorating; it’s about creating an environment that sparks joy, encourages imagination, and celebrates the precious moments of family life.
A huge thank you to Tam at Sew Dang Cute Crafts for inviting us to share this project as a guest post! It’s always a pleasure to connect with fellow crafters and share the love for DIY. And a heartfelt congratulations to Tam on the arrival of her sew dang cute new baby! We wish her all the best during this special time.
Make sure you hop over to Sew Dang Cute Crafts to check out our post and discover a plethora of other inspiring craft ideas and creative projects. You won’t be disappointed!