
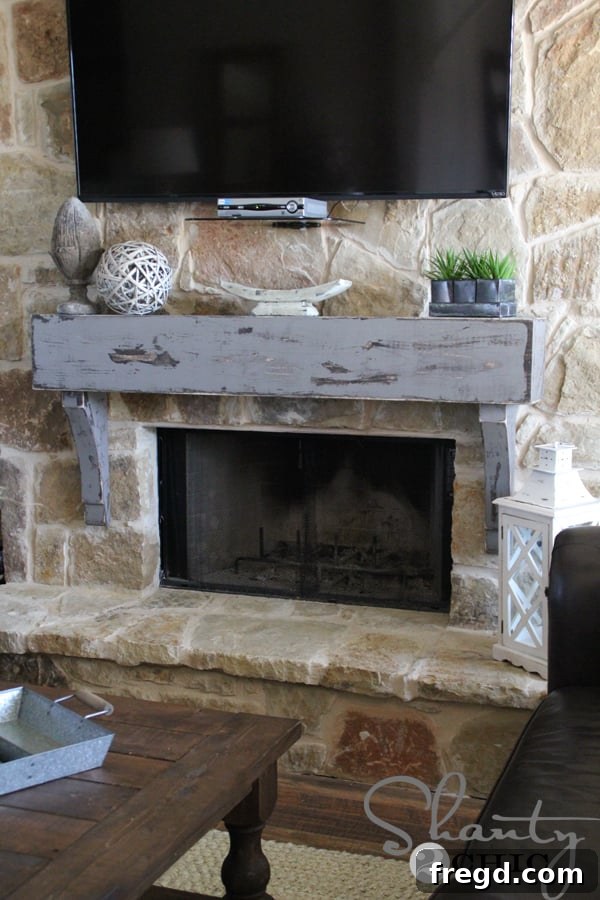
Give your stone fireplace a dramatic and affordable facelift with a beautiful DIY wood mantel! Discover how to easily build this custom piece and securely hang it on your stone surround, all for an incredible budget-friendly price of under $100.
For too long, the blank space above our stone fireplace felt incomplete, a canvas waiting for a masterpiece. This wood mantel project had been on my mind since the day we started building our house. Yet, the thought of drilling into natural stone and potentially messing up our beautiful fireplace surround was intimidating, leading to months of procrastination. Finally, I couldn’t ignore the emptiness any longer. That bare wall above the hearth seemed to grow larger by the day, prompting me to set aside other projects and fully commit to this long-awaited renovation. What I discovered was an incredibly rewarding and surprisingly straightforward process that completely transformed our living space!
DIY Fireplace Mantel: Transform Your Stone Fireplace for Under $100
Creating a beautiful fireplace mantel might seem like a daunting task, especially when dealing with a rugged stone surface. However, I’m thrilled to share that this project was incredibly simple and rewarding! If you’ve ever built our floating shelves, you’ll find the core concept very familiar. In essence, by simply constructing this elegant wooden shelf, I achieved a complete fireplace renovation that profoundly impacted the entire room’s aesthetic.
My finished mantel spans 61 1/2 inches, a size perfectly suited for my space. The beauty of this DIY project lies in its flexibility; you can easily modify these dimensions to fit your specific fireplace surround. It’s crucial to note that this comprehensive tutorial specifically covers attaching a mantel to a natural stone fireplace. If your fireplace features a stone veneer, the attachment method will differ due to the nature of the material. Always ensure you understand your fireplace’s construction before proceeding.
Why a DIY Fireplace Mantel? Elevate Your Home Decor on a Budget
A fireplace mantel isn’t just a decorative shelf; it’s often the focal point of a living room, drawing the eye and setting the tone for your home’s interior design. Opting for a DIY approach to building a fireplace mantel offers numerous advantages, making it an excellent project for any homeowner looking to enhance their space:
- Cost-Effectiveness: Ready-made mantels, especially those designed for stone fireplaces, can be prohibitively expensive. This DIY method allows you to create a high-quality, custom piece for a fraction of the cost – as demonstrated, under $100 for materials alone.
- Customization: When you build it yourself, you have complete control over the dimensions, wood type, finish, and style. Whether you prefer a rustic, farmhouse, modern, or traditional look, you can tailor every detail to perfectly match your home’s aesthetic and your personal taste.
- Sense of Accomplishment: There’s immense satisfaction in creating something beautiful and functional with your own hands. This project is not only practical but also deeply rewarding.
- Enhanced Home Value: A well-designed and installed fireplace mantel adds character, charm, and perceived value to your home, making it a wise investment.
- Functional Display Space: Beyond aesthetics, a mantel provides valuable display space for cherished photographs, artwork, seasonal decorations, or even a television, helping to keep your living area organized and personalized.
Don’t let the idea of working with stone deter you. With the right tools and a clear guide, this project is well within reach for intermediate DIYers and even confident beginners.
Important Considerations Before You Begin
Before you dive into cutting wood and drilling into stone, take a moment to plan your project carefully:
- Mantel Dimensions: Measure your fireplace opening and the surrounding stone. A general rule of thumb is for the mantel to extend 6-12 inches beyond the fireplace opening on each side. Consider the depth and height you desire for both aesthetics and functionality.
- Wood Selection: The type of wood you choose will impact the final look and cost. Common choices include pine, oak, maple, or reclaimed wood. Pine, as used in this tutorial, is affordable and takes stain well, making it ideal for a rustic, distressed finish.
- Style Choices: Think about whether you want corbels (decorative brackets) for a more traditional or classic look, or if you prefer a clean, floating shelf design for a modern aesthetic.
- Fireplace Type: As mentioned, this guide is for natural stone. Natural stone is typically rough, uneven, and requires specific drilling techniques and anchors. Stone veneer is a thinner, decorative layer applied over a different substrate (like drywall or cement board) and requires different mounting hardware (e.g., toggle bolts, wood screws into studs behind the veneer) to avoid damaging the veneer.
- Local Building Codes: Always check local building codes regarding mantel placement relative to the firebox opening, especially if it’s a working fireplace, to ensure proper clearances for fire safety.
Essential Supplies for Your Wood Mantel
Gathering all your materials beforehand will ensure a smooth and efficient building process. Here’s what you’ll need, including direct links to help you find them:
- 1 – 1x10x8 Common Board: This will form the main body and top of your mantel.
- 2 – 1x8x6 Common Boards: These will be used for the top and bottom panels of the mantel box structure.
- 1 – 2x4x8 Lumber: This crucial piece will form the hidden support cleat attached to your stone fireplace.
- 1 1/4″ Pocket Hole Screws: Essential for creating strong, concealed joints in your woodworking.
- Wood Glue: Provides additional strength and stability to all your wood joints.
- Your Choice of Wood Finish: Stain, paint, or a combination, depending on your desired look.
- Vaseline (optional): A key ingredient for achieving a distressed, chippy paint look.
- 2 Corbels (optional): These decorative brackets add character. Look for affordable options like these 18″ corbels.
- 3 Red Head 1/2″ x 4″ Sleeve Anchors: These heavy-duty anchors are vital for securely attaching the support cleat to your natural stone fireplace.
Tools You’ll Need for This Project
Having the right tools not only makes the job easier but also ensures accuracy and safety. Here’s a list of the tools that will be instrumental in building and installing your DIY mantel:
- Miter Saw: For making precise, straight cuts in your lumber.
- Kreg Jig: An invaluable tool for creating strong, hidden pocket hole joints.
- Cordless Drill: For drilling pocket holes and driving screws.
- Sander (Orbital or Corner Cat): For smoothing wood and distressing finishes.
- Hammer Drill: Absolutely essential for drilling into hard natural stone.
- Hammer: For tapping in anchors and general use.
- Wrench: To tighten the sleeve anchors securely.
- Tape Measure: For accurate measurements.
- Pencil: For marking cuts and drill points.
- Level: Crucial for ensuring your mantel is perfectly horizontal.
- Safety Glasses: Always wear eye protection when cutting, drilling, and sanding.
- Dust Mask: Especially important when sanding and drilling masonry.
Building Your Custom Wood Mantel
This part of the project focuses on constructing the hollow box structure of your mantel. Precision in measuring and cutting is key to a professional-looking finish.
Step 1: Precise Wood Cuts
Begin by carefully measuring and cutting your 1×10 board. From this board, you will need:
- One piece at 61 1/2 inches: This will serve as the long front face of your mantel.
- Two pieces at 7 1/4 inches: These will form the two side panels of the mantel.
Use your miter saw to ensure all cuts are perfectly straight and square. Accuracy here will directly impact how well your mantel pieces fit together. Double-check your measurements before making any cuts to avoid waste.
Step 2: Drilling Strong Pocket Holes
Pocket holes are a fantastic way to create strong, hidden joints, perfect for this project. Using your Kreg Jig, drill three 3/4-inch pocket holes into one end of each of the two short 1×10 pieces (the 7 1/4-inch cuts). Ensure your jig is set for 3/4-inch material thickness to get the correct screw depth. These holes will allow you to securely attach the sides to the long front piece.
- If you’re new to pocket hole joinery, a Kreg Jig is an excellent investment for any DIY enthusiast.
Step 3: Assembling the Mantel Shelf Structure
For maximum strength and durability, always use wood glue in addition to screws when assembling your wood projects. Apply a thin, even line of wood glue to the pocket-hole ends of the short 1×10 pieces.
Now, attach these glued side pieces to the ends of the long 1×10 piece using 1 1/4-inch pocket hole screws. Clamp the pieces together firmly while driving the screws to ensure a tight joint and prevent shifting. This forms the front and two sides of your mantel’s outer shell.
Next, take your two 1×8 boards and cut them to a length of 60 inches each. Drill 3/4-inch pocket holes along one side of each board and also on both ends. These will be used for the top and bottom panels of your mantel.
Apply wood glue to the top edges of your assembled front and side pieces. Then, carefully attach one of the 1×8 boards (with pocket holes facing inward) to the top of this mantel frame using 1 1/4-inch pocket hole screws. This completes the top surface of your mantel shelf.
Step 4: Crafting the Mantel Bottom (with Optional Corbels)
Corbels add a touch of classic elegance or rustic charm, depending on their style. I was fortunate to find a fantastic deal on these 18-inch corbels from Amazon, costing only $60 for the pair! Remember, corbels are entirely optional. You can choose a different style that suits your decor or omit them entirely for a more contemporary, minimalist floating mantel look.
To attach the corbels, take your remaining 1×8 board (the one with pocket holes) and determine their placement. Mark on the side of the board that does NOT have pocket holes. I positioned my corbels approximately 5 1/4 inches from each end of the board. This spacing allowed for a 2 1/4-inch gap between the corbel and the very end of the 1×8 piece, creating a balanced appearance.
Apply a generous amount of wood glue to the top surface of each corbel where it will meet the 1×8 board. This glue will provide a strong bond in addition to the screws.
Carefully align each corbel with your pencil marks on the 1×8 board. From the pocket-hole side of the 1×8, drive several 3-inch wood screws down into the corbels. This method ensures that the screw heads are hidden once the mantel is installed, maintaining a clean aesthetic.
Step 5: Joining the Mantel Bottom to the Shelf
Now it’s time to complete the mantel box by attaching the bottom piece (with corbels, if using) to the main shelf structure. To ensure the bottom board remains perfectly level and flush with the rest of the mantel during attachment, use some scrap wood pieces as temporary supports underneath. Apply wood glue generously along the bottom edges of the mantel frame. Then, using 1 1/4-inch pocket hole screws, attach the bottom board to the frame. The pocket holes on the bottom board should face inward, allowing the screws to connect seamlessly to the frame. Once assembled, allow the glue to dry completely before proceeding.
Your mantel structure is now complete! Before moving on to the finish, inspect all joints, fill any gaps with wood filler if necessary, and sand the entire piece thoroughly with a medium-grit sandpaper (e.g., 120-grit) followed by a fine-grit sandpaper (e.g., 220-grit) to achieve a smooth surface, ready for the next step.
Finishing Your Mantel for a Rustic, Distressed Look
The finish you choose can dramatically alter the perception of your mantel. For this project, we opted for a popular distressed, chippy look, which perfectly complements a rustic stone fireplace. This technique involves a combination of stain, paint, and a secret ingredient: Vaseline!
Step 6: The Distressed Finish Technique
First, apply one even coat of your chosen stain. I used Varathane Carrington stain, which provides a rich, warm base color. Allow the stain to dry completely, typically about an hour, but always refer to the manufacturer’s instructions for specific drying times. Ensure good ventilation during this process.
Once the stain is dry, it’s time for the Vaseline trick! Apply a thin line of Vaseline along the edges, corners, and any other areas where you want the underlying stain to show through the topcoat of paint. You can also lightly smear it on the main flat surfaces for a more overall distressed look. The Vaseline acts as a resist, preventing the paint from adhering properly, which will allow it to easily peel or chip off later.
Immediately after applying the Vaseline, paint one coat of your chosen latex paint over the entire mantel. I used Valspar’s Seine for a soft, neutral color. Don’t worry about perfection; slight imperfections will only add to the distressed character. Let the paint dry thoroughly according to its specific drying time. This is also a good time to work on the mantel installation steps to maximize efficiency.
Once the paint has dried, use your sander (a corner cat sander with an 80-grit pad works wonderfully for this) to gently sand the entire piece. You’ll quickly notice how easily the paint peels off in the areas where Vaseline was applied, revealing the beautiful stain beneath. Focus on edges and areas that would naturally show wear and tear for an authentic distressed appearance. Adjust the amount of sanding to achieve your desired level of distressing.
Securely Installing Your Mantel on a Stone Fireplace
Installing a mantel on natural stone requires a specific approach and the right tools, but it’s completely achievable. This method utilizes a hidden wooden cleat for maximum support and a clean look.
Step 7: Preparing for Mantel Installation
While your mantel’s finish is drying, you can begin preparing for its installation. This will save you time and allow for a more efficient project flow.
We’ll be using heavy-duty sleeve anchors for this project. I sourced these 1/2-inch diameter by 4-inch long sleeve anchors from a local hardware store. These are designed to expand and grip firmly within masonry materials, providing a robust hold.
Next, take your 2×4 lumber and cut it down to a length of 59 inches. This 2×4 will serve as the hidden support cleat that anchors your mantel to the stone. Drill three holes into the 2×4 for your sleeve anchors: one approximately 3 inches from each end, and one in the middle, slightly off-center. Use a 1/2-inch Forstner bit for these holes, as it creates a clean, flat-bottomed hole ideal for the anchors.
Additionally, cut four shorter 2×4 pieces, each 5.75 inches long. Drill 1 1/2-inch pocket holes into one end of each of these four pieces. These smaller 2×4 blocks will be used later to reinforce the mantel’s attachment to the cleat.
To ensure your mantel is perfectly centered, mark the midpoint on both the 2×4 cleat and your fireplace stone. Hold the 2×4 cleat against the stone fireplace at the desired height, aligning the center marks. Using a level, ensure the 2×4 is perfectly horizontal. Once aligned and leveled, use a black marker to mark the drilling locations on the stone through the pre-drilled holes in the 2×4. Accuracy here is paramount for a professional installation.
Drilling into Natural Stone
Drilling into natural stone is far easier with the right tool: a hammer drill. Don’t be intimidated by its appearance; a hammer drill makes quick work of masonry. You’ll need specialized SDS masonry drill bits. I recommend starting with a smaller 1/4-inch bit to create a pilot hole, then graduating to a 1/2-inch bit for the final diameter. This two-step process helps prevent the stone from cracking or chipping. You can find SDS masonry bits at any hardware store.
Your hammer drill will likely have a depth rod. Set this rod to a depth of 3 inches. This accounts for the 4-inch length of the anchors, allowing for 1 1/2 inches for the 2×4 thickness, and an additional 1/4 inch as recommended by anchor instructions, ensuring the anchor fully engages with the stone. Drill all three holes to this precise depth.
Installing the 2×4 Cleat to the Stone
With the holes drilled, hold the 2×4 cleat back up to the stone, aligning its holes with the newly drilled holes in the masonry. Insert the sleeve anchors through the 2×4 and into the stone holes. Use a hammer to gently tap each anchor until it is fully seated and flush with the surface of the 2×4. While this can be a one-person job, having an extra set of hands makes it significantly easier to hold the heavy cleat steady.
Once all three anchors are in place, use a wrench to tighten each bolt. As you tighten, the sleeve anchor will expand within the drilled hole, creating an incredibly strong and secure connection to the stone. Ensure they are tightened firmly but do not overtighten, which could damage the stone.
Your hidden support cleat is now firmly attached to the stone! This sturdy base is what your mantel will rest upon and be secured to.
Attaching Support Blocks to the Cleat
Now, take the four short 2×4 pieces (the ones you cut to 5.75 inches with pocket holes) and attach them to the 2×4 cleat that is now on the stone. Apply wood glue to the joining surfaces and use 2 1/2-inch pocket hole screws to secure them. Place one support block at each end of the cleat, and the other two evenly spaced between them, slightly off-center for maximum support. These blocks will fit snugly inside your mantel box, providing interior support.
Final Mantel Mounting
It’s time for the moment of truth! Carefully slide your finished mantel over the cleat and support blocks attached to the stone. The interior of your mantel box should fit snugly around the 2×4 structure. Once the mantel is in place and flush against the stone, secure it by driving 2-inch wood screws from the sides and top of the mantel into the underlying 2×4 support blocks. These screws will hold the mantel firmly to the cleat, preventing any movement.
The Stunning Result and Beyond
And just like that, your magnificent DIY fireplace mantel is complete! I am absolutely in love with the final outcome. What felt like a daunting task at first turned into a simple, quick, and incredibly satisfying project that gave our entire den a complete makeover. The impact of this rustic wooden mantel on our living room is truly remarkable; it instantly became the undeniable focal point of the space.
For roughly $100 in materials and an enjoyable afternoon of focused work, I achieved my dream fireplace. The secret cleat mounting system means that if my style evolves or I crave a new look in the future, I can easily swap out this mantel for another. This flexibility adds even more value to an already incredible DIY project!
To help you complete your fireplace styling, here are links to some of the lovely decorative items featured on my mantel, along with other popular DIY projects:
- Stone Artichoke Finial – from Save on Crafts
- Driftwood Ball – from Save on Crafts
- Herb Planter – from Save on Crafts
- Votive Holder – from Hobby Lobby
- DIY Square Coffee Table
- DIY Floating Shelves for the Living Room
- Easy DIY Rolling Console Table
- DIY Triple Leg Console Table
Thank you so much for joining me on this transformative DIY journey!
~ Ashley