
Hey there, DIY enthusiasts and home decor lovers!
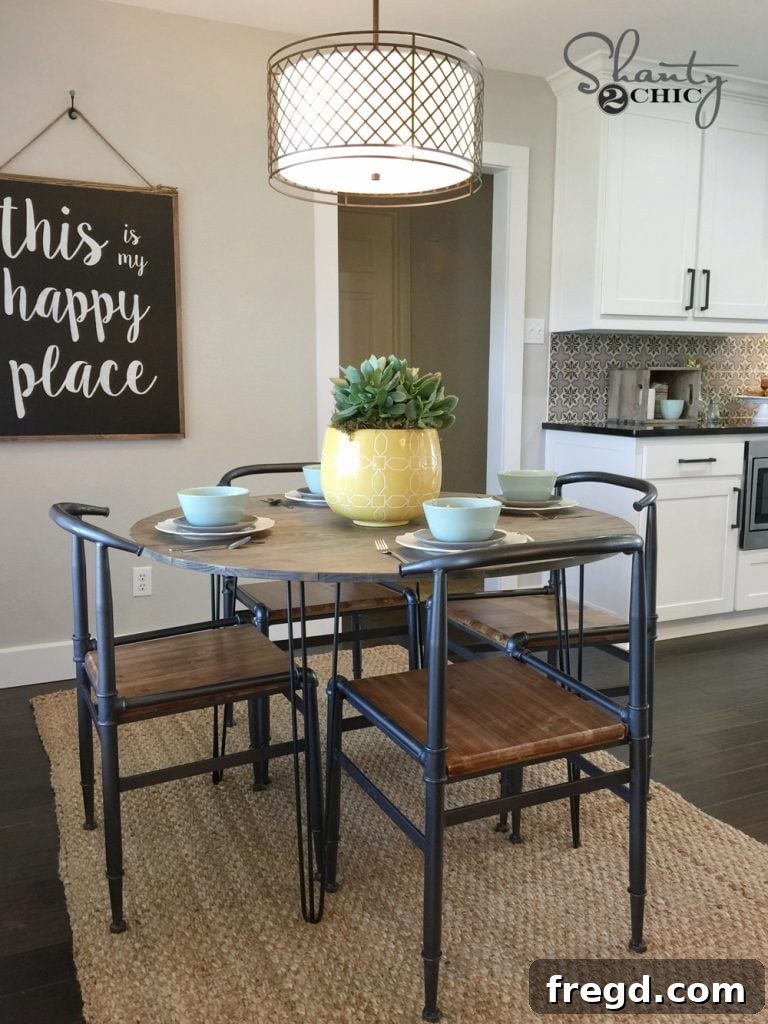
We hope you’re all having a wonderfully creative day. Today, we’re thrilled to share one of the most straightforward yet incredibly stylish dining table projects we’ve ever tackled! This beautiful piece was custom-built for the lovely Berry family on HGTV, and we absolutely adore how charming and chic it turned out. Its simplicity truly makes it a fantastic project for any skill level, transforming your dining space with a touch of modern elegance.
Isn’t it just stunning? The clean lines and minimalist aesthetic of the hairpin legs perfectly complement the warm, inviting feel of the wooden tabletop. This DIY hairpin leg dining table brings a unique blend of industrial and farmhouse charm, making it a versatile addition to any home interior, whether you’re furnishing a cozy kitchen nook or a spacious dining room.
DIY Hairpin Leg Round Dining Table: Easy, Stylish, and Built to Impress!
Dreaming of a custom dining table that perfectly fits your style without breaking the bank? Look no further! This step-by-step guide will walk you through building your very own round dining table with trendy hairpin legs. Perfect for family gatherings, intimate dinners, or even as a chic desk, this project combines affordability, ease of construction, and stunning visual appeal. We’re talking about a table that looks professionally crafted but comes with the immense satisfaction of being a DIY masterpiece.
Get Started: Your Free Plans Await!
Before we dive into the fun part of cutting and assembling, the first crucial step is to grab your plans! We’ve made it super easy for you by providing detailed, printable plans absolutely FREE. These plans include a comprehensive cut list, diagrams, and all the measurements you’ll need to make this project a breeze. Having the plans handy will ensure accuracy and efficiency throughout your build, helping you avoid costly mistakes and ensuring a smooth workflow. Don’t skip this essential step – it’s your roadmap to success!
Be sure to download and print the FREE PLANS HERE!
Essential Tools and Materials for Your Hairpin Leg Table Project
To ensure a smooth and successful build of your new DIY round dining table, gathering all necessary tools and materials beforehand is key. While the specific wood dimensions are detailed in the free plans, here’s a general list of what you’ll need to have on hand:
- Wood for the Tabletop: The plans will specify the exact amount, typically dimensional lumber like pine or fir, chosen for its workability and cost-effectiveness.
- Hairpin Legs: You’ll need a set of four. The free plans recommend finding a set that offers both durability and the desired aesthetic for your table.
- Kreg K5 Jig (or similar pocket hole jig): Essential for creating strong, concealed joints.
- Power Drill: For drilling pocket holes and driving screws.
- Ryobi Jig Saw (or similar jigsaw): Crucial for cutting the perfect round tabletop shape.
- Wood Glue: To reinforce pocket hole joints and attach leg braces.
- Pocket Hole Screws: Specifically 1.25-inch screws, designed to work with the 3/4-inch pocket holes.
- Measuring Tape, Pencil, String, and a Thumbtack: For accurately marking the circular tabletop.
- Screws: For attaching the hairpin legs to the leg braces.
- Sandpaper: Various grits for preparing your wood for finishing.
- Stain and Sealer: For example, Varathane Briarsmoke stain and Triple Thick Polyurethane for protection.
- Clamps: Essential for holding boards together while joining.
- Safety Gear: Eye protection, hearing protection, and gloves are always recommended when working with power tools.
Step-by-Step Construction Guide for Your Hairpin Leg Dining Table
Step 1: Prepare Your Boards with Pocket Holes
After you’ve made all your initial cuts according to the free plans, the very first step in assembling your beautiful dining table is creating the pocket holes. Pocket holes are an incredibly strong and versatile method for joining wood, allowing for hidden fasteners that create a clean, seamless look on your finished piece. This table specifically uses 3/4-inch pocket holes, which will be secured with 1.25-inch pocket hole screws. Using the correct size pocket hole and screw is vital for the integrity of your table.
For this project, I relied on my trusty Kreg K5 Jig to make all the pocket holes. The Kreg K5 is an excellent tool for DIYers and professionals alike, offering easy setup, precise drilling, and a built-in clamping mechanism that ensures your workpiece stays put. Make sure your jig is set to the correct depth for your wood thickness (3/4-inch in this case) to ensure the screws bite securely without protruding. Drill slowly and steadily, allowing the jig to guide your bit for perfect, repeatable holes.
Step 2: Assemble the Tabletop Base
Once all your pocket holes are drilled into the edges of your tabletop boards, it’s time to bring them together to form the solid foundation of your table. Lay the boards out on a flat, sturdy surface, arranging them precisely as they will appear in the final tabletop. Take your time to carefully line them up, ensuring the edges are flush and there are no unsightly gaps between the pieces. Paying close attention to grain direction can also enhance the overall aesthetic of your finished tabletop.
With the boards perfectly aligned, begin attaching them using your 1.25-inch pocket hole screws. It’s highly recommended to apply a thin bead of wood glue along the joining edges before driving in the screws. The combination of wood glue and pocket hole screws creates an incredibly strong and durable joint, preventing any movement or separation over time. Use clamps to hold the boards tightly together while you drive the screws, ensuring the surfaces remain flush and flat. Work systematically across the entire tabletop, making sure every pocket hole is secured. This meticulous approach will result in a robust and seamless tabletop ready for the next steps.
Step 3: Mark and Cut the Perfect Circle
Once your rectangular tabletop blank is fully assembled and secured, it’s time to transform it into the elegant round shape you envisioned. This step requires precision, but the method is surprisingly simple and effective. First, locate the exact center of your tabletop. A good way to do this is to draw two diagonal lines from corner to corner; where they intersect is your center point. Once you’ve found it, firmly attach a small thumbtack or a thin nail into this center point.
Next, tie one end of a piece of string or twine to the thumbtack. Measure the desired radius of your round tabletop (half of the total diameter) along the string, and at that exact length, securely attach a pencil to the other end of the twine. With the string held taut, carefully walk the pencil around the thumbtack, keeping the string consistently tight. This will scribe a perfect, accurate circle onto your tabletop. This age-old technique ensures a symmetrical and flawlessly round shape, critical for the aesthetic appeal of your dining table.
With your circle perfectly marked, it’s time for the cut. I used my reliable Ryobi Jig Saw to carefully cut the circle out of the tabletop. A jigsaw is the ideal tool for intricate cuts and curves, offering great control and maneuverability. When cutting, take your time and follow the line smoothly and steadily. Keep the saw blade perpendicular to the wood surface to ensure a clean, straight edge. If you rush, you risk an uneven or jagged edge, so patience is key here. Make sure to wear appropriate safety glasses and use ear protection. This Ryobi Jig Saw has quickly become one of my favorite tools for its versatility and ease of use!
After the cut is complete, take a moment to sand the newly cut edge. Start with a coarser grit sandpaper to smooth out any rough spots or imperfections from the jigsaw cut, then move to a finer grit to achieve a perfectly smooth and touchable edge. This attention to detail will significantly enhance the final appearance and feel of your dining table.
Step 4: Install the Leg Braces for Stability
Once the circular tabletop is perfectly cut and sanded, the next crucial step is to attach the leg braces. These braces serve a dual purpose: they provide additional structural integrity to your tabletop, especially around the edges, and more importantly, they offer a solid and secure attachment point for your hairpin legs. Properly placed and secured braces ensure your table is stable and wobble-free for years to come.
Position the braces on the underside of the table, making sure they are evenly spaced and provide sufficient support for where the hairpin legs will eventually be mounted. The exact positioning may depend on the size of your tabletop and the style of your hairpin legs, so refer to your free plans for precise measurements. Attach these braces using a combination of wood glue for a strong, permanent bond and either nails or screws driven through the braces and into the bottom of the table top. If using screws, ensure they are not too long and won’t penetrate through to the top surface of your table. Clamp the braces firmly in place while the glue dries for maximum adhesion.
Step 5: Attach Your Stylish Hairpin Legs
The final step for assembly is adding the legs – the signature feature that gives this dining table its modern, minimalist flair! Hairpin legs are incredibly popular in contemporary furniture design due to their sleek profile, robust construction, and ease of installation. They instantly elevate any wooden surface into a piece of stylish furniture.
I sourced my hairpin legs from Osborne Wood Products, known for their quality craftsmanship. For those looking for a convenient option, you can often find a set of 4 HERE on Amazon for under $100 – with Prime shipping, too! This makes acquiring high-quality legs both affordable and fast, getting you closer to completing your project sooner. When choosing your legs, consider the height that best suits a dining table (typically 28-30 inches) and the finish that complements your desired aesthetic.
To attach the legs, simply position each hairpin leg at the corners of the braces you just installed. Ensure they are aligned correctly and provide even support. Using appropriate wood screws (typically shorter screws that won’t go through the tabletop), securely fasten each leg to the braces. Drive the screws firmly but avoid overtightening, which could strip the wood. Double-check that each leg is straight and tightly secured to prevent any wobbling. Once all four legs are attached, you can carefully flip your table over and marvel at its transformation!
The Finishing Touches: Stain, Seal, and Style Your Masterpiece
Step 6: Protecting Your Masterpiece
With the assembly complete, your table is structurally sound, but it’s not truly finished until it’s protected and beautified with a proper stain and seal. This step is crucial for durability, especially for a dining table that will see daily use. First, ensure the entire tabletop surface is thoroughly sanded smooth. Start with a medium-grit sandpaper (e.g., 120-grit) to remove any remaining imperfections or glue residue, then move to a finer grit (e.g., 220-grit) for a silky-smooth finish. Wipe away all sawdust with a tack cloth before applying any finish.
For this table, I opted for a coat of Varathane Briarsmoke wood stain. This particular shade offers a beautiful, rich depth that enhances the natural grain of the wood, creating a sophisticated and inviting aesthetic. Apply the stain evenly with a brush or cloth, working in the direction of the wood grain. Allow it to penetrate for a few minutes, then wipe off any excess with a clean rag. The longer you let it sit, the deeper the color will be. Always follow the manufacturer’s instructions for drying times.
Once the stain is completely dry, it’s time to apply a protective topcoat. I used a coat of Triple Thick Polyurethane, an excellent choice for high-traffic surfaces like dining tables. This product offers superior durability and resistance to scratches, spills, and daily wear and tear. Apply the polyurethane evenly with a good quality brush, ensuring full coverage without drips or pooling. For maximum protection, especially on a dining surface, consider applying multiple thin coats, lightly sanding with a very fine grit sandpaper (like 320 or 400) between coats to achieve an ultra-smooth finish. Always allow adequate drying time between coats as per the product instructions. Once the final coat is dry and cured, your DIY hairpin leg dining table is not only beautiful but also built to withstand the rigors of everyday life!
Styling Your New Hairpin Leg Dining Table
Now that your fantastic DIY hairpin leg dining table is complete, the exciting part begins: styling your space! A round dining table naturally fosters conversation and creates a cozy, inviting atmosphere. To enhance its charm, consider these styling tips, inspired by how we decorated the Berry family’s space:
- Rug: A beautiful rug can anchor your dining area, defining the space and adding warmth. We found the perfect complement at World Market HERE! Look for one that complements your table’s finish and overall room palette.
- Lighting: Overhead lighting is key to setting the mood. A well-chosen pendant or chandelier can be a stunning focal point. We discovered the ideal light HERE! that perfectly balances the table’s modern-industrial vibe.
- Tableware: Simple yet elegant dishes can make a big impact. All the charming dishes featured in our photos are from Target, proving that stylish finds are accessible.
- Personal Touches: Don’t forget elements that add personality. A custom sign, like the one a sweet friend made for us, or a unique centerpiece can tell your home’s story.
When selecting chairs, aim for comfort and a design that harmonizes with the hairpin legs – perhaps mid-century modern, industrial, or even classic farmhouse chairs painted a complementary color. Add a vase of fresh flowers or a bowl of fruit for a natural centerpiece that brings life to your dining space. Your DIY table is now ready to be the heart of countless memorable meals and conversations!
Why Choose a DIY Dining Table?
Building your own dining table with hairpin legs offers a multitude of benefits beyond just having a new piece of furniture. It’s an opportunity for significant cost savings compared to purchasing a custom or designer table. More importantly, it allows for complete customization – you choose the wood, the size, the stain, and the finish, ensuring the table perfectly matches your home’s aesthetic and your specific needs. There’s an unparalleled sense of accomplishment that comes with crafting something beautiful and functional with your own hands. This project is not just about building a table; it’s about creating a unique, personalized centerpiece for your home, steeped in character and pride.
Ready to Build? Start Your Project Today!
We hope this detailed guide inspires you to take on this rewarding DIY hairpin leg dining table project. It’s a fantastic way to add a custom, stylish, and functional piece to your home, all while honing your woodworking skills. Remember, the free plans are just a click away, providing all the necessary details to get you started on the right foot. Don’t hesitate to download them and begin planning your build!
We love seeing your creations, so please share your finished tables with us in the comments or on social media! Happy building, friends!