
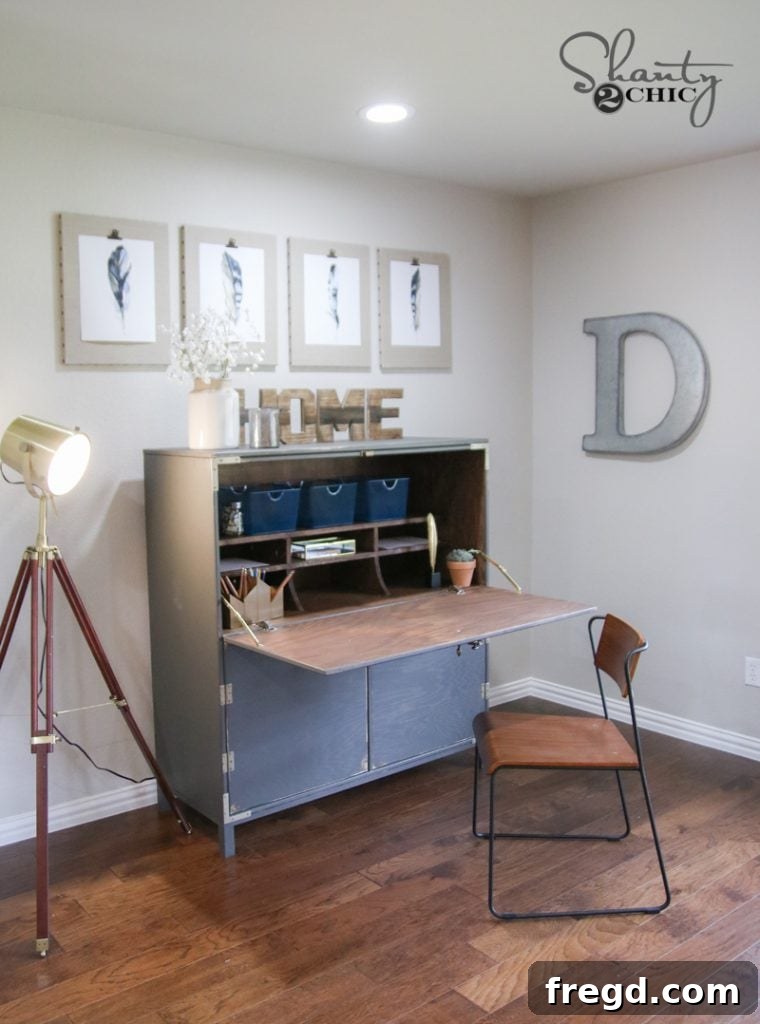
Hello, fellow DIY enthusiasts! Spring is in the air, and what better way to celebrate than by diving into a rewarding woodworking project? Today, we’re thrilled to unveil an incredible solution for anyone grappling with a cluttered living space: our custom-designed DIY Flip-Top Secretary Desk. This isn’t just a piece of furniture; it’s a strategic home office solution that combines elegance with unparalleled functionality, allowing you to seamlessly tuck away work essentials and reclaim your living room’s serene ambiance.
The inspiration for this magnificent secretary desk came from a challenge presented on HGTV’s Open Concept. The Davis family needed to integrate an office area into the heart of their living room, but without compromising style or creating visual chaos. Our answer? A beautifully crafted secretary desk that offers a dedicated workspace when open and a stunning, organized cabinet when closed. This innovative design provides a smart way to hide papers, laptops, and office supplies, ensuring your living room remains a place of relaxation and beauty. Prepare to be amazed by the transformation!
Why a DIY Flip-Top Secretary Desk is Your Ultimate Home Office Solution
In today’s dynamic world, more and more individuals find themselves working from home, often blurring the lines between living spaces and workspaces. A traditional desk can dominate a room, making it feel less like a home and more like an office. This is where the secretary desk shines. It’s a timeless piece of furniture renowned for its ability to offer a compact, functional workstation that can be neatly closed and out of sight when not in use. Our flip-top design takes this concept a step further, providing easy access to your workspace while maintaining a sleek, unobtrusive profile.
Crafting your own secretary desk allows for complete customization, from dimensions to finishes, ensuring it perfectly complements your existing decor and meets your specific organizational needs. Beyond its aesthetic appeal, this desk provides practical storage with internal shelves and dividers, keeping everything from stationery to important documents tidy and accessible. It’s more than just a desk; it’s a piece of art that enhances your home’s functionality and charm, proving that practical solutions can also be stunning focal points.
Ready to embark on this woodworking adventure? Before we dive into the detailed steps, make sure you have all the necessary information at hand. You can download and print the comprehensive FREE PLANS by clicking HERE! These plans are your essential guide to successfully building this elegant and robust secretary desk.
Essential Materials for Your Secretary Desk Project
The foundation of any durable piece of furniture lies in the quality of its materials. For this secretary desk, we primarily utilized hardwood plywood, a material known for its strength, stability, and beautiful grain. I specifically opted for PureBond Plywood, which is readily available at Home Depot. PureBond is an excellent choice for indoor projects due to its formaldehyde-free composition, making it a healthier and more environmentally friendly option for your home.
When purchasing large sheets of plywood, transporting them can be a challenge. A handy tip is to have the friendly associates at Home Depot rip the plywood into wider boards according to the dimensions specified in the plans. This not only makes the sheets more manageable for transport in a standard vehicle but also saves you time and effort on initial cuts. Once home, you can make the cross-cuts accurately with a miter saw, preparing your pieces for assembly.
Beyond the plywood, you’ll need a range of fasteners and adhesives to ensure the structural integrity of your secretary desk. Wood glue is paramount for strong, lasting joints, and it should be used generously alongside all mechanical fasteners. For the frame and internal shelving, 3/4-inch pocket holes paired with 1.25-inch pocket hole screws provide incredibly strong and concealed connections. For attaching the base, Spax screws offer superior holding power. Don’t forget a small, thin trim molding for the decorative accents, which can also be found at Home Depot.
For the finishing touches, gather wood filler to conceal nail and screw holes, various grits of sandpaper for a smooth surface, and your chosen stain and paint. We fell in love with Urbane Bronze by Sherwin-Williams for the exterior paint, a sophisticated hue that perfectly contrasts with the rich Dark Walnut stain by Varathane used for the interior and distressed edges. Finally, acquire the necessary hardware, including L brackets, strap hinges (which you can customize with spray paint), a brass latch, brass pulls for the doors, and a decorative pendent pull for the top door. Links to these specific hardware items are provided at the end of this guide.
Tools for a Seamless DIY Secretary Desk Build
Having the right tools makes all the difference in a woodworking project, ensuring precision and ease. Here’s what you’ll need:
- Miter Saw: Essential for accurate cross-cuts on your plywood boards.
- Pocket Hole Jig: A must-have for creating strong, hidden joints.
- Jig Saw: Perfect for cutting the decorative arched designs on the internal dividers.
- Drill/Impact Driver: For driving screws efficiently. An impact driver offers more torque and reduces wrist strain.
- Brad Nailer (18V): For attaching trim and smaller components with ease and minimal fuss.
- Sander (Orbital or Detail): Crucial for preparing surfaces for finishing and for distressing.
- Measuring Tape, Pencil, and Carpenter’s Square: For precise marking and ensuring square angles.
- Safety Glasses and Hearing Protection: Always prioritize safety when working with power tools.
Step-by-Step Construction Guide for Your Flip-Top Secretary Desk
1. Building the Robust Main Frame
Our journey begins with constructing the foundational box or frame of the secretary desk. This core structure will dictate the overall stability and dimensions of your piece. Utilize 3/4-inch pocket holes for all joints in this section. Apply a generous amount of wood glue to each mating surface before securing the pieces with 1.25-inch pocket hole screws. This combination of glue and screws creates an incredibly strong bond, crucial for a piece that will see daily use. As you assemble, frequently check for squareness using a carpenter’s square to ensure all angles are precise. This meticulousness now will prevent headaches later.
Once the main frame is assembled, position it on its side to review your work. You’ll notice how the pocket holes are strategically placed to face inward or downwards, ensuring they are concealed once the desk is complete. This attention to detail contributes to the clean, professional look of the finished piece.
2. Installing the Shelves and Decorative Dividers
With the main frame complete, it’s time to add the internal shelving, which greatly enhances the secretary desk’s organizational capacity. The shelves are attached using the same method as the frame: wood glue generously applied to all contact points, followed by 1.25-inch pocket hole screws driven through pre-drilled pocket holes. Ensure the shelves are level and evenly spaced according to your plans, creating functional compartments for your office supplies.
In addition to pocket hole screws, I also reinforced the center of the bottom shelf by nailing it down to the lower door divider. This extra step adds significant stability to the structure and ensures the divider remains firmly in place, even with constant use.
One of the charming features of this secretary desk is the arched design on the shelf dividers. These not only serve a practical purpose but also add a touch of character and visual interest when the desk is open. Use a jigsaw to carefully cut the rounded edges of each divider, following the lines in the plans. Once shaped, secure these dividers using wood glue and small nails for a clean finish. The top board is then nailed in place to each divider, further solidifying the structure.
Next, install the smaller dividers on the upper shelf. These are attached from underneath, using pocket hole screws into the first shelf. Pay close attention to the orientation to ensure they align correctly. Remember, applying wood glue to all your joints before fastening is key to achieving a lasting, professional-grade build. The top shelf board is also attached with pocket holes on each side and then further secured with nails into the dividers, guaranteeing a sturdy assembly.
At this stage, your secretary desk should begin to take its recognizable shape, resembling a well-organized internal cabinet, ready for its elegant exterior and base.
3. Constructing and Attaching the Sturdy Base
A well-built base not only provides stability but also adds to the overall aesthetic appeal of the secretary desk. The base is constructed from 1×2 pieces, cut to size to form the feet and connecting boards. For easier assembly, I utilized an impact driver, but a standard drill works just as well. Remember to apply wood glue beneath each foot before securing them to the base structure. This ensures a rock-solid foundation that will withstand the test of time and provide excellent support for the entire unit.
Once the individual leg assemblies are complete, it’s time to integrate them with the main body of the secretary desk. Carefully align the base with the bottom of the main frame. Apply wood glue to the contact surfaces and secure the base firmly using Spax screws. These screws are designed for strong wood-to-wood connections and provide excellent pull-out resistance, ensuring your desk remains stable and robust.
4. Trimming and Door Installation
The trim is where the secretary desk truly begins to transform from a functional piece into a decorative statement. I selected a small, thin trim molding, readily available at Home Depot, to outline the edges and give the desk a more refined, finished appearance. This step adds a professional touch and can conceal any minor imperfections in your cuts. Apply wood glue along the edges where the trim will be placed, then secure it firmly with an 18V brad nailer. The brad nailer makes quick work of this, leaving tiny nail holes that are easy to fill later.
Once the main body and the doors are trimmed, it’s time to attach the doors themselves. Carefully align the doors with their respective openings and install the hinges. Take your time during this step to ensure the doors hang straight and operate smoothly. Proper hinge placement is vital for the desk’s functionality and overall aesthetic. The plans provide specific details on hinge type and placement for a perfect fit.
The plans also include specific instructions and links to the hardware needed for the inside of the door, such as supports for the flip-top mechanism. This internal hardware is crucial for the desk’s unique functionality, allowing the top section to smoothly open and provide a stable writing surface.
5. The Art of Finishing: Painting, Staining, and Distressing
Finishing is perhaps the most transformative step, bringing your secretary desk to life with color and character. Begin by meticulously filling all nail holes with wood filler. Once dry, sand the entire piece lightly, paying extra attention to the areas with filler, until the surface is perfectly smooth. This preparation is critical for a flawless finish.
To achieve a subtle distressed look, I first applied Dark Walnut stain by Varathane to the edges and corners. This allows the darker tone to peek through the paint, adding depth and an aged feel. I also stained the entire inside of the secretary desk. This ensures that when the door is open, the interior is just as beautiful and inviting as the exterior. After the stain dried completely, I painted the exterior with Urbane Bronze by Sherwin-Williams, one of our absolute favorite colors for its rich, sophisticated appeal. After the paint had fully cured, I used a sander with a fine-grit sandpaper to lightly distress around the corners and edges, gently revealing the underlying stain and creating a wonderfully antique, worn-in look.
The contrast between the deep Urbane Bronze paint and the warm Dark Walnut stain creates a stunning visual dynamic. This two-tone finish not only highlights the craftsmanship but also adds a layer of sophistication that would be difficult to achieve with a single color.
6. Final Hardware Installation and Styling
The final step in bringing your secretary desk to life is installing the hardware. The L brackets and strap hinges, sourced from Home Depot, were originally silver. To achieve a cohesive and luxurious look, I spray painted them a beautiful gold to perfectly match the other decorative hardware. This simple customization elevates the entire piece, proving that small details can make a huge impact.
For the primary decorative elements, I found some truly unique goodies at House of Antique Hardware. To make it easier for you to replicate this look, I’ve included Amazon links to these specific items below:
- Brass Latch: A classic touch that secures the main flip-top door, combining functionality with vintage charm.
-
- Brass Pulls for Doors: These elegant pulls provide easy access to the storage compartments, adding a refined touch.
-
- Pendent Pull for Top Door: A distinctive pull for the very top section, adding a final flourish of antique elegance.
-
Presenting the Finished Masterpiece: Your DIY Flip-Top Secretary Desk
And there she is – completely finished and looking absolutely magnificent! This DIY Flip-Top Secretary Desk is more than just a functional piece; it’s a testament to the power of thoughtful design and dedicated craftsmanship. From its sturdy plywood construction to the elegant Urbane Bronze finish and antique brass hardware, every detail contributes to a piece that is both incredibly useful and visually stunning. This desk is ready to serve as a discreet yet stylish home office solution, seamlessly blending into your living room and hiding away clutter with ease.
This project was incredibly fulfilling, transforming a common problem into a beautiful and functional solution for the Davis family on HGTV Open Concept. Now, you too can create this stunning piece for your own home. Imagine the satisfaction of building a custom secretary desk that not only organizes your space but also adds a touch of timeless elegance. We hope this detailed guide and the free plans inspire you to tackle this project and bring a new level of order and beauty to your home. Don’t forget to share your creations with us! Happy building!