
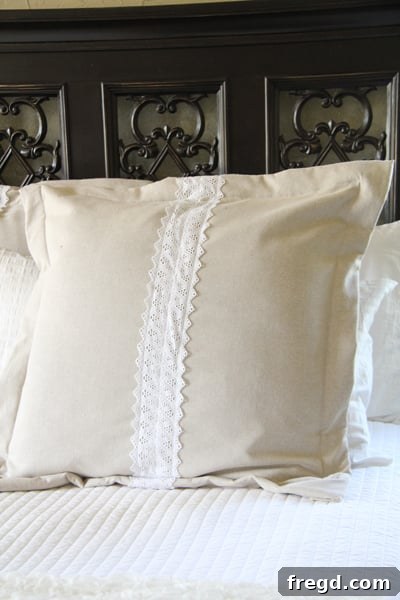
Welcome, fellow DIY enthusiasts and home decor lovers! Today, I’m thrilled to unveil the simple yet elegant secret behind the beautiful lace pillows I showcased in my recent Master Bedroom refresh post. If you’re looking for an affordable, quick, and stunning way to elevate your bedroom or living space, you’ve come to the right place. This project is all about transforming existing euro shams into chic, custom decorative pillows with a touch of vintage charm, making the most of what you already have while adding a fresh, personalized flair.
DIY Lace Euro Shams: An Elegant & Budget-Friendly Home Decor Update
The inspiration for these lace-adorned beauties stemmed from a desire to repurpose. I had a set of plain euro shams from my previous bedding, perfectly good but no longer matching my updated aesthetic. Instead of buying new ones, which can be quite an investment, I envisioned a creative way to give them a second life. My goal was to update just the fronts of these shams, making them fit seamlessly with my new white bedding, and the result was nothing short of delightful. This project embodies the joy of DIY – transforming the ordinary into something extraordinary with a bit of creativity and minimal expense.
Selecting the Perfect Fabric for Your DIY Pillow Covers
The first step in this transformation journey was finding the ideal fabric. I stumbled upon an absolute gem at Hobby Lobby: a utility fabric that closely mimics the sophisticated look and texture of linen, but with one crucial advantage – it’s virtually wrinkle-free! This was a game-changer, offering the desired aesthetic without the high maintenance often associated with natural linen. The fabric had a beautiful drape and a subtle texture that perfectly complemented the soft, romantic feel I was aiming for with the lace accents. Choosing the right base fabric is key to a successful project, ensuring durability and the desired visual appeal.
Not only was this fabric visually appealing, but it was also incredibly budget-friendly at just $3.99 per yard. For each euro sham, I purchased one yard, making the material cost incredibly low. This is one of the many benefits of DIY home decor – you can achieve high-end looks without the high-end price tag. When selecting your fabric, consider its weight, texture, and how it will interact with the trim you choose. For a project like this, a medium-weight fabric that holds its shape well is ideal.
Cutting Your Fabric Pieces with Precision
With my chosen fabric in hand, the next step was to prepare it for the pillow covers. I carefully laid my old euro shams flat on the fabric to use them as a template. To ensure adequate coverage and a neat finish, I cut each new fabric square approximately 2 inches larger than the dimensions of the existing sham. This extra margin is crucial for folding and securing the edges, providing a clean, finished look once attached. Precision in cutting ensures your finished pillow covers are perfectly sized and symmetrical, contributing to a professional appearance.
Finding the Perfect Lace Trim to Enhance Your Pillows
The lace trim is undoubtedly the star of this project, adding that delicate, elegant touch that truly transforms the pillows. I found my exquisite lace trim at Hobby Lobby as well, priced at $4.99 per yard. Always remember to utilize those fantastic store coupons! I used a 40% off coupon, significantly reducing the cost and making this project even more economical. When selecting your trim, consider the overall aesthetic you’re aiming for. Whether it’s intricate lace, a simple ribbon, or a bolder trim, it can dramatically change the character of your pillow.
For this design, a wider, somewhat substantial lace trim worked perfectly, offering a beautiful contrast against the linen-look fabric. Think about the scale of your pillows and the pattern of your fabric when choosing trim. A delicate lace might get lost on a large, heavily patterned fabric, while a bold trim could overwhelm a small, simple pillow. Don’t be afraid to experiment with different textures and widths to find what best suits your vision.
Attaching the Lace Trim: Sewing vs. No-Sew Options
Once the fabric was cut and the trim selected, it was time to bring them together. I chose to sew my trim straight down the center of each fabric square. This placement creates a focal point and draws the eye, enhancing the elegance of the design. If you’re comfortable with a sewing machine, a straight stitch provides a secure and professional finish. For those who prefer a no-sew approach, this is the perfect opportunity to use fabric glue. High-quality fabric adhesive can create a strong, lasting bond, making this project accessible to everyone, regardless of their sewing skills. Just ensure you apply it neatly and evenly for a smooth finish.
When using fabric glue, make sure to read the instructions carefully for drying times and application tips. A thin, even bead is usually best to prevent stiffness or visible residue. For sewing, choose a thread color that matches your lace or fabric for a seamless look. Pin the lace in place before sewing to ensure it stays perfectly aligned. This attention to detail will significantly impact the final appearance of your decorative pillows.
Finishing Raw Edges: Serger or Double Fold
After attaching the trim, the next critical step is to finish the raw edges of your new fabric squares to prevent fraying. Fraying can quickly ruin the longevity and appearance of any fabric project. I ran all of my raw edges through my serger, which quickly and efficiently encloses the edges, providing a professional and durable finish. A serger is an excellent tool for speeding up projects and achieving factory-like edges.
However, if you don’t own a serger, don’t worry! You can easily achieve a similar effect by folding each edge twice under and pressing it flat before sewing or gluing. This creates a neat, enclosed hem that will prevent fraying. While it takes a little more time than using a serger, the result is just as effective and keeps your project looking tidy and durable. This step is essential for creating high-quality, long-lasting pillow covers that withstand regular use and washing.
Once the edges were finished, I laid my new fabric square face down. Then, I placed my old euro sham directly on top of it, with the back side of the sham facing upwards. This setup prepares the pieces for their final assembly, ensuring the new fabric is correctly oriented when attached.
Securing the New Cover to the Old Sham: The Power of Hot Glue
Now, for the “old trusty” part of the process – my trusty hot glue gun! This tool is invaluable for quick and secure fabric projects, especially when the back won’t be visible. I knew that the back of the pillow cover would be hidden against the bed, so I wasn’t concerned about a perfectly seamless finish there. My priority was a strong, functional bond that would keep the new fabric securely in place.
I started by gluing down the top and bottom edges of the new fabric square to the old sham. I applied a generous bead of hot glue along the edges, then carefully folded the fabric over and pressed it firmly into place. Working in sections ensures a smooth, even attachment. Once the top and bottom were secure, I moved on to the sides, folding and gluing them down with the same method. Make sure to pull the fabric taut but not stretched, to avoid any puckering or wrinkles on the front. This method provides a clean, tailored look to the front of the pillow, while the back remains functional and out of sight.
Care and Maintenance: How Hot Glue Holds Up in the Wash
Now, for the question many of you might be wondering: how does hot glue hold up to washing? From my personal experience, hot glue washes remarkably well! The key is in the drying process. I never put my hot-glued fabric projects in the dryer. Instead, I let them air dry completely. If they need a little touch-up, I use a low setting on the iron, taking care not to directly iron over the glued areas if possible, or using a pressing cloth for protection.
I’ve tested this method extensively. For instance, I hot glued a fabric flower onto E’s shirt (you can see that project HERE), and it has gone through numerous washes, holding up perfectly every time! This demonstrates the surprising durability of hot glue when properly applied and cared for. This makes it an ideal adhesive for many decorative fabric projects, providing both convenience and reliability.
The Simple, Satisfying Conclusion to Your DIY Pillow Project
And that’s truly it – a pretty simple, yet incredibly rewarding project! Once the glue had fully set, I simply slipped my old pillows back into their newly transformed shams, and they were ready to adorn my bed. Not only did I achieve the exact look I wanted for my master bedroom, but I also saved a significant amount of money compared to purchasing new designer euro shams. Beyond the financial savings, this DIY approach saved time too, offering immediate gratification without waiting for shipping or hunting for the perfect store-bought option. Whoop! The satisfaction of creating something beautiful and functional with your own hands is truly priceless.
These DIY lace euro shams prove that you don’t need extensive sewing skills or a huge budget to create stunning, personalized home decor. Repurposing and upcycling are fantastic ways to refresh your space sustainably and creatively. They add a touch of handcrafted warmth and character that store-bought items often lack. Imagine the possibilities with different fabrics, trims, and embellishments!
Here they are, all finished and looking absolutely charming!
I sincerely hope you love these DIY lace pillows as much as I do and feel inspired to try this project yourself. It’s a wonderful way to add a bespoke touch to your home, reflecting your personal style and creativity. Whether you’re a seasoned crafter or a beginner looking for an easy entry into DIY, this project offers a rewarding experience with beautiful results.
Remember to share your creations with us if you give this project a try – we’d love to see how you personalize your lace euro shams! Your unique touches and fabric choices can truly make these pillows one-of-a-kind. Thank you for stopping by and being a part of our crafting community. Don’t forget, we will be announcing our exciting Silhouette machine giveaway this Thursday! Stay tuned for more details on how you can enter to win and unleash even more of your creative potential!