
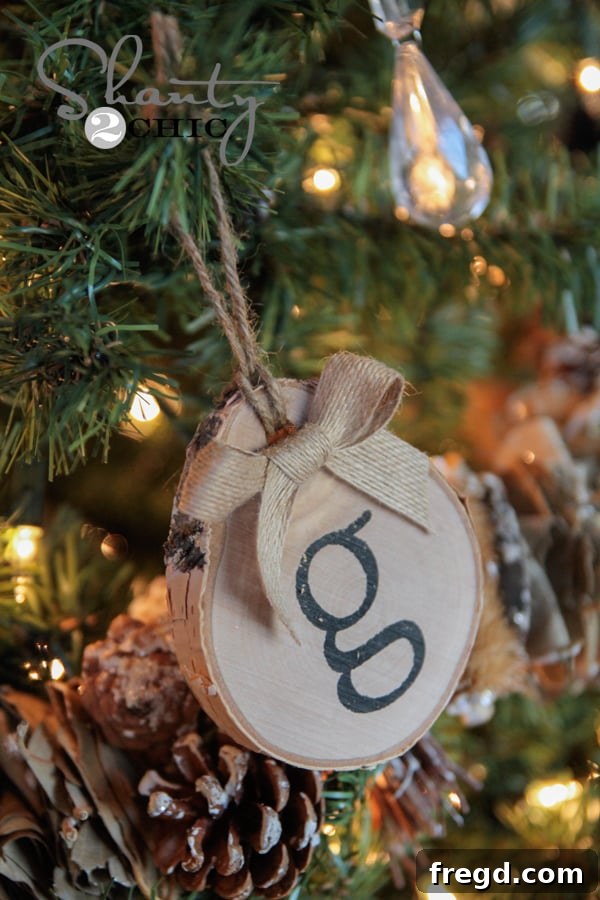
Welcome, fellow craft enthusiasts, to Day 10 of our much-loved 12 Days of Christmas Series! The holiday season is truly a magical time, filled with opportunities to create lasting memories and beautiful, personalized decor. Today, we’re diving into a project that perfectly blends rustic charm with heartfelt personalization: DIY Birch Initial Ornaments. These aren’t just for hanging on your tree; they double as elegant place settings or thoughtful gift toppers, bringing a unique touch to any festive occasion.
Crafting Personalized Birch Initial Ornaments: A Rustic Touch for Your Christmas
There’s something incredibly special about handmade decorations, especially during the Christmas season. They tell a story, evoke warmth, and carry the personal touch that mass-produced items simply can’t replicate. Our DIY Birch Initial Ornaments are the epitome of this sentiment. They are wonderfully simple to create, require minimal supplies, and offer a stunning, rustic aesthetic that complements a wide range of holiday decor styles. Imagine your Christmas tree adorned with these charming, personalized wood slices, each bearing the initial of a loved one, or perhaps your family’s surname initial. Beyond the tree, these versatile pieces can elevate your holiday table as unique napkin rings or add a personal flourish to wrapped gifts. Let’s embark on this creative journey and infuse your home with the authentic spirit of a handmade Christmas.
You’ll be delighted by how fun and remarkably simple these personalized birch ornaments are to make!
Why Choose Birch Wood for Your Christmas Ornaments?
Birch wood slices offer an unparalleled natural beauty and rustic appeal that makes them perfect for holiday crafting. Their smooth, light-colored surface with characteristic bark edges provides an ideal canvas for personalization. Unlike plastic or glass ornaments, birch wood brings an organic, earthy feel to your Christmas decorations, effortlessly blending with traditional, farmhouse, or modern minimalist aesthetics. The subtle variations in each slice, from its shape to its unique grain patterns, ensure that every ornament you create will be one-of-a-kind. Furthermore, birch is a durable material, meaning your handmade creations can be cherished for many Christmases to come. Opting for natural materials like birch also aligns beautifully with a desire for more sustainable and environmentally conscious holiday decor. These qualities make birch wood slices a top choice for anyone looking to craft distinctive and lasting DIY Christmas ornaments.
Materials You’ll Need for Your DIY Birch Initial Ornaments
Gathering your materials is the first exciting step in any DIY project. For these charming birch initial ornaments, you’ll find most items readily available at your local craft store, or even in your own home workshop. Here’s what you’ll need to create your own set of personalized rustic decorations:
- Birch Wood Slices: These are the stars of our project. You can often find pre-cut birch slices at craft stores like Michael’s, especially during the holiday season. Look for various sizes to add dimension to your collection. A money-saving tip: use a coupon if available, or consider buying larger birch logs and cutting your own slices with a miter saw for even greater savings and custom sizing.
- Ink Pad: A black ink pad provides a crisp, clear initial on the light birch wood. However, feel free to experiment with other colors like dark green, deep red, or metallic gold to match your specific holiday theme. Ensure the ink pad is suitable for wood surfaces and dries quickly.
- Rubber Stamp (Initial): Select a rubber stamp featuring the initial you wish to use. This could be your family’s last initial, the first initial of each family member, or even a specific year for a commemorative ornament. There’s a vast array of fonts and styles available, from elegant script to bold block letters, allowing for true personalization.
- Drill and Small Drill Bit: A power drill with a small drill bit (around 1/8 inch or 3mm is usually sufficient) will be needed to create the hole for hanging your ornament. Always prioritize safety when using power tools.
- Burlap-Style Ribbon: Small strips of burlap-looking ribbon will add that perfect touch of rustic elegance. You can find this in various widths and textures at craft stores. Other ribbon options like plaid, velvet, or grosgrain would also look beautiful depending on your desired aesthetic.
- Hot Glue Gun and Glue Sticks: Essential for securely attaching your decorative bows to the birch slices.
- Twine or String: A small piece of natural twine or festive string will serve as the hanger for your ornament. Jute twine offers an extra layer of rustic charm.
I chose this classic black ink pad to ensure my initial stood out clearly against the light birch wood.
And a charming ‘B’ rubber stamp to personalize each of our birch slices with our family’s initial.
Step-by-Step Guide: Crafting Your Personalized Birch Initial Ornaments
Step 1: Sourcing Your Beautiful Birch Wood Slices
The foundation of these DIY ornaments lies in the natural beauty of birch wood. As mentioned, I found my birch slices at Michael’s, taking advantage of a coupon to make them incredibly affordable. Craft stores often stock pre-cut wood slices in various diameters, perfect for immediate use. If you’re feeling adventurous or want to save even more, consider purchasing raw birch logs and cutting your own slices. This allows for complete customization of thickness and size. When selecting slices, look for pieces with interesting bark textures and relatively smooth surfaces for stamping. If you cut your own, ensure the surfaces are sanded lightly to remove any splinters and provide an optimal stamping area.
Step 2: Personalizing with Your Chosen Initial
This is where the personalization truly comes to life. Take your chosen rubber stamp and generously coat it with ink from your ink pad. Position the stamp carefully in the center of a birch wood slice, ensuring it’s straight and level. Apply firm, even pressure to transfer the ink smoothly onto the wood. Lift the stamp straight up to avoid smudging. Take your time with each one to ensure a clear, crisp impression. If you don’t have a rubber stamp, consider using a permanent marker, paint pen, or even a wood-burning tool for a different aesthetic. For extra flair, you could add the year alongside the initial. Allow the ink to dry completely before moving on to the next step to prevent any accidental smudges.
Step 3: Preparing for Hanging – Drilling the Hole
Once your initial is perfectly stamped and dried, it’s time to prepare your ornament for hanging. Using a drill with a small drill bit (typically 1/8 inch or a similar small size is ideal), carefully drill a hole near the top edge of each birch slice. Make sure the hole is centered horizontally and far enough from the edge to prevent the wood from splitting, but not so far that it interferes with your stamped initial. If possible, use a clamp to secure the wood slice to a workbench, and always wear safety glasses when operating power tools. Drill slowly and steadily to create a clean, smooth hole. Gently remove any stray wood fibers around the hole using fine-grit sandpaper or the tip of your drill bit.
Step 4: Adding a Touch of Rustic Elegance with Ribbon
Now for some decorative flourish! Cut small pieces of your burlap-looking ribbon, approximately 4-6 inches long depending on the size of bow you desire. Tie each piece into a cute, simple bow. The rustic texture of burlap beautifully complements the natural birch wood, enhancing the overall farmhouse-chic aesthetic. If burlap isn’t your style, consider other ribbons like red plaid for a traditional look, a shimmering metallic ribbon for glamour, or even thin strips of lace for a delicate touch. Experiment with different ribbon widths and colors to find the perfect accent for your personalized birch ornaments. The key is to create a bow that’s proportionate to your wood slice.
Step 5: The Final Assembly – Hot Gluing and Hanging
With your bows tied, it’s time for the final assembly. Heat up your hot glue gun. Apply a small dab of hot glue just above the drilled hole on the front side of your birch slice. Carefully press the center of your burlap bow onto the glue, holding it in place for a few seconds until it’s secure. Next, cut a piece of twine, about 6-8 inches long. Thread one end of the twine through the drilled hole from the front to the back, and then bring it back through from the back to the front, creating a loop. Tie the two ends of the twine together in a secure knot at the top, forming a hanger. Trim any excess twine. And just like that, your beautiful, personalized birch initial ornament is complete! Easy peasy, and undeniably charming, these ornaments are sure to become treasured pieces in your holiday collection.
They truly are so cute and incredibly satisfying to make!
Beyond the Tree: Creative Uses for Your Birch Initial Ornaments
While these personalized birch initial ornaments are perfectly designed to adorn your Christmas tree, their charm and versatility extend far beyond. Think creatively about how these beautiful handmade pieces can enhance other aspects of your holiday decor and gifting:
- **Elegant Napkin Rings:** As mentioned earlier, wrap a piece of twine around a napkin and tie on one of these ornaments for a stunning, rustic place setting that will impress your dinner guests. It’s an instant upgrade to your holiday table.
- **Personalized Gift Tags:** Attach an initial ornament to a wrapped present instead of a traditional gift tag. It adds a thoughtful, reusable element that the recipient can then hang on their own tree, making the gift even more special.
- **Festive Garland Accents:** String several birch ornaments together with beads, pinecones, or greenery to create a unique and personalized holiday garland for your mantel, doorway, or staircase.
- **Tiered Tray Decor:** Incorporate these wood slices into a festive tiered tray display, mixing them with small bottlebrush trees, mini lanterns, and other winter-themed items.
- **Door or Wall Decor:** Create a small cluster of ornaments, perhaps spelling out a festive word like “JOY” or “NOEL,” and hang them on a door or wall as a mini wreath alternative.
- **Party Favors:** If hosting a holiday party, these ornaments make charming and memorable take-home favors for your guests.
The possibilities are truly endless, allowing you to infuse personalized, rustic charm throughout your entire home during the festive season.
Making it a Memorable Family Activity
Crafting these birch initial ornaments is more than just a DIY project; it’s an opportunity to create cherished holiday memories with your loved ones. Gather the family around the crafting table and assign age-appropriate tasks. Younger children can help choose ribbons or even carefully stamp initials (with supervision), while older children and adults can take on the drilling and hot gluing. This collaborative effort fosters creativity, develops fine motor skills, and results in a collection of ornaments each person can proudly hang on the tree. Imagine the joy of reminiscing about making these ornaments years down the line, each one holding a special place in your family’s Christmas tradition. It’s a wonderful way to slow down during the busy holiday season and connect through a shared creative experience.
Tips for Perfecting Your DIY Birch Ornaments
To ensure your personalized birch initial ornaments turn out beautifully and last for many Christmases, here are a few extra tips:
- **Seal for Longevity:** For added durability and to protect the wood and ink, consider applying a clear matte sealant spray or a thin coat of Mod Podge to your finished ornaments. This will help prevent moisture damage and keep your initials looking crisp.
- **Experiment with Fonts:** Don’t limit yourself to just one type of rubber stamp. Try different fonts and sizes for variety. A playful script for children’s initials, a classic serif for adults, or a bold block font for a modern touch.
- **Add Embellishments:** Beyond the burlap bow, consider other small embellishments. A tiny jingle bell, a small sprig of faux pine, or a dab of glitter glue around the edge can add extra festive cheer.
- **Double-Sided Design:** If you wish, you can stamp an initial on one side and the year on the other, or a small festive image like a snowflake or star.
- **Gift-Giving Sets:** Create sets of these ornaments as thoughtful, handmade gifts. Bundle a few together with matching ribbon and a personalized tag for a truly unique present.
- **Storage:** Store your birch ornaments carefully in a dry place, wrapped in tissue paper or placed in a divided ornament box, to protect them until the next holiday season.
With these tips, your personalized birch initial ornaments will not only look fantastic but will also become cherished parts of your holiday tradition for years to come.
Join Our Festive Journey: The 12 Days of Christmas Series
This delightful project is just one of many inspiring ideas we’re sharing as part of our special 12 Days of Christmas Series! We’re thrilled to bring you a daily dose of DIY inspiration, helping you craft a truly unique and personalized holiday season. Don’t miss out on any of our festive creations and behind-the-scenes fun! Make sure to stay connected and up-to-date with all our projects and daily shares by following us on Instagram.
Follow us on Instagram!
We love sharing our creative adventures and connecting with fellow DIY enthusiasts!
Explore More Holiday Inspiration from Our Friends!
The holiday spirit is even more vibrant when shared! We’re incredibly lucky to be part of a talented community of crafters and designers. Be sure to check out the amazing Day 10 projects from our wonderful friends. Each link below leads to more fantastic ideas to inspire your own festive decorating and crafting endeavors. You’ll find a diverse range of styles and projects, offering something for everyone looking to add a handmade touch to their celebrations.
Discover Our Other Festive Christmas Projects!
If you’re looking for even more inspiration to deck your halls this holiday season, we’ve got you covered! Beyond today’s delightful birch initial ornaments, we have a wealth of other fun and creative Christmas projects that are perfect for adding a handmade touch to your home. From easy-to-print decorations to unique takes on classic holiday elements, there’s something here to spark every crafter’s imagination. Take a moment to explore some of our other popular festive DIYs below:
Free Printable Banner Letters
DIY Rectangle Wreath
Share Your Creations & Pin for Later!
Thank you so much for joining us today for this wonderfully simple yet impactful DIY project! We hope you feel inspired to create your own personalized birch initial ornaments. We absolutely adore seeing your creative interpretations, so please don’t hesitate to share your finished projects with us on social media. And if you loved this tutorial and want to spread the holiday cheer, we would be incredibly grateful if you would share it with your friends and pin it to your favorite Pinterest boards. Sharing helps us reach more fellow crafters and keeps the spirit of handmade holidays alive!
Conclusion: Embrace the Handmade Holiday Spirit
As we wrap up today’s project, we encourage you to embrace the joy and satisfaction that comes with creating handmade holiday decor. These personalized birch initial ornaments are more than just pretty decorations; they are tokens of love, creativity, and the warmth of the season. They add an authentic, rustic charm to any home and make for cherished keepsakes or thoughtful gifts. May your holiday season be filled with crafting, joy, and the beauty of personalized touches. Happy crafting!